Motorola Moto G6 Play (jeter) launched in April 2018. The smartphone came out of the box with Android 8.0 Oreo. Here we have a latest Custom ROM which brings all the Google Pixel phone feature on your Motorola Moto G6 Play. This custom ROM is known as Google Pixel Experience ROM. Now you can download and install Pixel Experience ROM on Moto G6 Play based on Android 9.0 Pie.
The new Android Pie brings a couple of design changes to the successor Android Oreo but the most notable one is the gesture-based navigation system. Other features of Android 9 Pie are New Quick Settings UI design, Redesigned volume slider, Advanced Battery with AI Support, Notch Support, Improved Adaptive Brightness, Manual theme selection, Android Dashboard which Google calls Digital Wellbeing, and more other features.
Page Contents
What is Pixel Experience ROM?
[su_youtube_advanced url=”https://www.youtube.com/watch?v=PTEv3MGNmgs&t=4s” controls=”alt” rel=”no” theme=”light”]
As the name suggests, ROM brings the real Google Pixel Experience ROM on Moto G6 Play. It has all the features and applications which comes out of the box with Google Pixel smartphone. Now you can experience the real Pixel Smartphone with this ROM. With this ROM, you can enjoy
- All Google Apps
- Pixel Launcher with round icon support
- Pixel Boot Animation
- Google Assistant
- Pixel Sounds
- Pixel Live Wallpapers
- Root
- Round Icon for Settings
- Pixel’s blue accent
![]()
Here you can download and install the latest Google Pixel Experienced ROM for Motorola Moto G6 Play based on Android 9.0 Pie now available. The ROM is stable and can be used as a daily driver.
Steps to Install Pixel Experience ROM on Moto G6 Play (jeter)
To install this ROM on Motorola Moto G6 Play (jeter), First of all, you need to Unlock Bootloader on your device, and then Install TWRP Recovery. If you already have TWRP, then you can simply follow the below guide to Install TWRP Recovery.
ROM is still under experiments. GetDroidTips will not be responsible for any internal/external damages to the device that may happen while/after following this guide.
Pre-Requisite:
- Supported Smartphone: Motorola Moto G6 Play (jeter)
- Charge the Motorola Moto G6 Play to a sufficient battery level to avoid any sudden shutdowns during the process.
- We strongly recommend you to take a complete backup of your personal data, including the internal storage. The phone will be formatted, so be prepared for it. You can also follow our Android backup guide for the same. [Follow any method]
- How to Backup Your Android Phone Without ROOT
- How to Backup Complete Stock or Custom ROM using TWRP recovery
- Backup Your Android Apps and Data with Titanium Backup
- How to Backup Your Android Phone Directly to PC with TWRP!!
- How to Backup Your Data on Android device
- If you already have TWRP: then you can Create and Restore Nandroid Backup via TWRP
- You need a USB cable to connect your phone to PC.
Required Downloads:
- Download Motorola USB Drivers.
- You need to Unlock the bootloader any Motorola device.
- Download and Install TWRP Recovery on Motorola Moto G6 Play. [How to Install]
- Download Pixel Experience GSI Treble ROM here: Click Here
- Download Magisk zip file for root your device or flash SuperSU zip file
Method 1: Install via TWRP Recovery
- First of all, make sure to download and move all the above required ROM packages on your Motorola Moto G6 Play Internal storage.
- Now reboot your phone into TWRP Recovery and Swipe Allow Modifications (Appears for the first time only)
- Once you are in TWRP Recovery, first of all. Take a complete backup of stock or custom ROM using TWRP.
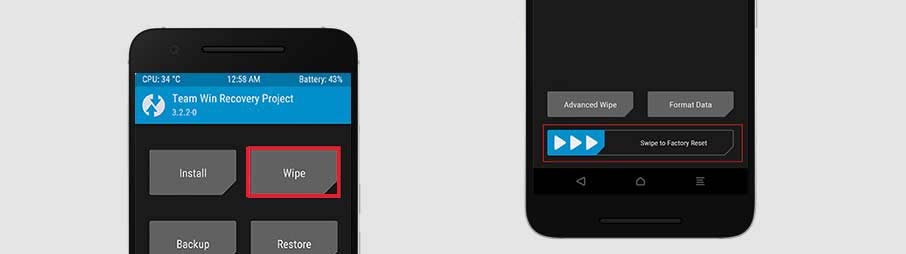
- Now wipe the cache, data, and system before flashing the Pixel Experience ROM on Moto G6 Play.
- To Wipe data: Go to Wipe —> Advanced Wipe and select Dalvik/ART cache, cache, and Data and then swipe to wipe. [su_note note_color=”#fef0ef” text_color=”#000000″]Warning: Make sure not to select Internal storage[/su_note]
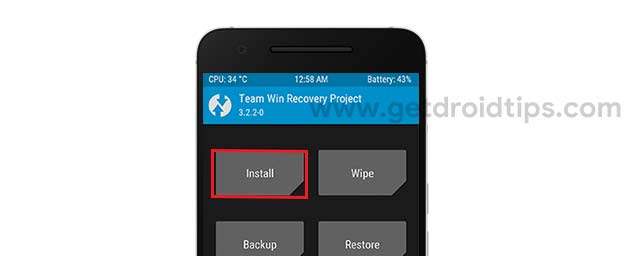
- Now you can install the System image file in TWRP: Install -> Install Image -> select system.img
- That’s it! Reboot and enjoy!
Method 2: Install via ADB Sideload
—> How to Install Generic System Image on Project Treble Devices
I hope this guide was helpful to install the Pixel Experience ROM on Moto G6 Play (jeter) based on Project Treble GSI images.
If this method doesn’t work, then go to the Pixel Experience ROM Phh-Treble thread in XDA and report your issue.
- Top 10 Features of Android 9.0 Pie Update
- Common Problems and solutions of Android 9.0 Pie
- Download Lineage OS 16: List of Supported Devices (Android 9.0 Pie)
- List of AOSP Android 9.0 Pie Custom ROM Supported devices
- Android 9.0 Pie: Supported Device List, Features and Downloads
- List of Pixel Experience ROM Supported Devices
Source: XDA || Credits to EnesSastim
no me sirvió intente todo pero no funciona
Will it work on Moto g6 play aljeter
Yes!