It can be very frustrating when you forget the pattern, PIN, or password you set to lock your screen. Now you cannot access your phone or use it to do anything except make emergency calls. In earlier days it was easy to bypass Android’s secured lock screen with a few simple tricks. But now in 2024, Android developers have made the OS very secure and now it’s hard to do the same. So in this article, we have some methods that you can try to unlock your phone with or without losing your data in it.
From common techniques such as pattern guessing, using ABD to bypass Android’s lock screen is a game of the past. We have made another guide to Bypass Android’s Secured lock screen regarding the older Android OS smartphones. But this is 2024, and the rules are not the same. If you have previously used any methods to unlock your phone, it will not work now. By this year, most people have at least upgraded to a phone with Android Oreo. Hence some articles that you find online will not work. Most of them are applicable only to phone with android Lollipop or below.
![Top 5 Ways to Bypass Android’s Secured Lock screen [Security Pattern, PIN and Password] - 2021 Guide](https://www.getdroidtips.com/wp-content/uploads/2021/04/Top-5-Ways-to-Bypass-Androids-Secured-Lock-screen-Security-Pattern-PIN-and-Password-2021-Guide.jpg)
Page Contents
Top 5 Ways to Bypass Android’s Secured Lock Screen
There are ways to bypass your Android Lockscreen. But it’s hard to save your data as you have to wipe your phone to the factory reset from the recovery. Even after that reset, you have to log in using the same Google account that you have previously used on this mobile. Else you will get locked out with a security feature called FRP lock. Although there are some methods to bypass FRP lock, you can look up online for your specific phone model.
Method 1: Using ADB Commands
This method assumes that you have previously set up and enabled ADB on your phone from the Developer Options menu. If you have not done it, then it is not possible to do anything. But if you have, then try this method:
- Connect your phone to your PC; it should show up as USB Debugging connected on your phone.
- Now, if you haven’t downloaded ADB packages, then download them from here.
- Install the ADB files, and drivers go to the ADB folder and copy the path.
- Open CMD and type cd and paste the copied path. Then run the following command.
adb shell rm /data/system/gesture.key
- This will remove the files in which the gesture is stored, and when you reboot your phone, it should directly take you to the home screen.
- If you still see your lock screen, then draw a random gesture, and the phone will unlock.
Method 2: If you have an Unlocked Bootloader
Sometimes the above method will fail due to some permission errors. So in this case this method can be helpful if you have unlocked your android phone’s bootloader. Else you may skip this method.
- Search google for custom recovery for your phone model.
- Then follow the methods mentioned on the website and install any custom recovery such as TWRP.
- Most recoveries will work, but TWRP works better in this case.
- Now Reboot your phone to recovery by holding the Volume down key and the Power key.
- You should be able to view the custom recovery.
Now you can follow method 3 or method 4 from this step.
Method 3: Remove Lock Screen from TWRP recovery
- From recovery, click on Advanced and click on File Manager.
- From the File Manager, navigate to /data/system
![Top 5 Ways to Bypass Android’s Secured Lock screen [Security Pattern, PIN and Password] - 2021 Guide](https://www.getdroidtips.com/wp-content/uploads/2021/04/Bypass-your-android-Lock-screen-1.png)
- Find these three files and remove them:
locksettings.db
locksettings.db-wal
locksettings.db-shm
- Now reboot your device this should work now.
Method 4: Backup Files from TWRP
Method 4 involves resetting your phone to the factory settings. Although before which you can take a backup of all files you need so that it doesn’t get lost when resetting.
- As mentioned in the above method, open file manager.
- Copy all files that are important to an external SD card or a Pendrive connected using OTG cable.
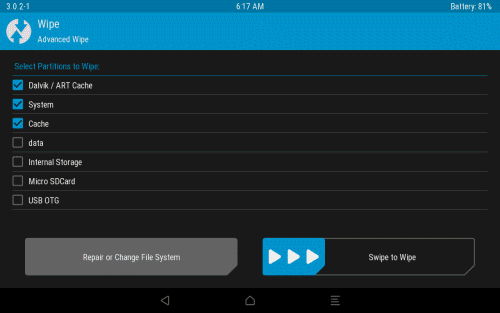
- Now go back to the main menu is recovery and select Reset / Wipe.
![Top 5 Ways to Bypass Android’s Secured Lock screen [Security Pattern, PIN and Password] - 2021 Guide](https://www.getdroidtips.com/wp-content/uploads/2021/04/Bypass-your-android-Lock-screen-2.png)
- When it shows swipe to factory reset, swipe the slider to perform a factory reset.
That’s it you have performed a factory reset. now when you reboot, your phone will ask for your google account that you previously used on your phone. When you use it, you can safely log back into your phone.
Method 5: Completely wipe your phone and install a Stock ROM
In case you have forgotten your Google account as well, you can take a backup and completely wipe everything. Although you may need a flashable zip file for your stock ROM that you can flash after a complete wipe.
- Reboot your phone to recovery; TWRP is preferred.
- Carefully wipe the following things:
System, Data, Vendor, Dalvik ART Cache, Cache, and internal Storage

- Here I mentioned carefully because you should not wipe the place where you have the stock ROM file (for example your SD card or OTG)
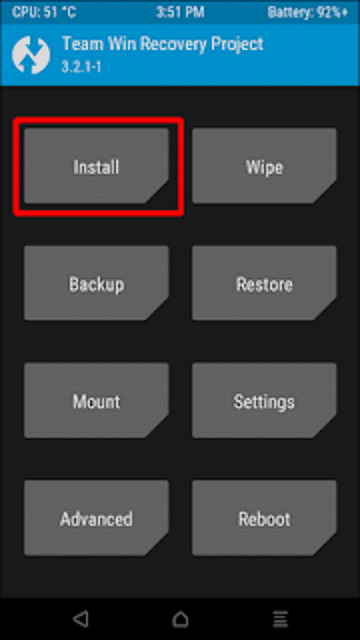
- Now go back to the home screen on Recovery and tap on install.

- Select the zip file and swipe to install. Wait for it to complete.
- Delete Dalvik’s cache and reboot your phone.
So now you have the phone as brand new. You can now use it as a new phone and transfer all backed-up data if you took any backup previously before resetting from the TWRP recovery.
Conclusion
As you can see, bypassing your Android’s secure lock screen is not a big task but it is not that easy as it used to be once. Google has patched all previous methods like using the Forgot Password option, Remote Lock using Find my device, and the Android lollipops bug/vulnerability to crash the lock screen. So it is always good to remember your password or at least have a backup of files elsewhere. So that in case of such disasters, you can completely wipe your phone and reset the password without losing the data completely.

It seems to work on every 5+ Android versions.
I’ve made it with my Resurrection Remix in Nougat (7.1) and it works as well as expected.
How To Remove Forgot Privacy Protection Password. Help Me Pleas
How To Remove Forgot Privacy Protection Password To Huawei Ascend Y300