Automatic updates of Windows Store applications is turned on in any Windows system by default. This makes the update procedure entirely automated, and the user does not need to check for any new updates manually. This is a useful feature for people who forget to update their apps. It automatically downloads the latest version and even installs it automatically in the background. However, for people who have a limited data or internet plan, this can be a data drainer. Windows Store applications are not small in size, and updating all of them, every time a new version comes out will not be ideal.
You do have the option of turning off automatic updates for Windows Store applications, and if you are someone on a limited plan, then you should do it. There are several ways by which you can turn off the automatic updates for Windows Store applications, and here in this article, we will take a look at all of them. According to your convenience, pick out the method for turning off this automatic feature. So without further ado, let’s get into it.

Page Contents
How to disable automatic updates for Windows Store applications?
You can turn off windows update entirely, and that will disable windows store application updates too. But turning off the updates for Windows entirely might not be a smart move if you want the latest features and modifications of the latest Windows built. So here we have mentioned all the methods to turn off only the application updates selectively.
Disabling Windows Store application updates directly through Store Settings:
- Click on the search icon at the bottom and open up Windows Search. Search for “Windows Store” and when it shows up in the results, open it up.
- Once Windows Store opens up, click on the three-dot icon at the top and click on Settings.

- Click on the Home tab, and there you will see a toggle for automatic updates. Turn this toggle off.
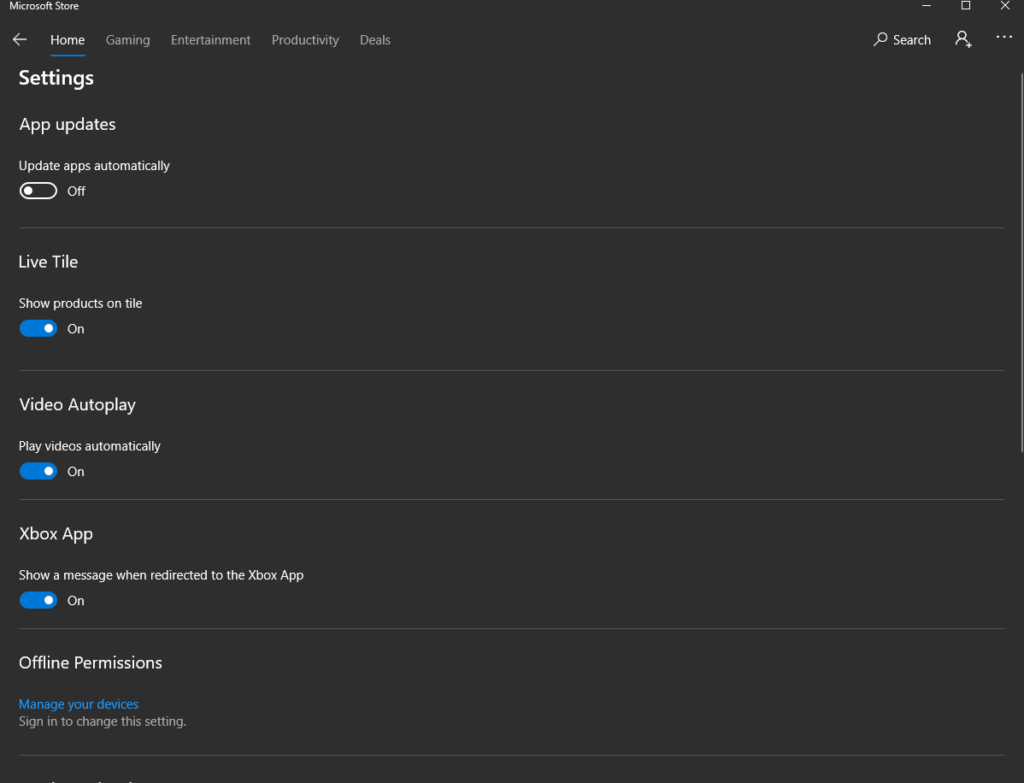
- Once the toggle is turned off, you won’t have to deal with automatic updates for applications in the Windows Store.
Now you can change the setting any time you want by following the same steps and turning on the toggle again if you ever decide to have automatic updates turned on again.
Disabling Automatic Updates using the Registry Editor:
Registry editor is a directory of different values and keys and making changes to the settings in the Operating system. So here we are going to use the Registry Editor to disable the automatic updates feature of the Windows Store applications.
- Press and hold the Windows Key + R to open up the Run dialog box.
- Enter “regedit” in Run and press the Enter key or click on Ok.
- If you get a User Acess Control prompt, then choose Yes and allow it.
- You will see the Registry Editor window then. Here, navigate to HKEY_LOCAL_MACHINE\Software\Policies\Microsoft\WindowsStore.
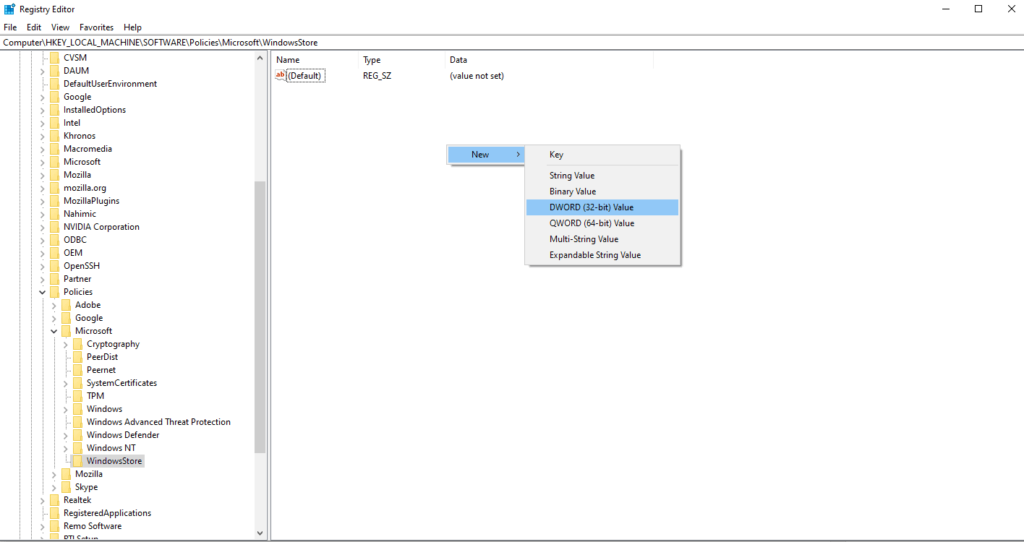
- If you can’t find the WindowsStore key inside Microsoft, then create it by right-clicking inside the Microsoft Key and choosing New > Key. Make sure to name the newly created key in Microsoft as “WindowsStore”.
- Now inside the WindowsStore key, right-click and choose New > DWORD (32-bit) value. Name this newly created value as “AutoDownload”.
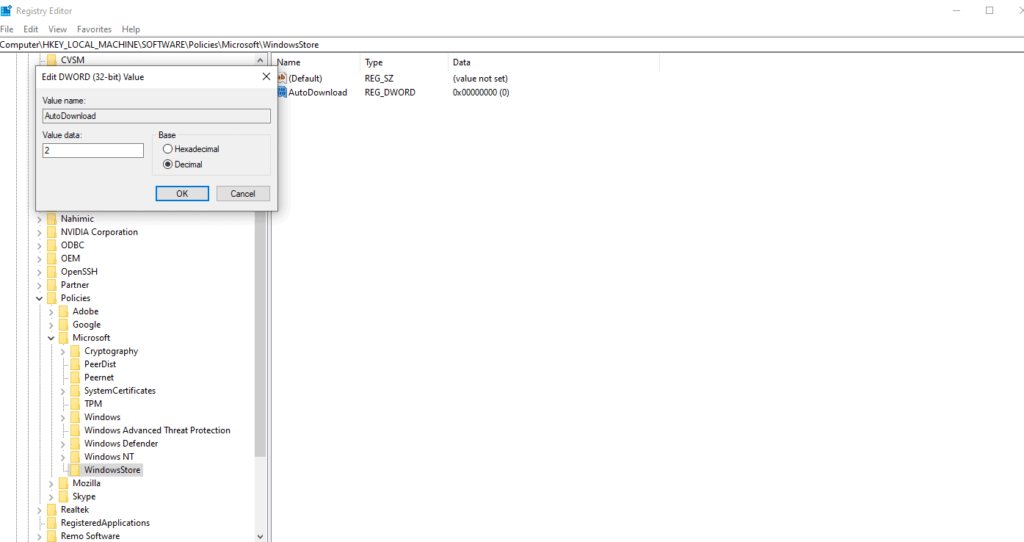
- Now double click on the AutoDownload value to open up its properties window. Here, change the value data to 2 and select the Base as Decimal.
- After all, this is done, close everything and restart the Windows system.
- After the restart is complete, the automatic updates of the Windows Store will be disabled.
If you ever wish to turn on automatic updates for the Windows Store again, then delete the AutoDownload value that you created in the WindowsStore key. Remember to restart after deleting the value to make sure the change takes effect.
Disabling Automatic Updates using the Local Group Policy Editor:
Group policy editor lets the users make almost any kind of change they want in their system. We are going to use it here to disable automatic updates in the Windows Store.
- Press and hold the Windows Key + R to open up the Run dialog box.
- Enter “gpedit.msc” in Run and press the Enter key or click on Ok.
- You will see the Local Group Policy Editor Window. Navigate to the following path here:
Computer Configuration\ Administrative Templates\ Windows Components\ Store\
- Go to the Setting section on the right and double click on “Turn off Automatic Download and Install of updates.”
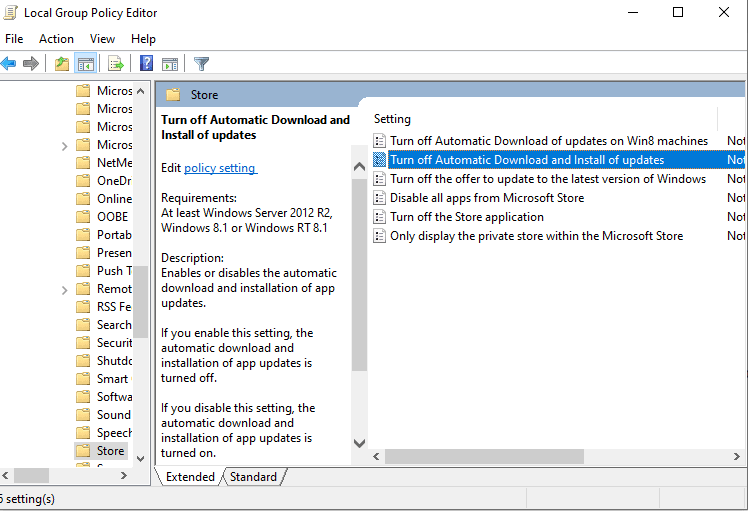
- In the window that opens up, click on the toggle option for “Enabled” and click on Apply.
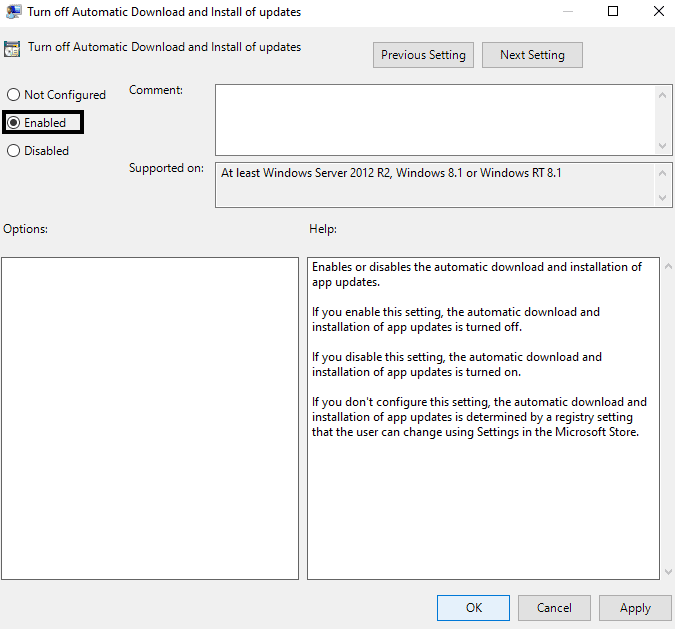
- Then Click on Ok and close the window.
This will not only turn off the automatic update for applications in the Windows Store, but it will even disable the setting or toggle that we used in the first method to turn on automatic updates on or off. That setting will be greyed out. So if you ever wish to turn on automatic updates for applications again, then you will have to make the change using the Local Group Policy Editor again. This time change the option from Enabled to Not configured.
Now you won’t be able to access Local Group Policy Editor if you are using any Home edition of Windows. Only the other editions come with this editor. So if you are unable to open it up on your Home version then don’t be surprised. Just use one of the other methods mentioned in this article.
So that is how you can disable the automatic updates of application in the Windows Store. If you have any questions or queries about this guide, then comment down below, and we will get back to you. Also, be sure to check out our other articles on iPhone tips and tricks, Android tips and tricks, PC tips and tricks, and much more for more useful information.
