The “Ethernet doesn’t have a valid IP configuration” is a common error rapidly occurring on the Windows system. It is basically a result of a problem with your Network Interface Card. When in case your router or modem fails to obtain a valid IP address, it usually ends up showing the said error.
Fixes for “Ethernet Doesn’t Have a Valid IP Configuration” in Windows
The “Ethernet doesn’t have a valid IP configuration” is a temporary network related issue and hence would not make any harm to your system. However, in order to get the uninterrupted connectivity back and use your system without the said error, follow the fixes explained in this article below:
FIX 1: Check the Network Adapter Settings:
Router have a unique IP address by default that is used for network interface identification and location addressing. Though users can change the IP address as well if it is needed at some point. Hence, the first resort to resolve the “Ethernet doesn’t have a valid IP configuration” error is checking the Network Adapter settings first and then changing them later if required. For doing so, follow the instructions given below:
- Firstly, press WINDOWS + R and open the RUN prompt.
- On the empty text box type “ncpa.cpl” and then click on OK. It will now open the Network Connections window.
- Here in the next window, right-click on your Network Adaptor and then select Properties. It will open the Ethernet Properties window prompt.
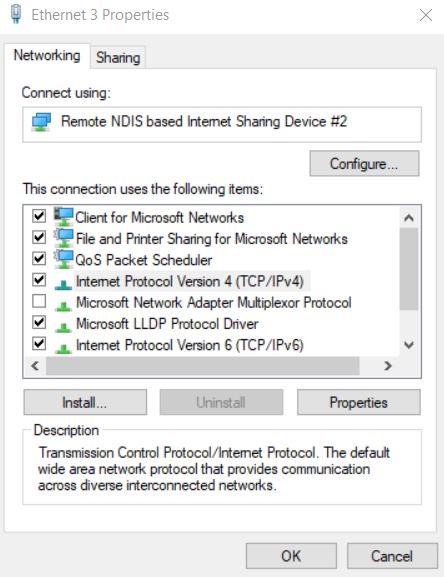
- Here select the option Internet Protocol Version 4 (TCP/IPv4) and then click on Properties. Make sure the following setting is selected:
Obtain an IP Address Automatically
Obtain DNS Server Address Automatically
Note: Now some chances are that obtaining DNS Server and IP Address automatically won’t help, then consider setting both of them manually. For doing so,
- Firstly, open your connection properties¸ select Internet Protocol Version 4 (TCP/IPv4) and then select Properties.
- Now select the circular boxes located before the options below and fill the following data accordingly:
Use the following IP address.
- IP Adress: 192 . 168 . 1 . 15
- Subnet Mask: 225 . 225 . 225 . 0
- Default Gateaway: 192 . 168 . 1 . 1
Use the following DNS server addresses.
- Preferred DNS server: 8 . 8 . 8 . 8
- Alternate DNS server:8 . 8 . 4 . 4
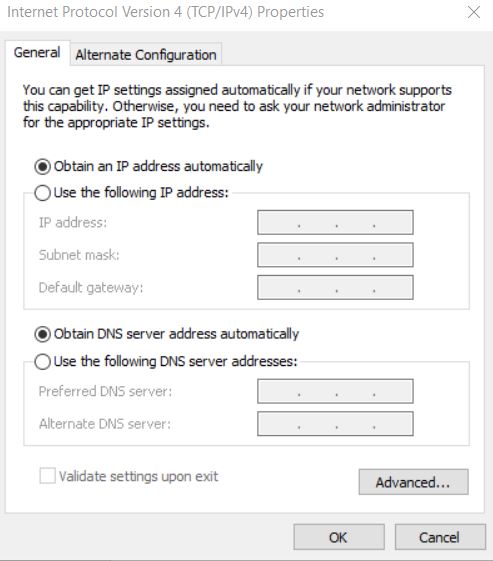
- After that click OK.
- For checking Subnet mask and Default gateway information, navigate to another device that connects with your system efficiently and then check connection properties.
FIX 2: Restart the Router and then check the Ethernet cable:
Once you are done with the FIX 1, turn OFF your Router for the next five minutes. After that turn it ON and check whether your PC has the valid IP configuration or not. If not, then connect your Router with the PC using another Ethernet cable. You can also consider joining with a different router. However, if this too does not solve the issue for you, then the problem lies in the network card. Here we recommend you to perform the factory reset setting on your Network card or replace it altogether (whatever helps).
FIX 3: Network Adaptor need to Reinstall:
Uninstalling and then Reinstalling the Network Adaptor might help here as well. For doing so,
- Firstly, press WINDOWS + R and open the RUN prompt.
- On the empty text box type “hdwwiz.cpl” and then click on OK.
- Now expand the Network Adaptor then right-click on your Ethernet card and then select the option Uninstall device.
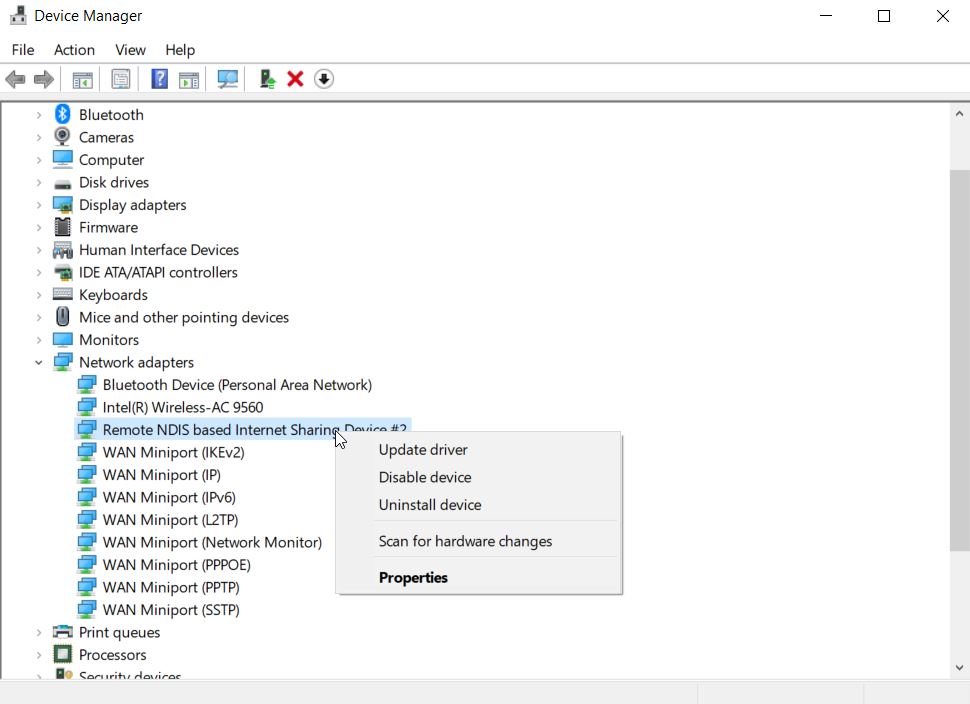
- On the next confirmation prompt, click on Uninstall to confirm your step.
- Lastly, reinstall the Network Adaptor through the driver accompanying the hardware.
However, if reinstall the Network Adaptor does not help in your case then we recommend you; from the manufacturer’s portal, reinstall the network interface card using the latest version of driver.
FIX 4: Disable Fast Startup and then Reboot the system:
The Fast Startup feature can also cause the “Ethernet doesn’t have a valid IP configuration” error. Hence disabling it would help in getting rid of the error. For doing so,
- Go to the desktop search bar, type Control Panel and open the relevant result from the search options.
- From the Control Panel items click on Hardware and Sounds option then select Power Options.
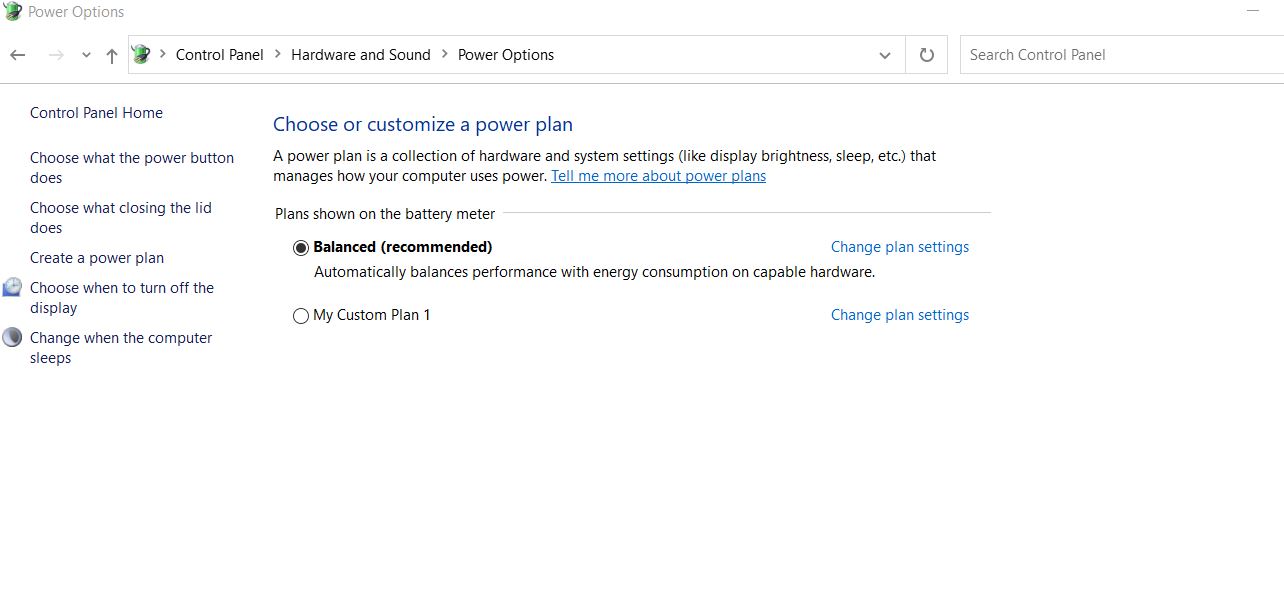
- On the next window, go to the left pane menu and you need to choose the option Choose what the power button does and then select Change settings that are currently unavailable.
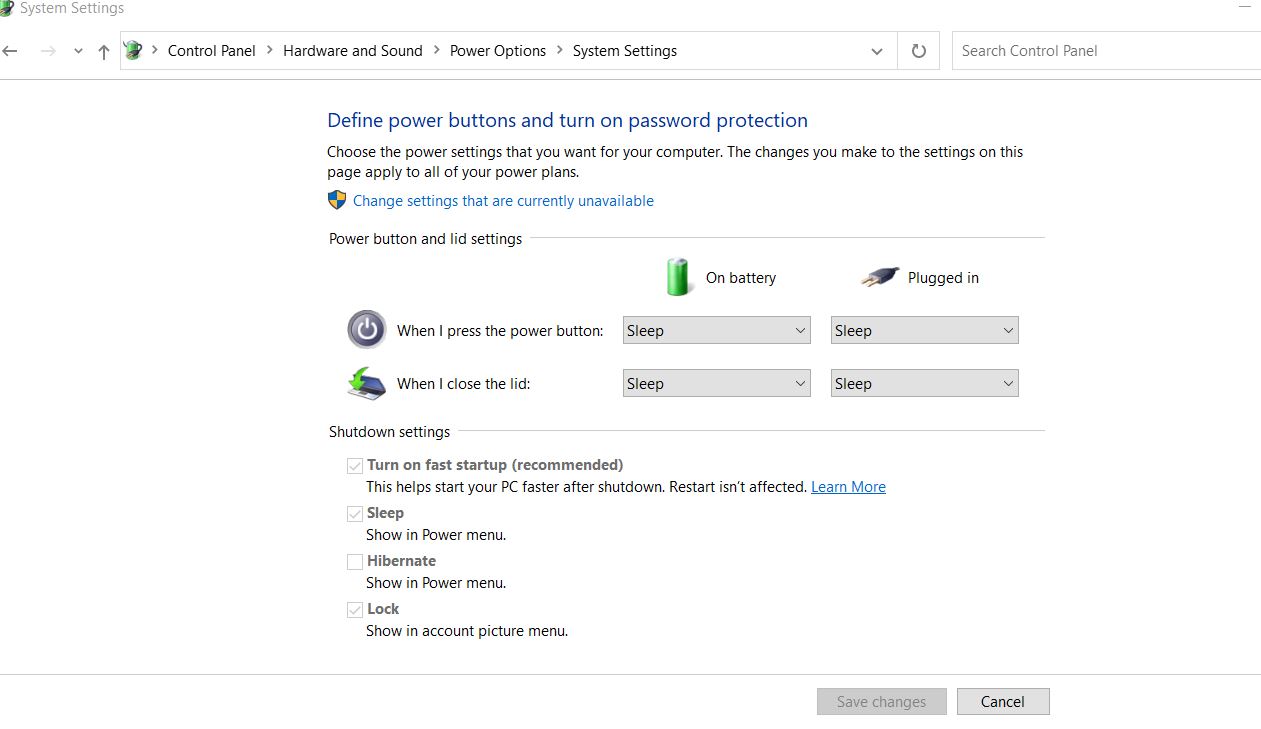
- Now you will find all the box selected by default. Here uncheck the tick box located before the option Turn on Fast startup (recommended). This step will turn off the Fast Startup.
- Finally, click on Save changes and then Reboot your PC.
FIX 5: Use the Command Prompt:
By running few commands on Command Prompt, the “Ethernet doesn’t have a valid IP configuration” error has been resolved as per some users. For doing so,
- Go to the desktop search bar and type Command Prompt.
- From the search results locate Command Prompt and then choose Run as Administrator from the given menu. One can use PowerShell (Admin) as well.
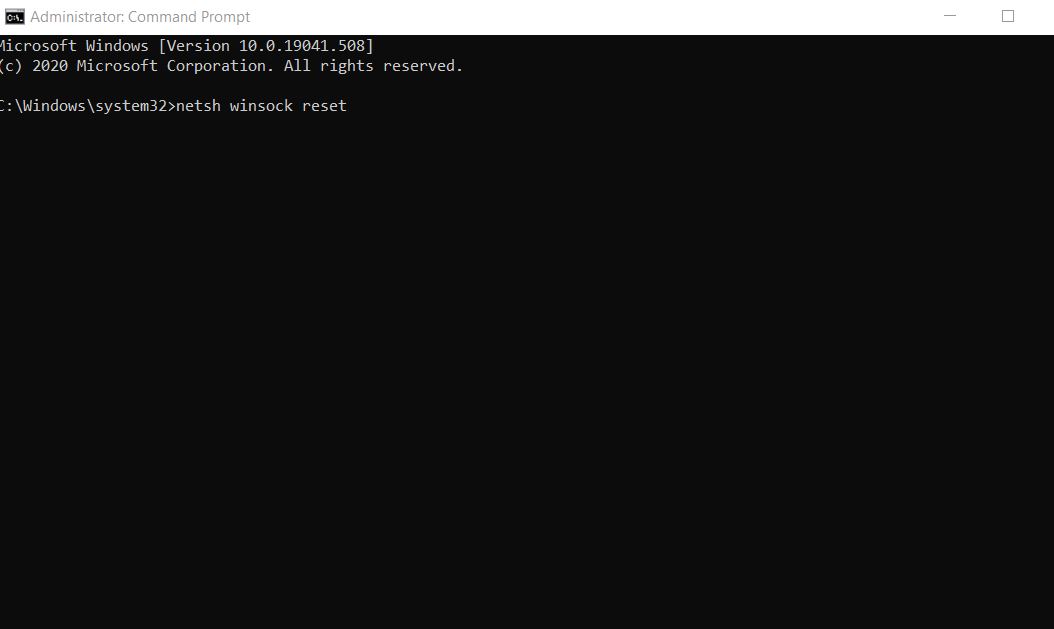
- Now on the Command Prompt window, type the following commands and press Enter after each of them:
netsh winsock reset
netsh int IP reset
- Once done, restart your PC in order to apply the required changes. Now you can check, and the said issue might have to get solved as well.
FIX 6: Disable the IPv6 connection type:
Computers are generally configured to work with the IPV4 connection type. And if the network setting gets automatically reconfigured to IPv6 connection type, then it might create a conflict resulting in Ethernet connection not working correctly. Hence here, disabling the IPv6 connection type might help. For doing so,
Disable the IPv6 connection type through Registry:
- Firstly, press WINDOWS + R and open the RUN prompt
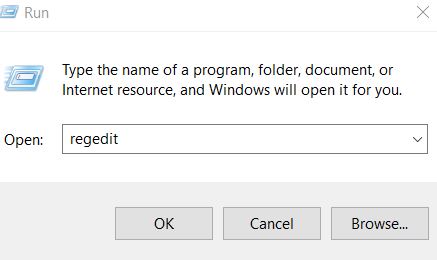
- On the empty text box type “regedit” and then click on OK.
- On the Registry Editor window, go to the left pane and then navigate to the following address:
HKEY_LOCAL_MACHINE\SYSTEM\CurrentControlSet\Services\TcpIP6\Parameters
- Now on the right pane, find any empty white space, right-click on it and select New > DWORD (32-bit) Value.
- Here for the name of new DWORD, enter DisabledComponents.
- Now open the DisabledComponents properties by double-clicking on it.
- Here set the value data as ffffffff and then click on OK.
- After that, restart your PC to make the changes applied. The IPv6 connection type would have solved by now resolving the said error for you.
Or
- Firstly, right-click on the Network icon system tray and then choose the option Open Network and Sharing Center.
- On the next window, go to the left pane and then click on the option Change adapter settings.
- Now right-click on the Network connection you are using and then select Properties.
- On Ethernet Properties window, uncheck the tick box located before the option Internet Protocol Version 6 (TCP/IPv6).
- Click on OK to save the changes.
- Finally, restart your PC and check whether the issue is resolved or not.
We cannot deny the fact and importance of the internet in our daily life. Today the workplace is resolving more around digital changes than ever before. And in this situation, one cannot get alone with limited or no internet connectivity at all.
The said error “Ethernet doesn’t have a valid IP configuration” has made the users suffer from internet connectivity issues. Hence from the given fixes in the article above, we hope that you will be able to get rid of it. If you have any queries or feedback, please write down the comment in the below comment box.
