All the Windows systems have the Automatic clock synchronization feature, which is responsible for managing the Date and Time settings of the computer according to the time zone. The feature is one of the oldest components of Windows and is also a part of its latest version Windows 10.
However, recently, it has been reported several times that the Clock synchronization is showing some issues and leading the users with an error message stating, “An error occurred while windows were synchronizing with time.windows.com”. Though it is not a huge issue and there are several fixes available for the same. Have a look:
Page Contents
- How to fix the “Time synchronization failed with time.windows.com” issue?
- FIX 1: Check if Windows Time service is running:
- FIX 2: Restart Windows Time service:
- FIX 3: Use a different server:
- FIX 4: Use Command Prompt and run a few commands:
- FIX 5: Change the default update interval:
- FIX 6: Add more servers to the registry:
- FIX 7: Change the registry values:
- FIX 8: Disable the third-party firewall:
How to fix the “Time synchronization failed with time.windows.com” issue?

FIX 1: Check if Windows Time service is running:
The Time synchronization feature is heavily dependent upon the Windows Time service, and if the Windows Time service is not working, you might encounter the “Time synchronization failed with time.windows.com” error. Here the fix you can try is to check whether the Windows time service is running or not. For doing so, follow the steps given below:
- Firstly, launch the RUN prompt by pressing Windows + R simultaneously.
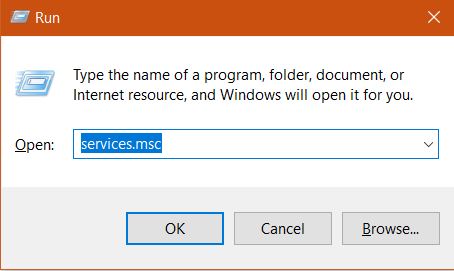
- Now inside the RUN dialogue box, type “services.msc” in the empty text field and then click on OK. It will launch the Service window.
- On the Service window, locate Windows Time from the list of options, and then double click on it to select Properties.
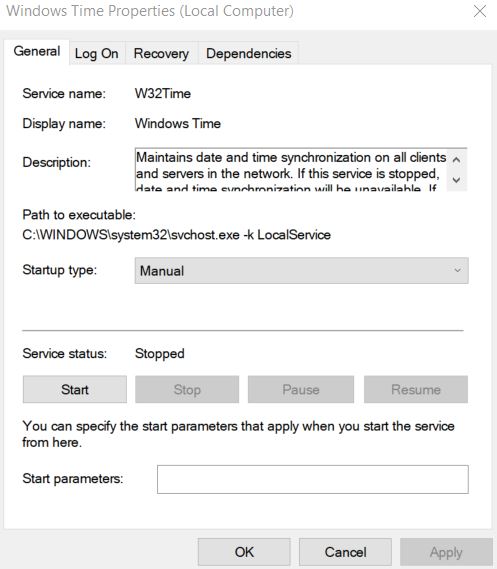
- On the Properties menu, firstly, Set Startup type as Automatic and then click on the Start button under the Service Status section to start Windows Time service.
- Further click on Apply -> OK to make the changes applied.
FIX 2: Restart Windows Time service:
A lot of suffered users suggest that restarting the Windows Time service resolved the “Time synchronization failed with time.windows.com” error for them. Hence, we recommend you try the same. For doing so, follow the steps given below:
- To begin with, follow the first three steps from FIX 1.
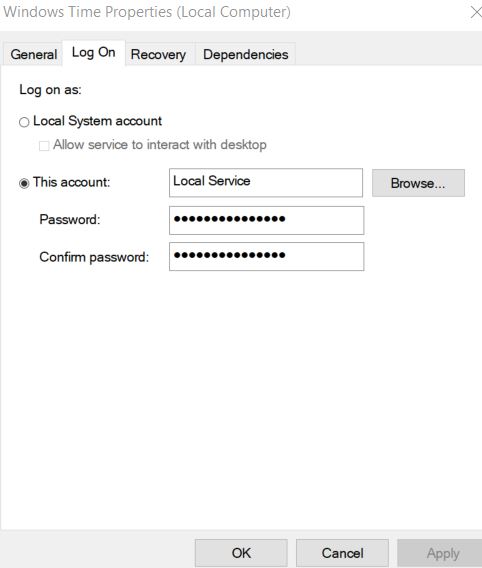
- Now inside the Windows Time Properties, navigate to the Log On tab from the vertical menu and then select the option the Local System account.
- Now tick the checkbox before the option Allow service to interact with desktop.
- Further click on Apply -> OK to make the changes applied. Thereafter, restart your computer.
FIX 3: Use a different server:
Using a different server has reportedly resolved the “Time synchronization failed with time.windows.com ” error for a few suffered users, and we advise you to try the same. There are several different time servers you can make use of, like time-b.nist.gov, time-a.timefreq.bldrdoc.gov, time-a.nist.gov, and time-b.timefreq.bldrdoc.gov.
Note: Before you proceed with the steps below, make sure that Windows Time service is set to Automatic and running in your system, just like explained in FIX 1.
Follow the steps given below:
- Firstly, go to the desktop search bar, type Date (in alphabetic form), and then select the option Date and Time from the search results.
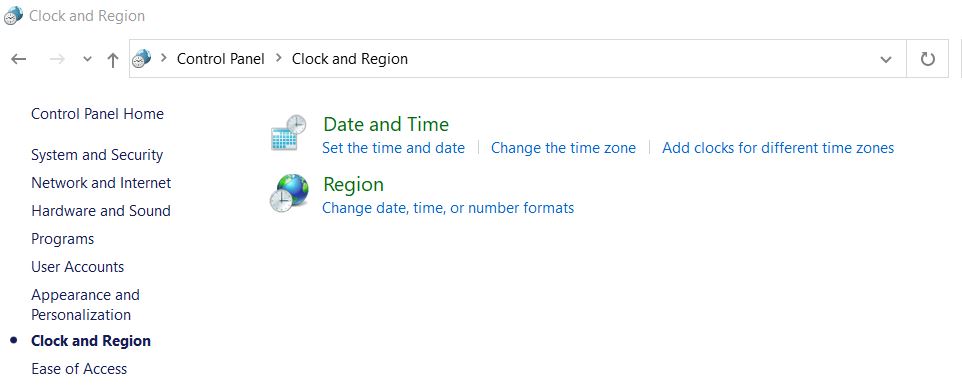
- Now inside the Date and Time window, navigate to the Internet Time from the vertical tab and then click on the Change settings tab.
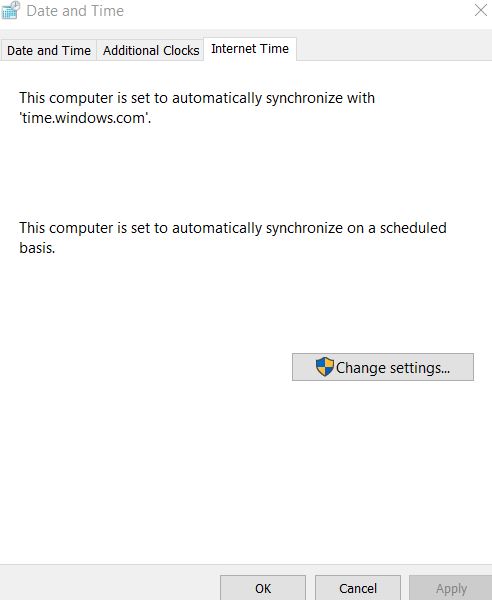
- Now inside the Internet Time settings, open the drop-down adjacent to the server, select the option time.nist.gov and then click on the Update now tab. (You can also try the pool.ntp.org server as it is effective in resolving the said issue).
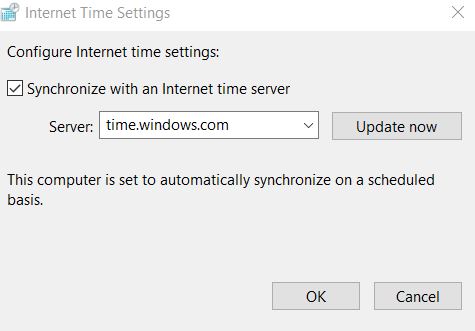
- Lastly, click on OK to save the changes.
FIX 4: Use Command Prompt and run a few commands:
There are a few commands that can effectively resolve the “Time synchronization failed with time.windows.com ” error. Use the said commands on the Command Prompt window by the steps given below:
- Firstly, launch the RUN prompt by pressing Windows + R simultaneously.
- Now inside the RUN dialogue box, type “cmd” and click on OK. It will launch the Command Prompt window. Make sure you open it will admin access.
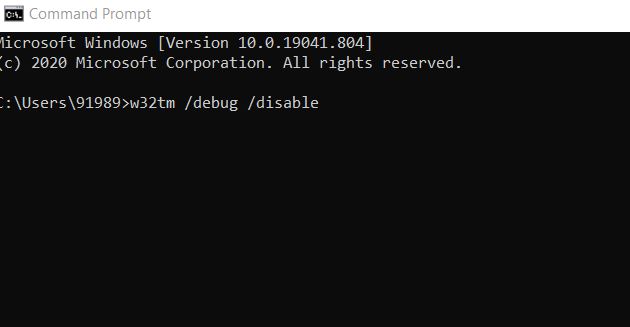
- Now in the Command Prompt window, type or copy + paste the following command and make sure you press Enter after each of them.
w32tm /debug /disable

w32tm /unregister

w32tm /register

net start w32time
- If the commands worked for you, then you will be able to view the message “The windows Time Service is starting. The windows time service was started successfully.”
- Lastly, close the Command Prompt window and then try to synchronize your clock.
FIX 5: Change the default update interval:
The “Time synchronization failed with time.windows.com ” error can at times be the result of your update interval. However, this can be fixed simply by changing few values in the registry. For doing so, follow the steps given below:
- Firstly, go to the desktop search bar, type “registry editor” and open the relevant search result.
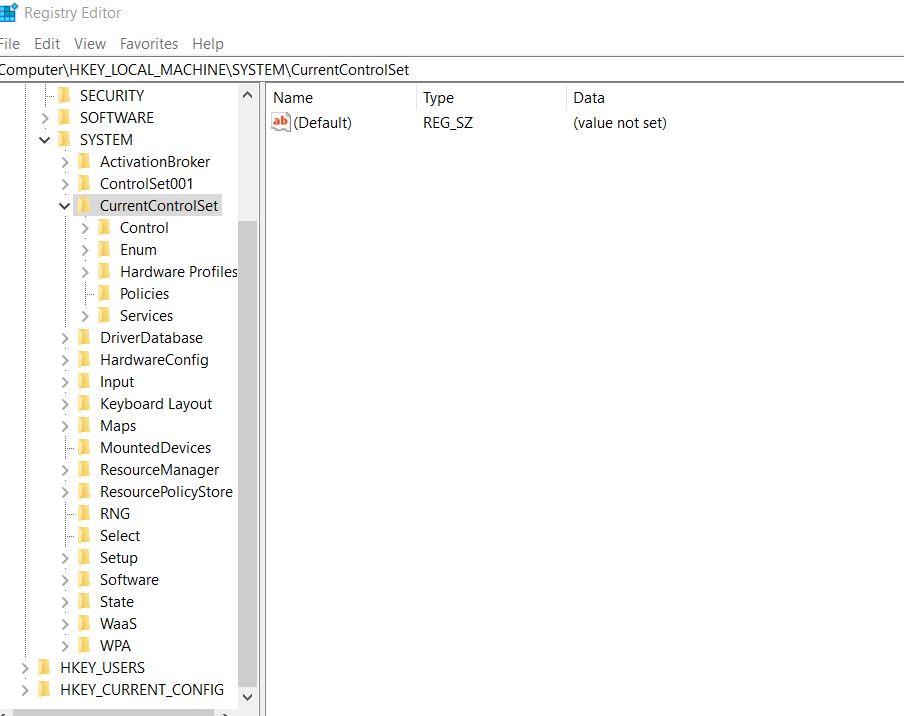
- Now on the Registry editor window, in the left pane, navigate to the following key.
HKEY_LOCAL_MACHINE\SYSTEM\CurrentControlSet\Services\W32Time\TimeProviders\NtpClient
- Now from the list of options, double-click on the SpecialPollInterval key.
- Further on the base section, select the option Decimal.
Note: Here, the default Value data should be set to 604800. The number, though, represents 7 days in seconds, but you can also change this value to 86400, which will represent 1 day.
- Finally, click on OK to make the changes applied.
FIX 6: Add more servers to the registry:
Here are a few serves which, when added to the registry, can help you to resolve the Time synchronization failed with time.windows.com error. Have a look at the steps below:
- Firstly, go to the desktop search bar, type registry editor and open the relevant search result.
- Now on the Registry editor window, in the left pane, navigate to the following key
HKEY_LOCAL_MACHINE\SOFTWARE\Microsoft\Windows\CurrentVersion\Date\Time\Servers
- It will now open a list of values, where every server will be represented by a numeric.
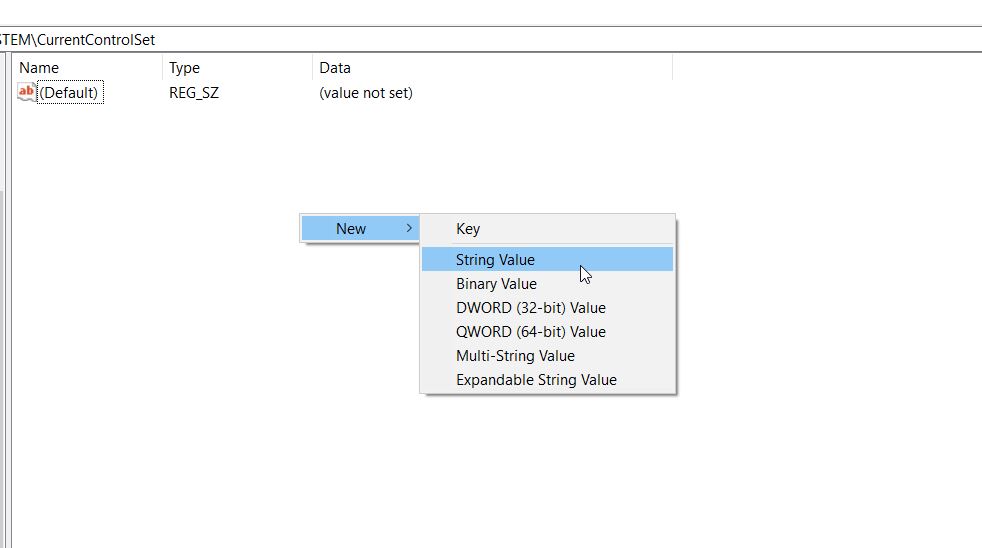
- Now right-click over the empty white space and select options as New > String Value for adding a new time server.
- Now enter any numeric to name the server and then double-click on it.
- Further inside the Value data field, fill in the server’s address. (tick.usno.navy.mil is the one that has worked for several users; thus, you can also use the same). Though you can use other servers as well and check whichever works for you. Choose from this list:
time-a.nist.gov
clock.isc.org
north-america.pool.ntp.org
time.windows.com
time.nist.gov
time-b.nist.gov
128.105.37.11
europe.pool.ntp.org
- After you enter the server’s address, click on OK.
- Now navigate to the Time and Date settings and then further select the server you have added. Changing the time server has been explained in details in FIX 3.
FIX 7: Change the registry values:
Changing the registry values is another proven fix that can help you get rid of the “Time synchronization failed with time.windows.com ” error. Here follow the steps given below:
- Inside the Registry Editor on the left pane, navigate to the following key,
HKEY_LOCAL_MACHINESYSTEMCurrentControlSetServicesW32TimeConfig
- Now on the right pane, locate MaxNegPhaseCorrection from the list of options, double-click over it, and then set the Value data to ffffff.
- Click on OK to make the changes applied.
- Now from the same list, locate MaxPosPhaseCorrection, double-click over it, and then set the Value data to ffffff.
- Finally, click on OK and close the registry editor.
FIX 8: Disable the third-party firewall:
As per reports, at times, the firewall tool can create a conflict with your clock and then trigger the “Time synchronization failed with time.windows.com ” error. Here the best resort is disabling the firewall and check whether it helps or not. If not, you will be required to completely uninstall it.
Though for a few suffered users, switching to Standard mode or disabling the firewall completely have helped them to synchronize their clock without an issue. Though you will also require to configure the firewall in order to unlock NPT access on UDP port 123. Also, in case you have changed the configuration of the router’s firewall, you will require to unblock UDP port 123 on your router too.
Note: Firewall tools are a great way to keep your system safe from potentially dangerous applications, virus,es and malware. Thus, if in case you are disabling or uninstalling your third-party firewall, we recommend you install another trusted one in the process to ensure your system’s safety.
These were all the tried and tested fixes that will possibly help you in getting rid of the “Time synchronization failed with time.windows.com ” error. Though all of them are basic fixes, when you try the one related to the registry editor, consider creating a backup of your registry to be on a safer side.
Registry editor is one crucial component, and one wrong step with it can lead to system stability issues. By the end of the article, we hope you will find all the information mentioned here as relevant. If you have any queries or feedback, please write down the comment in the below comment box.
