If you are experiencing issues when trying to add or use a sign-in option in Windows 10 and are looking for ways to fix it then, you are at the right place. As in this post, we will be giving you a proper guide on how you can fix this issue on your Windows 10 PC or laptop. A four-digit pin is one of the most secure ways of lock and safeguards your device. This also negates the need for using a long password every time you want to log in.
As per several guides and posts, the main issue related to this is the NGC folder. However, there are some other features related to it as well. And in this post, we are going to cover them as well. We will also be discussing all the other types of problems that the users are facing with the add or use PIN sign-in option. So, with that being said, let us get straight into the article itself:
Page Contents
Types of Problems associated when trying to sign-in using a PIN
As already mentioned, there are several types of problems, the users are complaining. Here is the list of issues that they are facing:
- Unable to add PIN: Most of the users have reported that whenever they are trying to enter the PIN, the “add PIN” option in settings is not working for them.
- Sign In option is not visible: When you use the PIN function on your PC, there are multiple other options available, that you can use to sign-in. However, some of the users are reportedly not able to see them.
- PIN sign-in is disabled: For many users the PIN sign-in option is disabled or greyed out, meaning that it is not available for them.
If you are experiencing any of the said issues or any other issues related to PIN and all, then you can follow the workarounds mentioned below. We hope that any one of the methods would help you sort out the issue for you.
Remove NGC Folder
As mentioned, the issue is often associated with the NGC folder on your computer. And removing the folder can help you fix it. Follow the steps below to remove the folder:
- Press the Windows + E key on your keyboard.
- This will open an Explorer window.
- Head over to the location mentioned below:
C: > Windows > ServiceProfiles > LocalService> AppData > Local > Microsoft > Ngc
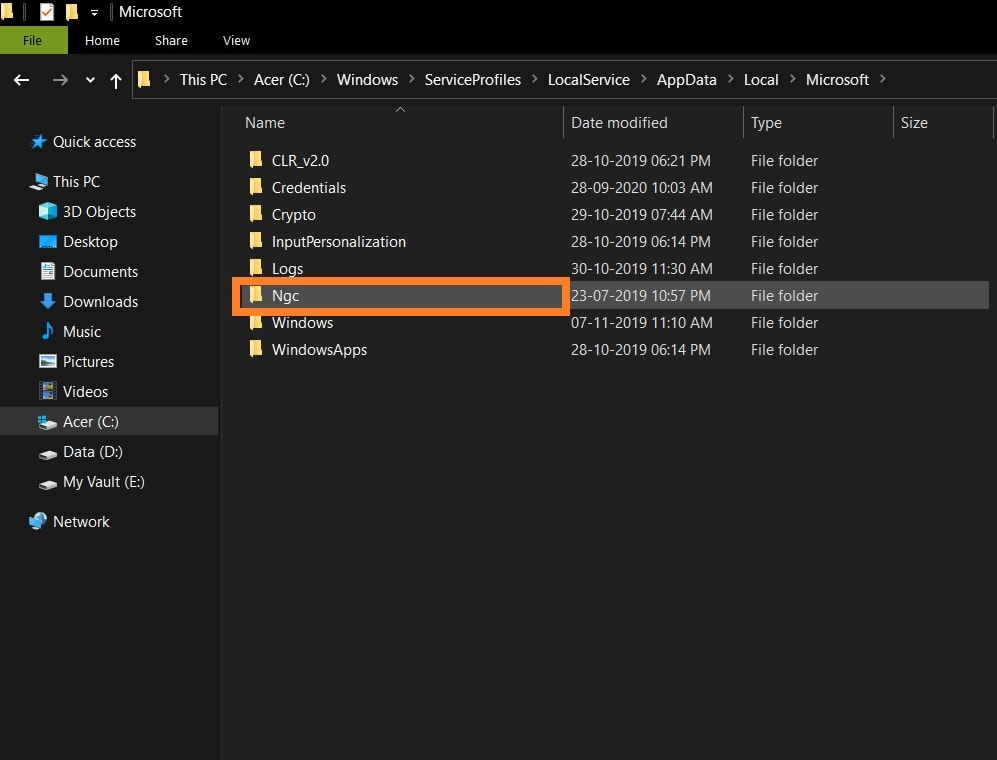
- Enter the Ngc folder.
- Here you need to delete all the contents. Press Shift + A to select all the contents inside the Ngc folder and hit the Delete button on your keyboard.
- Once you have done that, press the Windows + I button to open Windows Settings.
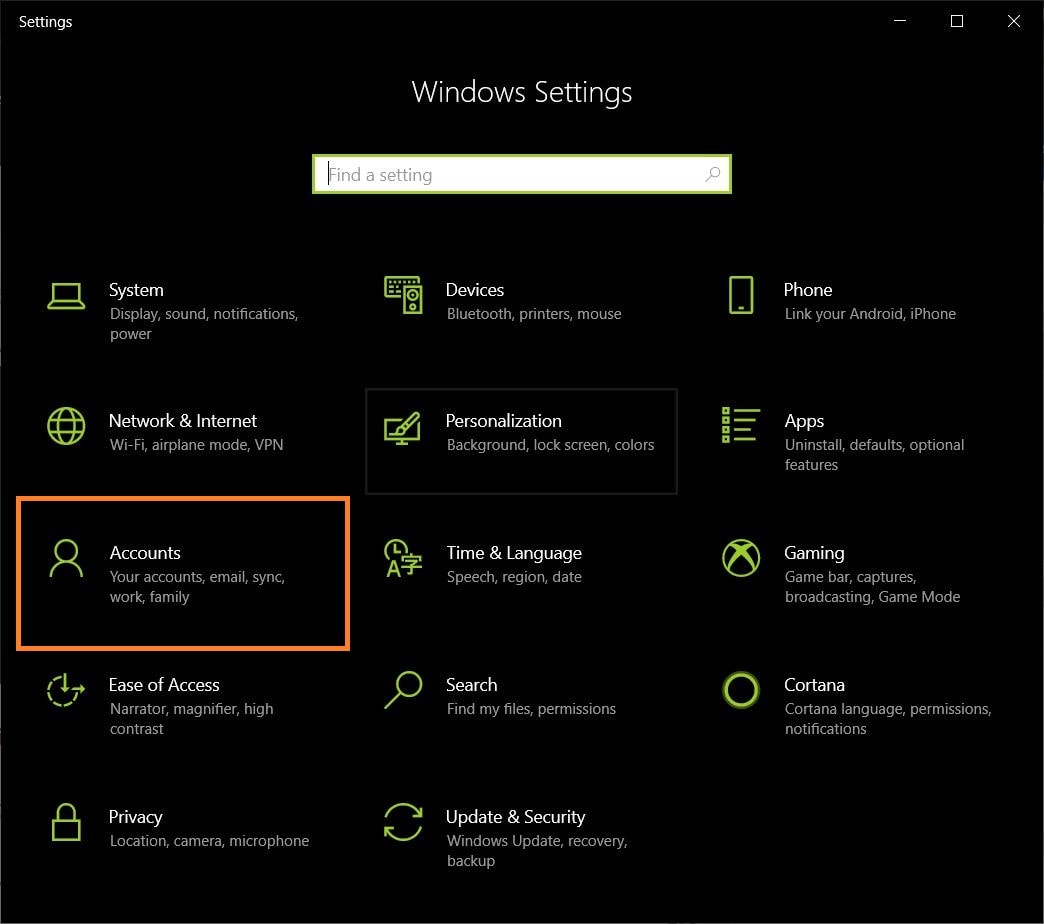
- Click on Accounts.
- On the left-hand side, you will find an option, Sign-in options.
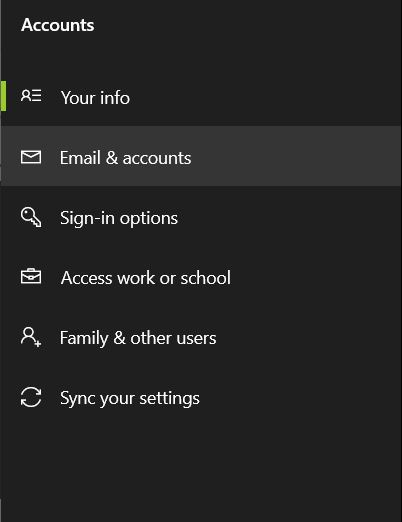
- Select the Windows Hello PIN option.
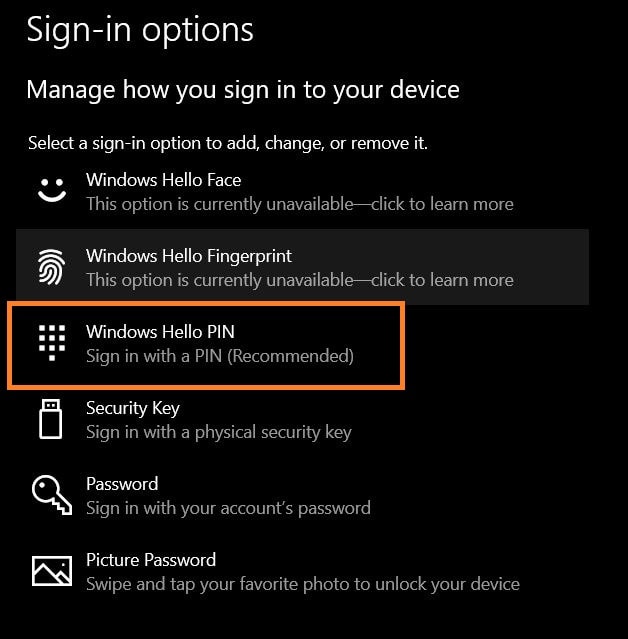
- Then click on Add to add a new PIN on your computer.
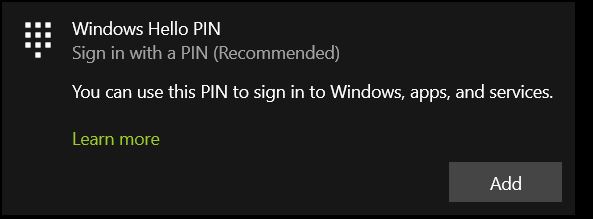
- Now in the Windows Security windows, you have to enter your Microsoft password and hit the Ok button.
- Tap on Set up a PIN and enter the four-digit PIN.
- Re-enter to confirm the PIN and click OK.
- Close the Settings window and reboot your computer.
- Now use the PIN you just set up to login to your PC.
Use Registry Editor
- Open the Run dialog by pressing Windows + R key.
- Type in regedit in it and hit the OK button.
- Once the registry editor opens up, navigate to the below location:
HKEY_LOCAL_MACHINE\SOFTWARE\Policies\Microsoft\Windows\System
- You need to create a key named AllowDomainPINLogon, only if it does not exist.
- To create this, on the right side, choose New>DWORD (32 bit) and name it AllowDomainPINLogon.
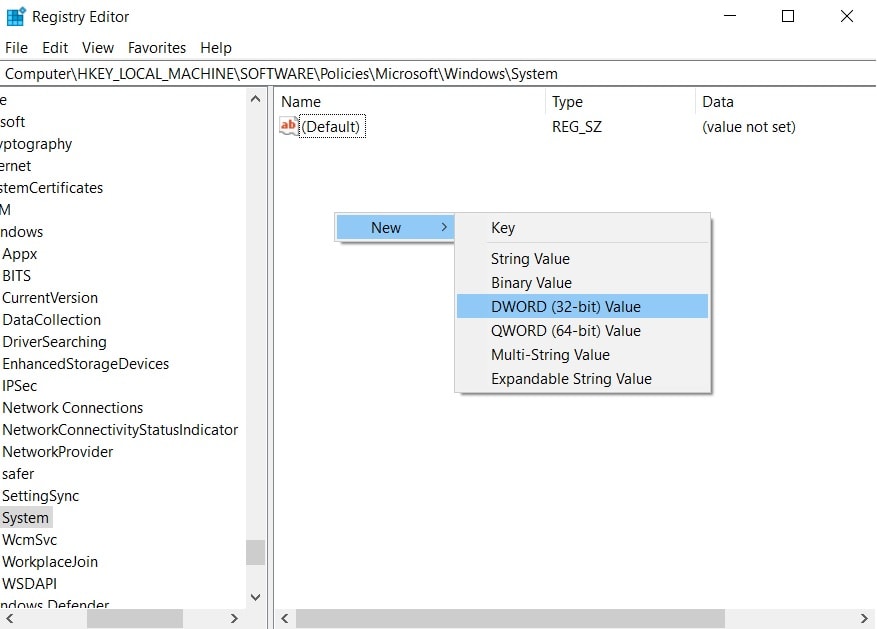
- Double click on the newly created AllowDomainPINLogon and change the value to 1.
- Close the registry editor and restart your PC for the changes to take effect.
Remove and Add PIN
- Open Windows Settings by pressing Windows + I key on your keyboard.
- Open Accounts.

- Head to the left side and click on Sign-in options.

- Click on Windows Hello PIN and then remove your older one.
- Again hit the Remove button.
- You will be asked to enter the Microsoft password to confirm the deletion.
- Once you have done that, again hit the Windows Hello PIN option.

- Click on Add to create a new PIN.

- Enter your Microsoft password to continue.
- Setup a PIN and enter a new four-digit PIN and reenter to confirm it.
- Click on OK.
- Close the settings menu and reboot your PC.
Use the Forgot My PIN option
There are instances were entering you have forgotten the password and blaming in on your PC. Well, your best bet is to use the Forgot My PIN option to recover your password. Follow the steps below to do that:
- Open Windows Settings by pressing Windows + I key on your keyboard.
- Open Accounts.

- Head to the left side and click on Sign-in options.

- Click on Windows Hello PIN.
- Here select the I forgot my PIN option.
- Click on Continue.
- Follow the on-screen instructions, enter your Microsoft password and you will have the option to either change the PIN or retrieve the old one.
- Reboot your PC once you are done with the above steps.
- Enter the changed or retrieved PIN to log in.
- See if that helps.
Create a new Admin account
There is another alternate way where you can create a new admin account and set up a PIN or password to sign-in into it.
- Press Windows + I key to open the Windows Settings menu.
- Click on Accounts.
- On the left pane, hit the Family & other users option.
- Then click on the Add someone else to this PC option.
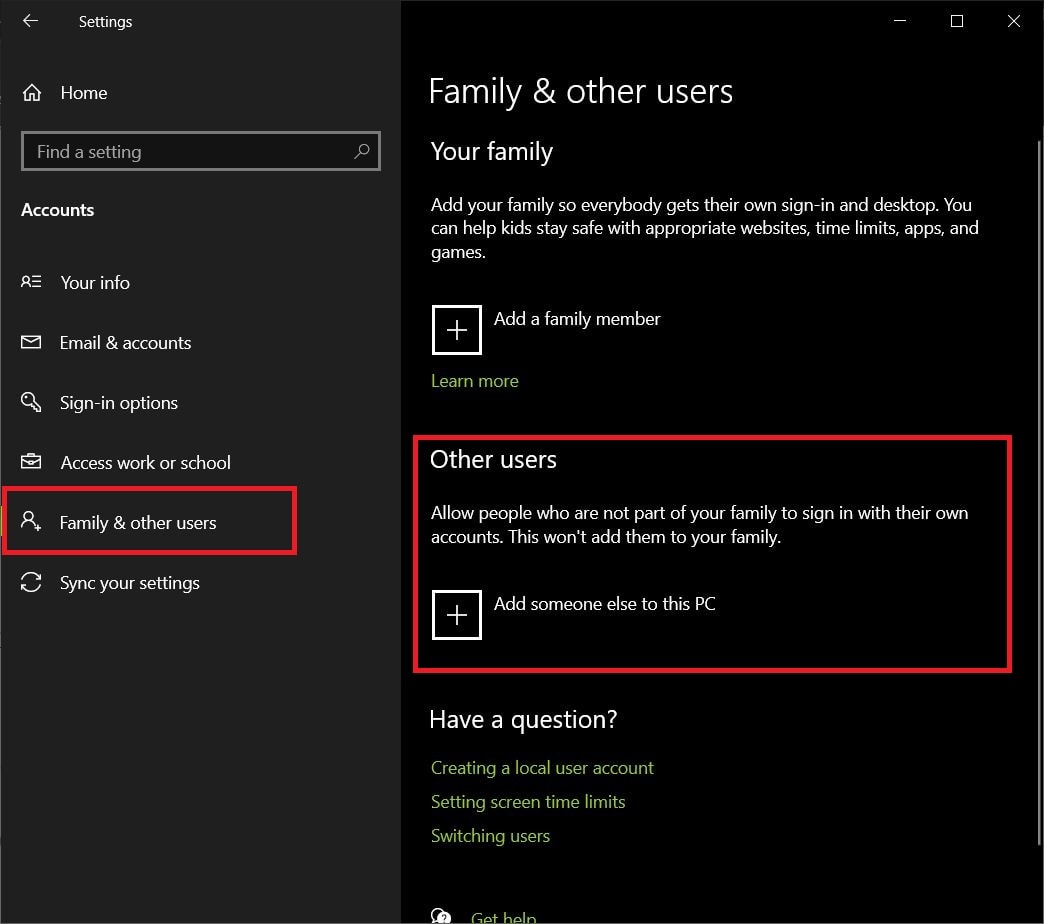
- Click on I don’t have this person’s sign-in information option.
- In the Create account menu, hit the Add a user without a Microsoft account.
- Then simply create a new account for your PC.
- Enter a User name, password, and re-enter to confirm it.
- Click on Next to complete the process.
- Now log off from your current account.
- And log in with the newly created account.
- In the new account, you will have to set up a new PIN.
- Follow the steps mentioned in the Remove and Add PIN section of this post to do that.
Check if CNG Key Isolation is running
CNG is a key that provides protection or security to passwords, PINs, or any other cryptographic service. You can check if this is manually running on your PC or not by following the below steps:
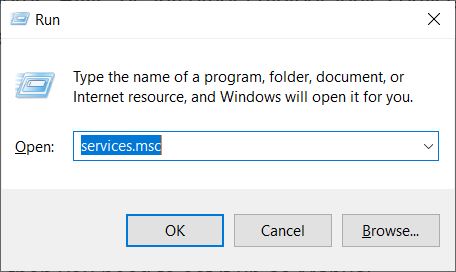
- Open the Run dialog by pressing Windows + R key.
- Type in services.msc and hit the Enter button.
- Scroll down to find the CNG key isolation.
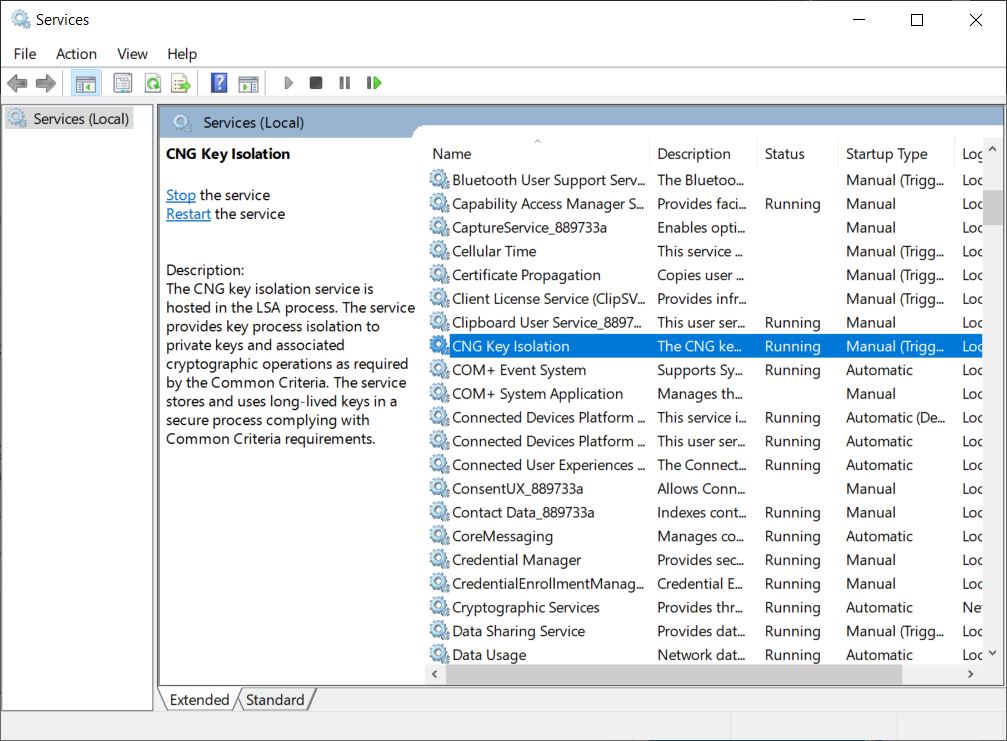
- Double click to open it.
- Check if the service status says Running.
- Also, check if the startup type is set to Manual. If No, then you need to set it up as Manual.
- Once you have done that, click on Start and press OK to save changes.
- Reboot your PC.
Wrap Up!
There you have it from my side in this post. I hope you guys liked this post and were able to fix the sign-in issue associated with the PIN on your Windows PC or laptop. Let us know which one of the above-mentioend steps did the job for you. If you liked this content and want to read more content, for more such awesome coverage, you can head over to our check out our Windows Guides, Gaming Guides, Social Media Guides, iPhone, and Android Guides to read more. Make sure to subscribe to our YouTube Channel for awesome videos related to Android, iOS, and Gaming. So, until the next post…Cheers!
