FTP or File Transfer Protocol is a great way of sending files between two machines. It is a standard that allows sending and receiving files between client and server over a network. FTP is often used to remotely access any file that users can download over the network at any time they want it. This allows larger files to be sent over a network between two devices. Browsers on the Android operating system have this FTP system pre-built and requires a correct configuration of TCP/IP network to access the said files without any hassle. Here, we will be discussing about some of the best FTP based file explorers available on Android and the procedure it would require to get it on-board.

Page Contents
How to Use FTP via Various Android File Explorers?
Using FTP through any File Explorer you download on your Android smartphone is really easy. In fact, it establishes an FTP connection between the phone and a computer that allows users to take required actions such as downloading any file that was stored on the phone right on their computer after navigating through the directory.
Using FTP is pretty easy as well. In fact, when you create an FTP server using any file explorer you download such as Solid File Explorer, you are required to enter the IP address listed by the explorer to the URL bar of any web browser on your computer and it is done. Navigate through the directory to search for files that you want to modify or download and so on.
However, this also raises a question and that’s about the privacy and security of the user’s data. Since anyone who might have access to the IP address of the FTP server can access it until the server is active, it raises privacy concerns. This is why many file explorer apps offer password-protected access to the FTP server. This means you will have to enter the username and password to get access to the same.
How to secure an FTP server?
Once you create an FTP server, you can access it remotely until the two devices are connected to the same WiFi network. Adding a layer of security should add a sense of relief against unwanted intruders in case the IP address is leaked.
Although the procedure to follow may differ from apps to apps, you need to know that there is basically a ‘not secure’ FTP server which is something you create using a File Explorer without password protecting it. The other one is basically when you add a layer of security i.e. secure server which requires a username and password to access.
You can set up both usernames and passwords within the File Explorer of your choice. You can change the password or username or both at any time and the same will be reflected when you access the IP address assigned to you.
How to Enable FTP on Astro File Explorer?
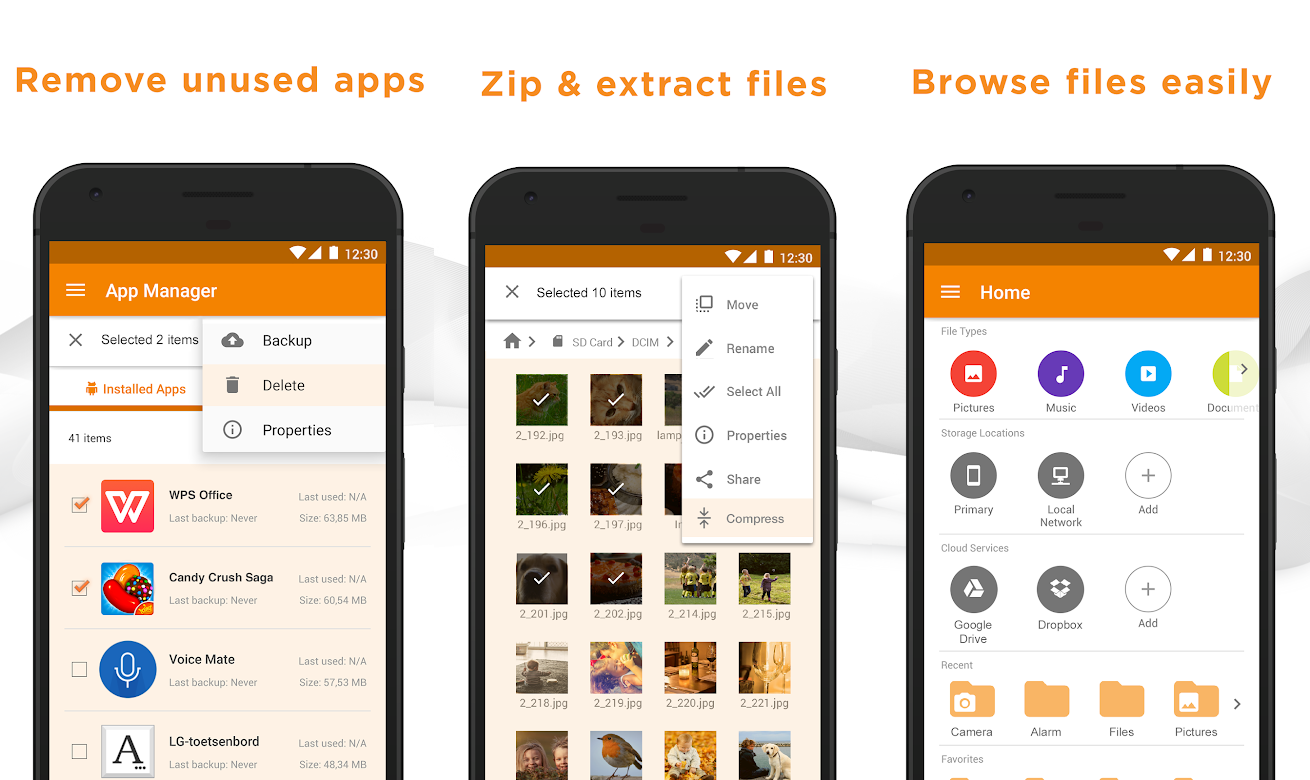
Step 01: The first thing you need here is the app itself so go to the Google Play Store and download File Explorer by Astro and open it.
Step 02: Tap on the ‘Add’ button under Storage Locations on the home screen.
Step 03: Next, you need to select FTP and then, enter the username required, Server IP address (eg 192.168.0.6) and desired port address (9999).
Step 04: Click on the ‘Save’ button that will create an FTP server with the said address under Storage Locations itself.
Step 05: Tap on it and enter the desired or set a password and the FTP server is created.
Step 06: Enter the Server IP address and port address (eg 192.168.0.6:9999) on your PC to access it.[googleplay url=”https://play.google.com/store/apps/details?id=com.metago.astro&hl=en_IN”]
How to Enable FTP on ES File Manager?
Note that the app is not available on Google Play Store so you will have to sideload it. Download it from this link given here and follow the procedure enlisted.
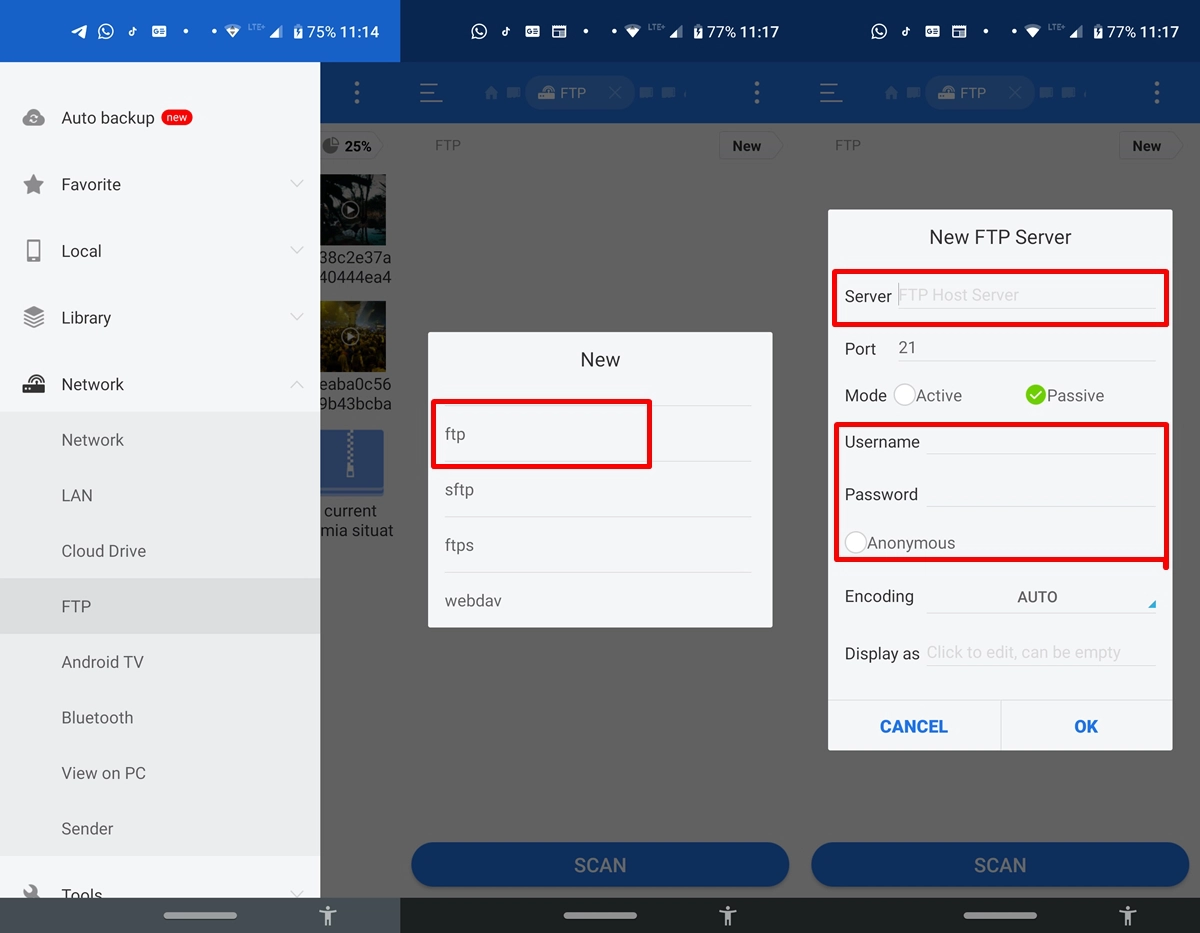
Step 01: Open the app on your phone and tap on the ‘hamburger menu’.
Step 02: Select Networks which should give you a hoard of options to select, you need to tap on ‘FTP’.
Step 03: Next, enter the New FTP Server details which include FTP Server address (eg 192.168.6.5) and port address (21), enter if you want the server to be password-protected or not and finally, tap on ‘OK’.
Step 04: Open a web browser on your PC and enter the server address to use FTP without any hassle.
How to Enable FTP on Solid File Explorer?
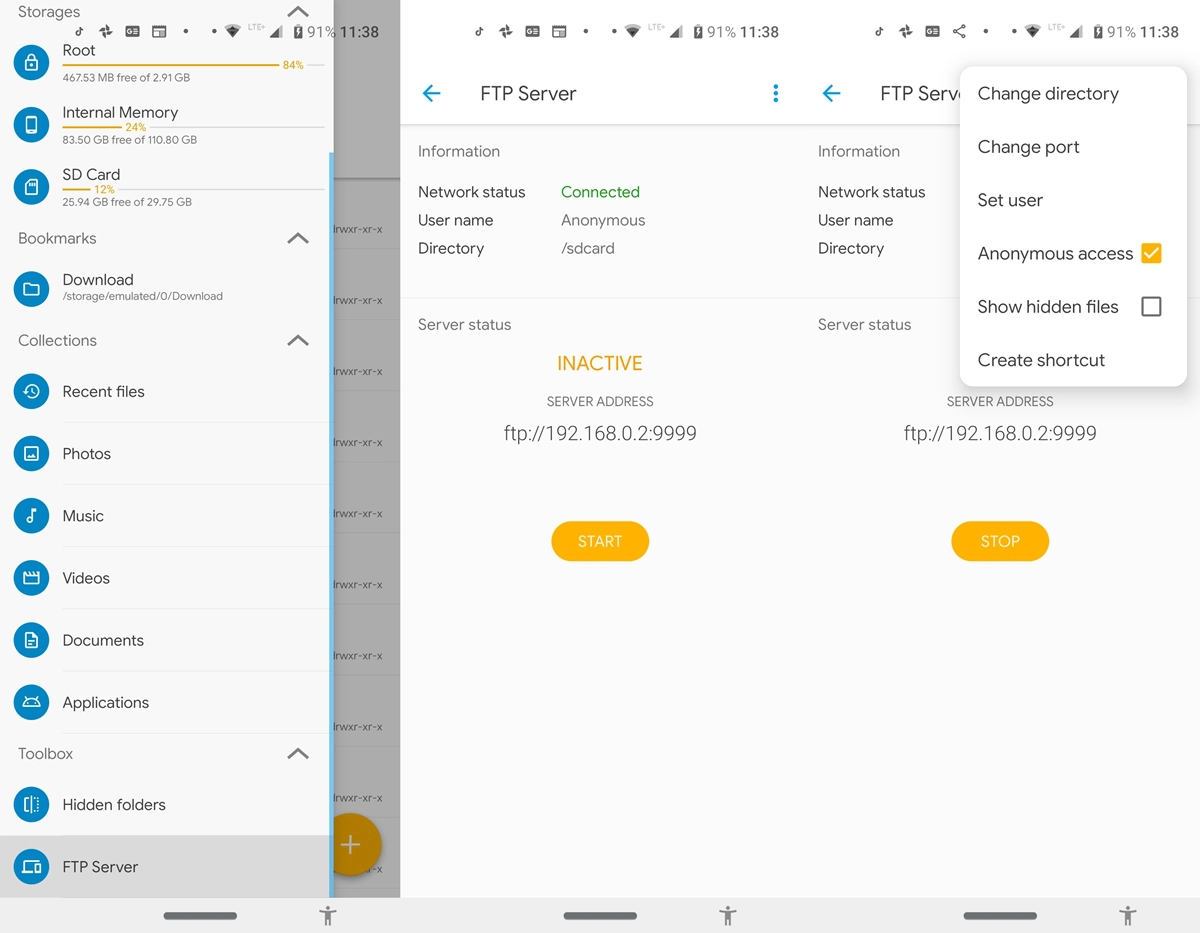
Step 01: Download and install the app from the Google Play Store and open it.
Step 02: Tap on the hamburger icon on the left to view the menu.
Step 03: Scroll to the extreme bottom to find ‘FTP Server’ and click on it.
Step 04: Tap on the overflow menu on the top right and untick ‘Anonymous access’.
Step 05: Tap on the ‘Start’ button, copy & paste the server address on your PC and it is done.
[googleplay url=”https://play.google.com/store/apps/details?id=pl.solidexplorer2″]
How to Enable FTP on Mi File Manager?
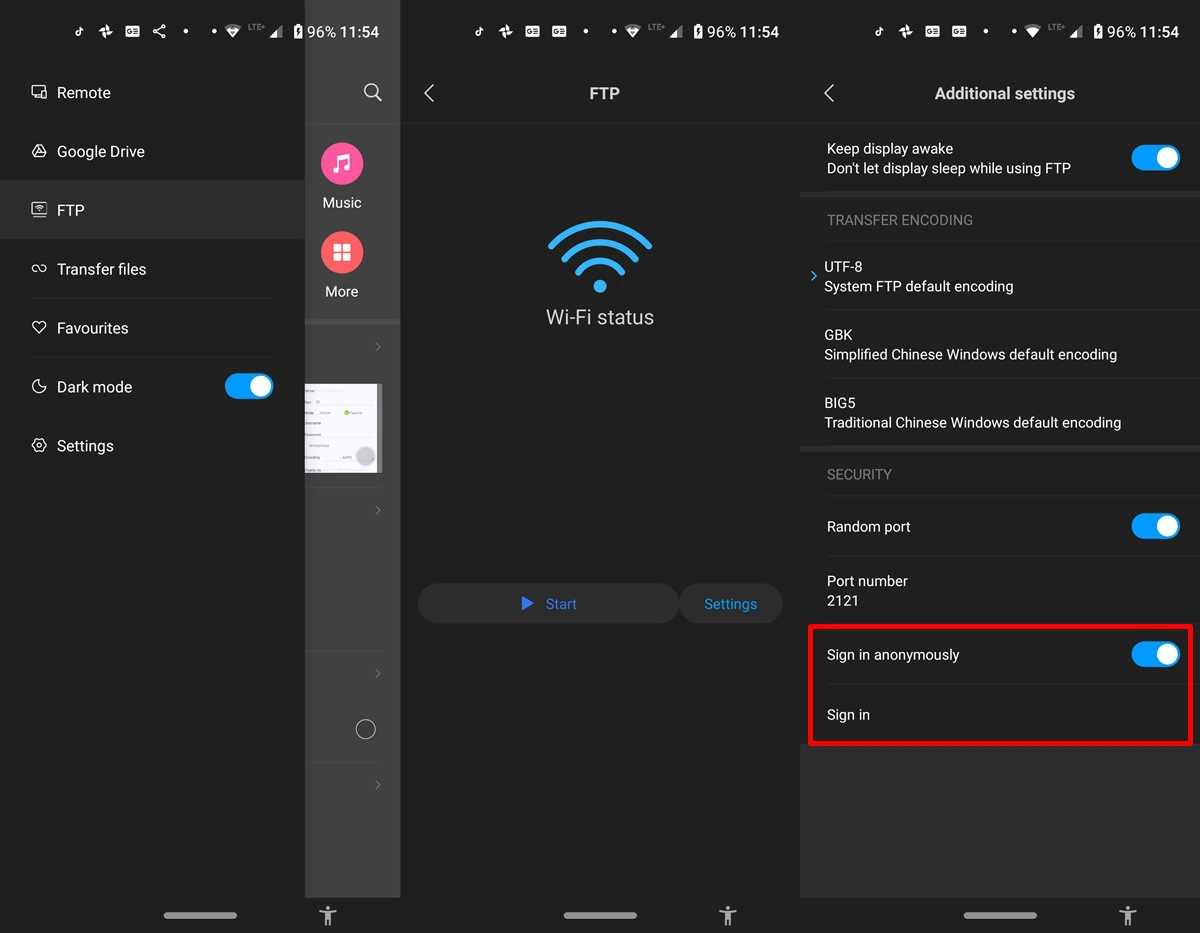
Step 01: First of all, download & install the Mi File Manager app.
Step 02: Next, open the app and tap on the hamburger menu and select ‘FTP’.
Step 03: Ensure that both the PC and the phone are connected to the same WiFi and hit the ‘Start’ button.
Step 04: Select whether you want the FTP server to be secure or not and act accordingly.
Step 05: Finally, go to Settings and untick ‘Sign in anonymously’.
Step 06: On hitting the ‘Sign In’ option, feeding in the required credentials, you can ensure that the FTP server is password protected as well.
[googleplay url=”https://play.google.com/store/apps/details?id=com.mi.android.globalFileexplorer”]
How to Enable FTP on File Manager (Asus)
This particular file explorer/browser is limited to Asus smartphones only so follow the method listed below to enable FTP.
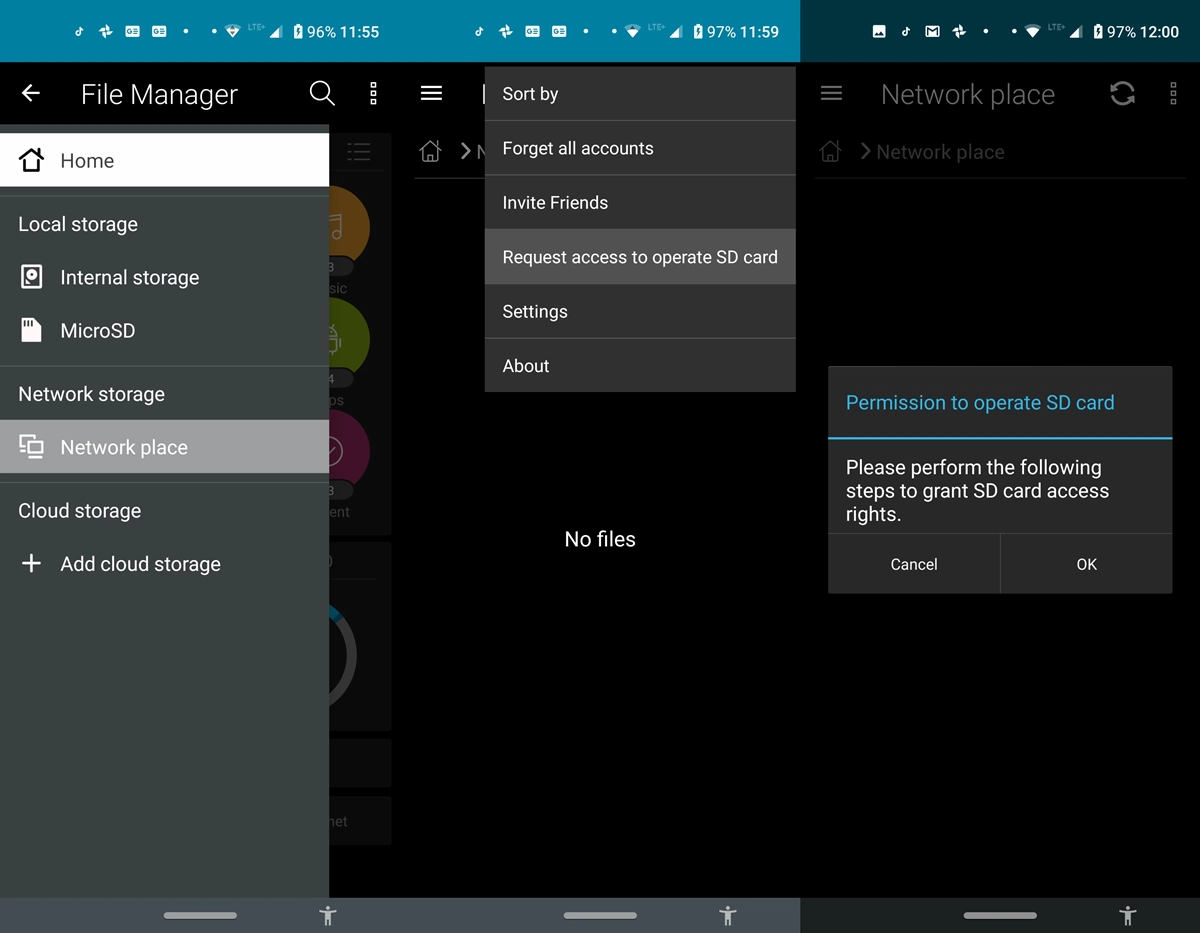
Step 01: Open the app and tap on the hamburger menu as you would do on any other app.
Step 02: Select ‘Network Place’ that will initiate a scan that should finish in a jiffy.
Step 03: You will have to proceed to the overflow menu and select ‘Request access to operate SD card >> OK’ or else the app wouldn’t read the content stored on SD cards.
Step 04: This should turn on FTP on your phone, now you can check out all the content on your phone from your PC as well.
[googleplay url=”https://play.google.com/store/apps/details?id=com.asus.filemanager&hl=en_IN”]
