In this tutorial, you will find the Huawei MediaPad M5 CMR-W09, CMR-AL09 testpoint which will be helpful in your future reference to remove the Huawei ID, remove FRP, User Lock, and firmware flashing then follow this article.
Page Contents
Why Do We Need TestPoint?
- Install the firmware file on Huawei MediaPad M5.
- You can remove Huawei ID using Test Point
- Repair IMEI and NVRAM using it
- Restore or Unbrick dead Huawei MediaPad M5 by flashing firmware.
- Easy to remove FRP lock or screen lock
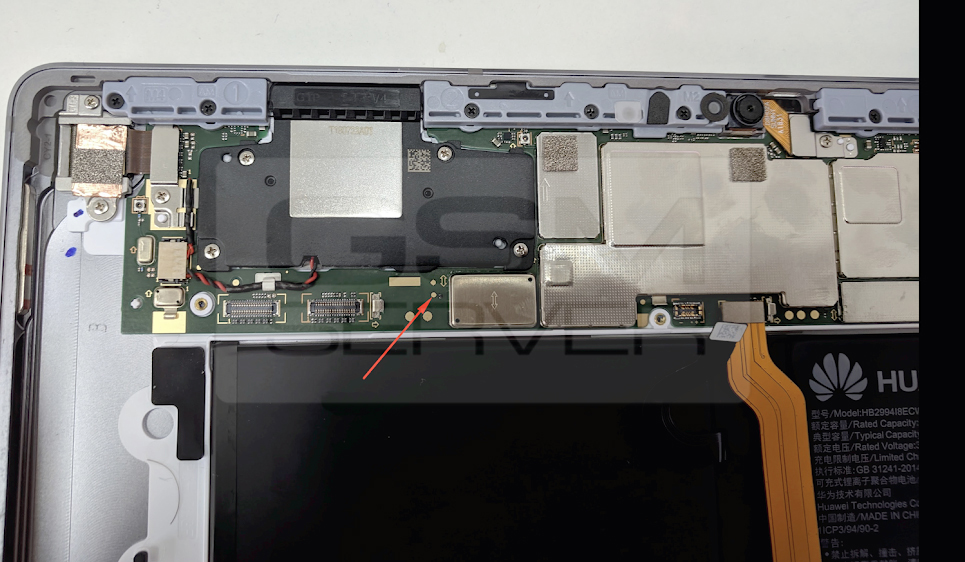
Where to Find Test Point in Huawei MediaPad M5
- First, Download and Install Huawei USB Drivers on Windows PC.
- Remove the back panel of the Huawei MediaPad M5 device carefully. Try not to damage hardware parts.
- Now, check the screenshot below to find out the Huawei MediaPad M5 Test Points.

How to Remove Huawei ID on Huawei MediaPad M5 CMR-W09, CMR-AL09 FRP Lock
- Download and install the SigmaKey Software on your computer.
- Connect your device to PC using a USB Cable in upgrade mode
- Select the Serial Port as DBA Adaptor Port.
- Select the Software Testpoint On Off

- Now load the downloaded firmware package “UPDATE.APP”
- The software will start the flashing process. Wait for a few seconds or minutes to complete the process on your Huawei MediaPad M5. Do not remove your device.
- After the process, the device will enter factory mode.
- Now you can connect your device again by removing and connecting the USB cable again.
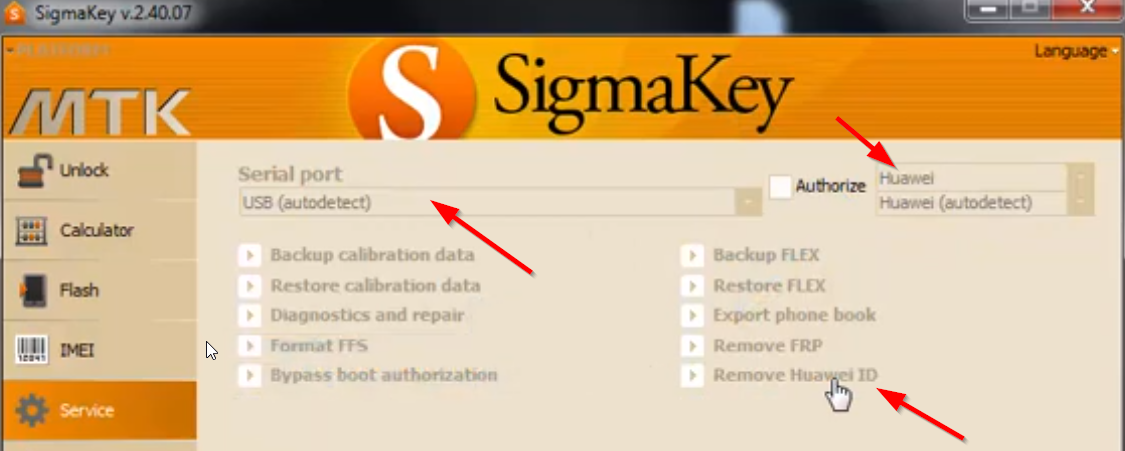
- Now under serial port, make sure you select USB (autodetect)
- Select Authorize has Huawei
- Tap on Remove Huawei ID.

- The process will begin to remove the firmware protection, also called FRP lock.
- After successfully removing the Huawei ID, you have to set the testpoint OFF. This will again revive the phone from factory mode to normal phone mode.
- Select the Serial Port as USB (autodetect), Authorize with device model, and then tap the Software Testpoint on/off.
- After completing the process, your device will be back to normal
That’s it, guys. We hope this guide was helpful to you. For additional queries, you can comment below.
