In this tutorial, we have listed out all the HyperX common problems and their solutions or fixes. HyperX is among the most reputable brand in the gaming industry. Its offerings span across Audio, SSDs, Headsets, Keyboards, Mouse, and other computer peripherals. Its Cloud series of headphones are among the best in this domain. However, it has its fair share of issues as well.
Some users have reported facing trouble with the headset upon connecting it to their PC. Furthermore, most of these issues seem to be happening with the Windows 10 PC. Along the same lines, some users have reported having a hard time with the brand’s SSD as well. In this tutorial, we will check out all the common HyperX problems and their solutions. Follow along for the complete instruction set.
HyperX Cloud Issues and their Fixes
HyperX Cloud boasts of some amazing headsets series with impressive features. However, it isn’t error-free. Fortunately, you don’t necessarily need to return it or go for the exchange. There are quite a few software side fixes that you could try out. This should rectify the issue in most of the cases. With that said, here are all the HyperX Cloud problems and their solutions.
Fix 1: Basic Fixes
Before heading over to the advanced fixes, here are some basic fixes that you should try out. On paper, they might sound along the obvious lines, but trust, more often than not, these handy tips are enough to fix most of the issues. So try out the below-mentioned tweaks right away:
- There is a USB Dongle with your gaming headset. That dongle comes with a small Mute button. Make sure you haven’t unintentionally pressed it. To check, simply press that button once again and see if it gives out desirable results or not.
- This dongle also comes with its own set of microphone control keys. You could try tweaking and adjusting the volume via those keys as well.
- Likewise, you could also try switching the USB ports from 3.0 to 2.0. Connecting the headset to the latter has worked out for some of the users.
- Some headsets also come with dedicated remote control. You could make use of the same to adjust the microphone sensitivity to the desired level.
if the above tweaks managed to rectify the issue, well and good. Otherwise, head over to our other HyperX common problems and their solutions that are given below.
Fix 2: Update Drivers
If you are using an old or outdated audio driver, then there might be quite a few issues with the headset. In that case, it is recommended to update the drivers to the latest version. Here is how it could be done:
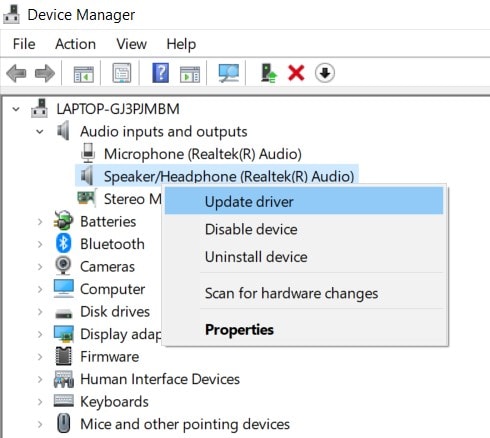
- Right-click on the Windows icon from the taskbar and select Device Manager.
- Click on the Audio, Input, and Driver section to expand it.
- Then right-click on your audio driver and select Update Driver from the menu.
- In the next menu that appears, select Search automatically for updated driver software.
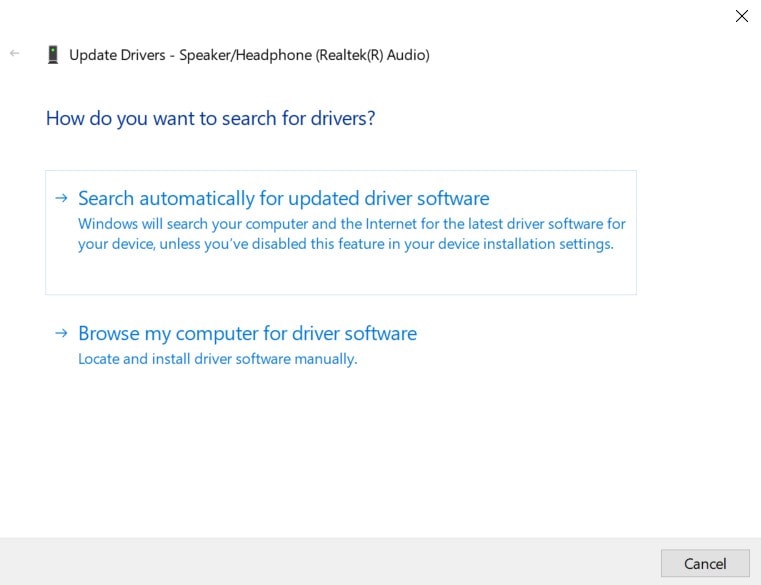
- Wait till Windows finds the latest available drivers. It will then download and install it onto your PC.
- Once that is done, restart your PC. Now check and see if the issue has been fixed or not.
Fix 3: Check Microphone Settings
You should also make sure that the microphone hasn’t been disabled or its settings haven’t been tweaked with.
- To do so, head over to the Control Panel from the Start menu.
- Then click on Hardware and Sound > Sound.
- Head over to the Recording tab and right-click on an empty space.
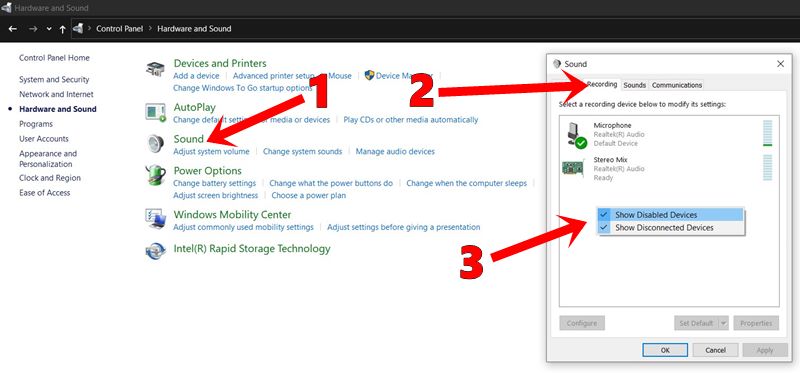
- Click on Show Disabled Devices and Show Disconnected Devices options.
- It will now display your microphone. Right-click on it and make sure to enable it, if it is disabled.
- If it is already enabled, you could disable it and then re-enable. Finally, click on Apply followed by OK.
If the issue persists, then you could check out some of the other HyperX Cloud common problems and their solutions, given below.
Fix 4: Use the Windows Sound Troubleshooter
If you are still unable to rectify the sound issues, then the in-build Windows Troubleshooter will come in handy. Here is how you could make full use of the same:
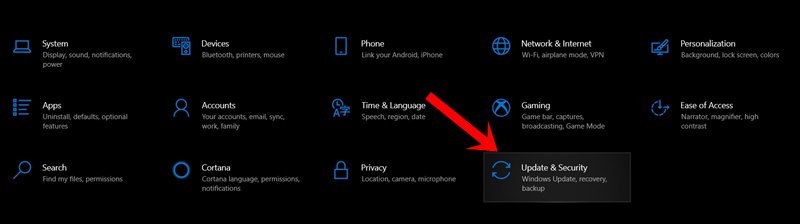
- Use the Windows+I shortcut key combinations to launch the Settings page. Within that, click on Update and Security.
- Then select the Troubleshoot option from the left menu bar.
- Scroll to the Recording Audio section and click on it to expand it.
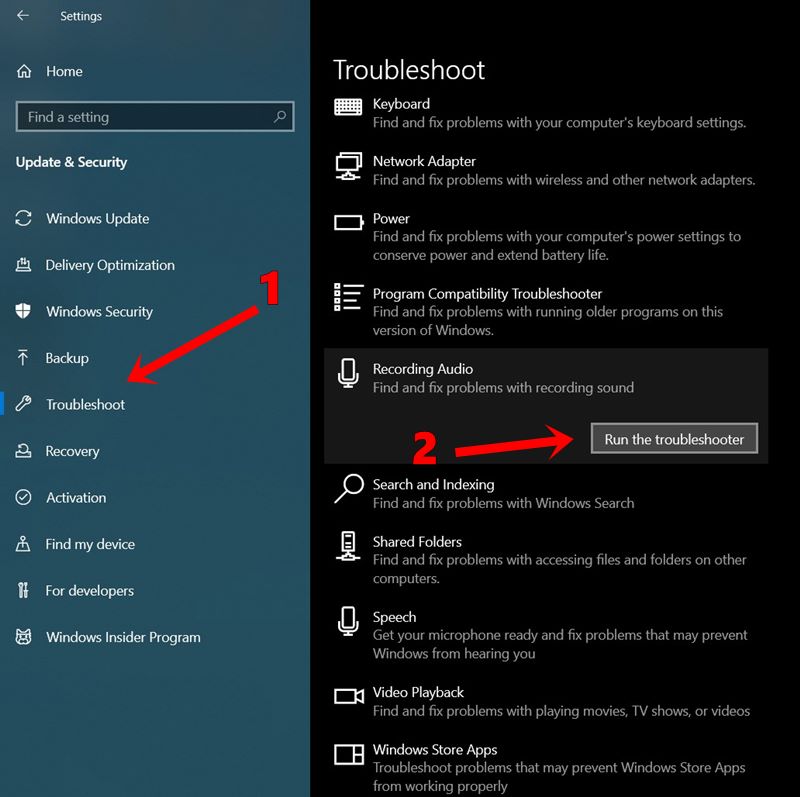
- Click on the Run the troubleshooter button. Follow the on-screen instructions as instructed. Once you have successfully completed the required steps, it should fix the issue with your headset.
Fix 5: Update Firmware
If the first fix of updating the general audio drivers didn’t give out the desired results, then you should consider installing the hardware-specific drivers. The HyperX website has all the required firmware files for all its set of Cloud headsets. So head over to the site’s Support section from the top menu bar.
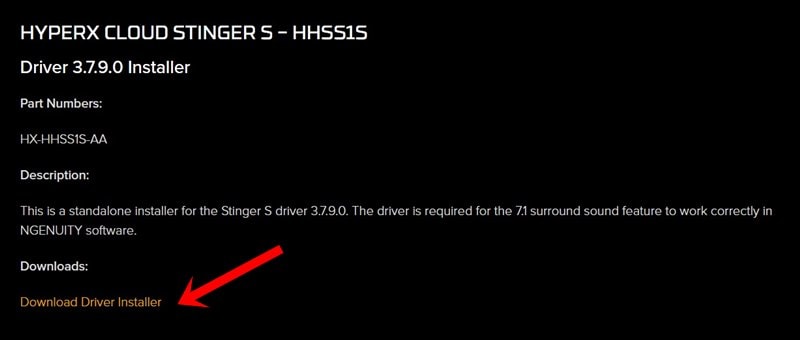
Then select your product and then click on the Download Driver Installer. Once downloaded, launch the setup and complete the installation steps. After this reboot your PC and it should fix your issues. With that said, here are some other HyperX Cloud common problems and their solutions that you should check out.
Fix 6: Reinstall Audio Drivers
This usually comes as a last-ditch effort. Even after updating the drivers didn’t manage to fix issues related to your headset, then you might consider reinstalling the audio drivers. For that, first of all, you will have to uninstall the drivers and it will then be re-installed automatically the next time you connect the headset.
- So head over to Device Manager on your PC.
- Go to the Audio, Input, and Driver section to expand it.
- Now right-click on your Audio Drivers and select Uninstall Device.
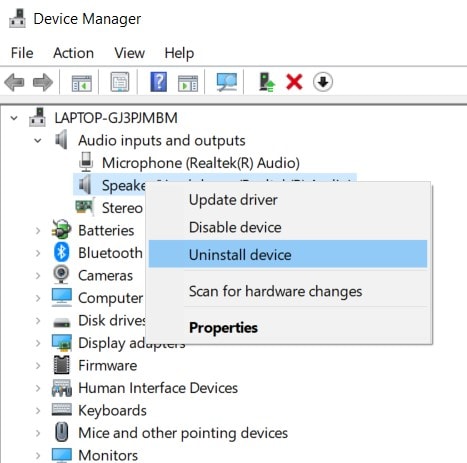
- Wait for the process to finish. After this, connect your headset to the PC and the drivers will be automatically re-installed.
Once that is done, restart your PC and the issues related to HyperX Cloud should have been fixed by now. Let’s now turn our attention towards HyperX Common problems and their solutions related to SSD.
HyperX SSD Issues and Fixes
As mentioned before, the brand doesn’t only excel in the headset but also has a slew of other peripherals lined up. Among them, some users seem to have been facing some issues with the SSD. So if you have purchased a HyperX Predator SSD and the latter is giving you a tough time, then its probably time to update your chipset’s drivers.
The chipset jobs are among the most important ones. It controls communications between the processor and external devices so that the latter is able to function properly on your PC. An outdated chipset might spell out trouble for many users. As a result, we would recommend you update the chipset drivers right away. For that, you will have to find out the complete information regarding your motherboard. Here are all the required steps for that:
- Head over to the Start menu and launch Command Prompt as an administrator.
- Now copy-paste the following command into the CMD window:
wmic baseboard get product,Manufacturer,version,serialnumber
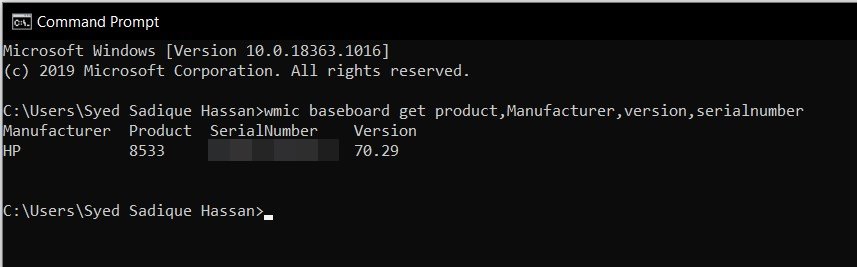
- Then go to your motherboard’s website and download and install the latest versions of the drivers.
- Once that is done, restart your PC. After this, you shouldn’t be facing any issues with the HyperX Predator SSD.
So this was all from the guide on HyperX common problems and their solutions. If you still have any queries, do let us know in the comments section below. Rounding off, here are some iPhone Tips and Tricks, PC tips and tricks, and Android Tips and Trick that you should check out as well.