Mortal Shell is one of the pretty ruthless and core-to-action RPG-based that offers role-playing video games. It’s developed by Cold Symmetry and published by Playstack in 2020. The game is available for Microsoft Windows, PlayStation 4, Xbox One platforms. However, some of the PC players experiencing plenty of issues with the Mortal Shell game like crashing, won’t launch issues or lags with FPS drops, black screen issues, stuck at the loading screen, and more. If you’re also facing the same, check this guide.
This is almost the same problem with most PC games where players may face multiple issues or errors with a new game. Additionally, the patch fixes also seem to be one of the reasons to bring more stability issues or errors to the game which isn’t expected at all. Luckily, we have got a couple of common fixes that are mentioned below in order to properly solve this issue.
PC users should also note that an outdated game version or client version or any pending Windows update or graphics driver update can cause these kinds of issues to the games. Therefore, we always recommend our readers stay updated with all the minor and major software updates whether it’s for the game or Windows OS, or anything else that’s related to the game. Make sure to check the PC configuration with the game’s system requirements as well.

Page Contents
- Why Does Mortal Shell Keep Crashing?
- Minimum System Requirements:
- Recommended System Requirements:
- Mortal Shell Crashing, Won’t Launch, or Lags with FPS drops: How to Fix
- 1. Run the game as admin
- 2. Update Graphics Drivers
- 3. Disable Steam Overlay
- 4. Adjust Discord Settings
- 5. Adjust Nvidia Control Panel Settings
- 6. Change AMD Control Panel Settings
- 7. Verify Mortal Shell Game Files via Steam Client
- 8. Uninstall Recent Windows 10 Update
- 9. Remove Temporary Files
- 10. Set Default CPU and Graphics Speed
- 11. Perform a Clean Boot
- 12. Exclude the game on antivirus
Why Does Mortal Shell Keep Crashing?
There may be a couple of reasons that can cause the Mortal Shell game keeps crashing whenever you launch it or the game loads. Such as:
- Your PC configuration doesn’t meet the system requirements of the game.
- Maybe there is an outdated DirectX version running on your PC.
- Pending Windows OS update.
- An outdated graphics driver version.
- Any background running overlay apps.
- Antivirus or Firewall issue.
Minimum System Requirements:
- Requires a 64-bit processor and operating system
- OS: Windows 7 SP1 or newer
- Processor: Intel Core i5-4590 or AMD FX 8350
- Memory: 8 GB RAM
- Graphics: NVIDIA GTX 970 or AMD Radeon R9 290
- Storage: 40 GB available space
Recommended System Requirements:
- Requires a 64-bit processor and operating system
- OS: Windows 10
- Processor: Intel Core i7 or AMD Ryzen 7
- Memory: 16 GB RAM
- Graphics: NVIDIA GTX 1070 or AMD Radeon RX Vega 56
- Storage: 40 GB available space
Mortal Shell Crashing, Won’t Launch, or Lags with FPS drops: How to Fix
Now, without wasting any more time, let’s jump into the steps below. Keep in mind that both the Nvidia and AMD graphics drivers are well optimized for the Mortal Shell game. So, if in case, you haven’t updated your graphics driver yet, do this first.
1. Run the game as admin
- Right-click on the Mortal Shell exe shortcut file on your PC.
- Now, select Properties > Click on the Compatibility tab.
- Make sure to click on the Run this program as an administrator checkbox to checkmark it.
- Click on Apply and select OK to save changes.
2. Update Graphics Drivers
If you’re using the Nvidia graphics card then update the GeForce Experience app on your PC from the Nvidia official site here. But if you’re using the AMD graphics card on your system, then update the latest AMD Drivers from here.
3. Disable Steam Overlay
- Open Steam on your Windows.
- Head over to the Settings > Click on the In-Game option.
- Click on the checkbox to disable “Enable the Steam Overlay while in-game“.
- Once the checkbox mark is removed, click on OK.
4. Adjust Discord Settings
- Launch Discord > Click on User Settings.
- Select Voice & Video from the left sidebar.
- Scroll down a bit and click on Advanced.
- Next, disable OpenH264 Video Codec provided by Cisco System, Inc.
- Then disable Enable Quality of Service High Packet Priority.
- Now, go to Overlay.
- You can also turn off the in-game overlay.
- Next, head over to Appearance.
- Go to Advanced.
- Disable Hardware Acceleration.
- Once done, restart the system.
5. Adjust Nvidia Control Panel Settings
- Click on Adjust image settings with preview under 3D settings.
- Select Use the advanced 3D image settings.
- Next, launch the Nvidia Control Panel.
- Click on Manage 3D settings > Go to Global Settings.
- Additionally, you can also adjust some of the other options:
- Disable Image Sharpening
- Enable Threaded Optimization
- Use Maximum Performance for Power Management
- Turn off Low Latency Mode
- Set Texture Filtering Quality to Performance mode
6. Change AMD Control Panel Settings
- Go to Global Graphics.
- Turn off Radeon Anti-Lag
- Turn off Radeon Boost
- Use Application settings for Anti-Aliasing Mode
- Set Anti-aliasing Method to Multi-sampling
- Turn off Morphological Filtering
- Disable Image Sharpening
- Turn off Anisotropic Filtering
- Use Performance mode for Texture Filtering Quality
- You can also enable Surface Format Optimization
- AMD Optimization for the Tesselation Mode
- Wait for V-sync – Turn it off
- Use AMD optimization for the Shader Cache
- Disable OpenGL Triple Buffering
- Turn off Maximum Tesselation Level
- Set Graphics for the GPU Workload
- Turn off the Radeon Chill
- Disable Frame Rate Target Control
7. Verify Mortal Shell Game Files via Steam Client
The Mortal Shell gamers on Steam can follow the below steps:
- Open the Steam Library by logging into the account.
- You can find the Mortal Shell game here.
- Right-click on the game and click on Properties
- Select the Local Files tab
- Then click on Verify Integrity of Game Files
- Wait for the process and then restart the game to check whether the issue has been fixed or not.
8. Uninstall Recent Windows 10 Update
A couple of days ago, Microsoft has released a new update for Windows 10 with KB4535996. So, this particular cumulative update for Windows 10 is quite buggy and causing so many errors or problems.
- Go to Start menu > Click on Settings
- Next, go to Update and Security
- Click on View update history
- Now, if you can see that there is an update having KB4535996 has been already installed. Make sure to uninstall it.
- Here you will see Uninstall updates option on the top of the page.
- Click on it and select the mentioned cumulative update version.
- Right-click on it > Select Uninstall.
- It may take some time to delete that update and your system may restart automatically.
- Have some patience and you can also manually reboot your Windows PC (if required).
9. Remove Temporary Files
- Press Windows key + R on your keyboard to open the RUN program.
- Now, type %temp% and press enter
- You will get a bunch of temporary files on a page.
- Select all files by pressing Ctrl + A on the keyboard.
Next, press Shift + Delete on the keyboard to remove all the files. - Sometimes some of the temporary files can’t be deleted. So, leave them as it is and close it.
10. Set Default CPU and Graphics Speed
Most users always want to use ultra-high performance from the CPU and GPU from the very first day. So, most of the users either buy an overclocked version or manually increased the overclocking speed. So, if you’ve also overclocked your GPU speed and after doing that you’re experiencing bottleneck or lagging or crashing-related issues, just set it to default mode.
You can also use the MSI Afterburner tool or Zotac firestorm application in order to lower the clocking speed. Once done, you can run the Mortal Shell game and check if the problem is fixed or not.
11. Perform a Clean Boot
- Press Windows + R keys to open the Run dialog box.
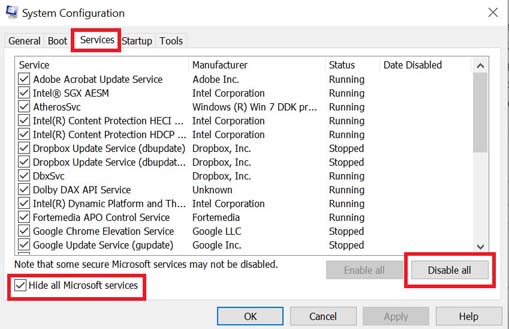
- Now, type msconfig and hit Enter to open the System Configuration window.
- Go to the Services tab > Enable the Hide all Microsoft services checkbox.

- Check all the services from the list and click on Disable all.
- Click on Apply and then OK to save changes.
- Go to the Startup tab > Select Open Task Manager.
- Under the Startup tab from Task Manager.
- Click on the individual task that you want to disable. Only disable the higher impactful tasks.
- Once selected, click on Disable. [Make sure to disable the startup process one by one]
- Finally, restart your PC to take effect immediately.
12. Exclude the game on antivirus
It’s recommended to exclude or whitelist the Mortal Shell game files on the antivirus or security software on your PC to allow the game to run properly. To do so:
For Windows Firewall:
- Press the Windows + I keys to open Windows Settings.
- Now, select Update & Security > Click on Windows Security from the left pane.
- Select Firewall & network protection > Click on Allow an app through firewall.
- Find and select the Mortal Shell game file > Make sure to checkmark Private, Domain, and Public Network Settings.
- Finally, click on OK to save changes.
For Windows Defender:
- Press the Windows + I keys to open Windows Settings.
- Select Update & Security > Click on Windows Security.
- Click on Virus & Threat Protection > Go to Manage settings.
- Click on Exclusions > Select Add or remove exclusions.
- Next, click on Add an exclusion > Select Folder.
- Make sure to browse the Mortal Shell game folder > Set the game exclusion.
- Once done, make sure to restart your computer to apply changes.
That’s it. We hope this guide was useful to you. You can comment below for any queries.
