Prefetch was introduced in the Windows system back when Windows XP was launched. It is a system service that works in the background taking up no power from the CPU. This service aims to improve the application loading time on a Windows system.
Prefetch is built into the Windows OS to improve the user experience. It is not a necessary system. So if you want to disable it, there will be no issues. But how does the prefetch actually work in a Windows system? Is it really good? If not, then how can you disable it? Let’s find the answers to all these questions in this article.

Page Contents
What is prefetch?
Prefetch is a Windows system service that silently fetches resources before an application in the future requires them. It creates a cache file where the resource information is stored. As soon as that application is launched, Windows comes back to this cache file and using the already fetched resources, and it ends up opening the application faster than usual. These cache files are created based on the daily behavior of the Windows user. It creates these cache files for all the applications that the user frequently opens up.
How does it work?
The windows system monitors the use of all the installed and system programs. Windows will create several small cache files in a specific prefetch folder depending on that information. So the next time the user opens up an application that he/she frequently uses, Windows will refer to these cache files in the prefetch folder, and it will speed up the loading of the application.
In the prefetch folder, a total of 128 entries can be made. The OS automatically keeps on refreshing these cache files, and there is no need for the user to mess with these files at all. Some people claim that cleaning up the prefetch folder speeds up the boot-up time and frees up the memory, but that is not true. The prefetch service does not even use any memory that needs to be cleaned up. It just simply uses the frequently used application’s data and creates a cache file out of it. If the user does not launch that specific application, then prefetch won’t come into effect. And if the user launches some other demanding application that is not there in the prefetch folder, it will simply take up any RAM it wants to function properly. The prefetch won’t interfere with that at all.
Where are the cache files stored?
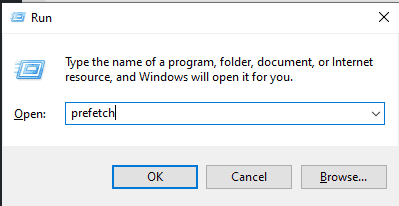
The cache files are stored in the prefetch folder of the Windows directory. To open it up,
- Press the Windows key + R to open up the Run dialog box.
- Enter “prefetch” in the box and click on Ok.

- The system will ask for permission to open up this directory. Grant it the required permission and the prefetch folder with all the cache files will show up.
How to disable prefetch?
Disabling the prefetch will only result in longer loading times for applications. But if you are facing specific issues such as 100% disk usage, which is a prefetch bug that affects some systems, consider disabling this service.
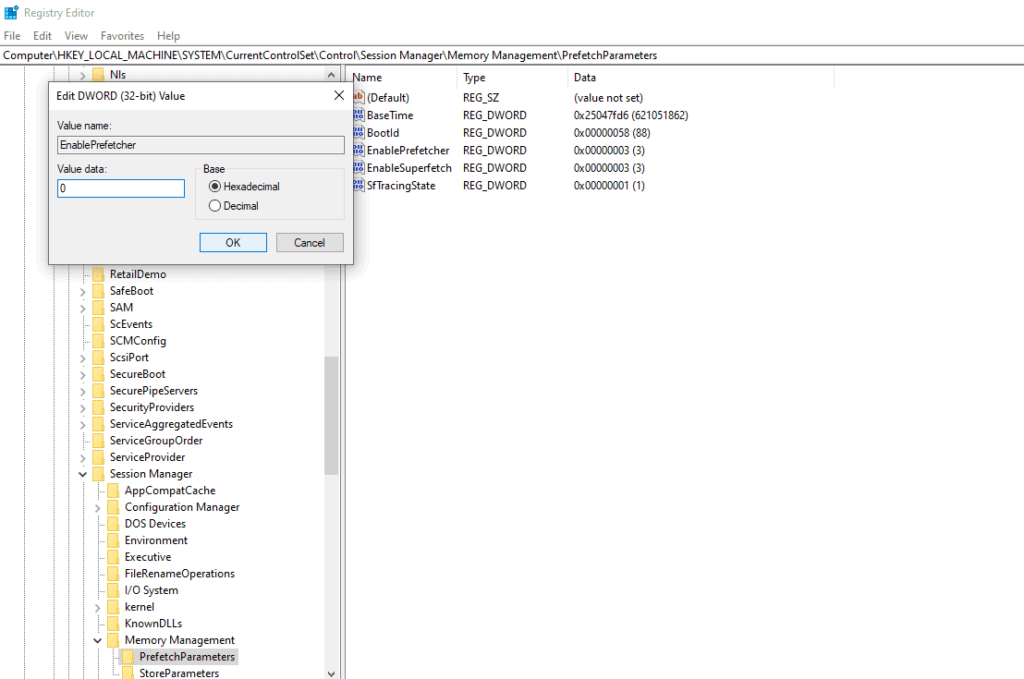
- Click on the search bar and search for ” Registry Editor.”
- Open it up once it shows up in the search results.
- Navigate to the following path:
HKEY_LOCAL_MACHINE\SYSTEM\CurrentControlSet\Control\Session Manager\Memory Management\PrefetchParameters
- Double-click on the “EnablePrefetcher” file.
- Set the value of this key to 0.

- Click on Ok, and you are done.
How to enable prefetch?
If you have prefetch disabled, your applications will take a while to load up. So to enable it,
- Click on the search bar and search for ” Registry Editor.”
- Open it up once it shows up in the search results.
- Navigate to the following path:
HKEY_LOCAL_MACHINE\SYSTEM\CurrentControlSet\Control\Session Manager\Memory Management\PrefetchParameters
- Double-click on the “EnablePrefetcher” file.
- Set the value of this key to 3.
- Click on Ok, and you are done.
So this is how you can enable or disable the prefetch function of Windows. If you have any questions or queries about this article, then comment down below, and we will get back to you. Also, be sure to check out our other articles on iPhone tips and tricks, Android tips and tricks, PC tips and tricks, and much more for more useful information.
