A webcam is one of the important components of any operating system. However, if it gets into an issue, it can create a setback in several important tasks. One of the common issues related to the computer’s Camera is the Webcam Keeps Turning Off and On Again.
The Webcam Keeps Turning Off and On Again issue has been reported by a lot of users recently. It is reported that when the webcam of the user keeps turning off and on again every few seconds, the said issue arises. There could be numerous reasons triggering the same; however, for every possible reason, we have a no-fail fix as well. Have a look:
Page Contents
- Fixes: “Webcam Keeps Turning Off and On Again” issue
- FIX 1: Run an Antivirus/Malware Scan:
- FIX 2: Install all the latest updates for Windows, Drivers, BIOS of Your System:
- FIX 3: Disable Power Saving for the Camera’s USB Port:
- FIX 4: Update / Reinstall the Windows 10 Camera App:
- FIX 5: Reinstall the Camera Driver:
- FIX 6: Rename the RsProviders Folder:
- FIX 7: Disable the Access to the Camera:
- FIX 8: Disable/Remove the Conflicting Applications:
- FIX 9: Edit the System’s Registry:
Fixes: “Webcam Keeps Turning Off and On Again” issue

Before you try on the detailed fixes in the article below, consider these quick workarounds and check whether they help or not:
- You can check whether the Webcam is not set as the default ‘video in’ for the streaming application.
- And check whether the camera works fine with another computer or not.
- Lastly, check whether the camera is directly connected to the system without using any extension cable or connection hub.
FIX 1: Run an Antivirus/Malware Scan:
In case your Webcam keeps turning off and on time by time, it is because your system is infected with some virus or malware. Here the best resolve is to run an Antivirus/Malware Scan, which will possibly stop the said issue and save your system from multiple other suspected errors as well. For running an Antivirus/Malware Scan, follow the steps given below:
Note: In case you are not able to perform an antivirus/ malware scan, then it is advisable to boot your system into the safe mode and thereafter try to run the scan again.
- To begin with, disconnect the internet from your system and then perform a Disk Clean-up. Consider removing Temporary files, Temporary internet files, and Offline webpages.
- Now perform an Antivirus scan using any reliable third-party software available online.
- Once the scanning process is completed, the “Webcam Keeps Turning Off and on” issue will get resolved quickly. However, if you find any virus or other detection during the scan, then it is advisable to connect with professionals further for clearing the same.
FIX 2: Install all the latest updates for Windows, Drivers, BIOS of Your System:
Outdated entities like Windows, Drivers, and the BIOS can create incompatibility with the operating system’s module triggering issues like “Webcam Keeps Turning Off and on.” Here, it is advisable to install all the latest updates for the same. Follow the steps given below:
For updating Windows:
- Firstly, go to the desktop search bar, type Check for Updates, and then press Enter. It will launch the Settings app with the Windows update screen.
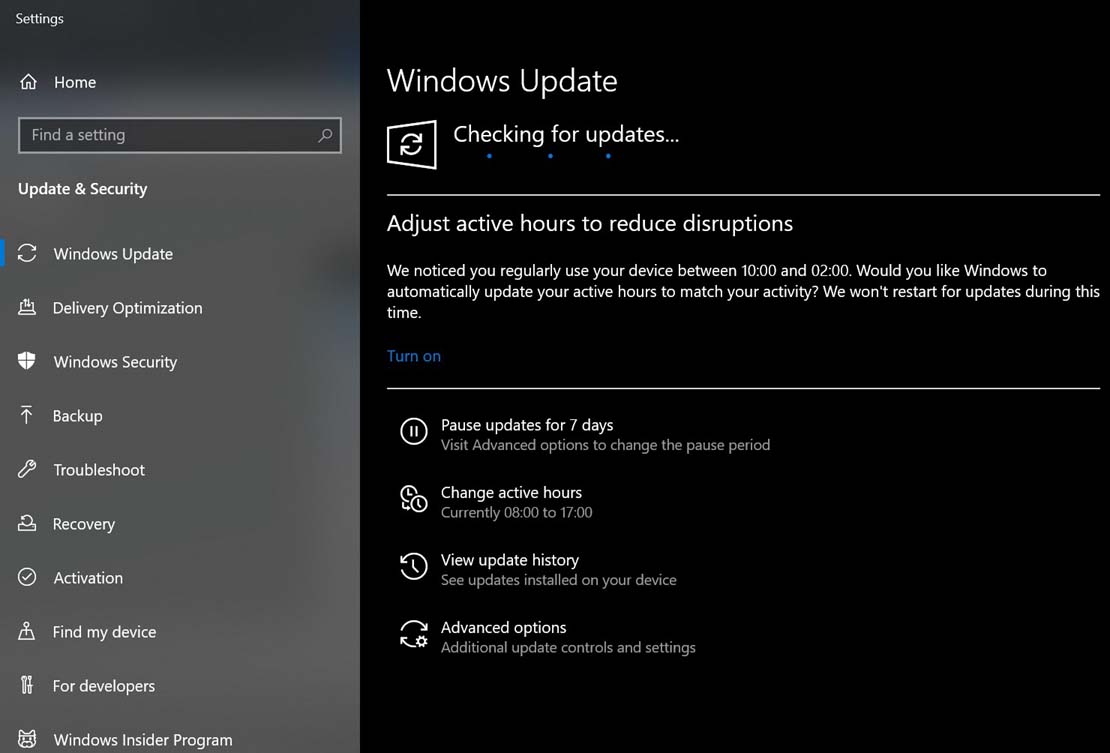
- Here on the right-pane menu, click over the Check for updates tab. Your system will now automatically look for any available updates and install them. The process might take some extended time.
- Once the update installation process gets completed, restart your computer.
Similarly, you can update the drivers one by one from the Device Manager window and the BIOS from its dedicated setting itself.
FIX 3: Disable Power Saving for the Camera’s USB Port:
In case your system is configured to power off the Camera’s USB port, it can also trigger the Webcam Keeps Turning Off and on error. Here, it is advisable to disable the power saving for the Camera’s USB port in order to resolve the issue. For doing so, follow the steps given below:
- Firstly, press Windows + X, and from the Quick access menu, select the option Device Manager.
- Now inside the Device Manager window, expand the option Universal Serial Bus Controllers and locate the USB port to which the Camera is attached. Here the user might require to disable every port one after the other in order to find out the right camera port.
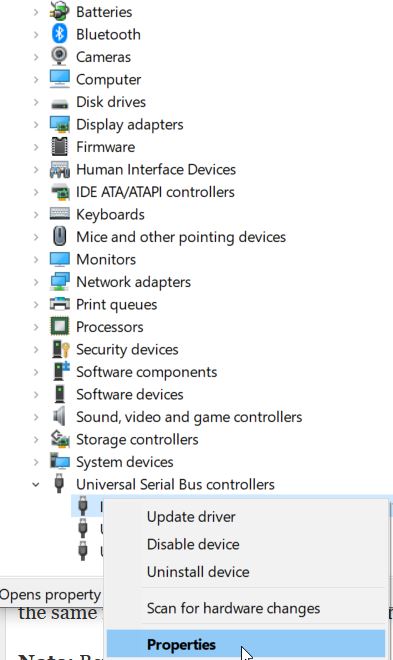
- Further, right-click over the correct camera port and select the option Properties from the sub-menu.
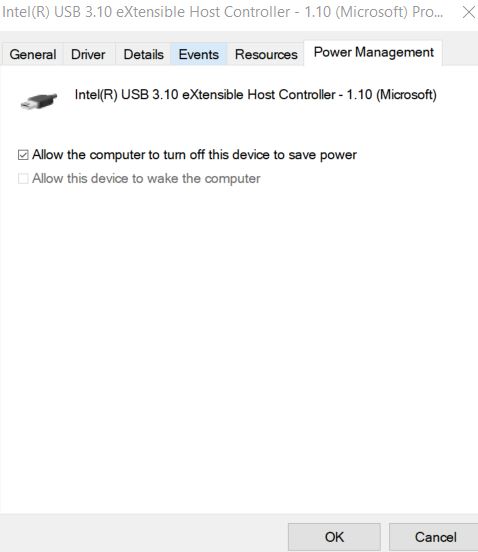
- Now on the Properties window, navigate to the Power Management from the vertical menu and then uncheck the tick box located before the option Allow the Computer to Turn Off This Device to Save Power.
- Finally, to apply the changes, restart your computer and then check whether the Camera works fine or not.
FIX 4: Update / Reinstall the Windows 10 Camera App:
If the Windows 10 Camera App is outdated, it might also trigger the Webcam Keeps Turning Off and on issue. Users who have encountered the same issue have suggested that updating, resetting, or reinstalling the Camera App on Windows 10 will possibly resolve the issue.
Note: Before you begin with the fix, make sure that there is no other third-party camera app installed in your system. If so, then consider uninstalling it beforehand.
For updating the Camera App:
- Firstly, go to the desktop search bar, type Camera, and locate the Camera app from the search results.
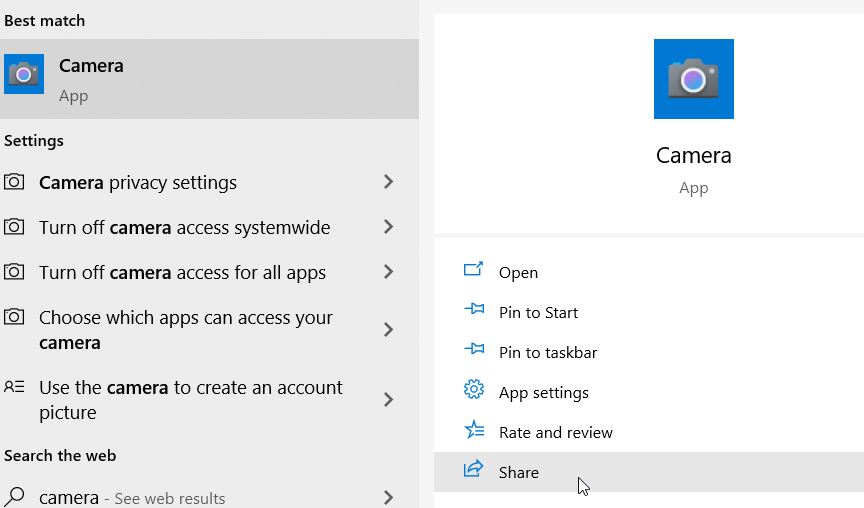
- Further, right-click over it and select the option Share from the Sub-menu. It will redirect you to the Microsoft Store’s page.
- Here skip the Share screen (if viewed) and then look at whether any update is available for the Camera app or not. If available, then consider updating the Camera app, and once the process gets completed, restart your computer.
Reset the Camera App to Default:
- Firstly, go to the desktop search bar, type Camera, and locate the Camera app from the search results.
- Further, right-click over it and select the option App settings from the Sub-menu.
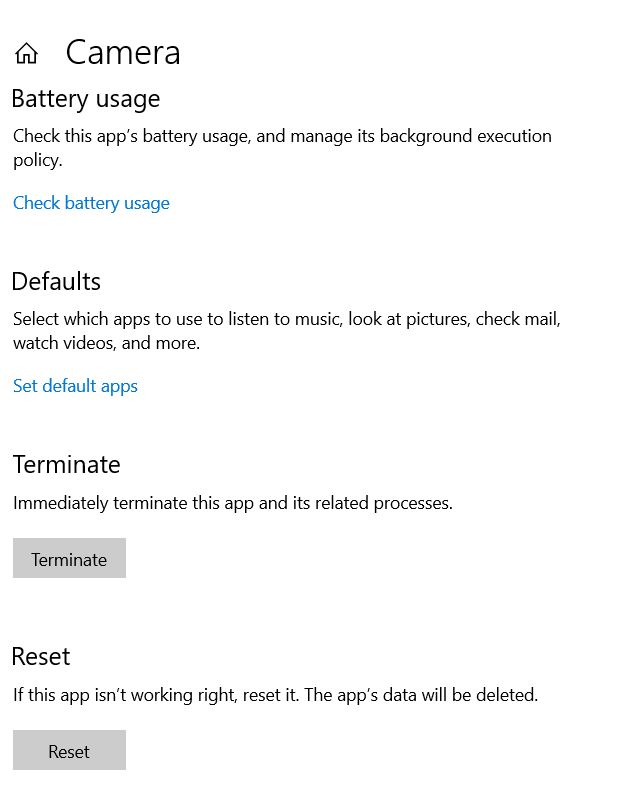
- Next, on the Settings window, click on the Terminate tab and then further click on the Reset tab.
- Now confirm to Reset the Camera app and then restart your computer.
Reinstall the Camera App:
- Firstly, right-click on the Windows start button and then select the option Windows PowerShell (Admin) from the context menu.
- On the PowerShell window, execute the following command and then press Enter.
Get-AppxPackage Microsoft.WindowsCamera | Remove-AppxPackage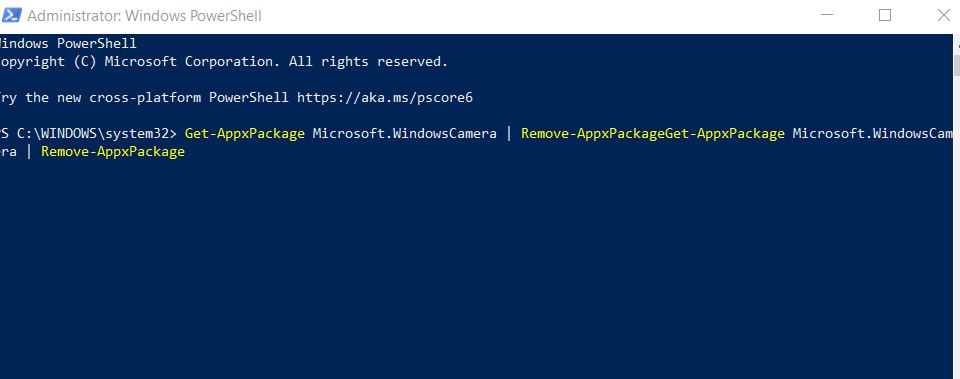
- Now once the Camera app is removed, restart your computer. Further, reinstall the Camera app either from the Microsoft Store or execute the following command in the Windows PowerShell (Admin) again:
Get-AppxPackage -allusers Microsoft.WindowsCamera | Foreach {Add-AppxPackage -DisableDevelopmentMode -Register “$($_.InstallLocation)\AppXManifest.xml”}
- Finally, once the Camera app is reinstalled, restart your computer and check whether the said issue got resolved or not.
FIX 5: Reinstall the Camera Driver:
At times when the installation of your Camera driver is corrupt, it can possibly create the Webcam keeps turning off and on the issue. Here it is advisable to reinstall the Camera driver and check whether it helps or not. For doing so, follow the steps given below:
Note: Before you begin with the steps, consider downloading the latest version of the camera driver from the OEM website.
- Firstly right-click on the Windows start button and select the option Device Manager from the context menu.
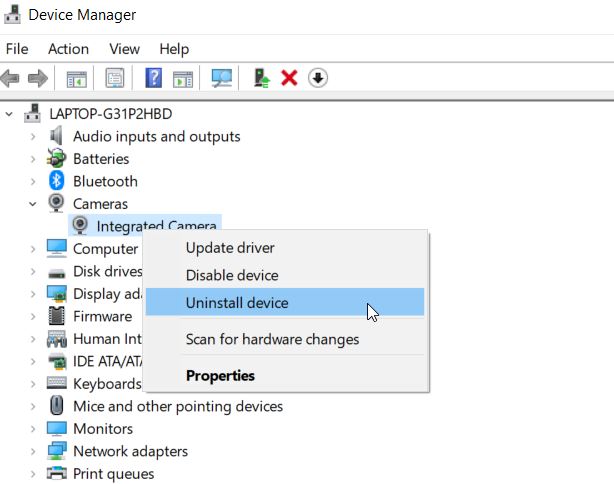
- Now on the Device Manager window, expand the option Cameras and then right-click over your Camera. Here select the option Uninstall and tick the checkbox before the option Delete the Driver Software for This Device.
- Further, click on the Uninstall button and wait for the process to get completed.
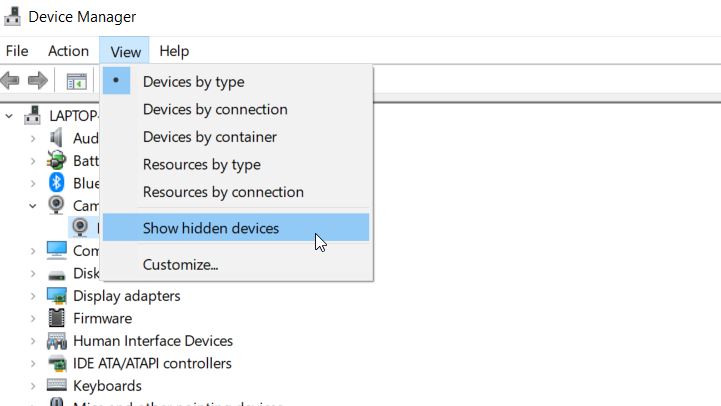
- Now again, on the Device Manager main window, navigate to the View menu from the top vertical bar and then select the option Show Hidden Devices.
- After that, remove all the rogue devices including, audio, video, and camera devices. Also, if there’s another camera shown in the Device Manager window, consider removing it as well.
- Now restart your computer. Windows here will automatically install all the missing drivers, including the Camera driver as well. However, if not, you can do the same manually as well.
- Once done, check whether the said issue got resolved or not.
FIX 6: Rename the RsProviders Folder:
RsProviders is an essential folder for the Camera app, and if the folder in itself is corrupt, it can possibly end you with the “Webcam Keeps Turning Off and On Again” issue. Though this folder is not available to all the users, in case you have the same, consider renaming it and check whether it helps or not. For doing so, follow the steps given below:
- Firstly, launch the Run dialogue box by pressing Windows + R altogether.
- Now within the Run prompt, inside the empty text space, enter or copy + paste the following command and then press Enter.
\Program Files\Realtek
- On the next screen, right-click over the RsProviders folder and select the option Rename from the sub-menu. Here rename the folder as RsProviders_backup or anything similar. However, in case you are not able to do the same, then consider force close the Realtek process in the Task Manager and then again retry to rename it.
- Once done, restart your computer and check whether the said issue got resolved or not.
- In case it is still the same, then ensure that the above-mentioned folder is renamed and thereafter consider copying the same folder from another trusted source.
- Lastly, again restart your computer and check whether the said issue got resolved or not.
FIX 7: Disable the Access to the Camera:
At times when any of the system’s processes/applications are accessing the Camera, it can possibly trigger the “Webcam Keeps Turning Off and On Again” issue. Here is advisable to disable the Camera access in the privacy settings. For doing so, follow the steps given below:
- Firstly right-click on the Windows start button and select the option Settings from the context menu.
- Within the Settings window, navigate to Privacy. Inside the Privacy window, on the left-pane menu, navigate to the option Camera.
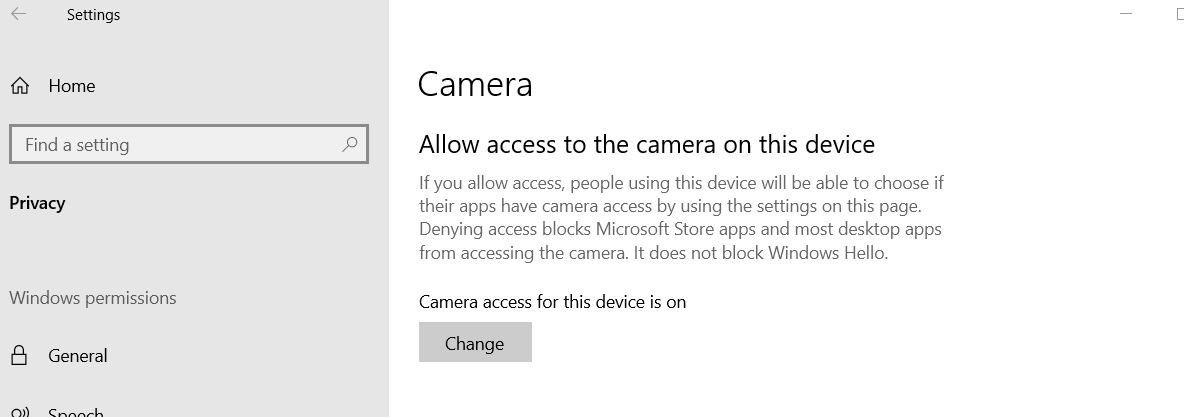
- Thereafter on the right-pane menu under the Camera Access for This Device, click over the Change tab and then toggle off the blue switch in order to disable it.

- Further under the Allow Apps to Access Your Camera, toggle off the switch to disable it.

- Then, under the Allow Desktop Apps to Access Your Camera option toggle off the switch to disable it.
- Finally, restart your system and check whether it has helped or not.
NOTE: It is advisable to check if your Original Equipment Manufacturer (OEM) uses any utility in order to manage the devices & their access. Further, Check if disabling the access to the Camera in the utility settings resolves all the issues regarding the camera app. However, if not, then disable the Camera either in the system’s BIOS or in Task Manager. As well as, when you need to use the Camera, you may need to enable it.
FIX 8: Disable/Remove the Conflicting Applications:
When any of the software or application creates a conflicting situation with the camera settings, it can usually lead to the Webcam Keeps Turning Off and On Again issue. Here the best resolve is disabling/ removing those applications. For doing so, follow the steps given below:
To locate the problematic processes/ applications:
- Consider performing a Clean boot into your system. It alone will resolve the issue.
- Now, if it gets resolved, then consider enabling the processes/applications again which were disabled during the Clean boot process. Enable one after the other until and unless you find the one responsible for creating the conflict and triggering the issue.
After you find out the problematic processes/ applications, then follow any of the solutions given below:
- Navigate to the Task Manager and End that application process.
- Uninstall the application.
- Consider disabling the Camera-related options in that application.
- You can stop the application at the system’s startup
FIX 9: Edit the System’s Registry:
If none of the above fixes worked for you, then we recommend you edit the system’s registry. For doing so, follow the steps given below:
Note: Before you begin with the steps, it is advisable to back up your system’s registry.
- Firstly, navigate to the Windows search bar and type Registry Editor.
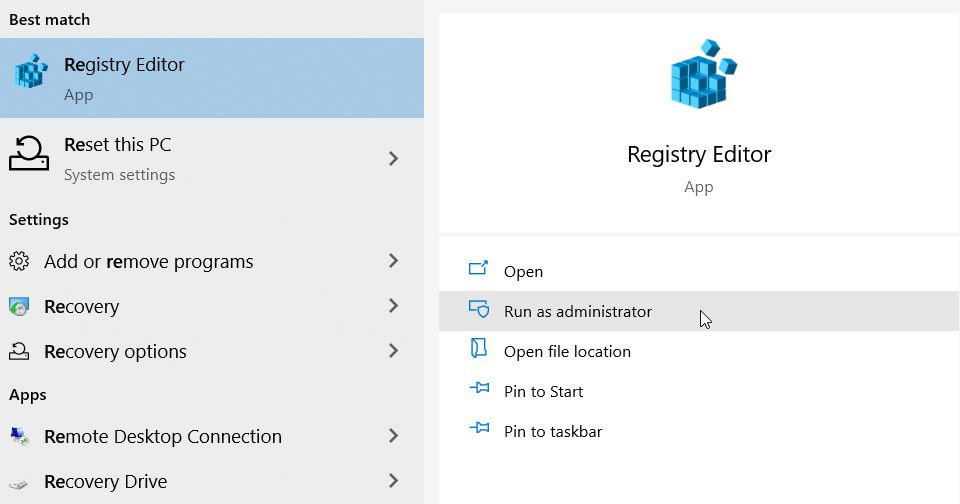
- Now go to the relevant search result, right-click over it, and select the option Run as Administrator.
- Further on the registry editors window, navigate to the following path,
HKEY_LOCAL_MACHINE\SOFTWARE\Microsoft\Windows Media Foundation\Platform
- After that, in the left pane menu, right-click over the option Platform and then select New > Dword (32-bit) Value.
- Now rename the folder as EnableFrameServerMode and change the value to Numeric 0.
- Further, repeat the same process within the following path,
HKEY_LOCAL_MACHINE\SOFTWARE\WOW6432Node\Microsoft\Windows Media Foundation\Platform
- Once done, restart your computer, and the issue would have got resolved by now.
These were all the tried, tested, and proven fixes for the “Webcam Keeps Turning Off and On Again” issue. It might be a common issue, but it can create great setbacks to several important works of the users.
If none of the above-mentioned fixes worked for you, then it indicates that the issue is related to hardware, and thus it is advisable to connect with a hardware professional in order to get it sorted soon. If you have any queries or feedback, please write down the comment in the below comment box.
