Windows Explorer has a preview pane on the right of every window. It is a built-in Windows feature that lets a user get a sneak peek at the content selected in the explorer. It gives the user a preview that gives information about the file without actually opening it. This feature works with images, text, PDF files, videos, and Microsoft documents. The user needs to click on these files, and the preview pane on the right will show up the content.
However, recently many Windows 10 users have complained and reported that they are facing issues with this particular feature. These users are either not seeing a preview of some files in the preview pane, or the preview pane area is completely greyed out. If you are someone who is facing this issue, this article will help you out. Here in this article, we will take a look at all the possible solutions for this particular problem, and surely one of them will work out for you. So without any further ado, let’s get into it.
Page Contents
How to fix Preview Pane Not Working in Windows 10?
The preview pane is certainly useful when dealing with multiple files, and you don’t want to open all of these files while working on them. So try the solutions mentioned below, one after the other, until one solves your problem.
Enable Preview Pane:
The preview pane feature might be disabled in your system.
- Press Windows key + E, and it will open up the Windows Explorer.
- Click on the View option on top and then check whether the “Preview Pane” option is highlighted or not. If it is highlighted, then it is turned on, in which case you don’t need to do anything.
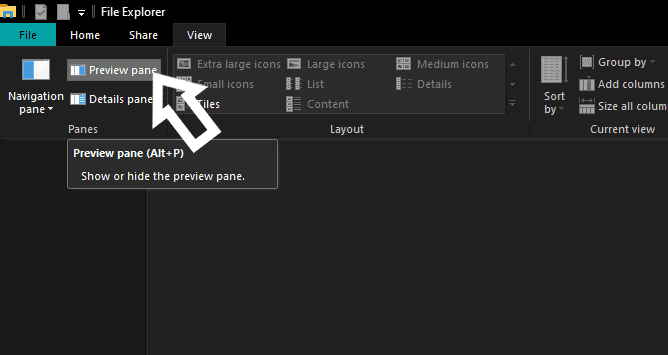
- If it is not highlighted, click on it and then the feature will be enabled.
Once you click on Preview Pane, you will see the preview pane show up right away on the right of your Windows Explorer window.
Enable Show Preview Handlers:
You need to enable the feature of showing preview handlers in the preview pane. This option is present in the Folder Options window.
- Press Windows key + E, and it will open up the Windows Explorer.
- Click on the View option on top and then click on “Options.”
- The Folder options Window will show up. Here, click on the View tab.
- Under Advanced settings, check the box next to “Show preview handlers in preview pane.”
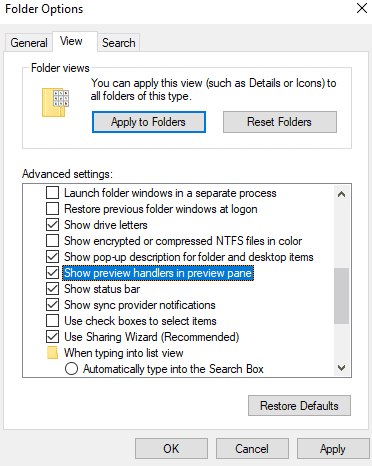
- Click on Apply and then click on Ok.
- Restart your computer.
Now you should see the preview pane working fine in your Explorer windows. If you are still having problems with the preview pane, try the next solution.
Disable Always Show Icon settings:
You need to disable the feature to always show icon settings in Explorer as that can sometimes cause the preview pane not to work properly.
- Press Windows key + E, and it will open up the Windows Explorer.
- Click on the View option on top and then click on “Options.”
- The Folder options Window will show up. Here, click on the View tab.
- Under Advanced settings, uncheck the box next to “Always show icons, never thumbnails.”
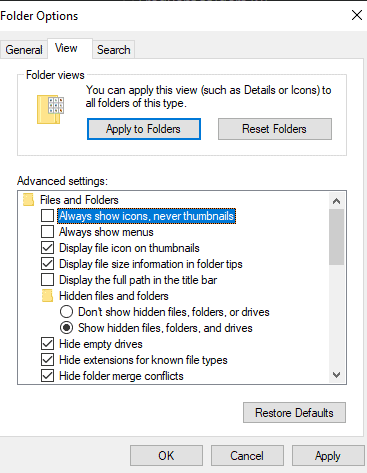
- Click on Apply and then click on Ok.
- Restart your computer.
Now you should see the preview pane working fine in your Explorer windows. If you are still having problems with the preview pane, try the next solution.
Change Visual Effects settings:
Changing the settings for visual effects sometimes fixes all preview pane related issues.
- Press Windows Key + R, and it will open up the Run dialog box.
- Enter “sysdm.cpl” here and then click on Ok.
- The system properties window will open up. Here, go to the Advanced tab and then click on Settings.
- In the visual effects tab of the performance options, choose “Adjust for best appearance.”
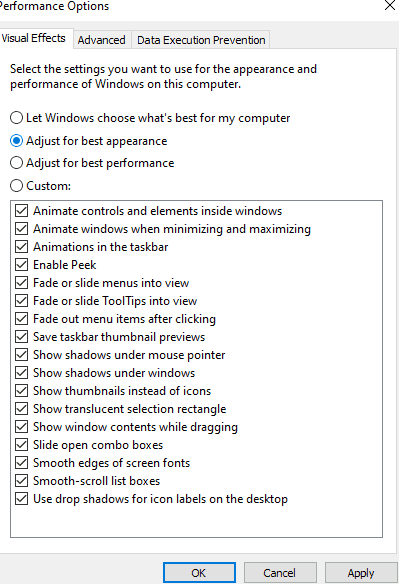
- Click on Apply and then click on Ok.
Now you should see the preview pane working properly in your Explorer windows. If you are still having troubles with the preview pane, try the next fix.
Run System File Checker:
System File Checker or SFC is a built-in Windows utility that scans your computer for any corrupted or missing system files. If any corrupted files are detected, the utility fixes them.
- Press Windows Key + R, and it will open up the Run dialog box.
- Enter “cmd” here and then press Ctrl+Shift+Enter.
- In the command prompt window, enter the following command, then press Enter.
sfc /scannow
- Wait for the process to complete, and then close the command prompt window.
- Restart your computer.
Now check whether you can preview files in the preview pane or not. If you are still having troubles with the preview pane, try the next solution.
Change the File Explorer Startup Mode:
There have been discussions in the Microsoft Forum where users have revealed that making File Explorer open to This PC instead of Quick Access fixes the preview pane not working problem. This setting is also in the folder options window.
- Press Windows key + E, and it will open up the Windows Explorer.
- Click on the View option on top and then click on “Options.”
- The Folder options Window will show up. Here, click on the General tab.
- Click on the drop-down menu next to “Open File Explorer to:” and choose “This PC.”
- Click on Apply and then click on Ok.
- Restart your computer.
Now check whether you can preview files in the preview pane or not. If you are still having troubles with the preview pane, try the next solution.
Reset Folder Options:
Resetting the folder options settings is a quick way to fix any possible setting that may be preventing the preview pane from functioning properly.
- Press Windows key + E, and it will open up the Windows Explorer.
- Click on the View option on top and then click on “Options.”
- The Folder options Window will show up. Here, click on the General tab.
- Click on the “Restore Defaults” option down below.
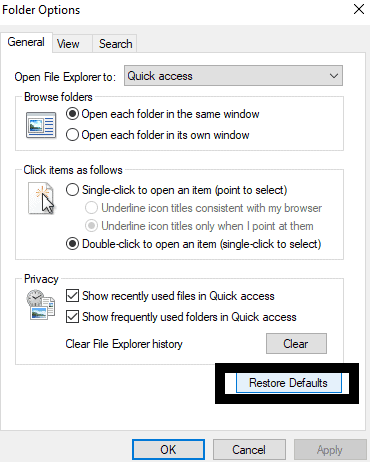
- Then click on the View tab.
- Again, click on the “Restore Defaults” option down below.
- Click on Apply and then click on Ok.
- Restart your computer.
Use PreviewConfig:
If none of the above solutions worked for you, then third-party applications are your only choice. There is an application called PreviewConfig that lets you customize and add file types you want to view in the preview pane. You can even make adjustments to select what kind of a preview you want for each file type. If for any file type, the Preview Type is set to another, you can fix it using PreviewConfig.
Use QuickLook:
Another third party that you can consider is QuickLook. This is like a separate application that acts as a replacement for the preview pane. Just like the preview pane, this will also show a preview of the file when you press the Spacebar on your keyboard. If none of the solutions mentioned above work, you can consider this particular application as a replacement.
This is how you can fix Preview Pane not working issue in Windows 10. If you have any questions or queries about this article, then comment down below, and we will get back to you. Also, be sure to check out our other articles on iPhone tips and tricks, Android tips and tricks, PC tips and tricks, and much more for more useful information.
