In this tutorial, we will show you how to activate the Biometric (Fingerprint, Face, or Iris Scanner) in Google Autofill. Near about every one of you might be using this autofill service on your Android devices. The tons of associated perks that it brings with itself might compel the device owners to try out this offering from Google. For example, you no longer need to remember your credentials from across the plethora of sites that you have logged in.
Furthermore, it also saves your efforts from typing in your complete address, phone number among other details. You simply have to tap on the desired field, and Google will then do its job (granted you have approved the same). Likewise, it could save all your preferred payment methods as well. While all this definitely scores high in the ease of usage factor, there exists a glaring security concern.
The thing with these autofill information is the fact that they aren’t protected by any additional security measures. Once your device is unlocked, anyone could then get hold of these data. But all this is about to change, and for good. With the latest updates to its Play Services, Google has added the biometrics options in its Autofill menu, and in this guide, we will show you how to activate the same. So without further ado, let’s begin.

How to Activate Biometric in Google Autofill
The new biometric authentication in the autofill section is definitely a welcome move on the parts of the Silicon Valley Giants. In this regard, they have added three verifications methods- via Fingerprint, Face, and Iris Scanner. It ultimately boils down as to which security measure does your device supports, as Iris Scanner might not be present across many Android devices. However, we guess the FIngerprint is something that a lot of the users could make full use of. On that note, here are the steps to Activate Biometric in Google Autofill. Follow along.
- Head over to the Play Store and update the Google Play Services to the latest version.
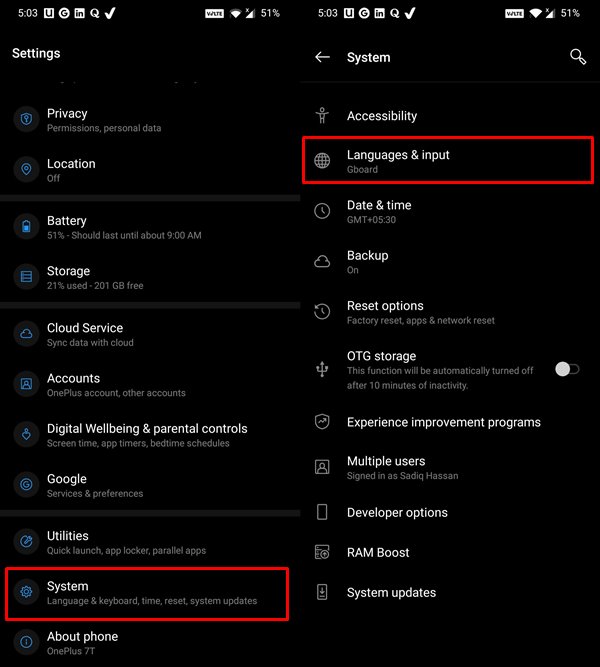
- Then on your Android device, go to the Settings page. Within that go to System.

- Navigate to Languages and Input.
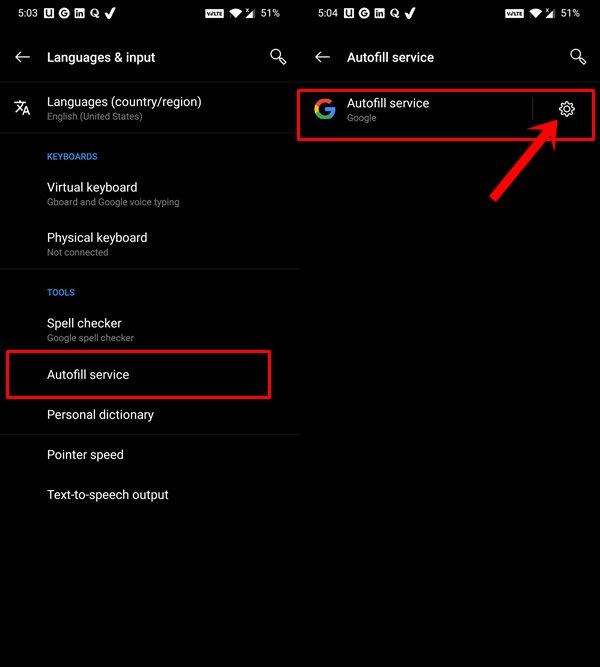
- Then tap on Advanced followed by Autofill service.

- You should then see a Settings icon (cogwheel) next to Google’s Autofill service, tap on it,
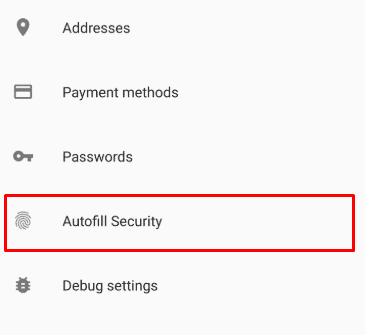
- There you should see the Autofill Security option.

- Head over to that menu and enable the Credentials toggle.

That’s it. These were the steps to activate the Biometric (Fingerprint, Face, or Iris Scanner) in Google Autofill. One thing worth mentioning is the fact that even if you are running the latest Google Play Service version 20.33.13, some of you might still not see the Autofill Security option. Being a server-side update, it is rolling out in batches. This is how most of the Google updates are released and shouldn’t come as a surprise to anyone.
If you wish to skip the queue, you could try sideloading the 20.33.13 beta APK from the APK Mirror. Although there isn’t any assurance that the feature will definitely become available, yet the chances might be high on this beta build. On that note, if you are among the early adopters of this update, do let us know your views in the comments about this additional security measure. Rounding off, here are some iPhone Tips and Tricks, PC tips and tricks, and Android Tips and Trick that you should check out as well.
