CD Projekt Red has recently rolled out Cyberpunk 2077 update 2.0 across all platforms like PC, PlayStation, and Xbox Series X|S. Though the update 2.0 includes plenty of improvements and new features, specific to the PS5 & Xbox Series X changes, several players are experiencing a lot of issues after installing the latest update. After 2.0 update, Cyberpunk 2077 keeps crashing on PC specifically which becomes quite consistent. As this issue feels irritating, affected players are storming online forums.
If we take a quick look at the Cyberpunk 2077 Update 2.0 patch notes, this free new 2.0 update brings an overhaul to a number of gameplay mechanics and core game features. Interestingly, using the previous mods on the PC might trouble players. That’s why Cyberpunk 2077 developers are claiming to uninstall previously installed mods on the PC to avoid further issues or crashes because outdated mods can disrupt the overall experience and they’re not tested. So, it can be another reason.

Page Contents
- After 2.0 Update, Cyberpunk 2077 Keeps Crashing on PC: How to Fix?
- 1. Check the Updated System Requirements
- 2. Revert to an Earlier Version
- 3. Run Cyberpunk 2077 as an Administrator
- 4. Check for Cyberpunk 2077 Updates
- 5. Scan and Repair the Game Files
- 6. Perform a Clean Boot
- 7. Update the Graphics Driver
- 8. Uninstall Older Mods
- 9. Delete the usersettings.json File
- 10. Disable HyperThreading
After 2.0 Update, Cyberpunk 2077 Keeps Crashing on PC: How to Fix?
As per multiple reports, after downloading and installing Update 2.0 on Cyberpunk 2077, it simply crashes on the desktop with the following error that says “Pattern fail 40 53 48 83 ec 20 33 c0 c6 1 0 found : 0 expected : 4 wc: cc”. Affected players have also verified the game files after installing the patch update but nothing seems to be working at their end. Well, there are some limitations coming with the new 2.0 Update it seems that players need to understand.
Luckily, here we’ve shared with you a couple of possible workarounds that should come in handy. Make sure to follow all troubleshooting methods until the problem has been fixed. So, without further ado, let’s jump into it.
1. Check the Updated System Requirements
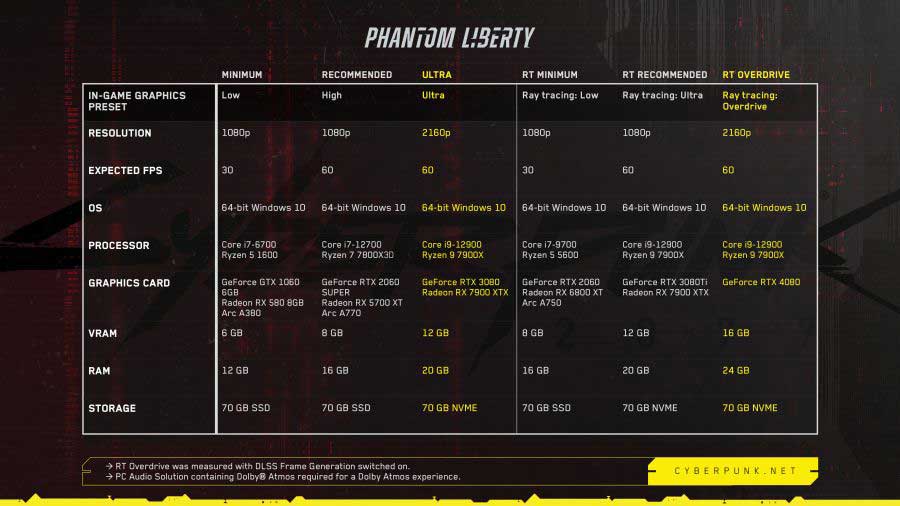
With the release of the Cyberpunk 2077 Update 2.0 patch, it seems that CD Projekt RED has changed the system requirements for the PC version which will play a major role in smoother launching and better gaming experience. Check out the screenshot of the updated system requirements below.
Please Note: An SSD is now required to run the Cyberpunk 2077 (Update 2.0) game. So, do keep in mind that the game has been installed on an SSD drive. If not then uninstall the game and reinstall it on an SSD. While getting the ultra-performance, using an NVME SSD is recommended now.

So, fulfilling the requirements of the PC specifications is crucial to run Cyberpunk 2077 after Update 2.0 no matter what you used earlier.
2. Revert to an Earlier Version
Do keep in mind that only the latest version of the game is officially supported. But affected players can revert back to a previous version of Cyberpunk 2077 at their own responsibility if they’re encountering issues with the Update 2.0 right now. To do so:
For Steam:
- Open Steam > Go to Library.
- Right-click on Cyberpunk 2077.
- Select Properties > Go to BETAS.
- Select 1_63_legacy_patch and the game will update automatically.
To return to the newest version of the game, just follow the same steps, and select None in the BETAS menu.
For GOG:
- Open GOG on the PC > Go to the Installed section on GOG Galaxy.
- Select Cyberpunk 2077 > Click on Manage Installation.
- Choose Configure… > Change the Beta Channels to 1_63_legacy_patch.
- Disable the auto-updates option.
- Now, choose your preferred version > Click on OK.
To return to the newest version of the game, just follow the same steps, and select Disabled in the Beta Channels menu.
3. Run Cyberpunk 2077 as an Administrator
Make sure to run the game exe file as an administrator to avoid user account control regarding privilege issues. You should also run the Steam or GOG client as an administrator on your PC to avoid any further issues whatsoever. To do this:
- Right-click on the Cyberpunk 2077 exe application on your PC.
- Now, select Properties > Click on the Compatibility tab.
- Click on the Run this program as an administrator checkbox to enable it.
- Now, click on Apply > Select OK to save changes.
4. Check for Cyberpunk 2077 Updates
You can try checking whether the affected game is updated to the latest version. An outdated game version can eventually trigger multiple issues with the performance. To do so:
For Steam:
- Open the Steam client > Go to Library.
- Click on Cyberpunk 2077 from the left pane.
- It’ll automatically search for the available update.
- If there is an update available, make sure to click on Update.
- Wait for some time to install the update.
- Once done, make sure to close the Steam client.
- Finally, reboot your PC to apply changes.
For GOG GALAXY:
- Launch GOG GALAXY on the PC.
- Now, make sure to log in with your valid GOG account.
- Go to Library > Click on the Cyberpunk 2077 game.
- Click on the Customize button (next to the Play button).
- Select Check for updates from the list.
- If the new update is available, proceed to it.
- Once done, reboot the PC to apply changes.
5. Scan and Repair the Game Files
In case, there is an issue with the game launching or crashing during the gameplay sessions then ensure to follow the steps below to scan and repair the game files. Mostly, corrupted or missing game files on the PC might trigger multiple issues whatsoever.
For Steam:
- Launch Steam > Click on Library.
- Right-click on Cyberpunk 2077 from the list of installed games.
- Now, click on Properties > Go to Local Files.
- Click on Verify Integrity of Game Files.
- You’ll have to wait for the process until it gets completed.
- Once done, restart your computer.
For GOG GALAXY:
- Launch GOG GALAXY on the PC.
- Now, make sure to log in with your valid GOG account.
- Go to Library > Click on the Cyberpunk 2077 game.
- Click on the Customize button (next to the Play button).
- Select Manage Installation > Click on Verify / Repair.
- Wait for a while to complete the repair process.
- Once done, relaunch the GOG Galaxy, and run the game again.
6. Perform a Clean Boot
Multiple reports did claim that several third-party programs are always running in the background from the Windows boot. So, performing a clean boot and disabling conflicting startup apps will be crucial enough to get better performance.
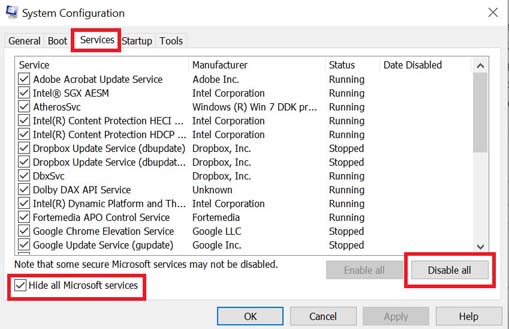
- Press the Win+R keys to open the Run dialogue box.
- Now, type msconfig and hit Enter to open System Configuration.
- Go to the Services tab > Enable the Hide all Microsoft services checkbox.

- Click on Disable all > Click on Apply and then OK to save changes.
- Now, go to the Startup tab > Click on Open Task Manager.
- Click on the Startup tab from Task Manager.
- Make sure to click on the particular task that has a higher startup impact.
- Once selected, click on Disable to turn it off. [Do the same steps for each program that has a higher startup impact]
- Finally, make sure to restart your computer to apply changes.
7. Update the Graphics Driver
You can try updating the graphics driver on your PC by following the steps below to ensure that there is no issue with the outdated or missing graphics driver. If your PC does have an outdated GPU driver then make sure to update it.
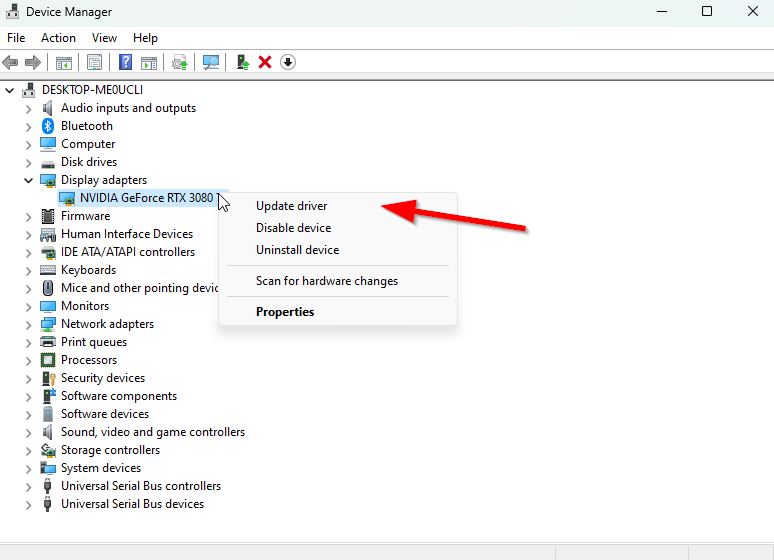
- Right-click on the Start Menu on the Taskbar.
- Click on Device Manager from the list.
- Double-click on the Display Adapters option to expand the list.
- Next, right-click on the graphics card.

- Select Update driver > Choose to Search automatically for drivers.
- If there is an update available for the GPU driver, it’ll automatically download & install the update.
- Let the process be completed > Once done, reboot your PC to apply changes.
If there is no update available for your GPU card then you can go to the official graphics card website from the links below and search for the model of your graphics manually. Make sure to download and install the latest graphics driver version for your specific graphics card model depending on the manufacturer.
8. Uninstall Older Mods
Another thing you should do is simply uninstall the previous in-game mods manually before applying the Update 2.0 patch on Cyberpunk 2077 to ensure older mods won’t left installed or running on the system.
9. Delete the usersettings.json File
Multiple players have found this method useful and you should also try it once. Make sure to delete the usersettings.json file from the game directory.
- Go to the local disk path C:/Users/(Name of PC)/AppData/Local/CDProjektRed/Cyberpunk2077.
- You may need to Enable hidden items from File > View > Hidden Items.
- Now, ensure to Delete the Usersettings.json file.
- Restart the PC and then launch Cyberpunk 2077 again to automatically re-add the deleted file.
10. Disable HyperThreading
New-generation programs and utilities are basically designed to work with multiple cores and multiple threads on Windows. However, turning off hyperthreading from BIOS can be helpful to improve overall performance. To do so:
- Hit Restart on the PC > While your PC is rebooting, press the Del/F2/Esc key to open the BIOS menu.
- If you’re using a laptop then using the Fn+respective key combo will do the same.
- Once the BIOS menu appears on the screen, go to Processor/CPU.
- Select HyperThreading or HyperThread Control from the list.
- Now, you’ll have to Disable it > Then save changes by pressing the F10 key and selecting Yes.
That’s it, guys. We assume this guide was helpful to you. For additional queries, you can comment below.
