Moving towards the thrilling journey of Armored Core VI Fires of Rubicon, some PC gamers might experience multiple issues with the texture loading or in-game graphical glitches. As a newly launched title, it’s quite expected for someone to go through several issues or bugs on the PC version. Though the overall gaming experience is greatly appreciated, Armored Core 6 Texture Not Loading or Graphics Issue on the PC has become one of the hot topics among the community.
Now, if you’re also facing the same kind of an issue recently while launching the Armored Core 6 game on the Windows machine then the chances are high that your PC configuration or the in-game graphics settings aren’t complementing each other. This issue can be frustrating at times when it starts appearing most of the time. We should mention that sometimes issues with the outdated game patch version, outdated graphics drivers, background running tasks, etc. can be possible reasons.

Page Contents
- Fix Armored Core 6 Texture Not Loading or Graphics Issue
- 1. Restart the PC
- 2. Check the System Requirements
- 3. Run Steam as an Administrator
- 4. Update Armored Core 6
- 5. Verify and Repair the Game Files
- 6. Update the Graphics Driver
- 7. Adjust the In-Game Graphics Settings
- 8. Free Up the Storage Space
- 9. Close Unnecessary Third-Party Tasks
- 10. Try Increasing Virtual Memory
Fix Armored Core 6 Texture Not Loading or Graphics Issue
As the game is quite new in the market, we’re expecting the developers will provide more patch fixes to improve the graphical experience. Meanwhile, you can try following the methods below to resolve texture loading issues until the problem gets fixed by the developers. Here we’ve shared with you a couple of potential workarounds that should come in handy. So, without further ado, let’s get into it.
1. Restart the PC
You should try restarting the PC manually to ensure there is no issue with the temporary system glitches or cache data. Sometimes a normal restart of the system can fix several issues rather than performing other workarounds.
2. Check the System Requirements
Make sure to check out the game’s system requirements if your PC configuration is compatible with this game or not. You should cross-check the system requirements of the Armored Core 6 game to ensure your PC configuration is compatible enough.
| Minimum Requirements | Recommended Requirements |
| OS: 64-bit Windows 10 | OS: 64-bit Windows 10/11 |
| Processor: Intel Core i7-4790K | Intel Core i5-8400 or AMD Ryzen 7 1800X | AMD Ryzen 5 2600 | Processor: Intel Core i7-7700 | Intel Core i5-10400 or AMD Ryzen 7 2700X | AMD Ryzen 5 3600 |
| Memory: 12 GB RAM | Memory: 12 GB RAM |
| Graphics: NVIDIA GeForce GTX 1650, 4 GB or AMD Radeon RX 480, 4 GB | Graphics: NVIDIA GeForce GTX 1060, 6GB or AMD Radeon RX 590, 8GB or Intel Arc A750, 8GB |
| DirectX: Version 12 | DirectX: Version 12 |
| Storage: 60 GB available space | Storage: 60 GB available space |
| Additional Notes: Windows-compatible audio device | Additional Notes: Windows-compatible audio device |
3. Run Steam as an Administrator
Make sure to run the Steam app on your PC as administrator access to allow the User Account Control (UAC) access to the system. In some cases, your system requires the UAC access permission to run a program which is quite important. By following the steps below you’ll have to allow the admin access for once and it won’t ask you for the same again. To do so:
- Right-click on the Steam app on your PC.
- Click on Properties > Click on the Compatibility tab.

- Click on the Run this program as an administrator checkbox to enable it.
- Once done, click on Apply and then OK to save changes.
4. Update Armored Core 6
You can manually check for the game update by following the steps below to ensure the game is not outdated. An outdated game version can cause launching issues or texture not loading issues.
- Open the Steam client > Go to Library.
- Click on ARMORED CORE VI FIRES OR RUBICON from the left pane.
- Steam will automatically search for the available update.
- If there is an update available, click on Update.
- Ensure to wait for some time until the update is completed.
- Once done, ensure to reboot the PC to apply changes.
5. Verify and Repair the Game Files
Sometimes corrupted or missing game files on the PC might also trouble you a lot when it comes to the installation or updating of the game. You really can’t do anything for the issue to happen. But most of the game launchers do come with a built-in option to verify and repair the game files automatically that you can use whenever you face any kind of issues. To do this:
- Launch Steam > Click on Library.
- Right-click on ARMORED CORE VI FIRES OR RUBICON from the list of installed games.
- Now, click on Properties > Go to Local Files.
- Click on Verify Integrity of Game Files.
- You’ll have to wait for the process until it gets completed.
- Once done, just restart your computer.
6. Update the Graphics Driver
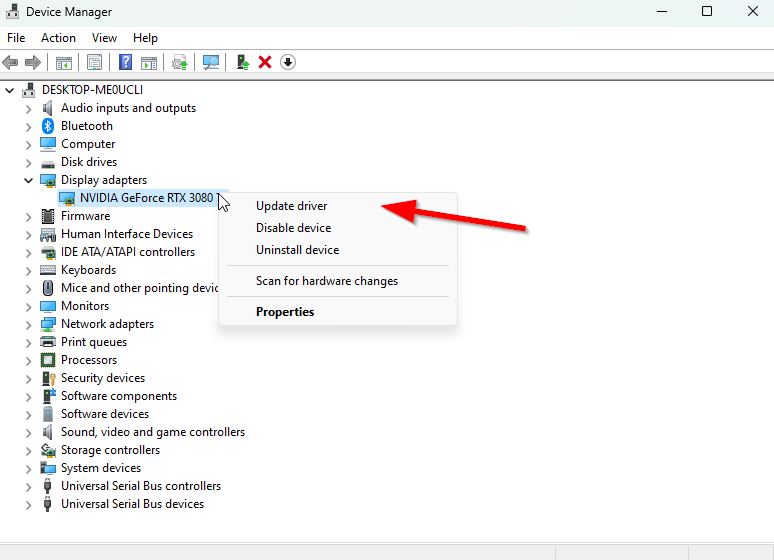
You should try checking for the graphics driver update on your Windows PC and installing the latest version to ensure no update is pending. An outdated or missing graphics driver can trigger issues with properly functioning graphics-intensive programs. To do that:
- Press the Win+X keys to open the Quick Link Menu.
- Click on Device Manager from the list.
- Now, double-click on Display Adapters to expand it.

- Then right-click on the dedicated graphics card name you’re using to bring the context menu.
- Next, click on Update driver > Choose Search automatically for drivers.
- The system will automatically check for the available updates.
- If an update is available, it’ll automatically download and install the latest version.
- Once done, make sure to restart your PC to apply the changes.
If you can’t find any pending updates then just head over to the official website of the respective graphics card manufacturer below and search manually for the latest update. If a new version is available for the graphics card, just download the driver and install it on your PC. You can jump to the link below to do so:
7. Adjust the In-Game Graphics Settings
The chances are high that your budget PC or the outdated gaming PC will start struggling to run the latest AAA titles or graphics-intensive video games smoothly. It’s better to manually tweak the in-game graphics settings depending on your PC specifications to cross-check if the problem appears or not.
- Texture Quality – Medium
- Antialiasing – Medium
- SSAO – Low
- Depth of Field – High
- Motion Blur – Low
- Shadow Quality – Low
- Lighting Quality – Medium
- Effects Quality – Low
- Volumetric Fog Quality – Low
- Reflection Quality – Low
- Water Surface Quality – Low
- Shader Quality – Medium
- Ray Tracing Quality – Off
8. Free Up the Storage Space
It’s highly recommended to free up the storage space on the installed game directory to check if the game is running properly or not. Not only before installation but also after installation, the game application might require more free storage space.
9. Close Unnecessary Third-Party Tasks
Unnecessary background running tasks or programs can eat up a lot of system resources like CPU or Memory usage literally reducing system performance. Hence, the startup crashing, lagging, and texture not loading issues appear quite often. Simply, close all the unnecessary background running tasks completely. To do this:
- Press the Ctrl+Shift+Esc keys to open up the Task Manager.
- Now, click on the Processes tab.
- Click to select tasks that are unnecessarily running in the background and consuming enough system resources.
- Click on End Task to close them one by one.
- Once done, restart your system.
10. Try Increasing Virtual Memory
The chances are high that setting up the paging file size for the virtual memory should be equal to or higher than the RAM capacity of the system. Overall, you’ll have to increase the virtual memory size on your PC from the storage space so the respective game can run properly using the extra virtual memory space. If you want to change the virtual memory paging file size, then follow the steps below properly:
Please Note: You must be logged on as an administrator or a member of the Administrators group to complete this process. The network policy settings may also cause such issues if your computer is connected to a network.
- Click on the Start menu > Search and open Control Panel.
- Click on Performance and Maintenance > Go to System.
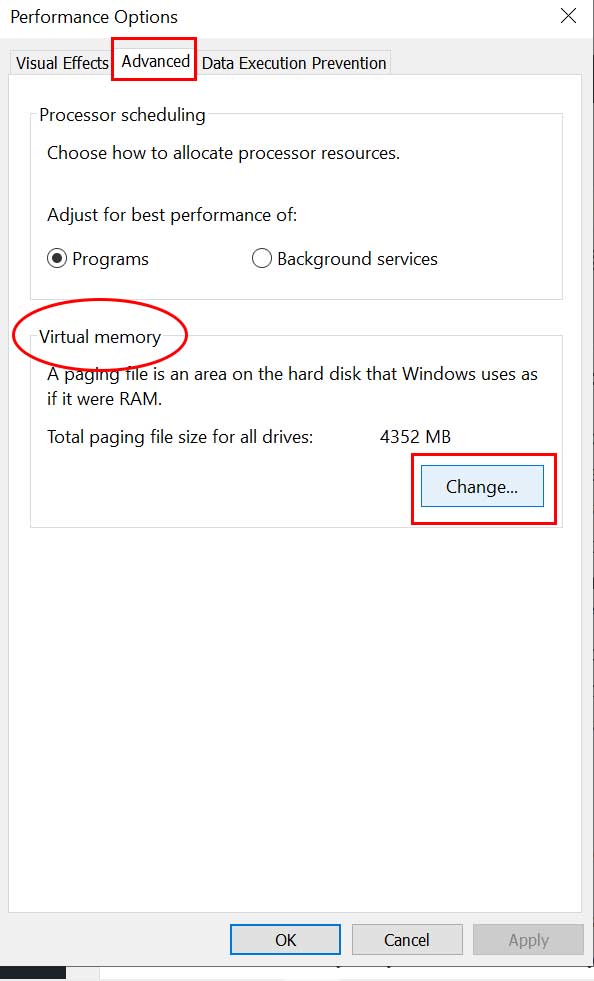
- From the Advanced tab, click on Settings under Performance.

- On the Advanced tab, click on Change under Virtual Memory.
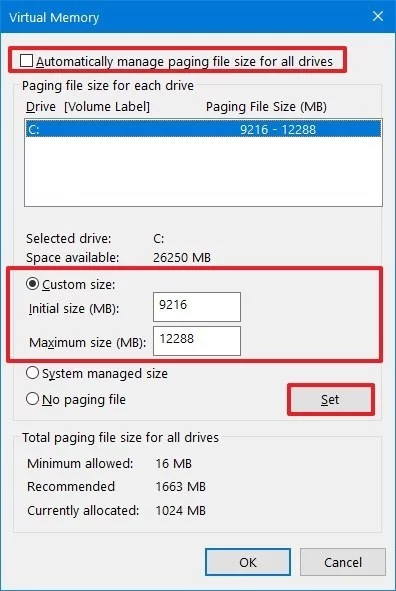
- Under Drive [Volume Label], click on the drive that contains the paging file you want to change.
- Under Paging file size for the selected drive, click on System Managed Size.
- Click on Set > If this option hasn’t been flagged, restart the PC after flagging it.
- Now, if the system paging file size is used to be System Managed, click on Custom Size under Paging file size for selected drive.

- Now, type a new paging file size in megabytes in the Initial size (MB) or Maximum size (MB) box. [It should be 1.5x-2x higher than the physical RAM]
- Click on Set > Restart the PC and check if the problem has been fixed or not.
That’s it, guys. We hope this guide was helpful to you. For further queries, you can comment below.
