ASUS ProArt display monitor series offers the creators the most advanced technologies, including mini-LED backlights, OLED displays, and ASUS Smart HDR technology. These ProArt monitors feature auto-calibration and delivers accurate & brilliant colour reproduction for content creators or graphics professionals depending on the display categories. However, some users seem to be encountering the ASUS Proart Monitor Not Turning On / No Signal Issue unexpectedly.
Things might not go right when someone powers on the display monitor connected to a PC and the warning notice shows ‘No Signal‘ on the monitor. Well, sometimes it even goes weird not to turn on the screen at all. This issue can happen to anyone and is usually a common thing for most users. But when you assume that your monitor is connected to the computer and still the monitor doesn’t get any signal then you may get worried a bit. So, if you’re also facing the no signal issue with your Asus ProArt then don’t worry.
Page Contents
- Fix: ASUS Proart Monitor Not Turning On / No Signal Issue
- 1. Check for Power Connectivity
- 2. Power Cycle the Monitor and PC
- 3. Check for the Correct HDMI Input Port
- 4. Ensure No Physical Damage to the Cable
- 5. Try Using Another HDMI Cable
- 6. Update the Display Driver (Graphics)
- 7. Install Pending Windows Updates
- 8. Check for Optional Updates
- 9. Select the HDMI Input on Asus ProArt
- 10. Try Resetting the HDMI Connection
- 11. Update the Monitor Driver
- 12. Perform a Factory Reset on ASUS Monitor
- 13. Manually Detect the Connected Display Device
- 14. Set the Screen Project Option
- 15. Manually Update the Firmware on Your Asus Monitor
- 16. Test Your Asus ProArt on Another Computer
Fix: ASUS Proart Monitor Not Turning On / No Signal Issue
Issues with the Asus ProArt HDMI no signal or not turning on can be related to faulty or loose cable connections, damaged display cable or port, outdated display or monitor drivers on the system, an outdated system software version, lack of power source to the monitor, incorrect cable input, and more. Luckily, here we’ve shared with you some workarounds that should help in resolving such an issue. Make sure to follow all troubleshooting methods until the problem has been fixed. So, without further ado, let’s jump into it.
1. Check for Power Connectivity
Sometimes a minor mistake can cause issues with the monitor not turning on or no signal. It’s better to check for the power source or connectivity before jumping into any other workarounds. You should try unplugging the power cable from both the monitor and outlet and reconnect it again to check for the issue.
2. Power Cycle the Monitor and PC
It’s also recommended to manually power cycle the Asus ProArt monitor as well as the computer to refresh temporary glitches (if any). This specific method fixes the turning on or no signal issue with the display monitor. To do so:
- Power Off your Asus ProArt monitor and the computer.
- Now, unplug all the power cables connected to the monitor and computer.
- Wait for a couple of minutes and then reconnect the power cables.
- Finally, power on the computer and monitor to check if the display shows or not.
3. Check for the Correct HDMI Input Port
The chances are high that you’re not connected to the HDMI cable to the correct input on your computer. In some cases, a loose connection to the HDMI port can also occur with no signal issues. Do keep in mind that if you’re using an external graphics card then connect the HDMI cable to the same instead of the motherboard’s HDMI port.
4. Ensure No Physical Damage to the Cable
You should also keep in mind that there is no faulty or damaged cable you’re using on the Asus ProArt monitor. Any kind of HDMI cable-related issues might trouble in displaying content on the monitor’s screen. So, check for the damaged HDMI cable & replace it with a new one to ensure the problem is still bothering or not.
5. Try Using Another HDMI Cable
Make sure to use a different HDMI cable on the Asus ProArt monitor to check if the ‘no signal’ issue still appears or not. Some of the reports do claim that using another HDMI cable has done the trick and fixed the problem.
6. Update the Display Driver (Graphics)
It’s also recommended to manually check for the graphics driver updates on your computer by following the steps below. This method usually helps in fixing graphical glitches or the monitor’s no signal issue most of the time. An outdated graphics/display driver might trouble you a lot with the monitor’s screen not turning on issue.
Recommended Update:
- Press the Win+X keys > Click on Device Manager from the list.
- Double-click on Display Adapters to expand the list.
- Right-click on the dedicated graphics card that you’re using.
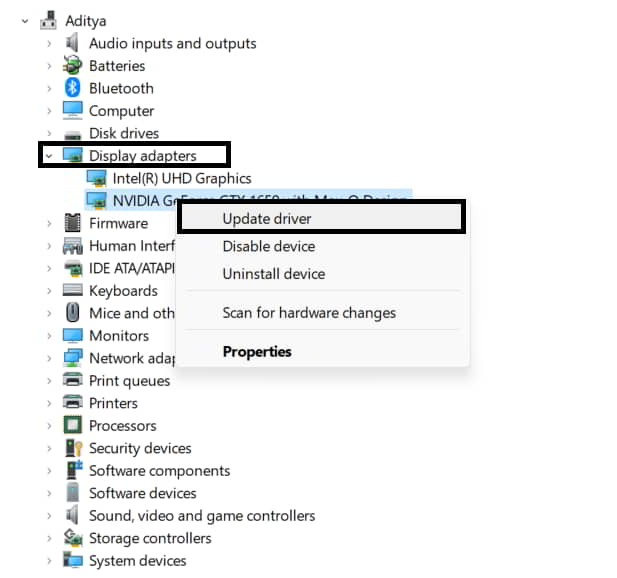
- Select Update Driver > Click on Search automatically for drivers.
- If an update is available, it’ll automatically download & install the latest version.
- Once done, restart the system to apply changes.
Manual Update:
If you can’t find any pending updates, visit the official website of the respective manufacturer for the graphics card that you’re using. Make sure to search for the graphics card model on the website and download the latest version of the graphics driver. Then run the installer and complete the driver installation process. You can jump to the link below to do so:
7. Install Pending Windows Updates
It’s also suggested to manually install pending Windows system updates on the computer which might fix outdated or corrupted system patch versions whatsoever. Follow the steps below to easily check for Windows updates.
- Press the Win+I keys to open Windows Settings.
- Click on Update & Security.
- Select Check for updates under Windows Update.
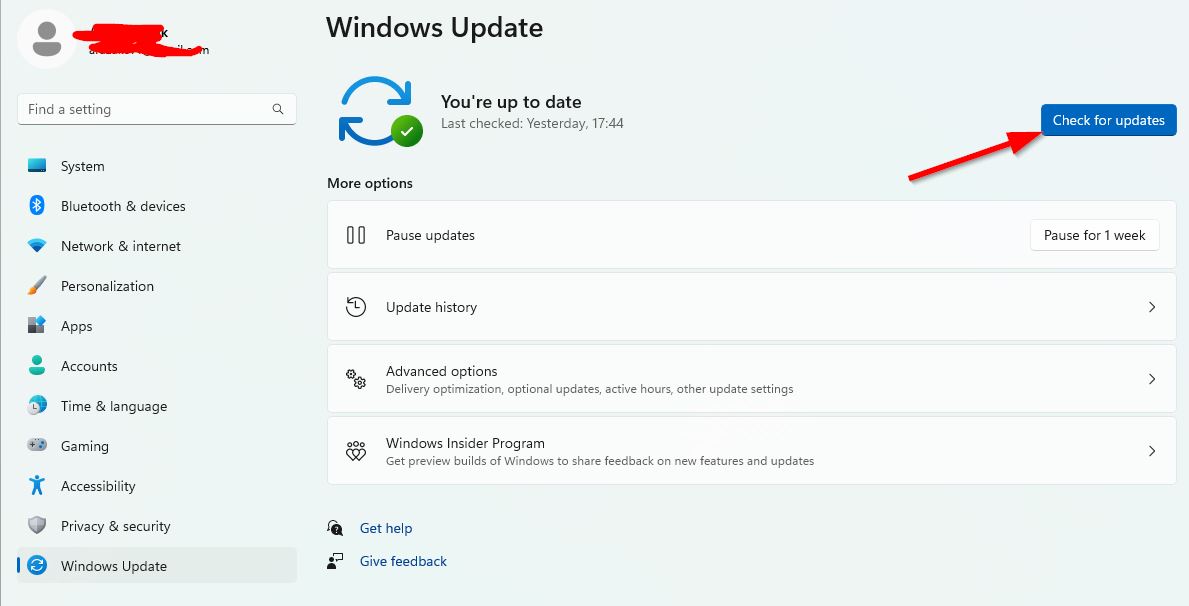
- If there is a feature update available, select Download and Install.
- Wait until the software update is complete.
- Once done, restart your computer to apply changes.
8. Check for Optional Updates
You can also check for optional updates manually on the Windows computer to ensure there is no driver update pending. Some of the driver updates might appear hidden under the optional updates section and you’ll need to follow the steps below to check for the same.
- Open the Start menu > Go to Windows Settings.
- Click on Windows Update > Click on Advanced Options.
- Navigate to Optional Updates (under Additional Options).
- Click on Driver updates to expand the list.
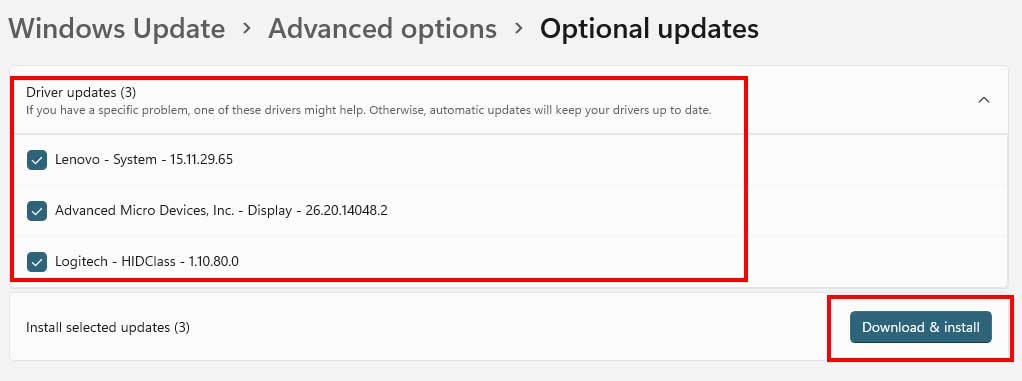
- If there is an update available, click to select the box.
- Then click on Download & Install > Wait for the update process to be completed.
- Once done, reboot your PC to apply changes.
9. Select the HDMI Input on Asus ProArt
Another thing you can do is simply check out the correct HDMI input option on the Asus ProArt monitor. Sometimes not selecting the HDMI connection to the correct input might trigger a ‘no signal’ issue. To do that:
- First, press the Power button on the Asus ProArt monitor.
- Navigate to the Input Select option and select it.
- Next, select HDMI 1 or HDMI 2 as the correct input source (depending on which port you’re connected to).
- Once done, exit from the interface then power off & on the monitor.
10. Try Resetting the HDMI Connection
You can also try resetting the HDMI connection by turning off the monitor and then unplugging the HDMI cable for a few minutes. Some Asus ProArt monitor users have found this trick helpful.
11. Update the Monitor Driver
Ensure to manually check for the monitor driver updates on the Windows computer by following the steps below. This specific method helps in installing the latest monitor driver version which might resolve outdated drivers. To do so:
- Press the Win+X keys > Click on Device Manager from the list.
- Double-click on Monitors to expand the list.
- Right-click on the monitor that you’re using.
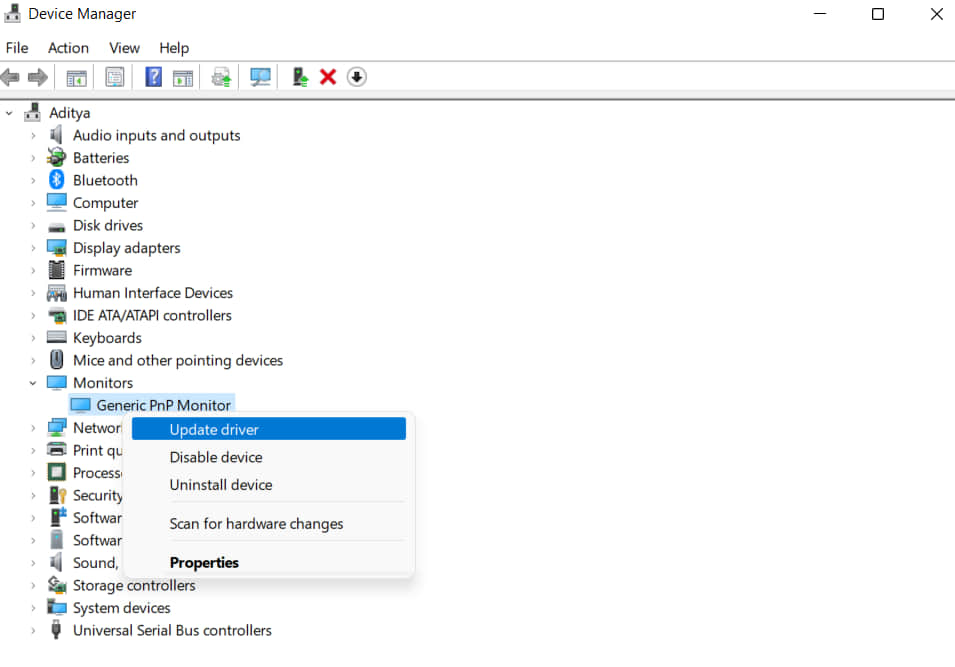
- Click on Update driver > Click on Search automatically for drivers.
- If available, it’ll automatically download & install the update.
- Once done, reboot the PC to apply changes.
12. Perform a Factory Reset on ASUS Monitor
If none of the above methods work for you then make sure to perform a factory reset on your Asus ProArt monitor by following the steps below to clear the user configuration. Sometimes the factory default setting might help in working the monitor properly. If you’re not sure whether you’re able to reset the monitor or not, make sure to check out the user manual of the monitor. However, the general procedure is mentioned below.
- Ensure to Power On the Asus ProArt monitor first.
- Press the On-screen display menu button on the back of the monitor. (button location may vary)
- Now, press the Up and Down buttons to navigate to the System Setup option.
- Then locate and select the All Reset option.
- Select Yes to confirm and wait for the reset process to be completed.
- Once done, power off & on the monitor to check for the no signal issue.
13. Manually Detect the Connected Display Device
Try manually detecting the connected display device on your computer by following the steps below. In case, you’re using multiple monitors connected to the system (especially with the laptops) then selecting the specific monitor device will be crucial enough.
- Press the Win+I keys to open Windows Settings.
- Click on System > Select Display on the right side.
- Go to the Multiple Displays option.
- Now, click on Detect to manually recognize the connected display devices.
- Select the specific monitor and you’ll be good to go.
- Once done, it’s recommended to restart the computer.
14. Set the Screen Project Option
We’ll also recommend our readers set the specific screen project option if you’re using multiple monitors on a single computer (mostly laptops). Using a multi-monitor setup might need to be configured from the screen project settings to check for the issue.
- Press the Win+P keys to open open Project.
- Choose the Duplicate or Extend option depending on what you’re trying to achieve.
- In case, you don’t use the primary laptop screen then try choosing PC screen only or Second screen only.
- By doing so, you’ll be able to see the content on your monitor immediately.
15. Manually Update the Firmware on Your Asus Monitor
You can also try visiting the official Asus website and grab the latest firmware respective to the model number of your Asus ProArt monitor. Then run and install the driver to update the currently installed driver version of the monitor. To do so:
- Open the official ASUS website here.
- Enter the Asus ProArt model number manually or select the product model from the list.
- Now, click on Driver & Utility > Go to the BIOS and Firmware section.
- Then click on the Download button to grab the latest available firmware.
- Once downloaded, connect the USB flash drive to the computer.
- Then open File Explorer > Right-click on the USB flash drive.
- Select Format > Choose FAT32 in the File System.
- Next, select Quick Format > Click on Start.
- Once the format is completed, go to the downloaded section on the PC.
- Extract or unzip the firmware folder > Copy & paste the extracted folder to the USB flash drive.
- Now, connect the USB flash drive to the computer.
- Ensure the Asus ProArt monitor is powered on.
- Then press the two buttons on the upper side of the Power button.
- The firmware updating process will begin and wait for it to complete.
- Once done, turn off the monitor, and turn it on again.
Please Note: You should also try performing a factory reset on your Asus ProArt monitor after updating the firmware to get it to work seamlessly.
16. Test Your Asus ProArt on Another Computer
Last but not least, try testing out your Asus ProArt monitor on another computer using the HDMI cable to ensure whether your specific monitor is working fine or not. In case, the monitor is working fine then the chances are high that somehow your existing Windows machine is having issues with the display connectivity. However, if the monitor doesn’t even work with the other PC then get your monitor repaired or replaced (if under warranty).
That’s it, guys. We assume this guide was helpful to you. For additional queries, you can comment below.
