2013’s BeamNG.drive is a soft-body physics and realistic vehicle simulation video game that has been developed and published by BeamNG GmbH. The game is exceptionally well in terms of the graphics, driving controls, damage, etc that most of the players like. It has received overwhelmingly positive reviews on Steam but some unfortunate players are facing a couple of bugs & BeamNG Drive White, Black, Green, and Blue Screen Issue are one of them.
As per multiple reports on the official BeamNG forum, several affected players are claiming that the title is going through the white screen and black screen issue. Apart from that, some players are also facing the green screen and blue screen of death issue which is really bad. It looks like after spawning in the gameplay, the title automatically gets into the blue, black, green, and white screen. Later nothing is visible on the screen except the full color respectively.
Also Read

Page Contents
Fix: BeamNG Drive White, Black, Green, and Blue Screen Issue
Well, this seems one of the oldest bugs on BeamNG Drive that players may experience even after so many years. Though the BeamNG Team did mention on the forum that the issue has been fixed earlier by a patch update, the chances are high that it may arrive again with some other update. Luckily, there are a couple of possible workarounds mentioned below that should going to be helpful for you. Now, without further ado, let’s jump into it.
1. Reset In-Game GAMMA Settings
The first thing you can do is reset the GAMMA settings from the in-game menu to check if the problem has been fixed or not.
- Launch the Steam client > Go to Library.
- Click on BeamNG.drive then click on Play.
- Head over to the in-game Settings menu (Options) > Click on Graphics.
- Now, Reset the GAMMA option.
2. Update Graphics Driver
Sometimes the PC games don’t show any display but the background music can appear during the gameplay due to an outdated or missing graphics driver on the system. It’s recommended to update the graphics driver on the PC by following the steps below.
- Press Windows + X keys to open the Quick Start Menu.
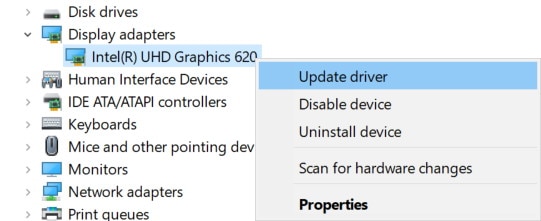
- Now, click on Device Manager from the list > Double-click on Display adapters.
- Right-click on the particular graphics card that’s currently active.

- Next, select Update driver > Choose to Search automatically for drivers.
- If there is an update available, it’ll automatically download & install the latest version.
- Once done, the system will reboot automatically. Otherwise, you can manually restart the system to apply changes.
Alternatively, you can head over to the provided link below as per your graphics card manufacturer to find out the specific graphics driver for the model. Just make sure to download the latest graphics driver and install it on the PC like usually we do. Once done, you should reboot the system.
3. Verify and Repair Game Files
Sometimes issues with the installed game files on the PC such as missing or corrupted game files may trigger multiple conflicts while running. It’s needless to say that you can use your Steam client to automatically verify and repair game files (if any). To do that:
- Launch the Steam desktop client > Go to Library.
- Right-click on BeamNG.drive from the list of installed games.
- Now, click on Properties > Go to Local Files.
- Click on Verify Integrity of Game Files > Wait for the repairing process to complete.
- Finally, reboot the PC to apply changes, and check for the issue again.
4. Disable Fullscreen Optimization
The chances are high that disabling the fullscreen optimization option of your game executable file should work for some users. You should check for the same.
- Open the Steam launcher > Click on Library.
- Right-click on BeamNG.drive > Click on Manage.
- Select Browse local files > Go to Elden Ring installed location.
- Now, right-click on BeamNG.drive.exe > Select Properties.
- Click on the Compatibility tab > Click on the Disable fullscreen optimizations checkbox to enable it.
- Once done, click on Apply and then OK to save changes.
5. Reinstall Microsoft Visual Studio
Some BeamNG.drive players are reporting that reinstalling the Microsoft Visual Studio program on the Windows PC may fix the black or green or white or blue screen issue completely. Microsoft Visual Studio is related to the Microsoft .NET or Microsoft Visual C++ Redistributables which is useful for the Windows system to run necessary programs in the background.
6. Disable Windows Firewall
It’s highly recommended to disable the Windows Firewall program on your PC and then check for the issue again.
- Click on the Start Menu > Type firewall.
- Select Windows Defender Firewall from the search result.
- Now, click on Turn Windows Defender Firewall on or off from the left pane.
- A new page will open > Select the Turn off Windows Defender Firewall (not recommended) option for both the Private & Public Network Settings.
- Once selected, click on OK to save changes.
- Restart the computer to change effects immediately.
7. Tun OFF Overclocking
You should manually disable the CPU/GPU overclocking option using the overclocking software because a bottleneck issue can bring crashes and a black or blue screen. You can use any of the overclocking software such as MSI Afterburner, Intel Extreme Tuning Utility, AMD Ryzen Master, AMD Overdrive, CPU Tweaker, EVGA Precision X, or RivaTuner.
8. Update BeamNG.drive
If none of the methods worked for you then make sure to update the BeamNG.drive game on the system to ensure there is no issue with the stability or bugs. To do that:
- Open the Steam client > Go to Library > Click on BeamNG.drive from the left pane.
- It’ll automatically search for the available update. If there is an update available, make sure to click on Update.
- It may take some time to install the update > Once done, make sure to close the Steam client.
- Finally, reboot your PC to apply changes, and then try launching the game again.
That’s it, guys. We assume this guide was helpful to you. For further queries, you can comment below.
