We all at some point in our lives must have encountered the error which says that our Windows PC does not recognize a device that we have just connected to it. This can happen with any device we connect to our PC, whether it be our smartphone, tablet, external hard drive, game controller, and so on. This error can be very frustrating, especially when you’re trying to get to a new game you just acquired, or if you are trying to transfer an important file or folder. In this article, we will be focusing on how you can fix this issue when you experience it on your Android device.
But do not fret, as we have compiled here for you fifteen (15) possible solutions to the problem. We believe that in the vast majority of instances, you would not need to go through all of the solutions outlined below to solve your problem, but we have prepared all of them just in case.
If you ever encounter this issue, be sure to try some of these best ways to fix the problem of Windows won’t recognize your Android device until the error disappears.
Page Contents
- How to Make Windows Recognize Your Android Device
- Connect a Different Device
- Use a Different USB Cord/Cable
- Turn on Airplane Mode
- Restart Your Android Phone
- Connect Your Phone Directly to Your PC
- Check If Your Android Phone is Connected as a USB Mass Storage Device/Media Transfer Protocol (MTP)
- Turn On USB Debugging
- Install or Update Your Android Device Drivers
- Reboot Your Android Device Into ODIN Mode
- Run the Windows Device and Hardware Troubleshooter or Windows Diagnostics
- Clear All Cached Data in Your External Storage and Media Storage system app
- Attempt Syncing Your Android Device to Your PC Using a Third Party Application Software
- Uninstall Your Android Drivers
- Uninstall Redundant or Conflicting Android Device Drivers
- Do a Factory Reset
- Reinstall Your Android Composite ADB Interface
How to Make Windows Recognize Your Android Device
In this list, you will find a mix of solutions of easy, intermediate, and complex difficulties. We recommend that you go with the easy ones first (they are also the ones that top this list), and if they fail to solve your problem, you can then resort to the more difficult ones which will be discussed as you move further down this list.
So without further ado, here are the 15 best ways to fix Windows won’t recognize your Android device explained from the most mundane fixes to the more complicated ones.
Connect a Different Device
The first thing you want to do is try to test whether the problem is coming from your Android device or your Universal Serial Bus (USB) port. This may sound senseless, however, interfacing an alternate gadget will help erase all doubt about whether or not there are any issues with your PC’s USB ports. In the event that another gadget works fine, you realize the port itself is working. However, if the port isn’t working, attempt another USB port, on the off chance that you have one.
Likewise, on the off chance that you have another PC to attempt, interface your Android gadget to it. This progression is just to preclude potential programming or port issues with your Android gadget.
Use a Different USB Cord/Cable
You could also try connecting your Android device to your Windows PC using a different USB cord/cable as a means to ascertain if a problem with your cable is the reason why you are experiencing this error. In the event that you are not using the original copy that accompanied your gadget, you should think about exchanging your USB cord. In some uncommon cases, some USB cords are simply intended for charging and powering your device but not for moving files, so you may have one of those USB cords.
Therefore, in order to erase all doubt, take a stab at utilising an alternate USB cord, or have a go at interfacing your Android gadget to an alternate PC which uses a similar USB cord.
Turn on Airplane Mode
Although there is not a lot of information on this or why it happens, but some users have reported that this problem has been solved after they turned on airplane mode on their device.
If you are experiencing an issue with your Windows PC not being able to recognize your Android device, try turning on airplane mode on your device and try to do the file transfer again.
You can always turn airplane mode back off when you are done with what you are trying to do with your Android device and your Windows PC. If the problem persists, try the next solution to see if you have better luck with it.
Restart Your Android Phone
A simple fix like turning off your android device and turning it back on could be all that you need to do to solve this problem. It is not unusual for this problem to correct itself after a system restart. Perhaps this works because every time you turn off your phone, your device’s Random Access Memory (RAM) frees up temporarily, perhaps clearing out whatever undetected background services were preventing your phone from being recognized by your Windows PC.
Connect Your Phone Directly to Your PC
Some people use USB port extension hubs when connecting their devices to their PC. This may interfere with your PC being able to communicate directly and effectively with your phone’s connection terminal. If you are using an external USB connector hub to connect your phone to your PC, try unplugging it and plugging your phone directly to your PC’s USB ports.
Check If Your Android Phone is Connected as a USB Mass Storage Device/Media Transfer Protocol (MTP)
Depending on the manufacturer of your Android device, any time you plug in your phone to your Windows PC, you will be met with anywhere from three (3) to eight (8) different options, each of them representing a different action or interaction between your phone and your PC. However, the most common three options are to connect your Android phone either: to charge your device, as a mass storage device (to enable file transfer), or for USB tethering. In some cases, and once again depending on your manufacturer, the third option might be to install your device’s drivers and/or software.
Anyway, if you are encountering an issue with Windows recognizing your device while trying to move files across from your phone to your PC or vice-versa, you should check to make sure your phone is connected as a USB mass storage device. This is to enable you to transfer files successfully, as opposed to being stuck with using your PC as a charger for your Android phone due to this error.
Usually, the menu to choose what option to connect your phone to your PC as comes up by default, but when it doesn’t here’s how you can set your phone to connect to your PC as a USB mass storage device:
- Go to your phone’s Settings.
- Look for USB Settings (or simply type “USB” in the search box in your settings page if your phone supports this).
- Select “File Transfer” or “Connect as USB Storage” from the list of options.
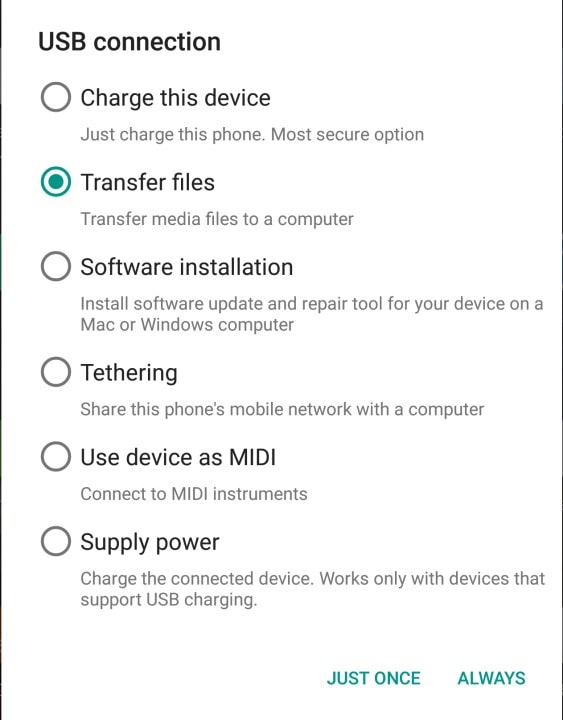
(Please note that, depending on your Android version or mobile phone manufacturer, this option may be called MTP and not USB mass storage).
Turn On USB Debugging
USB debugging is a mode in Android devices that allows your device to communicate with your PC in a way that makes creating Android apps easier for developers. It gives you access to certain areas in your Android device that you otherwise have no need to access as a regular smartphone user.
Some users say that enabling USB debugging has helped them overcome issues with their PC not recognizing their Android device. To enable USB debugging, here is what you should do:
- Go to your phone’s settings.
- Tap on Developer Options (you may receive a warning message. If you do, just click OK).
- You can then enable Developer Options and turn on USB Debugging from there.
- Click OK to turn off any warning message that may appear and you now have USB Debugging enabled.
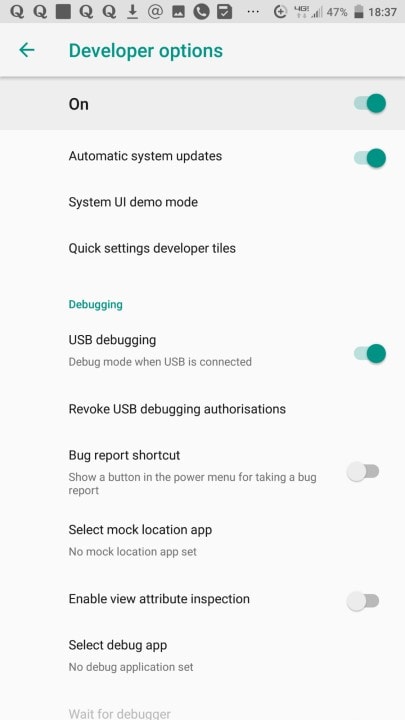
Depending on your Android version and/or your Android manufacturer, the above steps may not work for you. Another way to locate Developer Options on your device and turn on USB Debugging is to take the following steps:
- Go to your phone’s settings.
- Tap on About Phone and look for Build Number.
- Tap on Build Number seven (7) times until a small message bubble that reads, “You are now a developer!” appears on your screen.
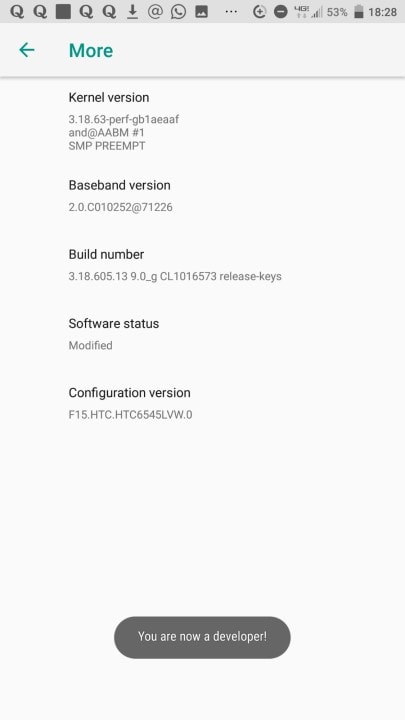
The Developer Options menu will now be available to you on your settings page and you can now use it to enable USB Debugging on your Android device.
Install or Update Your Android Device Drivers
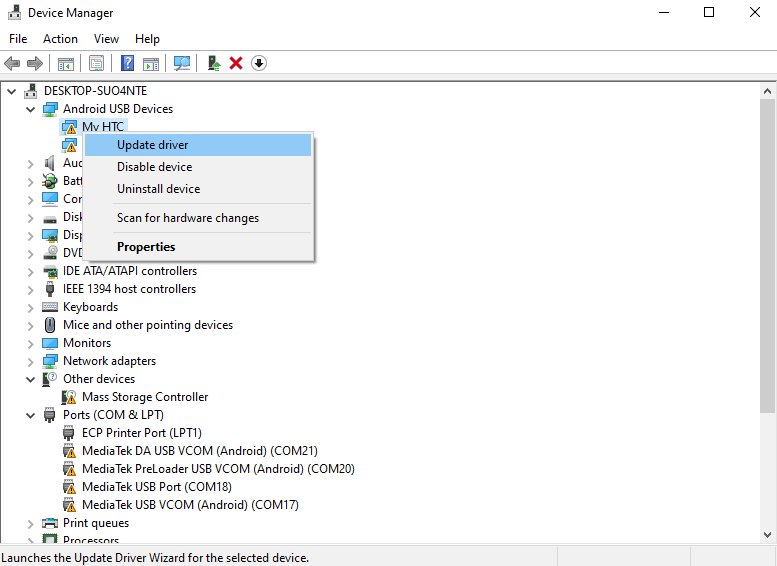
You may be encountering issues with windows recognizing your Android device as a result of missing or outdated drivers. To install or update these missing or outdated Android device drivers, take the following steps:
- Press Windows + “X” keys on your keyboard and select Device Manager from the list of options.
- Look through the list of available devices for your device’s name and right-click on it.
- Click on Update Driver, which should be the first option in the list.
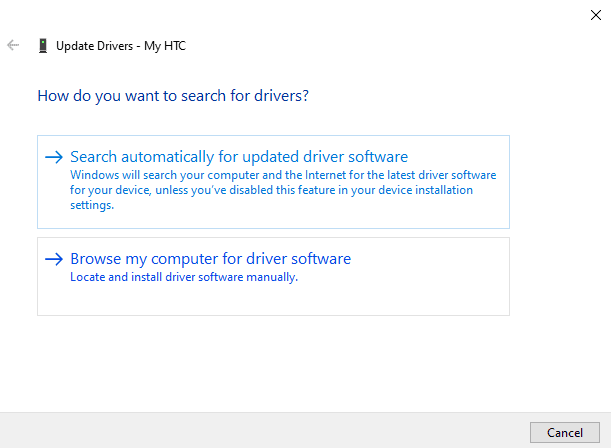
- On the next screen, you will be presented with two options: Search automatically for updated driver software, and Browse my computer for driver software.
- Select whichever one of both options works best for you. This would be depending on whether you have the requisite software already resident on your PC, or if you would rather connect to the internet and have windows search the world wide web for relevant drivers for you.
Reboot Your Android Device Into ODIN Mode
This fix will work for you only if you use a Samsung device. This is because Samsung devices are the only devices that can access and use the ODIN mode. However, it is important to note that ODIN is also the mode you would reboot your phone into if you want to flash it. Therefore, if you are going to be trying this method, tread carefully to avoid inadvertently wiping off all of the data and information in your phone.
To be able to access the ODIN mode, here is what you must do:
- Power off your Samsung Android device.
- Hold down the Volume Down button, the Home button, and the Power button at the same time for a few seconds to turn on your phone.
- This will boot up your phone into ODIN mode.
- Connect your phone to your PC and allow it to install all of the necessary drivers.
- Remove the battery from your device and turn your phone on as you normally would (or simply restart the phone again if your Samsung device has a non-removable battery).
When you have successfully finished the process above, you can then try plugging your phone to your PC again to see whether your Samsung Android phone will now be recognized by your Windows 10 PC.
Run the Windows Device and Hardware Troubleshooter or Windows Diagnostics
The Windows Hardware and Device troubleshooter is a diagnostic tool and is very useful in detecting and resolving hardware-related issues on your device. for diagnosing issues. To access the Windows Hardware and Device troubleshooter, you can use either one of the methods below:
- Go to your PC’s Settings page then click on Update & Security.
- In the tray of options on the left-hand side of your screen, click on the Troubleshoot option.
- Scroll down in the right pane until you find Hardware and Devices and then click it.
Alternatively, if your PC is currently running on a more recent version of Windows 10 (for example, Windows 10 Pro), you can follow the steps below to find and run the troubleshooter on your PC:
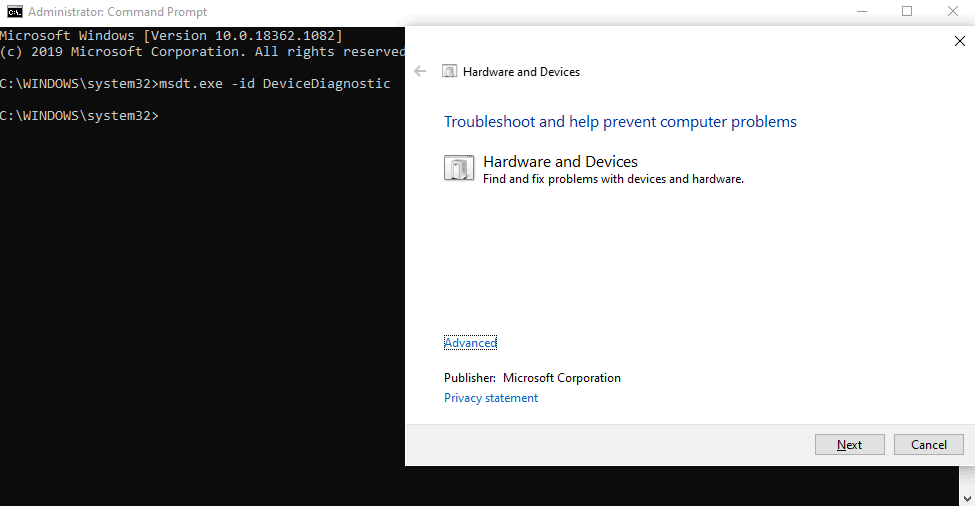
- Press Windows + “X” keys on your keyboard and select Command Prompt (Run as Administrator) from the list of options.
- In the Command Prompt interface, type in this command: msdt.exe -id DeviceDiagnostic and press the Enter key on your keyboard.
- From the window that pops up, press the Next button and allow the system diagnostic tool to run its course and automatically fix andy hardware and devices issues on your Windows PC.
Clear All Cached Data in Your External Storage and Media Storage system app
While this solution works mostly on Android devices running on Android 6.0 (Marshmallow) and above, but if you have an older version of Android you can try it out as well. To delete the cached data in your external storage and media storage system app, here are the steps you should follow:
- Open up your phone’s settings page and scroll down to select the Apps menu.
- Tap on the three vertical dots in the top right-hand corner of your screen and select Show system apps from the short drop-down menu
- Click on the External Storage and Media Storage app and delete its cache and data.
- When you are done deleting all of the cache and data, restart your Android device and try connecting it to your PC again to see if the problem has been solved.
Attempt Syncing Your Android Device to Your PC Using a Third Party Application Software
There are third-party PC software packages out there that can help you synchronize your android phone with your PC effortlessly. However, this is not always guaranteed to work, but it does work for many users. Either way, it is worth a try since these software packages are usually free and are easy to download off the internet.
Here are two of the best free software you can download to help sync your Android phone with your PC more easily:
- WonderShare MobileGo, which you can download the free version here.
- Syncios. You can also download the free version of it here.
Uninstall Your Android Drivers
We know we earlier advised that you install and update your Android drivers and that this may sound contradictory, but we promise you that it is not. This is because sometimes, installing or updating drivers may mess with the compatibility of your devices. Some updates may come with some undetected bugs or compatibility issues and that may make them not work properly.
If you have recently updated your Android device drivers and now your Windows PC does not seem to be able to recognize your Android device anymore, then it may be an issue with your new or updated drivers. You should uninstall them or revert to the previous version of the drivers you were using.
Uninstall Redundant or Conflicting Android Device Drivers
Similar to the previous fix, you can also uninstall Android drivers that belong to other devices that are not the device that you are currently having trouble getting your Windows PC to recognize. This can work because, in some instances, redundant or conflicting Android drivers may interfere with your PC’s ability to connect with your current device. You should try removing any such drivers and then try to connect your Android phone to your Windows PC again.
Do a Factory Reset
While we do not recommend this and would only advise you do it as an absolute last resort, this may be a potentially good fix for this issue. But before embarking on attempting this solution, make sure that you have safely backed-up all of your important files, folders, documents, and apps first. This is because doing a factory reset will wipe all the data on your phone, restoring it to a state as if it is fresh from the factory (hence the name, factory reset).
To do a factory reset, here are the steps you must follow:
- Open your phone’s settings and navigate to Backup & Reset. Depending on your Android phone manufacturer and/or your operating system version, this may be labeled as Systems in your device, after which you should select Restart & Reset.
- Click on the Factory Data Reset option on the next page and confirm.
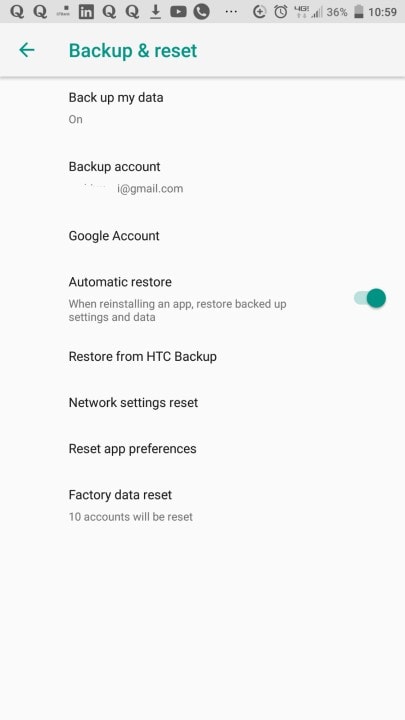
This will wipe your phone and all its data clear and should fix any problems with your phone not being recognized by your Windows PC.
Reinstall Your Android Composite ADB Interface
Issues with your Android Composite ADB Interface may cause your device to not be recognized by your Windows PC. Reinstalling your Android Composite ADB interface might help resolve issues with your PC not being able to recognize your Android phone.
To reinstall your Android device’s Composite ADB interface, here are the steps you should follow:
- Open up Device Manager on your PC and navigate to Android Composite ADB Interface. This might be presented in a different name, depending on your manufacturer. For example, it may be written as DELL Composite ADB Interface, depending on who your PC manufacturer is. It may also be written as Android Bootloader Interface as it was written on the PC we used for our tests.
- Once you have located Android Composite ADB Interface, right-click on it and click on Uninstall.
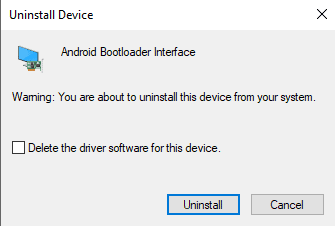
- Be sure that you have checked to Uninstall driver software for your device.
- Reboot your PC and try connecting your Android device to it again.
- Double-check to see whether your device can now be recognized by your Windows 10 PC. If the problem still persists, you may move on to the next steps.
If this tutorial has been helpful to you, kindly let us know in the comments section below. Also, if you have tried any other solutions that worked for you but weren’t mentioned in this article guide, we would love to hear all about them for the benefit of our other readers. Cheers and good luck with getting your Android device recognized by your Windows PC!
