Udemy is a prominent online learning platform with many courses to improve knowledge and abilities. Udemy offers classes from specialists in programming, photography, marketing, and other industries. As a student on Udemy, you may come across valuable information and visuals that you’d like to capture for future reference or to share with others. Taking screenshots can be an effective way to save important content, record progress, or highlight key concepts within a course.
However, some Udemy users have encountered a frustrating issue known as the “Udemy screenshot black screen.” This issue occurs when attempting to capture a screenshot within the Udemy platform, resulting in a blank or black image instead of the desired content. Fortunately, several methods are available to bypass this problem and successfully capture screenshots on Udemy. Let’s take a look at them.
Page Contents
Best Ways to Bypass Udemy Screenshot Black Screen
As we mentioned earlier, there are a number of ways to bypass the Udemy black screenshot issue. We have gathered all the profound solutions or ways to bypass this issue. Let’s take a look at them so you can easily take screenshots on Udemy.
1. Try Using Chrome Extensions
The other best way is try using a chrome extension to capture a screenshot of a screen on Udemy. You will need to install the Nimbus extension on your browser. However, Nimbus Screenshot is a free Google Chrome extension that allows you to take a screenshot of an image and video from your laptop or computer screen. It’s easy to access on your browser if you’re having trouble taking a screenshot of any specific page. Here’s how you can do this.
- To access the Nimbus capture tool, you have to first add it on your browser as an extension.
- Once successfully added, Nimbus allows you to sign in or sign up. Alternatively, you can create a dedicated Nimbus account or try to sign in with Google or Facebook instead. Once signed in, you’re ready to use it on your browser.
- You can find the extension menu from the top bar of Chrome. Once you open it, you will be presented with a pop-up menu with options to capture or record only a specific part of the screen, the entire screen, or a specific tab in Chrome browser. Make sure to select either the fragment of the window, the visible part of the window, or a specific area of the page.
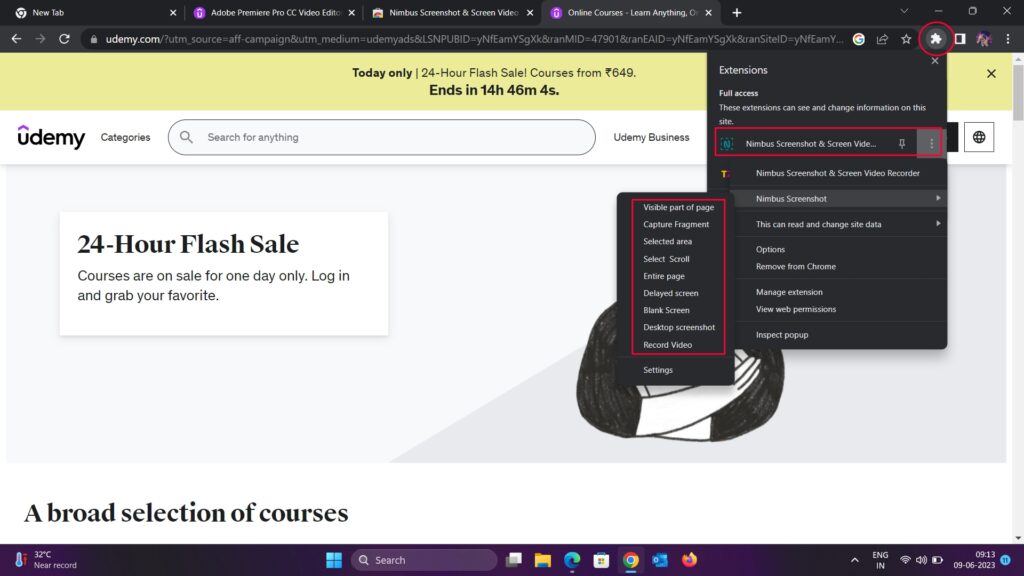
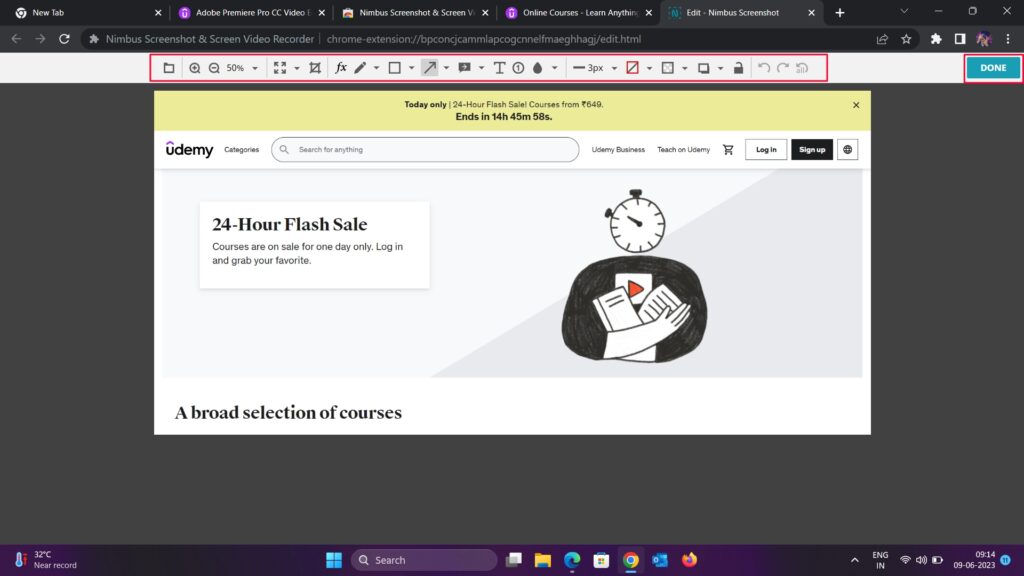
4. Once you have selected how much of your screen you want to be captured, then pick the action of the extension after capturing has been completed. On the menu, it includes an editing window where you can easily make changes to the media, download media and be able to upload on various platforms such as Google Drive or Dropbox. In addition, you can also upload the file to Nimbus.
5. Now, if you want to simply take a screenshot of Udemy or a specific page of the screen, select “Visible part of the image” or “Entire page” depending on what you’re looking for. If you want to make edits, simply choose “Edit” from the menu under “Action after the capture” option. That’s how you can easily take a screenshot of a specific browser and screen on your laptop. If you’re looking for full details, head over to Nimbus official website.
2. Disable Chrome Hardware Acceleration
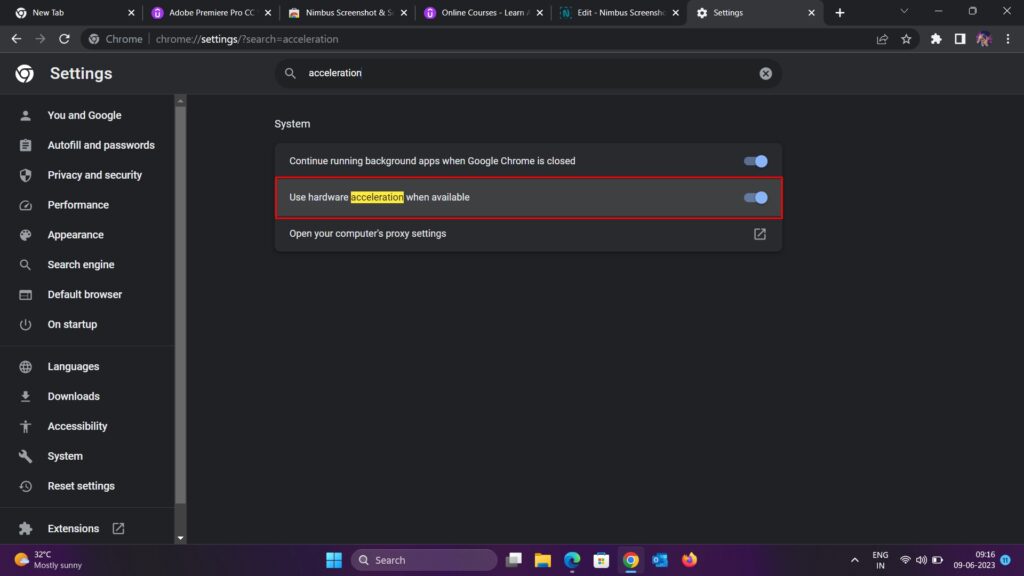
If you’re not able to take a screenshot while accessing Udemy on your laptop or computer, try disabling the chrome hardware acceleration. This may usually allow you to capture a screenshot on your device. Here’s how you can disable this feature by following the steps below:
- Launch Chrome Browser on your laptop or computer.
- Click on the three-vertical dots at the top right corner of the screen and select Settings.
- Now type the word “Acceleration” in the search bar.
- You will see “Use hardware acceleration when available.” Simply click the toggle next to it to disable this feature.
- Now close and relaunch your browser and try to take a screenshot. Hopefully, the issue has been resolved.
3. Try Using Chrome Developer Tools
Chrome’s developer tools are the most powerful unified debugging tools which are built into the Google Chrome browser. By using these tools on your Chrome browser, you will be able to enable developers to test as well as optimize web applications and software to make them more reliable and faster than normal. If you’re trying to take a screenshot on Udemy and the screenshot will appear as black screen, you should try taking the screenshot using Chrome developer tools.
Here’s how you can take a screenshot of a web page or Udemy by using the developer tools in Google Chrome browser:
- Firstly, launch Google Chrome on your laptop and computer and head to a specific webpage or a website. Again, right-click anywhere on the screen on the page.
- Once the pop-up menu appears on the screen, select Inspect at the bottom of the drop-down menu.
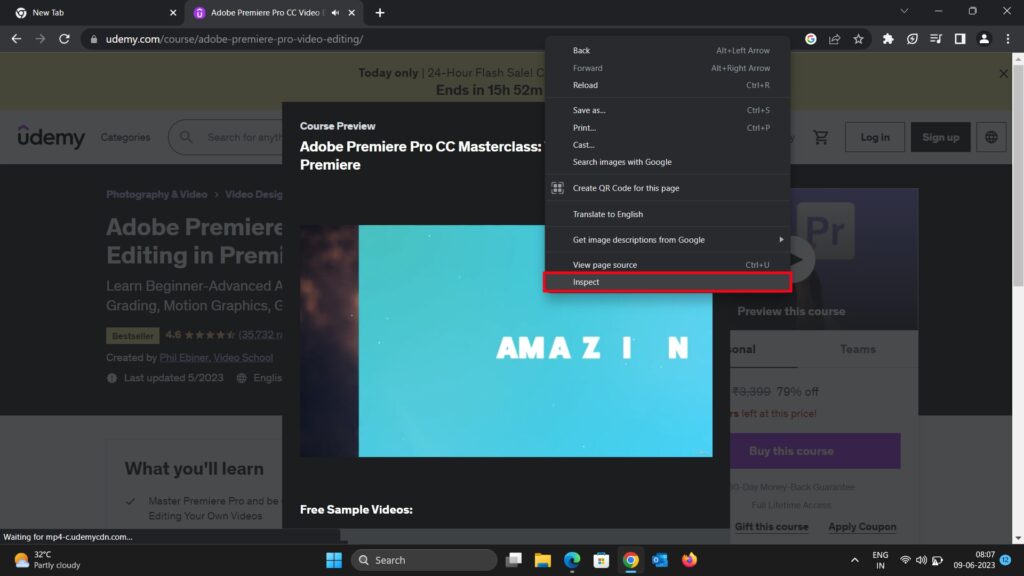
3. Now you will automatically head over to the Developer Tools Panel. Plus, you can use Ctrl + Shift + C to open the Developer Tools panel.
4. Simply toggle the Device Toolbar option by clicking on the second icon in the top-left corner of screen. Alternatively, you can press Ctrl + Shift+ M keys on the keyboard. By doing this, you are able to see how the page looks on different devices such as smartphones and tablets.
5. In the top-left corner of the screen, there is a drop-down menu called Dimensions. Once you have clicked on it, you will reveal a menu with different devices. By clicking on the specific option, you will see what the page looks like on that device. Plus, you can see the width and height of the page as well as the zoom-in and zoom-out option.
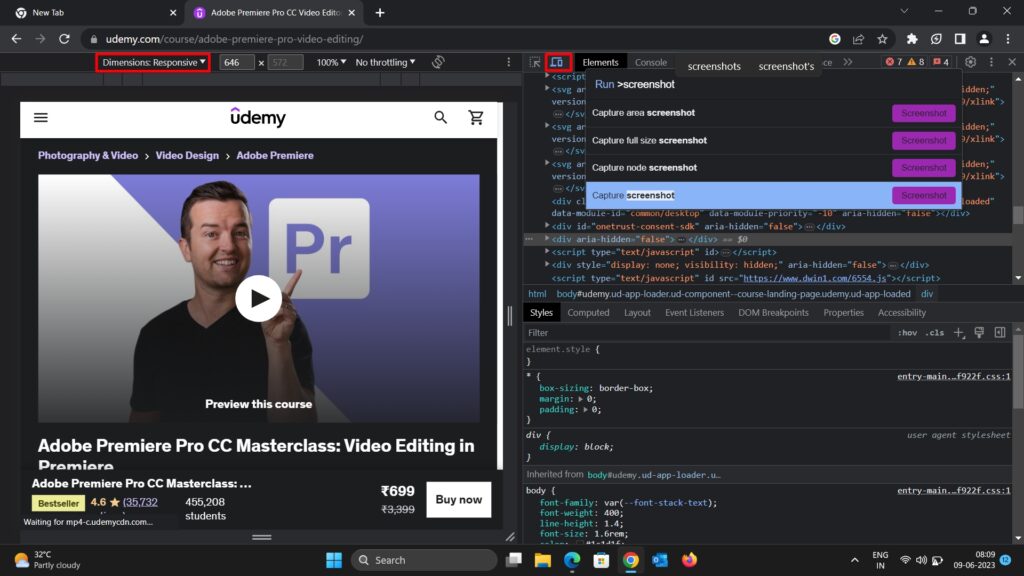
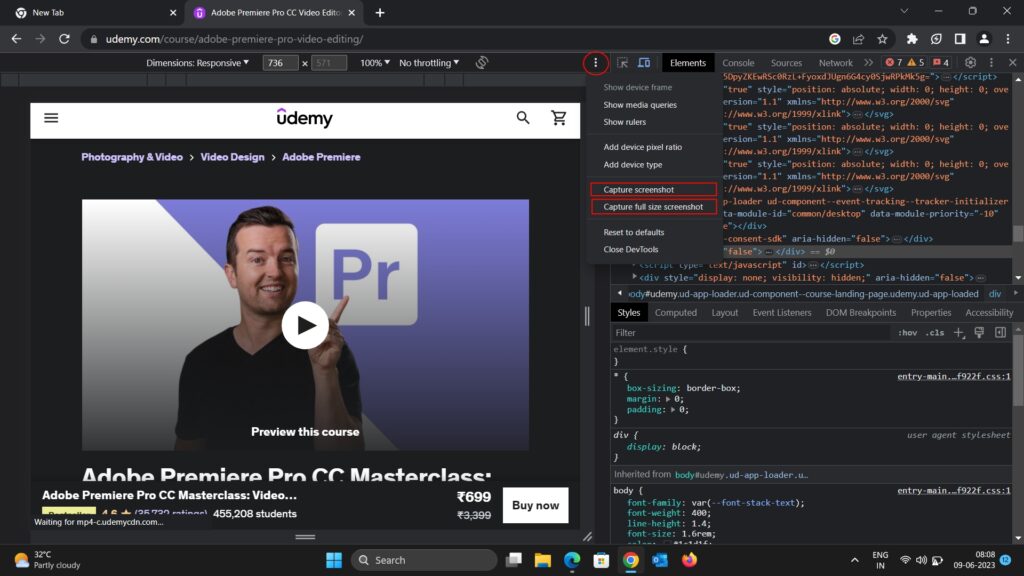
6. Now you can quickly choose the device and orientation to capture a screenshot by using Device Mode. Once everything looks fine, click on the three-vertical dots at the top right in the dimensions bar and select either Capture screenshot or Capture full size screenshot.
Alternatively, you can capture a screenshot by using Ctrl + Shift + P to open the command menu and type screenshot in the text box. Now you will notice four types of capturing-screenshots appears in a dropdown menu:
- Capture area screenshot: It allows you to take a screenshot of an inspected element.
- Capture full size screenshot: It allows you to take a screenshot of the entire page.
- Capture node screenshot: It allows you to drag a specific area if the page you want to capture.
- Capture screenshot: It enables you to take a screenshot of all visible content on the page.
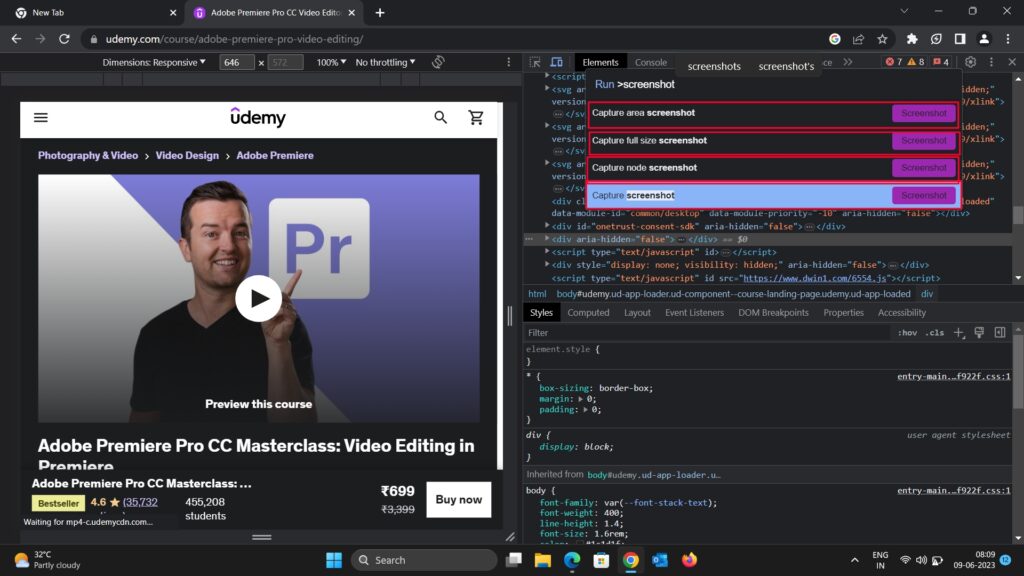
You can click either option to capture the screenshot according to you. However, to get a broader screenshot of the page, simply adjust the size of the Developer Tools panel. You can quickly do this by hovering your mouse over to the right of the vertical and again scroll until you are able to see a double ended arrow. Just click it and drag the panel left or right to change the page size. Once you have captured the screenshot, it will automatically save into your Downloads folder. From there you can make any type of adjustment to the image.
4. Use Mozilla Firefox
You can also try using Mozilla Firefox instead of Google Chrome browser on your laptop or computer. By using Firefox browser, you are able to take a screenshot of a specific page easily without any hassle. But, multiple users complained that using Firefox browser isn’t working anymore even if the hardware acceleration is disabled from settings. However, if you still want to take a screenshot on Mozilla Firefox, you have to do something just as similar to Method 3.
- Head over to the Firefox browser on your laptop or computer and head to a specific webpage or a website. Again, right-click anywhere on the screen on the page. Once the pop-up menu appears on the screen, select Inspect (Q) at the bottom of the screen.
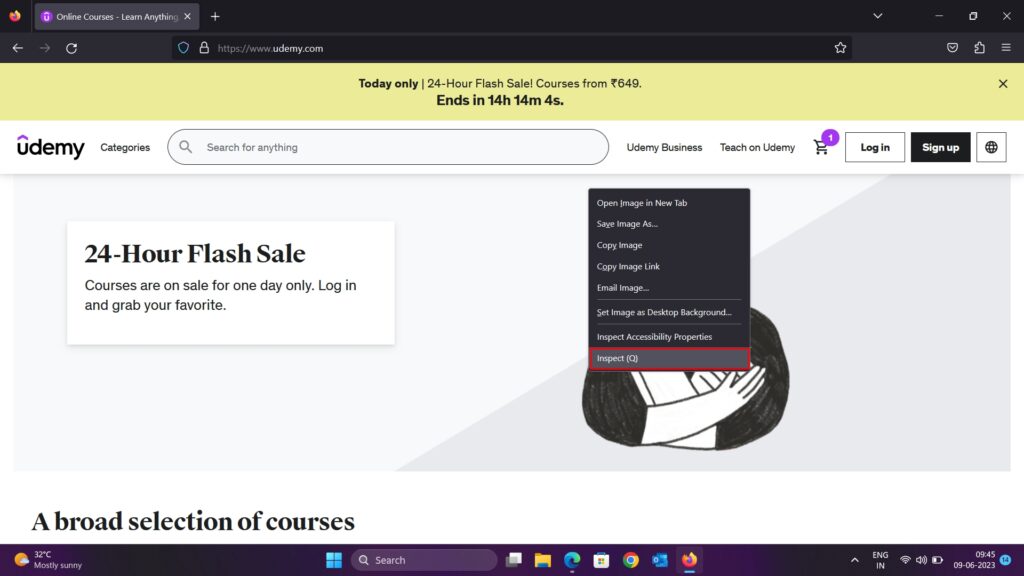
2. Now you will automatically head over to the Developer Tools Panel.
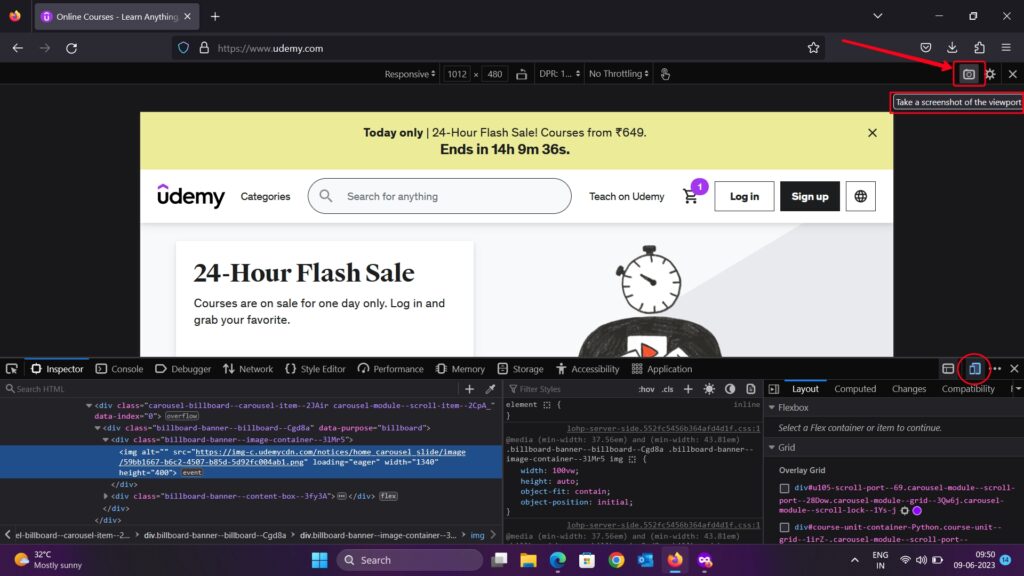
3. Now click the Responsive Design Mode by clicking on the second icon in the top-left corner of the screen. Alternatively, you can use Ctrl + Shift+ M keys on the keyboard.
4. In the top-right of the screen, you will be able to see the Camera icon which represents the “Take a screenshot of a viewport.” Simply click the Camera icon menu and it will automatically capture a screenshot of a page. You can also change the settings by clicking on the settings icon at the right corner of the screen. That’s it.
Wrapping Up
Taking screenshots on Udemy is a great way to retain data or reference resources for later use. However, the occasional occurrence of a dark screen can be annoying. Using the techniques described in this article, such as installing a Chrome extension like Nimbus Screenshot, you can easily capture the required screenshots despite Udemy’s black screen. Try out a few different approaches and see what works best for you. Have fun studying and taking screenshots!
