Content Warning is a horror game that can be played by 2-4 players in co-op mode. The game is simple: you and your friends need to explore scary locations, capture spooky moments on camera, and gain views. However, some players have reported encountering issues while playing Content Warning on their PCs.
Several online forums have reported that the game crashes during startup on PCs. This can be frustrating, as there is no specific warning or error message, and it can distract from the overall gaming experience. This issue seems to occur mostly on the PC platform, despite the developer’s efforts to improve and fix bugs. It is important to note that this game is relatively new in the market, and it is possible that some issues are still being worked out.
Page Contents
- What are the Reasons Behind the Content Warning Crashes?
- Content Warning Crashing, Not Launching, or Not Responding on PC
- 1. Check the System Requirements
- 2. Restart Your PC
- 3. Run Content Warning as an Administrator
- 4. Turn Off In-Game V-Sync
- 5. Update Content Warning
- 6. Verify the Integrity of Game Files
- 7. Update Graphics Card Drivers
- 8. Close Unwanted Programs or Tasks
- 9. Whitelist Content Warning on Antivirus
- 10. Add An Exclusion of Content Warning on Firewall
- 11. Update Windows
- 12. Adjust Power Settings for High Performance
- 13. Use the Maximum Performance Graphics Card
- 14. Tweak Windows Pagefile Size
- 15. Change CPU Priority in Task Manager
- 16. Update the DirectX Version
- 17. Turn Off Unwanted Overlay Apps
- 18. Scan for Malware and Viruses
What are the Reasons Behind the Content Warning Crashes?
The startup crashing issue that mostly happens with PC games may be related to in-game bugs or directly to the PC itself. While some affected gamers may blame the developers for not optimizing the game properly, it’s important to consider that problems with the PC’s specifications or other aspects may also play a major role.
If you’re experiencing crashing issues with Content Warning on your PC, it’s essential to cross-check all elements before concluding. It’s possible that your PC specifications may not be compatible enough with the game’s system requirements or that the installed game version has become outdated.
Other potential reasons behind game crashes or not launching could include conflicts with the installed graphics card driver, temporary system glitches on the PC, running the game application without administrative privileges, resource-hungry third-party programs running in the background, or blocking issues with antivirus and firewall software.
Content Warning Crashing, Not Launching, or Not Responding on PC
As the game becomes more popular among the community, developers will continue pushing more patch updates and fixing bugs. However, it would be best if you tried performing some workarounds to fix the issue at your end. Plenty of players try common troubleshooting methods and find them useful in most scenarios. It’s highly recommended to follow all fixes individually until the problem has been fixed. So, without further ado, let’s jump into it.
1. Check the System Requirements
Any incompatibility between the PC specifications and the game’s system requirements might cause startup crashes or not launching issues in most cases. It’s always a better idea to check the system requirements of the Content Warning game to understand whether your configuration meets the requirements or not. In case you’re missing any major requirement or your hardware becomes outdated, then try upgrading it.
| Minimum Specs | Recommended Specs |
|
|
2. Restart Your PC
It is not uncommon for a PC to experience occasional shutdowns while launching high-intensive programs or certain games. However, frequent crashes or startup issues while launching a game may be caused by temporary system glitches or corrupted cache data. To resolve the issue to some extent, it is recommended to manually reboot the system. Simply open the Start menu, go to the Power icon, and click on Restart.
3. Run Content Warning as an Administrator
According to multiple reports, running Content Warning on a PC without administrative privileges prevents the game from launching. Granting administrative access to the game application can offer better access to specific features or settings. This is a one-time process and you won’t have to repeat it. To do so:
- Navigate to the installed directory of Content Warning.
- Now, right-click on the Content Warning.exe application.
- Click on Properties > Click on the Compatibility tab.

- Enable the Run this program as an administrator option.
- Click on Apply and select OK to apply changes.
4. Turn Off In-Game V-Sync
To avoid any graphical glitches or screen tearing while launching the game or during gameplay, it’s recommended that you turn off the in-game v-sync option. Disabling the vertical sync feature can also help prevent any startup crashes. Here’s how you can do it:
- Open Content Warning > Go to the Settings menu.
- Navigate to the Display option.
- Head over to the V-Sync option.
- Turn Off the V-Sync feature to avoid potential crashes.
5. Update Content Warning
If you are experiencing startup crashes on your PC while running a game, it could be due to an outdated game patch version. If you haven’t updated your game version in a while, it’s possible that it could be causing the problem. To resolve this issue, follow the steps below to manually update your game patch version. This will bring new features and include improvements and bug fixes, making your gaming experience smoother.
- Open the Steam client > Go to Library.
- Click on Content Warning.
- If there is an Update option available, click on it.
- Wait for the game to install the update.
- Once done, close the client, and reboot the system.
6. Verify the Integrity of Game Files
You can try verifying and repairing game files on your PC to fix any potential glitches or corruptions with the game files. Follow the steps below:
- Open Steam > Go to Library.
- Right-click on Content Warning.
- Go to Settings > Select Properties.

- Click on Local Files > Select Verify integrity of game files.
- You may need to wait for a while to complete it.
- Once done, close the client, and restart the PC.
7. Update Graphics Card Drivers
Several players have reported that an outdated graphics card driver could cause issues when launching the game. However, updating the graphics driver has proved to be a helpful solution for some players in fixing the launching problems. On the PC version, graphical glitches usually occur due to conflicts with the graphics driver.
Recommended Method:
- Open the Start menu > Search for Device Manager and open it.
- Double-click on Display Adapters to open it.
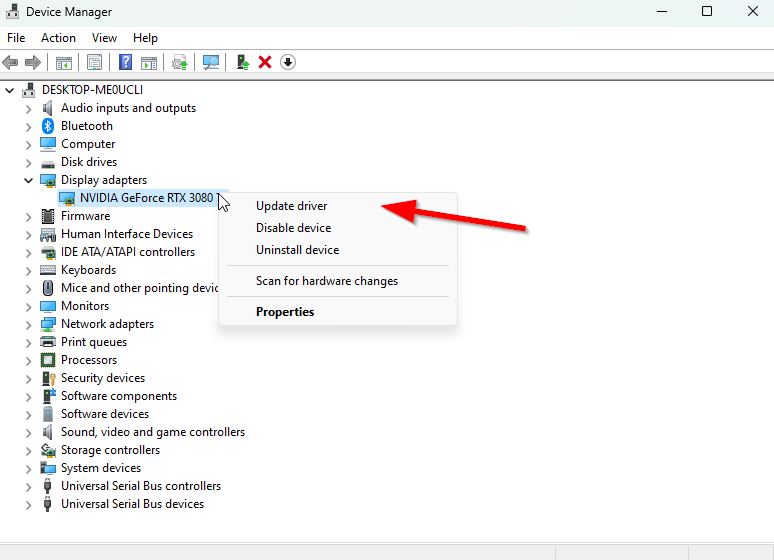
- Right-click on the dedicated graphics card.
- Now, choose Update driver > Click on Search automatically for drivers.
- If an update is available, the system will automatically download and install it.
- Once done, restart your PC to apply the changes.
Visit the Official Graphics Website:
If you are unable to receive any updates for your graphics driver, please visit the official website of your graphics card manufacturer by following the links provided below. Once you are on the website, search for the latest graphics driver for your specific graphics card model. Download the latest driver and install it on your PC.
8. Close Unwanted Programs or Tasks
At times, your computer may run into problems with third-party background processes that consume excessive resources. This can lead to CPU or graphics-intensive video games running poorly or crashing frequently. To reduce the likelihood of these issues, it is recommended that you close any unwanted programs running in the background before launching your game. This should help prevent startup crashes and ensure a smoother gaming experience.
- Press the Ctrl+Shift+Esc keys to open Task Manager.
- Go to Processes > Select the specific task that you want to close.
- Click on End Task > Follow the same steps again for each task that you want to end.
- Once done, restart your PC to apply changes.
9. Whitelist Content Warning on Antivirus
It is recommended that you add the Content Warning game application to your antivirus software’s whitelist manually. This will allow the game to run without any issues. Aggressive antivirus scans can sometimes delete or block game launcher applications without your knowledge, mistaking them for suspicious programs. Whitelisting the Content Warning application on your specific antivirus software can prevent this from happening. Below, we have provided the default Windows antivirus exclusion method for your convenience.
- Press the Win+I keys to open Settings.
- Click on Privacy & Security from the left pane.
- Click on Windows Security.

- Navigate to Virus & Threat Protection.
- Then go to Manage Ransomware Protection.
- Enable – Controlled Folder Access.
- If prompted by UAC, click on Yes.
- Now, click on Allow an app through controlled folder access.
- Click on Yes again if prompted by UAC.
- Choose Add an allowed app > Head over to the installed game directory.
- Select the Content Warning.exe app > Click on Open to add it.
- Once done, reboot the PC to apply changes.
Please Note: If you’re using a third-party antivirus software then ensure to whitelist the game application on your antivirus settings.
10. Add An Exclusion of Content Warning on Firewall
Another thing you can do is whitelist the Content Warning program in the Windows Firewall protection to reduce game-launching conflicts on the PC. It usually allows the game program to run smoothly without any further issues. To do so:
- Open the Start menu > Search and open Control Panel.
- Click on Systems and Security > Go to Windows Firewall.
- Choose Allow an app through Windows Firewall.
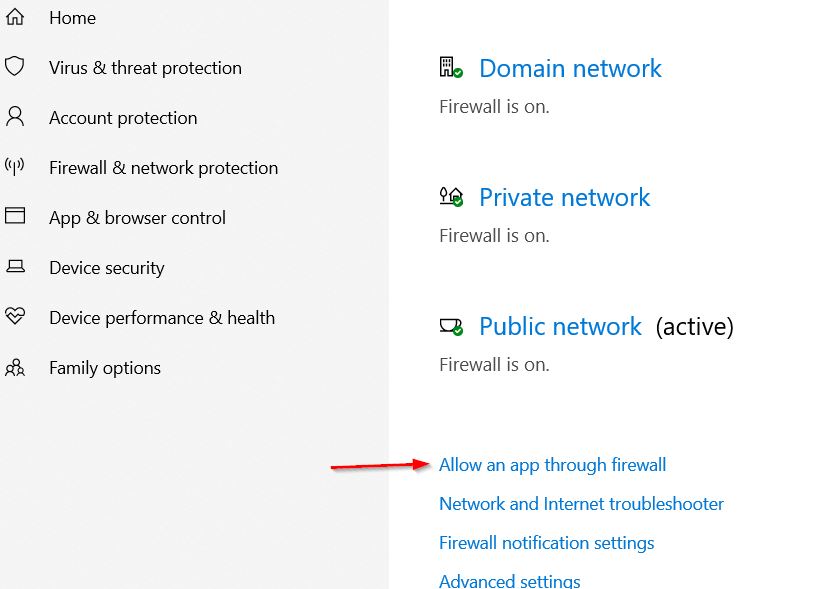
- Then select Change Settings > Choose Allow another app.
- Click on Browse > Choose Content Warning.
- Now, click on Add > Save changes to check for the issue again.
11. Update Windows
An outdated Windows system version on the PC can also trigger multiple conflicts that we can’t deny. Issues with the system version might also appear due to some instability. It’s better to follow the steps below to manually check for system updates.
- Press the Win+I keys to open Settings.
- Click on Update & Security.
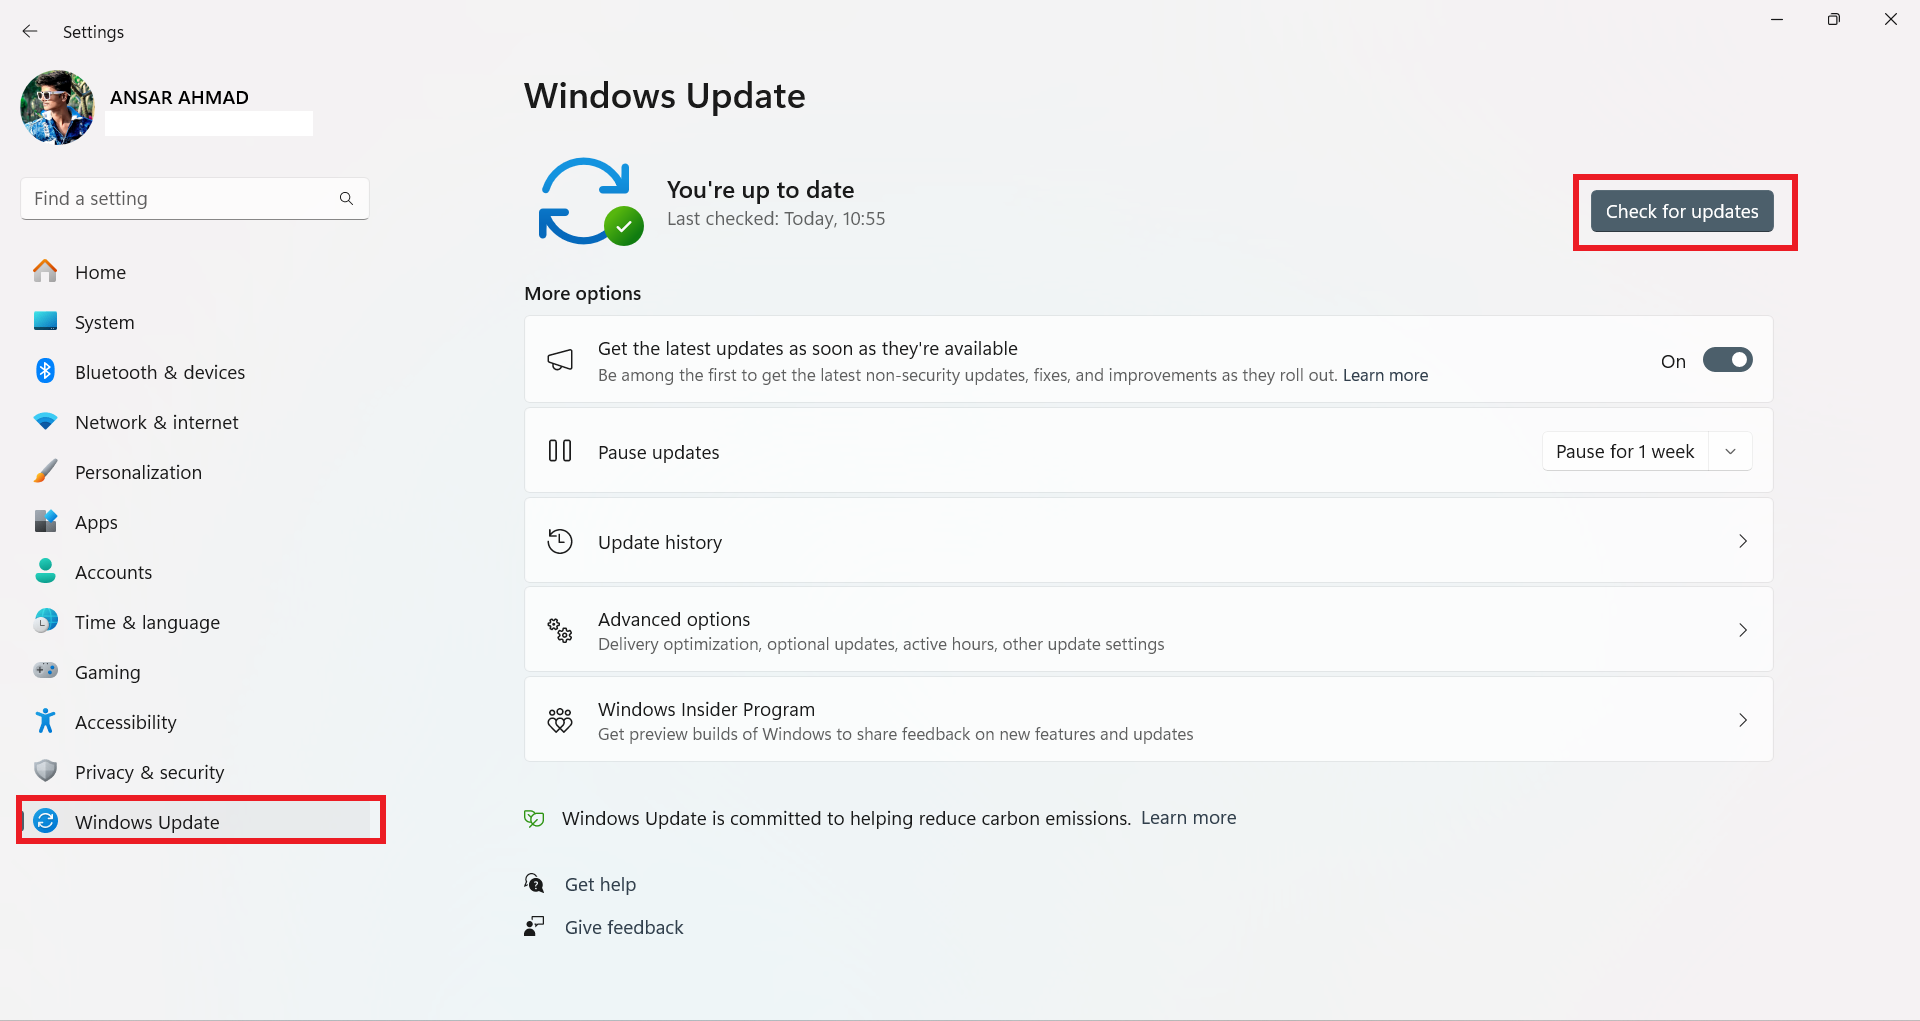
- Click on the Check for updates button.
- If there is a new update available, click on Download and Install.
- Once done, reboot your PC to apply changes.
12. Adjust Power Settings for High Performance
Adjusting the power settings for high performance on the Windows machine might also increase resources for video games by default. In that way, your games will go through minimum hiccups on the PC caused by system resources or graphical glitches. To do so:
- Open the Start menu > Search and open Control Panel.
- Click on Hardware and Sound.
- Go to Power Options > Click on Show additional plans.
- Select High Performance.
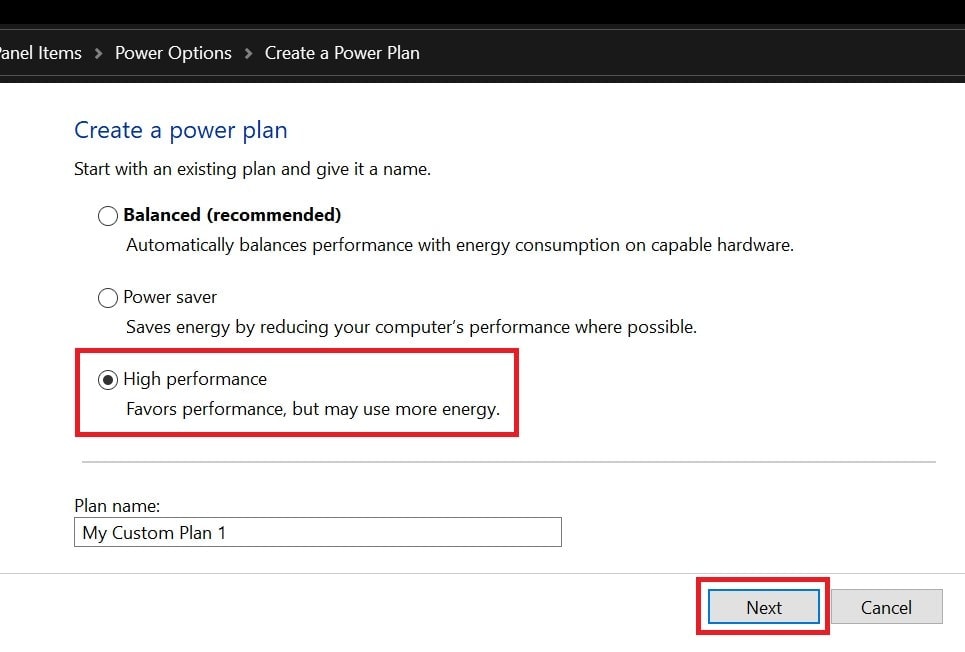
- Once done, you’re good to go.
Note: You can also select Ultimate Performance if you’re using a high-end PC.
13. Use the Maximum Performance Graphics Card
This method will come in handy if your processor does have an inbuilt HD graphics card (integrated) and even if you’re connected to an external graphics card, you’re not using it. So, selecting the external graphics card specifically for the game might help in reducing startup crashes or loading issues to some extent. Here we’ve shared both methods for both graphics card brands that most PC gamers use.
For Nvidia GPU:
- Right-click on the desktop screen.
- Choose Nvidia Control Panel > Go to Manage 3D Settings.
- Navigate to Program Settings > Choose Content Warning.
- Click on High-Performance.
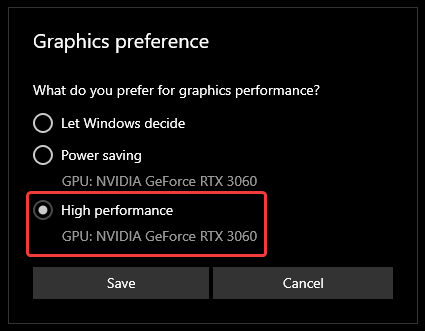
- Apply changes and restart the system.
For AMD GPU:
- Right-click on the desktop screen.
- Choose AMD Radeon Settings > Go to Preferences.
- Select Additional Settings > Head over to System.
- Choose Switchable Graphics > Select Content Warning.
- Click on High-Performance Profile.
- Apply changes and reboot the system.
14. Tweak Windows Pagefile Size
Adjusting the size of the Windows pagefile on your PC may help the game to run properly. This will increase the virtual memory on your system and partially fix the lack of physical RAM allocation. Some users find this method useful in preventing startup crashes of games. To make this change:
- Open the Start menu > Search for system settings.
- Click on View Advanced System Settings from the search result.
- Under Performance, click on Settings.
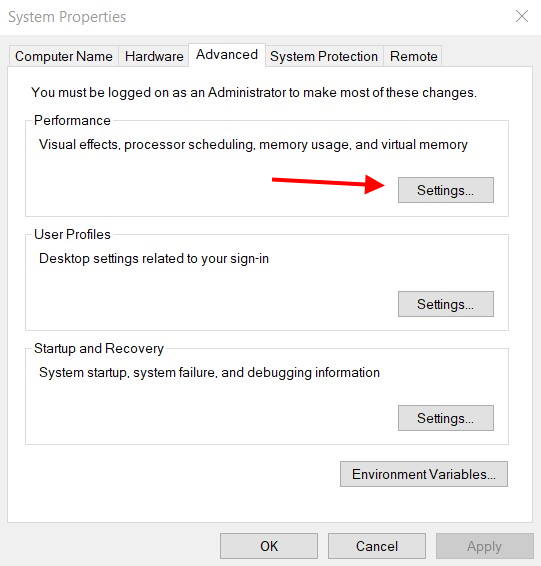
- Then go to the Advanced tab.
- Choose Programs under Adjust for best performance of.
- Now, click on Change under Virtual Memory.
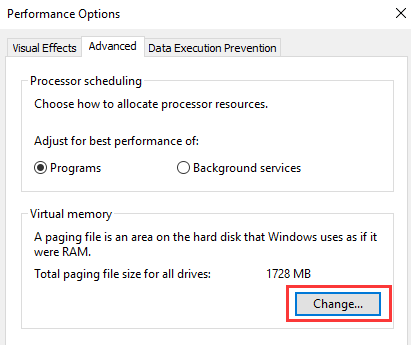
- Uncheck the Automatically manage paging file size option.
- Select Custom size > Set the specific value as per your preference.
- Set both Initial Size and Maximum Size values.
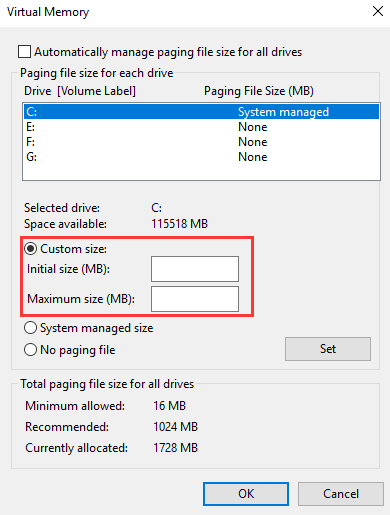
- Then click on Set > Click on OK.
- Finally, restart your computer.
15. Change CPU Priority in Task Manager
Configuring the CPU priority in Task Manager might also help you in fixing startup crashes or game-loading issues in most cases. By doing so, you’ll be able to allocate extra CPU resources for the specific game application to run smoothly.
- Press the Ctrl+Shift+Esc keys to open Task Manager.
- Go to the Details tab > Right-click on the Content Warning task.
- Choose Set Priority > Click on High.
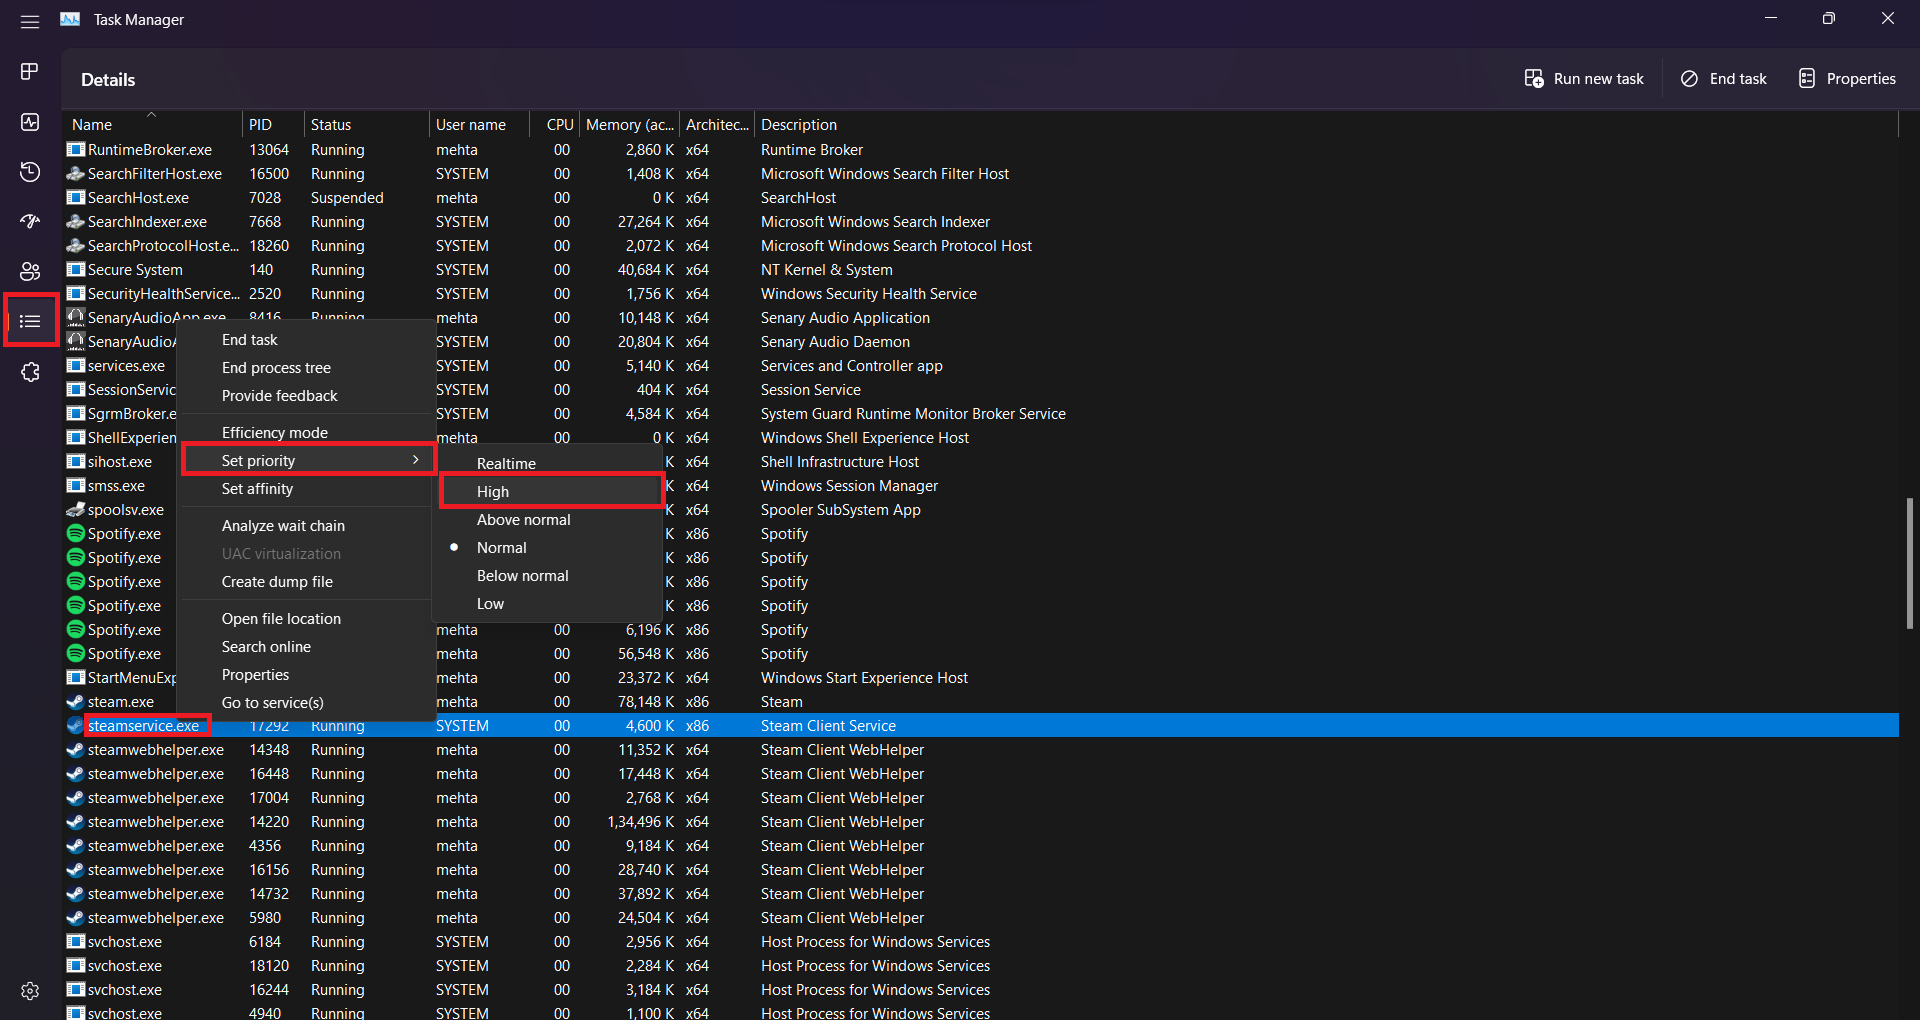
- Once done, close Task Manager, and try running the game again.
16. Update the DirectX Version
It seems that an outdated DirectX version on the system is somehow conflicting with the game startup or loading issues. You should always check for the latest DirectX version and install the latest update accordingly. Windows programs especially video games are required to run DirectX properly for a smoother gaming experience.
- Visit the official Microsoft website in your web browser.
- Search for the latest version of DirectX.
- Download the installer file and run it as per on-screen instructions.
- Once done, restart your PC to apply changes.
17. Turn Off Unwanted Overlay Apps
You should also turn off some unwanted overlay applications on your computer to ensure there is no conflict with the background running resources. Some of the overlay programs run in the background while running video games and unnecessarily consume higher CPU or RAM which eventually brings some issues. It’s better to manually turn them off by following the steps below.
Game Mode:
- Press the Win+I keys to open Settings.
- Click on Gaming > Go to Game Mode.
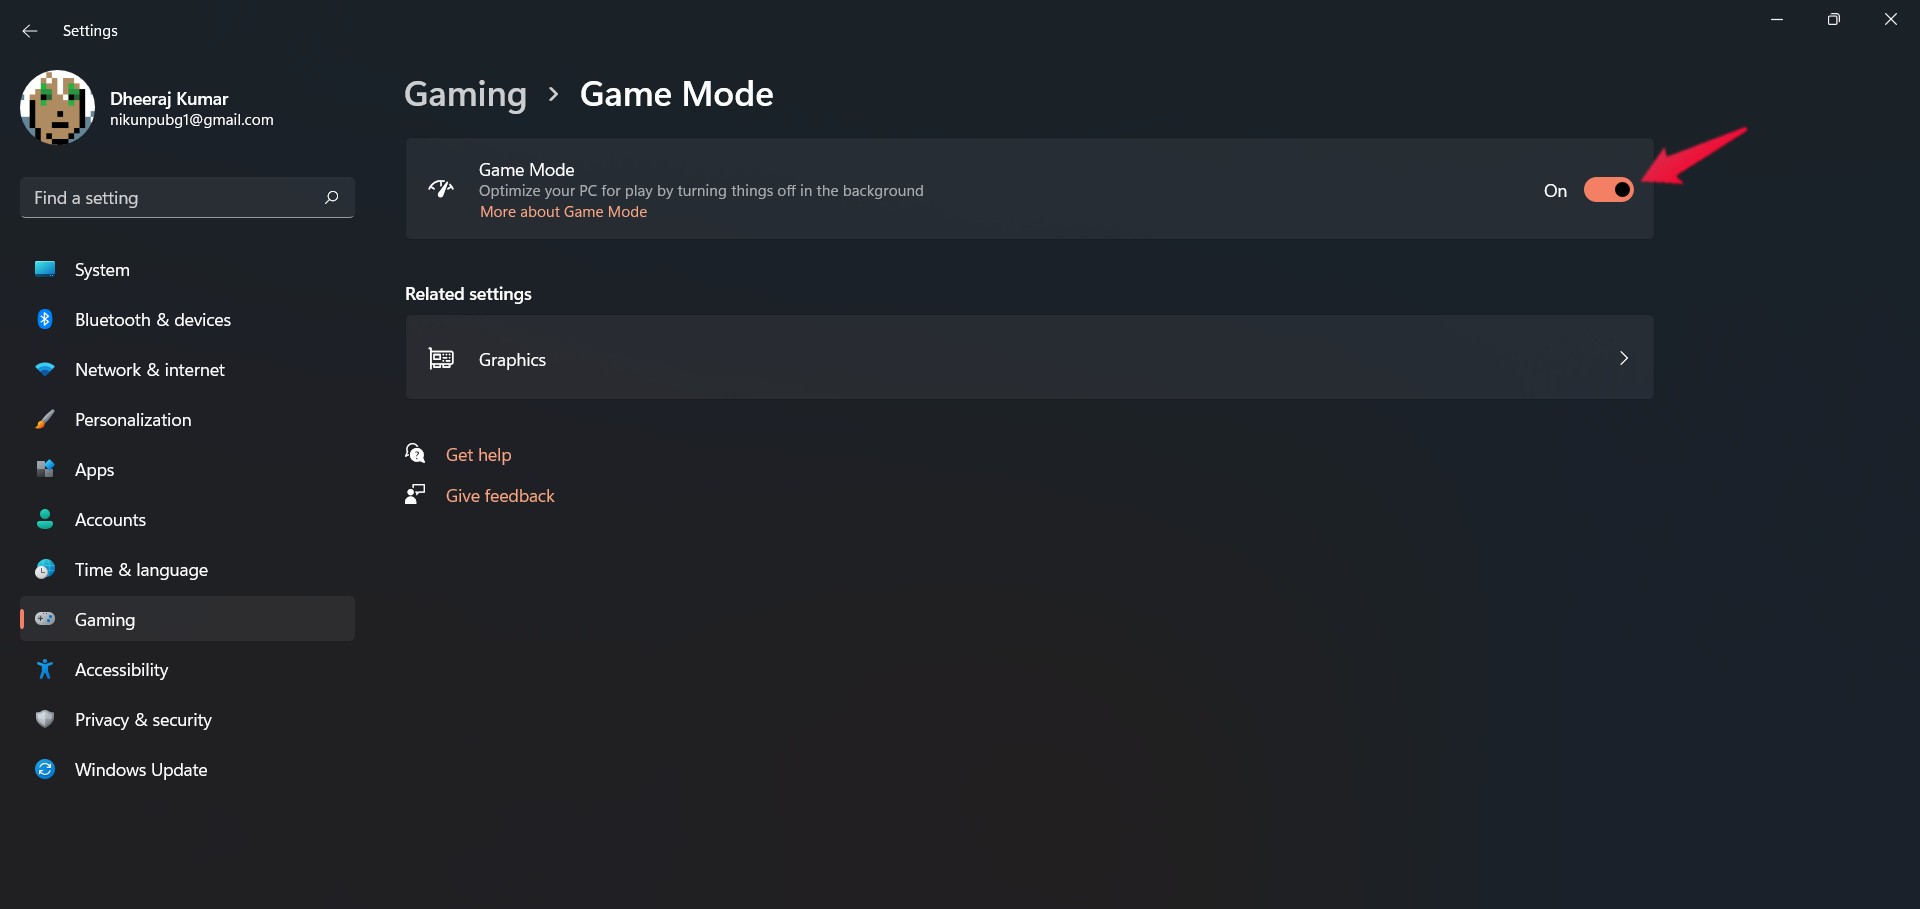
- Turn Off the toggle.
Xbox Game Bar:
- Press the Win+I keys to open Settings.
- Click on Gaming > Go to Game Bar.
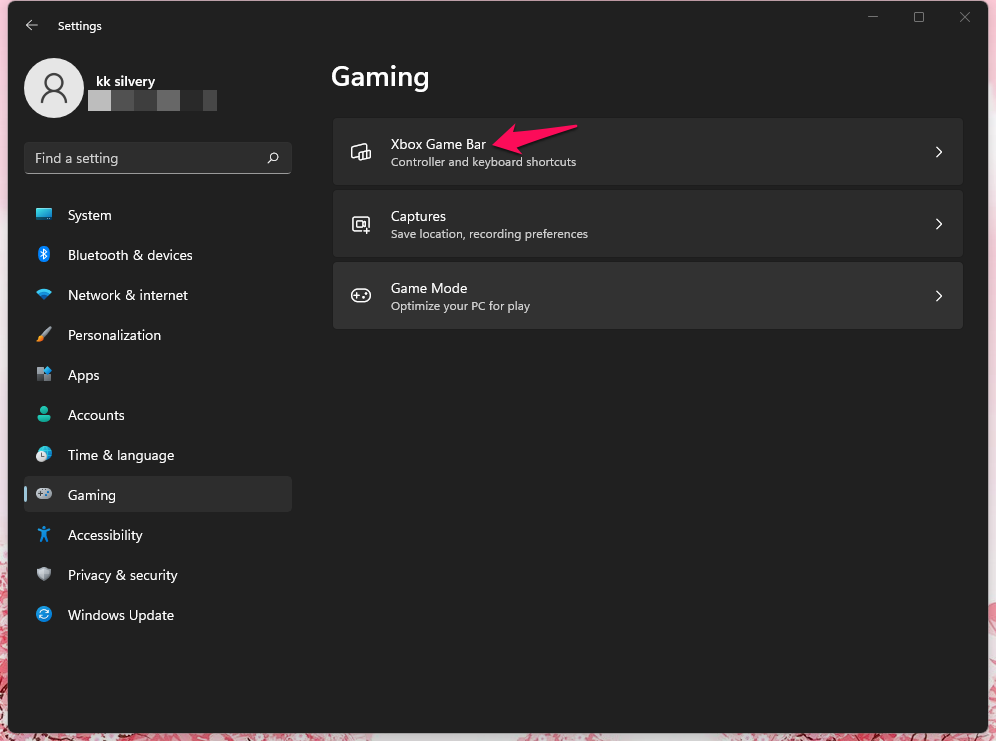
- Disable the Record game clips, screenshots, and broadcast using Game bar option.
Discord Overlay:
- Open Discord > Click on the gear icon at the bottom.
- Under App Settings, go to Overlay.
- Turn On the Enable in-game overlay option.
- Go to Games > Select Content Warning.
- Turn Off the Enable in-game overlay option.
- Once done, restart the system.
Nvidia GeForce Experience Overlay:
- Open Nvidia GeForce Experience.
- Head over to Settings.
- Click on General > Turn Off the In-Game Overlay toggle.
- Once done, restart the PC to apply changes.
Note: Many users prefer to use third-party overlay applications such as overclocking software, RGB customization software, mouse or keyboard tweaking software, and screen recording software. Ensure to closely monitor background tasks through Task Manager and disable any suspicious overlays.
18. Scan for Malware and Viruses
It is important to remember that you can resolve startup crashing issues on your PC by conducting a full disk drive scan using antivirus software. This method will help you identify potential viruses or malware attacks that may be hidden within files or folders without your knowledge. It is recommended that you run a full scan and let the antivirus software complete the process. Additionally, it is advisable to activate regular or weekly scanning for all of your disk drives or Windows drives to minimize the chances of vulnerability.
- Open the particular antivirus program that you use.
- Go to Virus & threat Protection / Scan Mode.
- Run a Full Scan > It might take an hour, depending on the disk size.
- Wait for the scan results and then check whether any potential risk is found.
- If found, use the recommended options by the antivirus to be safe.
- Finally, reboot the PC to apply changes.
That’s it, guys. We hope this guide was helpful to you. If you have additional queries, you can comment below.There have been reports on various online forums of the game crashing during startup on PC. It can be frustrating when you try to launch the game and it fails to run, without any specific warning or error notice. This issue can easily detract from the gaming experience and seems to happen mostly on the PC platform, even after improvements and bug fixes have been made. However, it should be noted that the game is new to the market and may be prone to some issues.
