As a co-op horror game, it’s always recommended to communicate with your friends during gameplay sessions becomes crucial especially when anything weird happens and you guys have to run away from monsters. Content Warning is all about capturing horror spooky things and uploading them on SpookTube to get popular & rich. However, if you start facing communication issues due to the proximity chat, it may be challenging to complete tasks. Well, the Content Warning Voice Chat Not Working issue is one of them.
It seems that recently the voice chat issue appears a lot which leads to audio stops working or communication gap. Without having proper coordination with your friends in the game, you may fall into trouble because suddenly your microphone stops responding to teammates. Though not all players are having the same issue, the specific voice chat issue troubles plenty of players and the actual reason is unknown yet. In case, you’re unfortunate enough to experience this voice chat issue, you can check this full guide to try fixing it.
Page Contents
- Possible Reasons for Voice Chat Glitches in Content Warning
- Content Warning Voice Chat Not Working, How to Fix?
- 1. Relaunch Content Warning
- 2. Reboot the PC
- 3. Check for In-Game Audio Settings
- 4. Increase the Voice Volume for Microphone
- 5. Update Content Warning
- 6. Verify and Repair the Game Files
- 7. Run Content Warning as an Administrator
- 8. Update Audio Drivers
- 9. Check the Windows Sound Settings
- 10. Set the Correct Audio Input Device
- 11. Update Windows
- 12. Allow the Microphone Access in Windows
- 13. Check for Any Physical Damage to Your Mic
- 14. Reinstall Content Warning
Possible Reasons for Voice Chat Glitches in Content Warning
One thing is sure the audio glitch or proximity chat bug can be the main reason behind the voice chat not working issue in Content Warning. Though it looks like a new issue, this isn’t because the same issue has happened in most multiplayer video games in recent years. Another noticeable thing is that the voice chat bug mostly occurs on the PC version of games where players are unable to chat with teammates using a microphone or push-to-talk, which leads to being unable to chat with each other.
Some reports claim that the voice chat breaks when party members go back to the surface or someone dies in the game. Whereas some affected players believe that this particular issue starts appearing after installing the latest patch update to the game. Sometimes one player can easily hear others but the rest of the teammates can’t hear anything. So, more or less we can expect that this is an in-game bug that needs to be addressed by the developers soon.
However, there may be some other major or minor conflict present at your end that you should check properly before heading over any conclusion. Such as an outdated audio driver, incorrect audio input device, low volume level, misconfigured audio settings in the game, temporary system glitches, missing admin access to the game, Windows compatibility issues, an outdated game patch version, corrupted or missing game files, system sound setting issues, microphone permission conflicts, damaged microphone, and more.
Content Warning Voice Chat Not Working, How to Fix?
Luckily, here we’ve shared with you some workarounds that should help in resolving voice chat issues. Make sure to follow all troubleshooting steps until the problem has been fixed. So, without further ado, let’s get into it.
1. Relaunch Content Warning
First, you can try closing and relaunching the Content Warning game on the PC which is a simple trick to resolve the temporary cache issue with the voice chat not working. To do so:
- Close the game and Steam.
- Open Task Manager by pressing the Ctrl+Shift+Esc keys.
- Now, go to the Processes tab.
- Select the contentwarning.exe task.
- Click on End Task > Select the Steam task.
- Click on End Task and relaunch the game.
2. Reboot the PC
We generally recommend you manually restart the computer to refresh potential system glitches. In some cases, a normal reboot of the system can cause multiple issues with the in-game audio glitches.
- Open the Start menu.
- Click on the Power icon > Click on Restart.
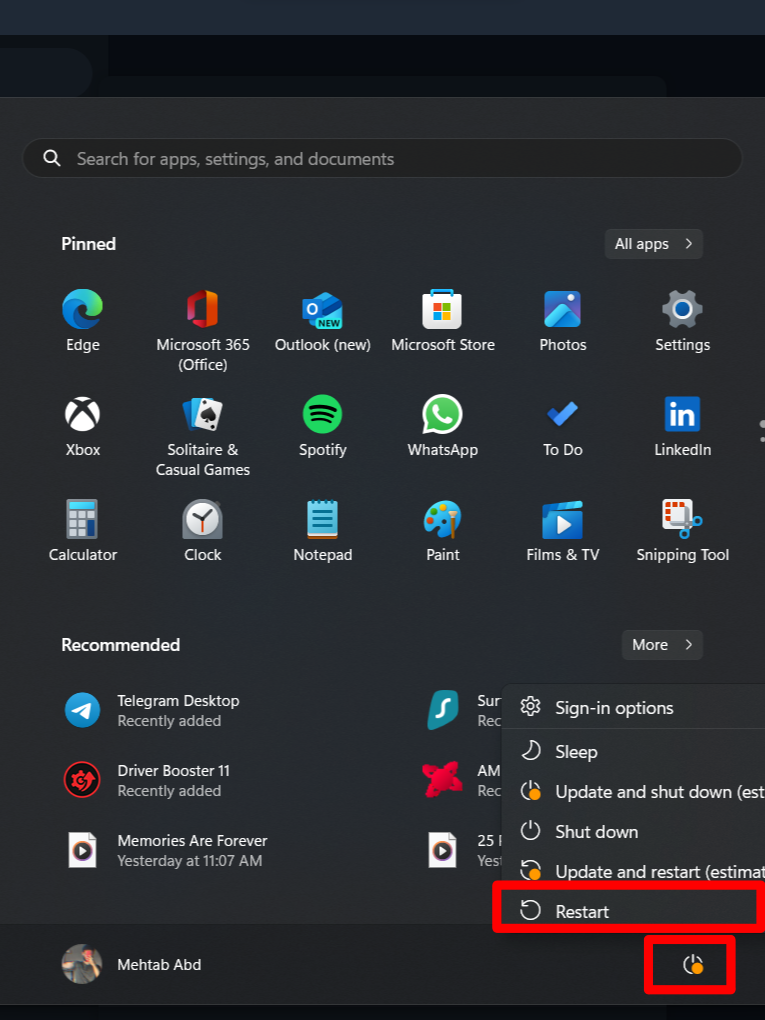
- Once the system reboots, check for the voice chat issue again.
3. Check for In-Game Audio Settings
Another thing you can do is to check for the in-game audio settings by following the steps below to ensure there is no issue with the audio configuration. It’s better to select the correct audio input and voice chat mode in the game.
- Launch Steam > Go to the Library.
- Run Content Warning from the list.
- Click on Settings > Navigate to the Audio tab.
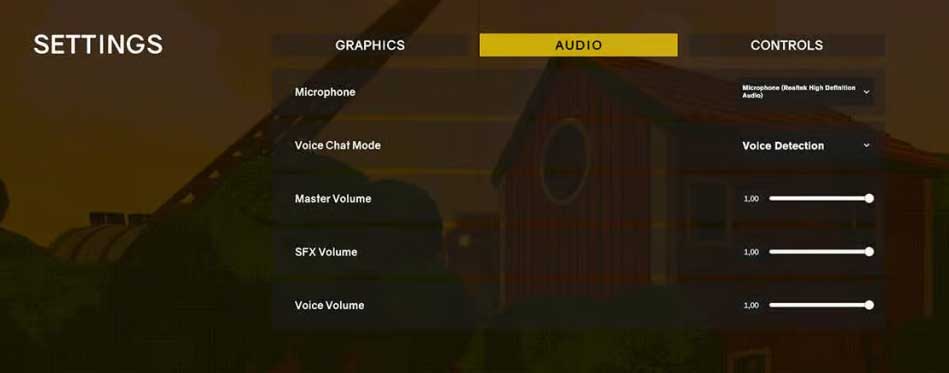
- Expand the Microphone section.
- Choose the correct microphone audio input.
- Select the Voice Chat Mode to Voice Detection or Push-to-Talk.
- Set all three volume sliders to high.
- Now, go back & play the game.
4. Increase the Voice Volume for Microphone
You can also try increasing the voice volume for the connected microphone device from the Windows taskbar directly. Check the steps below to do so.
- Click on the audio icon at the right bottom side of the taskbar.
- Next to the volume slider, click on the Select a sound output icon.
- Ensure to increase the Volume Mixer slider for microphone/headphone to some extent.
- Click on the cogwheel icon (More mixer settings).
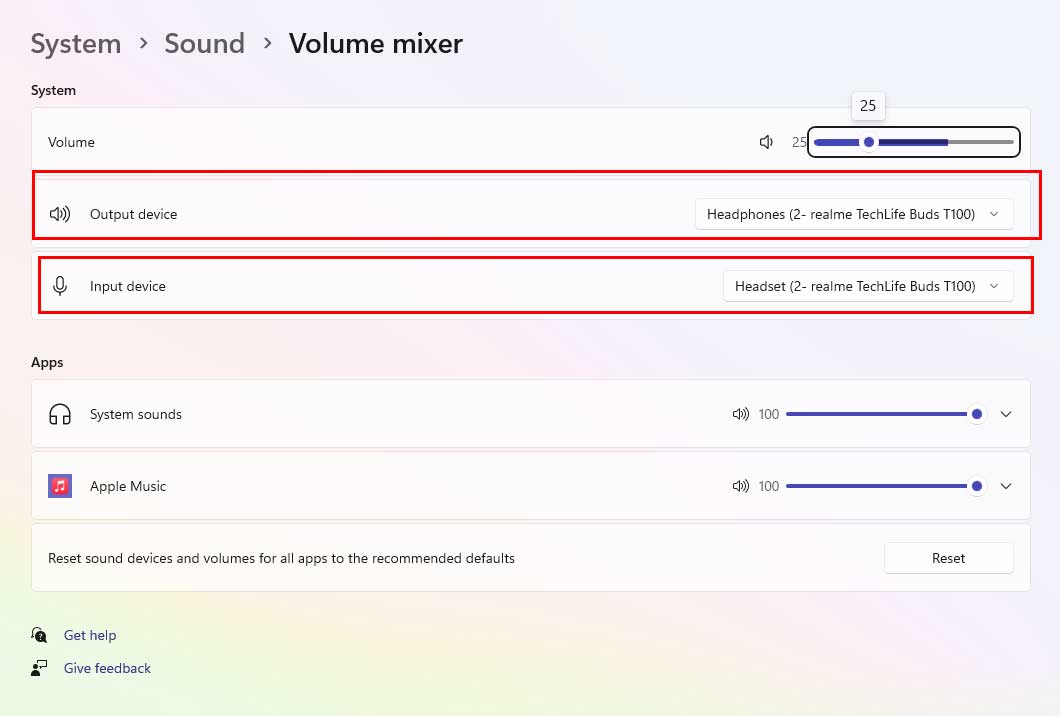
- Here you should select your microphone/headphone for both the Output device and the Input device.
- It should resolve the issue with voice chat in gaming.
5. Update Content Warning
Sometimes an outdated game patch version can trouble you a lot when it comes to in-game performances and voice chat issues. You should check for the game updates by following the steps below.
- Open Steam > Go to the Library.
- Right-click on Content Warning.
- Select Properties > Click on Updates.
- Navigate to Automatic Updates.
- Select Only update this game when I launch it.
- It’ll automatically install updates whenever available.
6. Verify and Repair the Game Files
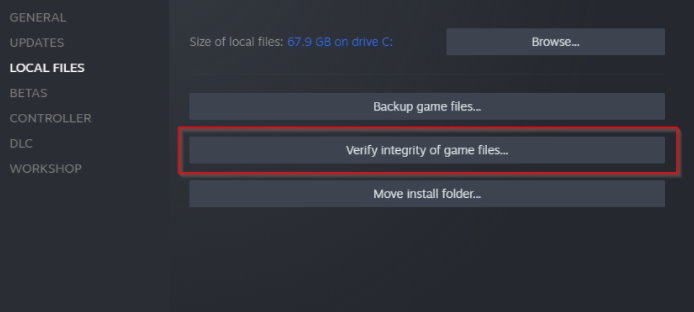
Corrupted or missing game files installed on the PC might also trouble you at times. It seems that multiple players are getting affected by the corrupted game files in game launching, performance, and multiplayer sessions. So, you should verify the integrity of the game files manually by following the steps below.
- Open the Steam client > Go to the Library.
- Right-click on Content Warning.
- Go to Settings > Select Properties.
- Click on Local Files > Select Verify integrity of game files.
- Wait for the process to complete.
- Once done, relaunch the game.
7. Run Content Warning as an Administrator
You should run the game executable application as an administrator to avoid user account control regarding privilege issues. The chances are high that your game application is getting blocked by the system admin permissions. To do this:
- Right-click on the Content Warning (exe) app on your PC.
- Go to Properties > Click on the Compatibility tab.

- Enable the Run this program as an administrator checkbox.
- Click on Apply and select OK to save changes.
8. Update Audio Drivers
Sometimes an outdated or missing audio driver on the system can also trigger several issues in multiple ways. It’s highly recommended to check for the audio driver update and install it (if available). You can follow this in-depth article link to do the same. Otherwise, you can follow the brief steps below to install the update.
- Press the Win+X keys to open the Quick Link Menu.
- Click on Device Manager > Double-click on Sound, video, and game controllers.
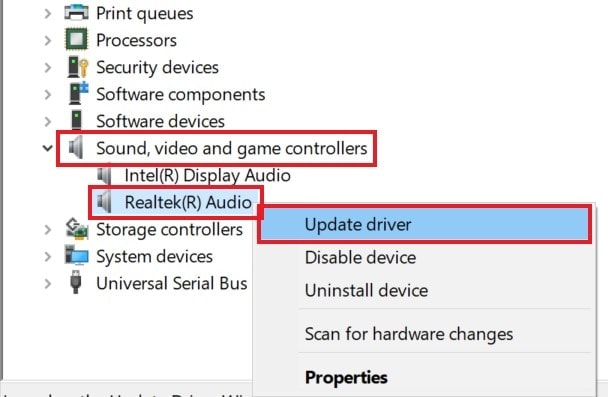
- Right-click on the active audio device.
- Select Update driver.
- Click on Search automatically for drivers.
- Wait for the process to complete.
- If there is an update available, it’ll be automatically installed.
- Once done, ensure to reboot the system to apply changes.
Please Note: You can also update the ‘Audio inputs and outputs’ adapter by following the same steps.
9. Check the Windows Sound Settings
Several Content Warning players may experience sound settings-related issues while playing video games and communicating with other players via voice chat. In case, the connected microphone device isn’t get detected in the game, you should check the sound settings options in Windows. Make sure to manually set your headset mic to the default playback mode.
- On the bottom right side of the taskbar, right-click on the Volume icon.
- Click on Sounds > Select the Recording tab.
- Right-click on the headphone (mic) device that you’re currently using.
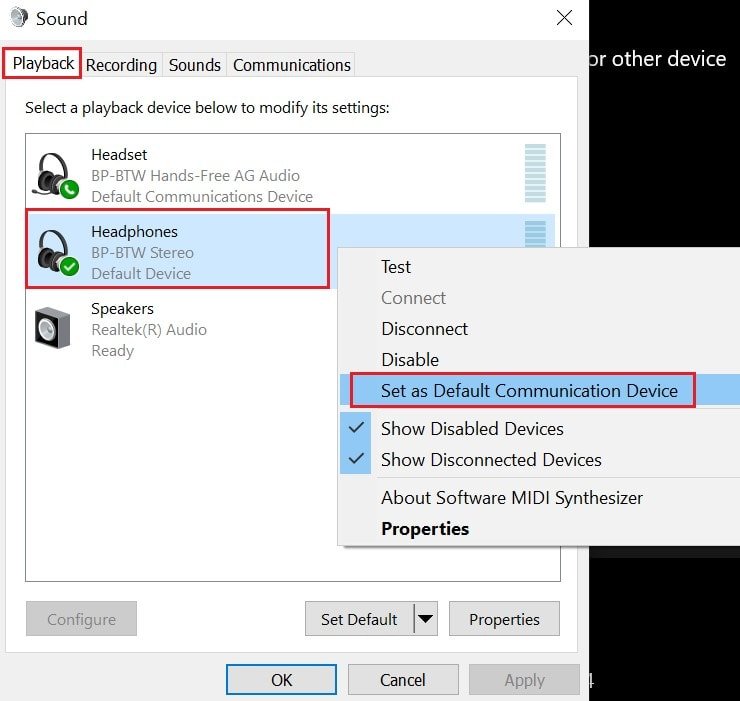
- Next, select Set as Default Device.
- Choose Set as Default Communication Device.
- Right-click on your default microphone.
- Select Properties > Go to the Levels tab.
- Drag the slider of the Microphone to increase the volume level (in case, the volume is low/mute).
- Once done, click on OK to save the changes.
10. Set the Correct Audio Input Device
The chances are high that somehow your audio input device isn’t selected in the Windows Sound Settings menu. You should check the steps below to manually select Audio Input Device on the PC to ensure the input audio device can get detected.
- Right-click on the sound icon on your taskbar.
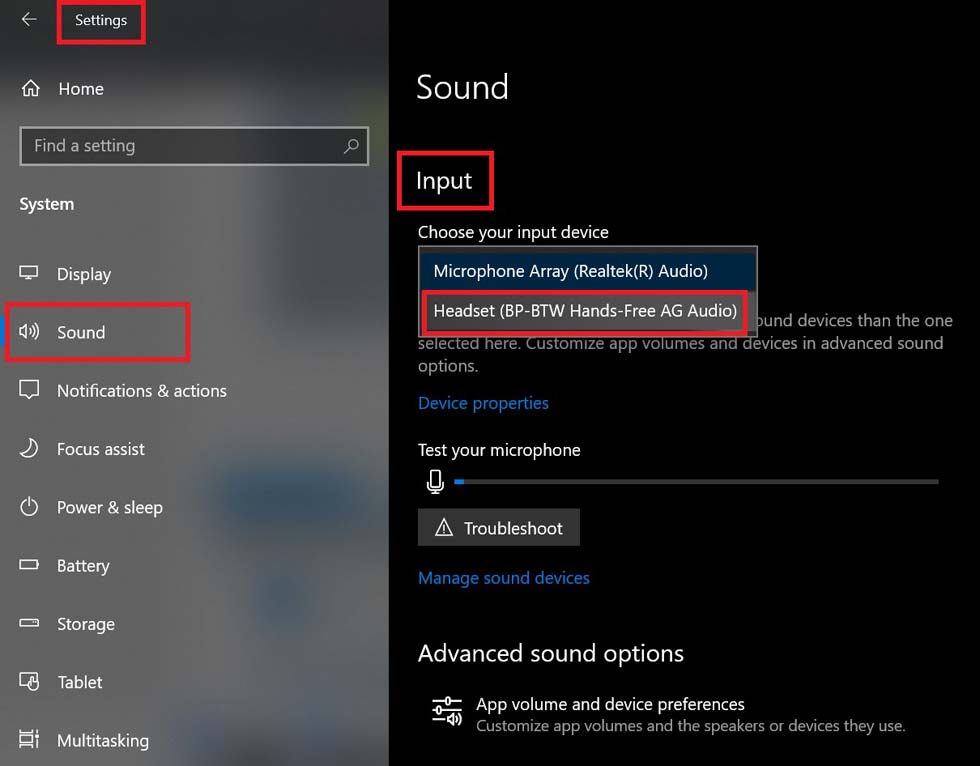
- Click on Open Sound settings.
- Now, choose your Input device that’s connected under the Input section.
- Make sure to test out the changes with the Master volume.
- If not visible, add a new microphone device.
- Once done, you can reboot the PC to refresh changes.
11. Update Windows
It’s recommended to check for system updates on the Windows PC before getting into any other workarounds. Sometimes an outdated system build can cause several issues.
- Press the Win+I keys to open Windows Settings.
- Click on Update & Security.
- Select Check for updates under Windows Update.
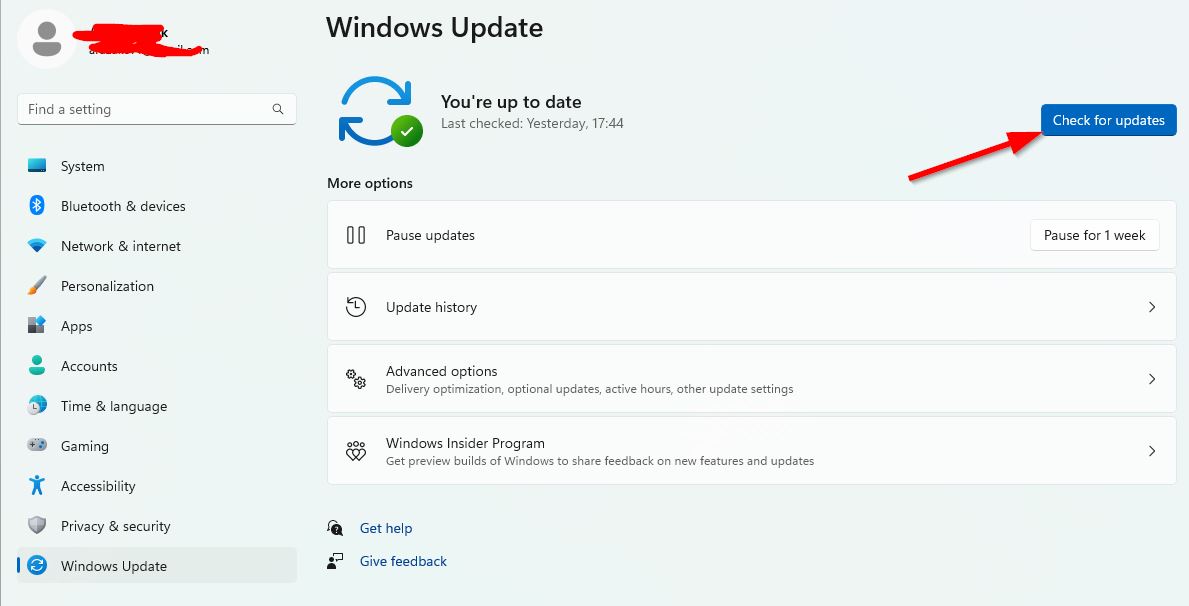
- If there is a feature update available, select Download and Install.
- Wait until the software update is complete.
- Once done, restart your computer to apply changes.
12. Allow the Microphone Access in Windows
Also, try allowing the microphone access to apps by following the steps below to ensure your system and the game can use the connected microphone. To do that:
- Press the Win+I keys to open Windows Settings.
- Go to the Privacy & Security section.
- Click on Microphone under App Permissions.
- Enable the Let desktop apps to access your microphone option.
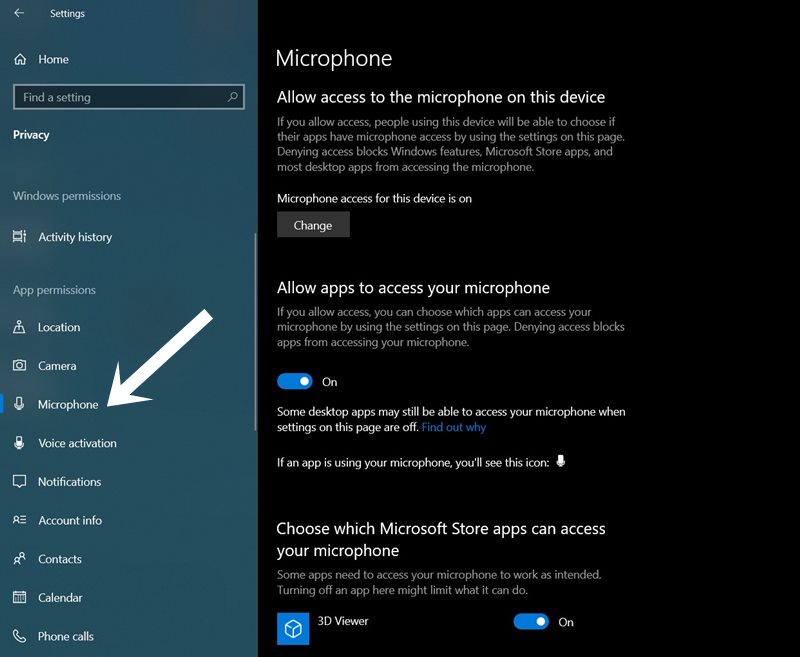
- Finally, check for the voice chat not working issue.
13. Check for Any Physical Damage to Your Mic
Another thing you can try checking the microphone device properly whether there is any physical damage visible or not. Sometimes torn wire or bent near the jack might cause issues with the connectivity. You should try using a different microphone device to check for the issue.
14. Reinstall Content Warning
If none of the workarounds help, try uninstalling and reinstalling the Content Warning game on your PC. Sometimes issues with the game installation directory may cause multiple conflicts. Though not everyone will feel good uninstalling a game, there is nothing to do at your end. So, you should uninstall and reinstall the game by following the steps below.
- Open the Steam client on your PC.
- Go to the Library > Right-click on Content Warning.
- Select Uninstall > Click on Delete to confirm.
- Wait for the uninstallation process to complete.
- Exit the Steam client > Reboot the PC.
- Launch Steam and reinstall the Content Warning game.
That’s it, guys. We assume this guide was helpful to you. For additional queries, you can comment below.
