Google has released the stable build of Android 13, and it’s been a while now. Many of you have jumped on the bandwagon to explore the new changes in the latest version of Android OS. Though Android 13 brings a truckload of improvements, not all like it. The primary reasons include stability issues and software bugs. If you are a Google Pixel 6 or Pixel 6 Pro user and can’t stay on Android 13, there’s a way to downgrade to Android 12, which we will discuss in this article.
Also Read
![]()
To downgrade a Google Pixel, we manually flash an older Android OS. But, you can’t apply the same process to Google Tensor-powered Pixel 6 and Pixel 6 Pro. Besides new features and customizations, Google has brought bootloader updates to Android 13. After you have installed Android 13 build on your Google Pixel 6 and Pixel 6 Pro, you can’t downgrade them to Android 12, due to anti-rollback protection. Hence, you can’t apply the regular process of downgrading a Google Pixel.
Does it mean that you can’t go back to Android 12 on your Pixel 6 series phone? The answer is NO. You can still boot Android 12 on the device as the upgraded bootloader is compatible with both Android 13 and Android 12.
Page Contents
How to Downgrade Google Pixel 6 and 6 Pro From Android 13 to Android 12
Method 1: By Modifying the Flashing Script
Before we get to downgrading Google Pixel 6 and 6 Pro from Android 13 to Android 12, it’s important to note that after downgrading the Android OS, you’ll miss out on the latest privacy and security features. Also, the device won’t receive new security patch updates.
Take a complete backup of your phone, as the downgrading process wipes all your data. Ensure you have installed the latest ADB and Fastboot binaries on your PC.
Step 1: Download the Android 12 factory image for your Google Pixel.
- Google Pixel 6
- Google Pixel 6 Pro
Step 2: Extract the downloaded ZIP file and file the bootloader image. The file should be named as “bootloader-[device codename]-slider-[major version]-[minor version].img”.
Step 3: Delete the bootloader image from the extracted folder.
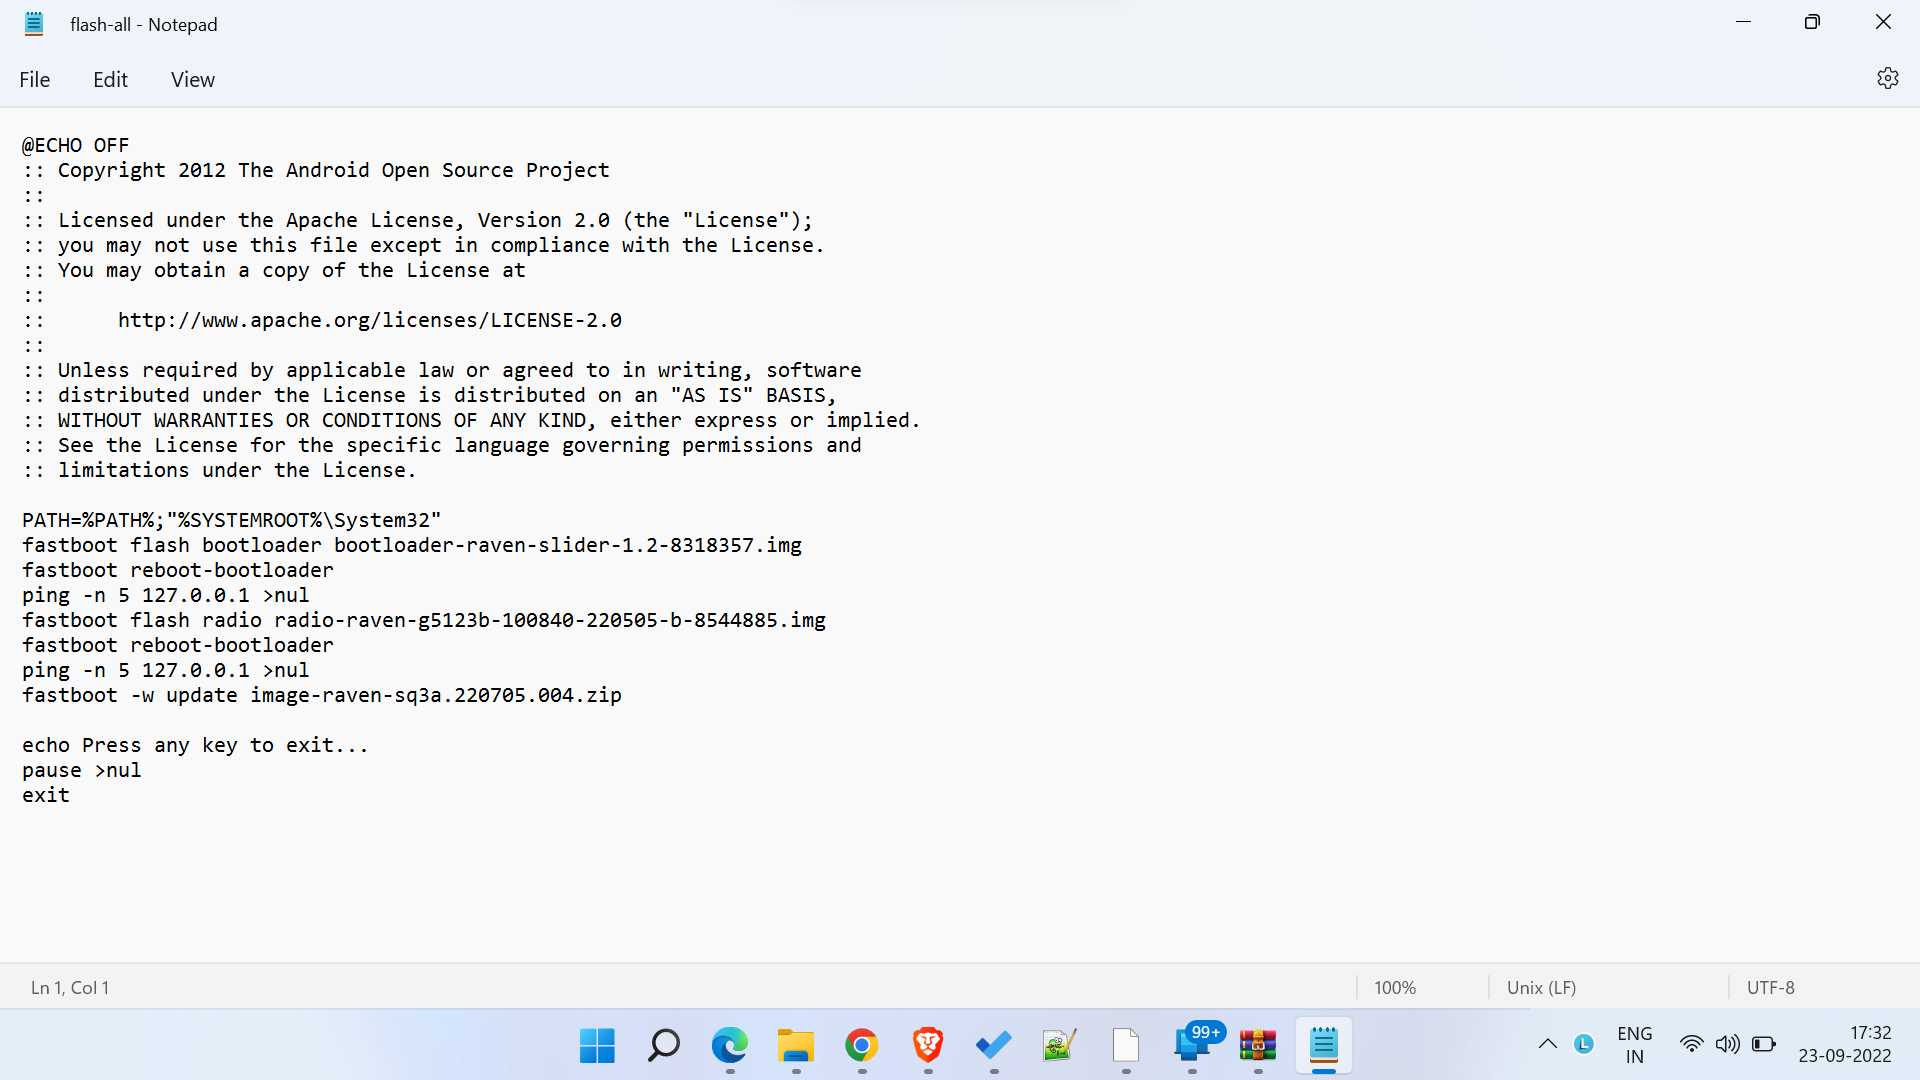
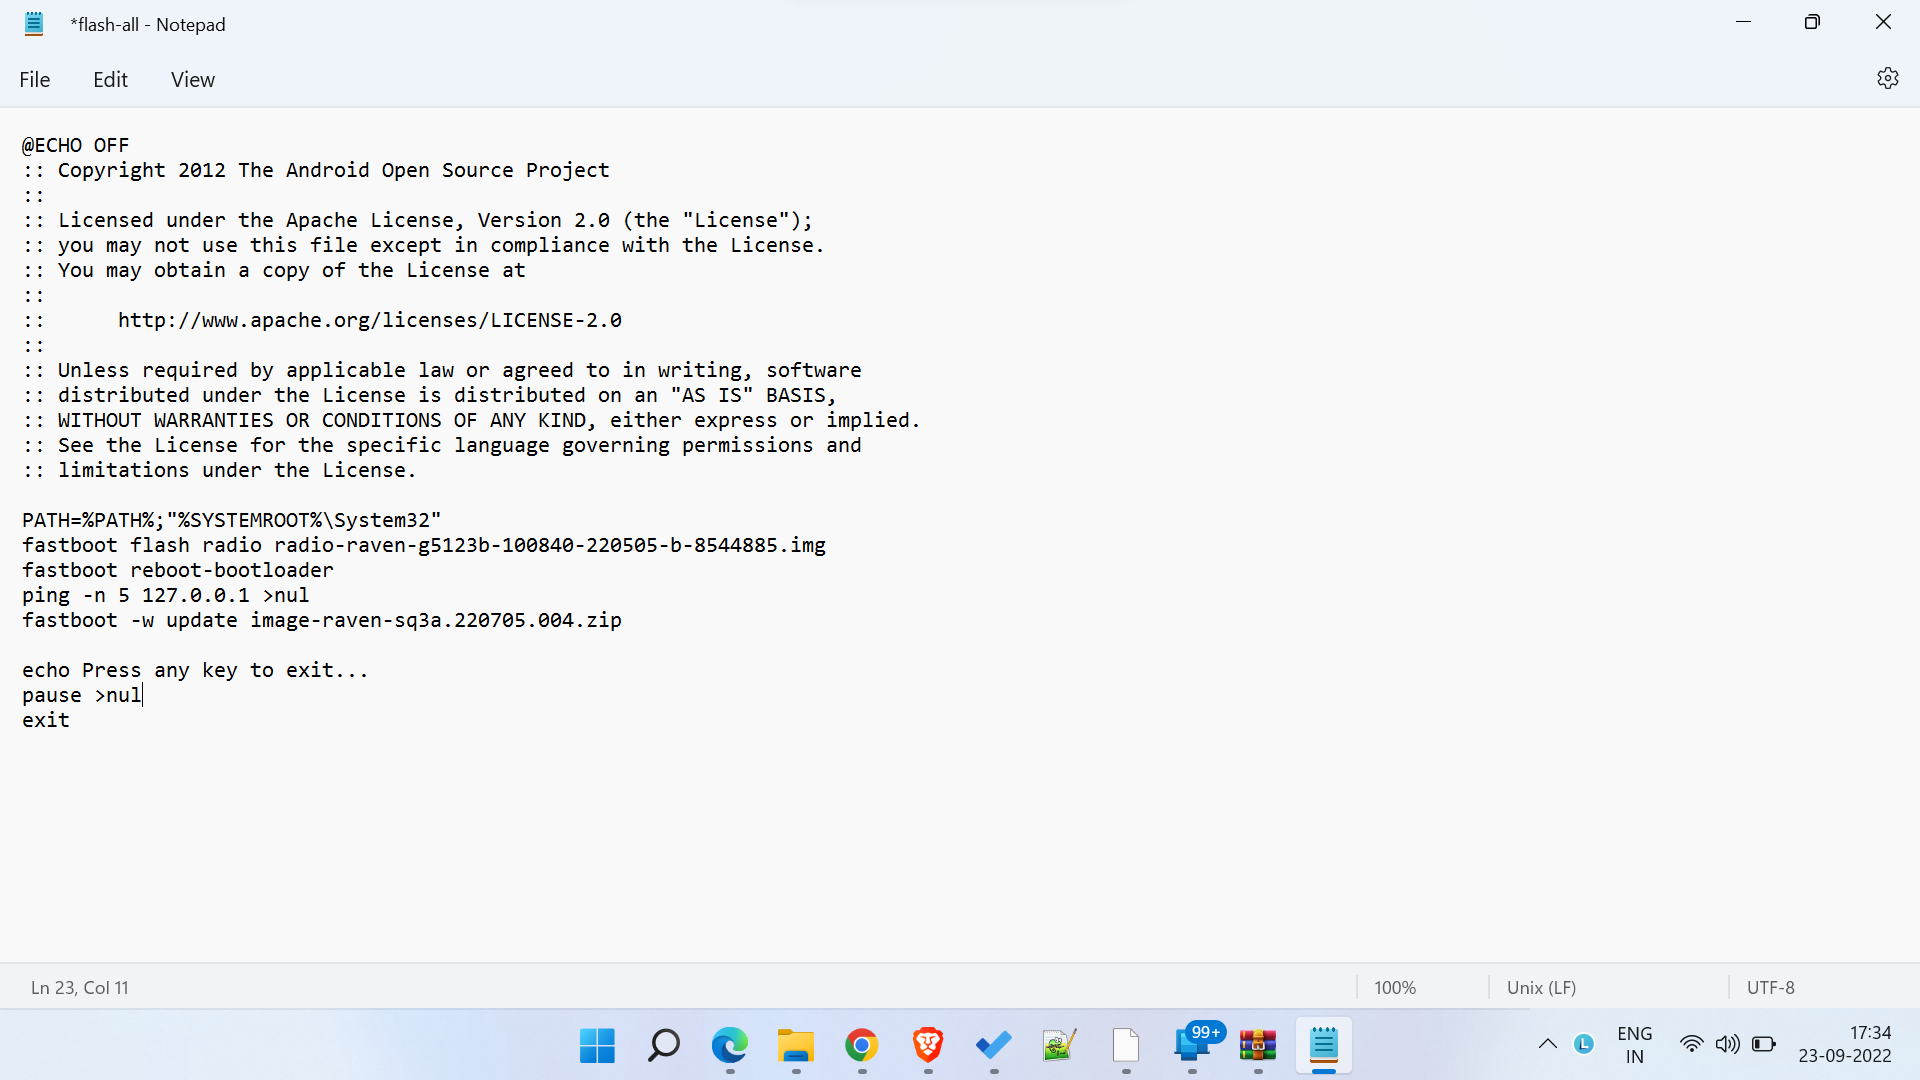
Step 4: If you’re using a Windows PC, open the “flash-alll.bat” file in Notepad or any other text editor. Now, remove the bootloader flashing-related portion, add “–force” (without quotes) between “-w” and “update” arguments in the system image flashing section, and save the file.
If you’re a Linux or macOS user, open the “flash-all.sh” file in your favorite text editor. Now, remove the bootloader flashing-related portion, add “–force” (without quotes) between “-w” and “update” arguments in the system image flashing section, and save the file. See the above images for reference.
Step 5: Now, we are ready to flash the Android 12 factory image via Fastboot. You need to have an unlocked bootloader to flash via Fastboot. You should therefore unlock the bootloader if not done already.
Step 6: Open the command window on your computer and navigate to the extracted Android 12 factory image location. You can navigate to the extracted folder on Windows, press Shift + right-click, and click Open Windows PowerShell here.
Step 7: Run the following flashing script.
- For Windows:
.\flash-all.bat- For macOS and Linux:
./flash-all.shStep 8: Wait until the flashing process is complete. The device should reboot automatically.
The first reboot after flashing the Android 12 factory image can take a little longer. Do not panic and press any buttons. Thanks to XDA Developers for sharing this method.
Method 2: By Flashing Official Developer Support Images
Google offers Android 12 system images for the Pixel 6 and Pixel 6 Pro based on stable Android 12 and Android 12L. These builds are intended for developers that feature an updated bootloader version. The Developer Support Images include new security fixes and incremented anti-rollback counter.
Download Developer Support Images for Pixel 6 and Pixel 6 Pro
After you’ve downloaded the Developer Support Images for the target device, follow these steps to flash the build via Fastboot:
You need a Pixel 6 or Pixel 6 Pro with an unlocked bootloader to perform the required steps. You should therefore unlock the bootloader if not done already. Also, make sure that you have installed the latest ADB and Fastboot binaries on your PC.
Step 1: Extract the zip file and paste the extracted files onto the ADB and fastboot folder.
Step 2: Enable USB Debugging on your phone. It is located under the Developer Options. If you can’t find it, go to Settings > About Phone and tap 7 times on the build number to enable Developer Options. Now, find the Developer Options inside the Settings app and enable USB Debugging.
Step 3: Connect your phone to your computer through a USB cable.
Step 4: Open the command window on your computer and navigate to the ADB and fastboot folder location. On Windows, you can simply do it by navigating to the ADB folder, pressing Shift + right-click, and tapping Open Windows PowerShell here.
Step 4: Run the following command to reboot the phone into Fastboot mode.
adb reboot bootloaderStep 5: Run the following command on your Mac or Linux PC:
flash-allThis command executes the flash-all.sh script file that installs baseband firmware, operating system, and bootloader. Windows users can simply double-click the flash-all.bat file.
Step 6: Your device should reboot into the Android 12 OS.
Final Words
I would not recommend downgrading your Google Pixel from Android 13 to Android 12. However, if you are facing various software bugs, system glitches, or stability issues and feeling frustrated with Android 13, downgrading to Android 12 should not be a bad choice. I hope this guide was useful to you. Have any questions or doubts? Write them in the comments below, and we’ll try to respond as soon as possible.


Hii