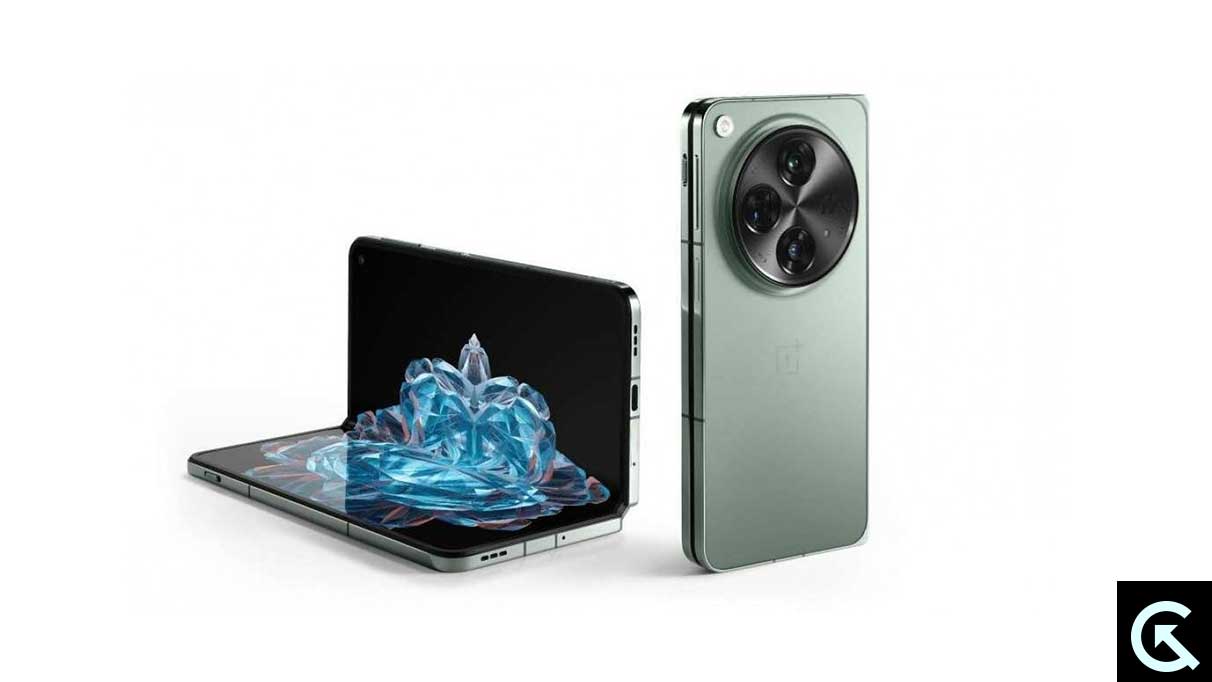
The OnePlus Open is one of the best foldable smartphones that money can buy now. It uses the most mature foldable technology and blurs the line between a slab phone and a foldable even more. If you have got your hands on one of these, you might have noticed that the device comes with Google Dialer by default.
You must use the Google Dialer to make and receive phone calls on your OnePlus Open. Sometimes, recording these calls becomes necessary, and this is where the call recording feature comes in handy. Although the Google Dialer does support call recording, it might not be available in all countries and all regions.
But don’t worry; we will share two methods to enable call recording on OnePlus Open in any country, whether incoming or outgoing. We will also show you how to record calls automatically and disable any call-recording announcements so that you can record calls without any worries. So, without any further ado, let’s get started.
Also Read
Page Contents
Enable Call Recording In Any Country (Google Dialer)
Google’s Phone app, popularly known as the Google Dialer, does not allow users of all countries to record calls. Even in the countries where it is allowed, Google loudly announces that the call is being recorded so that the person on the other side can hear it loud and clear.
This might not be ideal for many users who simply want to record calls so as to use them as evidence or a reminder in the future. Thankfully, there is a way to get around this issue and get call recording in any country. This solution was suggested by XDA member AMooza on a forum. Follow the steps below:
Note: You need a computer for this. Any computer running Windows, Linux, or macOS will work.
Step 1: Enable USB Debugging
- Open the Settings app on your OnePlus Open.
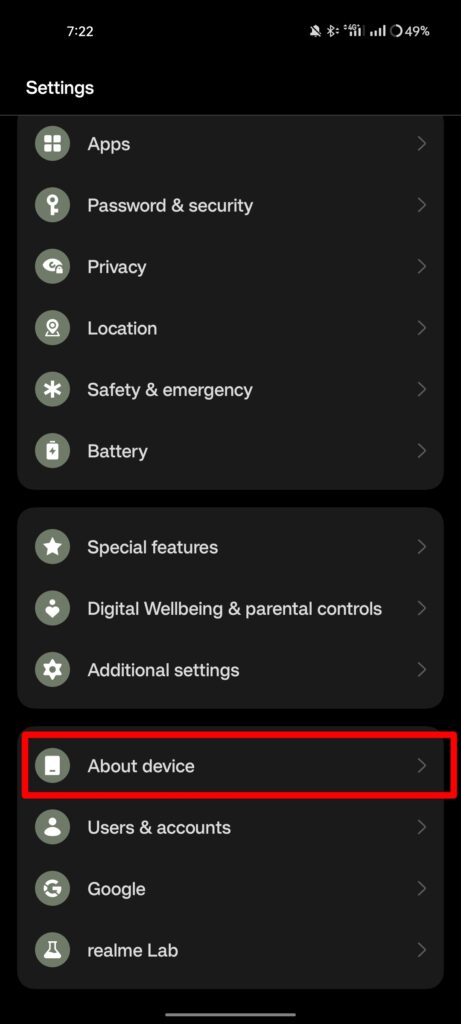
- Scroll down and tap on About device > Version.
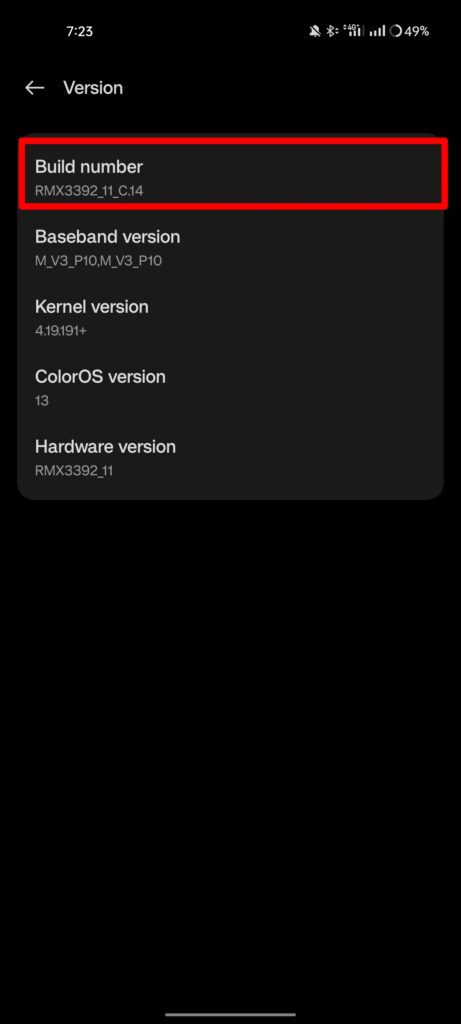
- Tap on the Build number 5 to 7 times to enable the Developer Options.
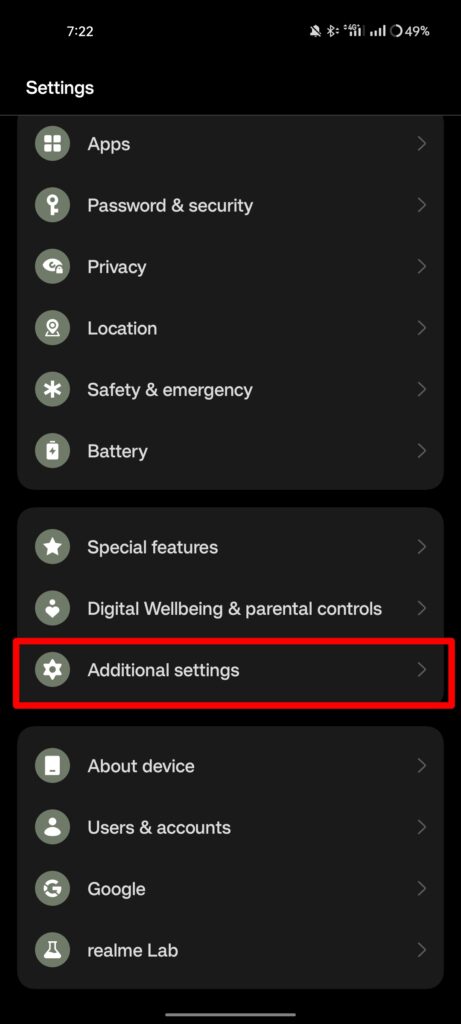
- Now, go back to the main Settings page, and tap on Additional settings.
- Tap on Developer options.
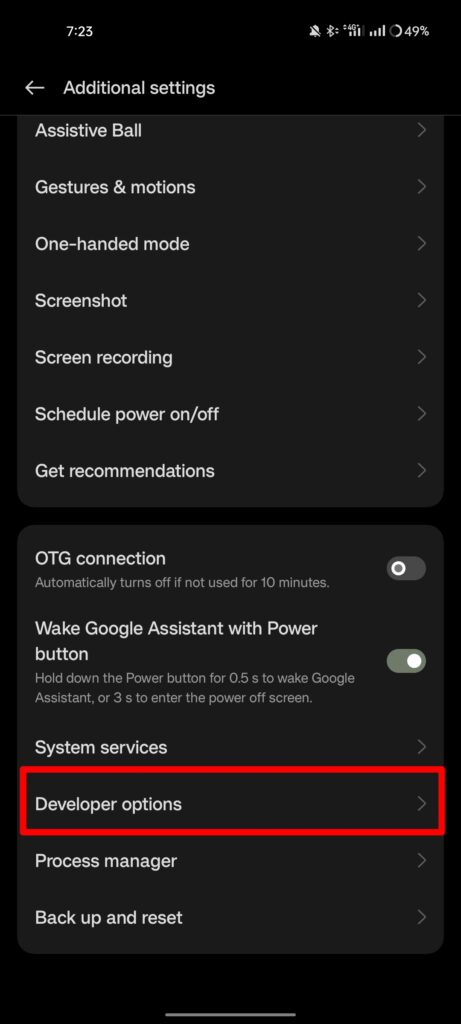
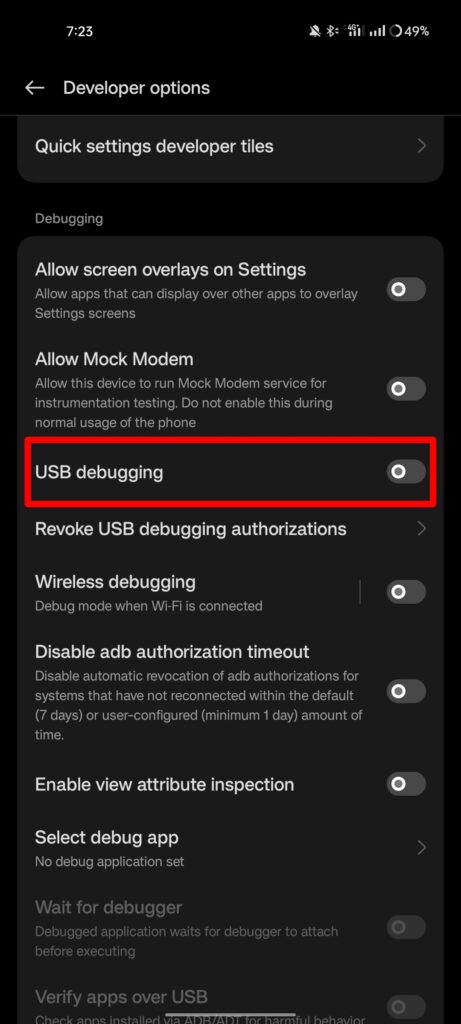
- Find the USB Debugging option in the Developer Settings and toggle it ON.
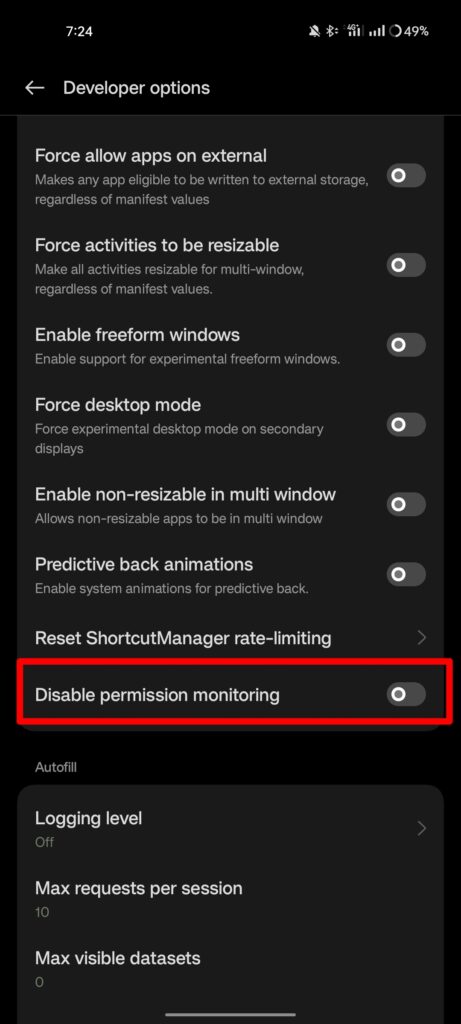
- Under the Apps section, turn ON the toggle next to Disable permission monitoring.
- Restart your phone.
Step 2: Set Up ADB
You’ll need the Android Debug Bridge (ADB) to execute commands on your smartphone. We have instructions for setting it up on Windows, macOS, and Linux. Follow the instructions and set it up on your respective computer.
Windows:
Note: You may need to install Android USB drivers tailored to your device if you haven’t previously. Drivers for such devices are typically pre-installed, but if you need them, you may always grab them from the manufacturer’s website.
- First, download the Android SDK Platform Tools ZIP for Windows from this website.
- When the download is complete, extract the ZIP file and save it to your internal storage.
- Make sure USB debugging is enabled on your phone.
- Connect your phone and the computer using a USB cable.
- Now, go to the folder where you extracted the SDK Platform Tools ZIP.
- For Windows 10, press and hold the Shift key, right-click on an empty area in the folder and select Open command window here or Open PowerShell window here. For Windows 11, simply right-click and select Open in Terminal.
- Type the following command and press Enter:
adb devices - On your phone, tap on Allow when prompted.
- You can now start executing ADB commands.
macOS:
- First, download the Android SDK Platform Tools ZIP for macOS from this website.
- When the download is complete, extract the ZIP file and save its contents to your internal storage.
- Make sure USB debugging is enabled on your phone.
- Connect your phone and the computer using a USB cable.
- Now, go to the folder where you extracted the SDK Platform Tools ZIP.
- Right-click on the folder and select Open Terminal at Folder.
- Type the following command and press Enter:
./adb devices - On your phone, tap on Allow when prompted.
- You can now start executing ADB commands.
Linux:
- Open the Terminal and execute the following command to install the Android SDK Platforms tool on your machine.
- On Debian/Ubuntu-based Linux:
sudo apt-get install adb - On Fedora-based Linux:
sudo dnf install android-tools - Now, make sure USB debugging is enabled on your phone.
- Connect your phone and the computer using a USB cable.
- Now, find the folder where the SDK Platform Tools was installed and open a terminal there.
- Type the following command and press Enter:
./adb devices - On your phone, tap on Allow when prompted.
- You can now start executing ADB commands.
Step 3: Set Up jOneplus Tools
- Then, you need to install the jOneplus Tools app on your OnePlus Open.
- Go to the APK Mirror website and download the APK from there.
- Install the jOneplus Tools and open it.
Now, you need to grant the permissions for the jOneplus Tools app via ADB. Enter the following commands one by one and press Enter:
adb devices
adb shell pm grant net.jroot3d.joneplustools android.permission.WRITE_SECURE_SETTINGS
- Go to the Call Recorder tab.
- Start the Call Recorder Service and the Call Recorder.
- You can turn off notifications for jOnePlus Tools in the settings if the unclearable silent notification is too much to bear.
Step 4: Set Up the OnePlus Phone and Contacts Apps
- Get the OnePlus Dialer and OnePlus Contacts APKs from this Telegram group, install them on your device.
- Once installed, set them as the default dialer and contacts app for your phone, respectively.
- Do not disable the Google Dialer or the Phone app. If you disable the Google Dialer, then you won’t be able to make any calls.
- So, if you want to keep making calls, don’t turn off the Google Phone app.
If you live in a country where call recording isn’t officially available, you may still use this approach to activate it on your OnePlus smartphone. However, it’s necessary to be aware of local rules and regulations governing call recording and privacy.
Enable Call Recording In Any Country (ODialer)
Instead of doing all of this, you can simply install ColorOS’ official dialer called ODialer. Since OxygenOS is a modified version of the ColorOS, you can install the ODialer on your OnePlus Open as well.
ODialer is available on the Google Play Store, so you don’t have to worry about anything much. Plus, you can record all the calls with this dialer without any regional or legal restrictions. This was confirmed by a user on the same forum. Follow the steps below:
- Open the Google Play Store and search for ODialer or simply follow this link.
- Tap on Install.
- Once the app is installed, tap on Open.
- Allow all the permissions needed for the app.
- Also, set it as your default dialer app when prompted. Tap on Set as default.
- Now, tap on the three dots on the top right corner of the screen.
- Then tap on Settings.
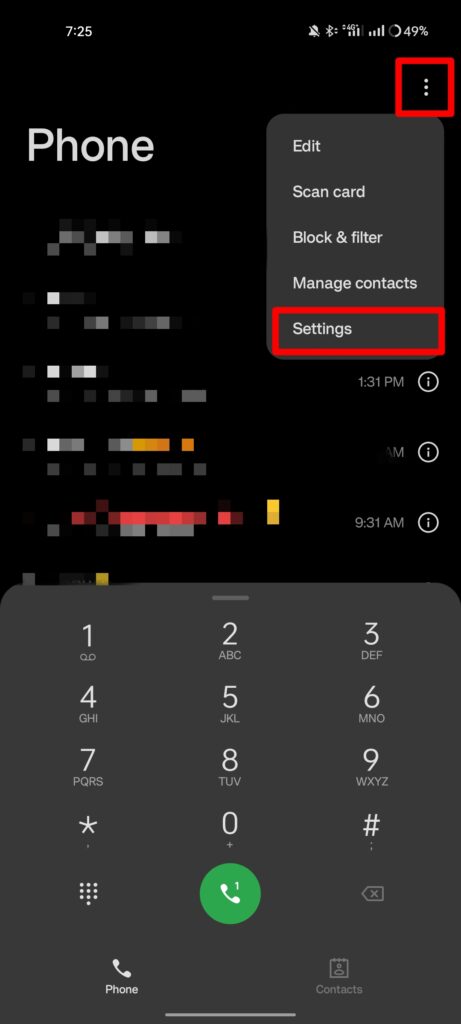
- Tap on Call recording.
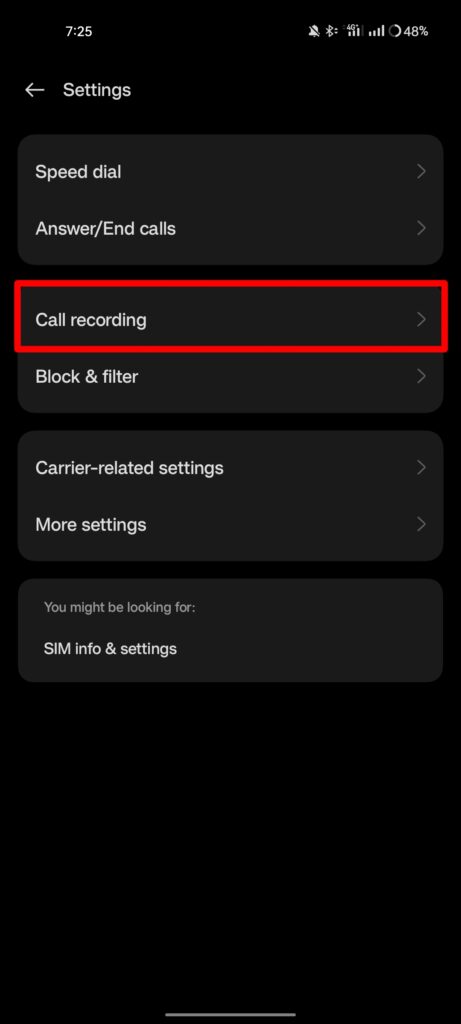
- Turn on the toggle next to Record all calls.
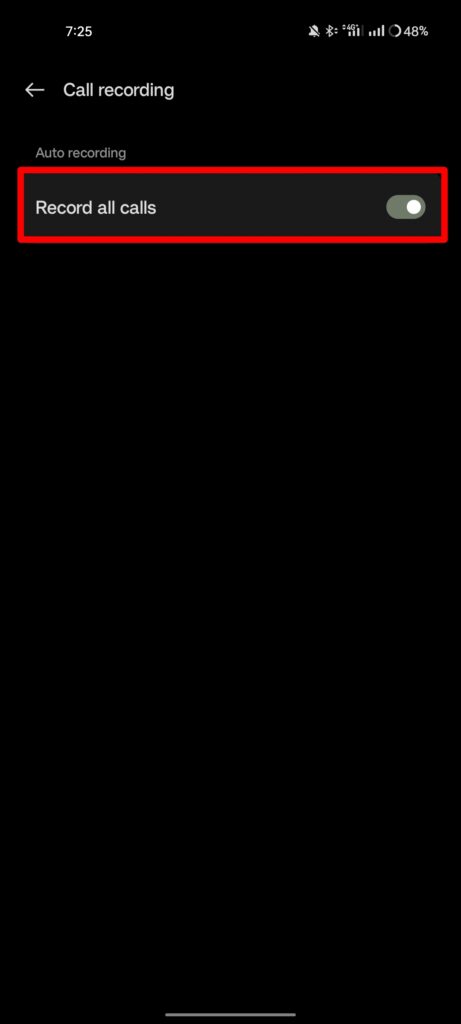
- If this doesn’t work, install the OnePlus Call Recorder APK and the option should show up.
- Now, you can disable the Google Dialer or the Phone app if you want to.
Summing Up
Legal and privacy restrictions have limited the call recording capabilities in several nations. People who use call recording for things like keeping track of key discussions or for their jobs may find this frustrating. Call recording may not be enabled by default in all regions, but it can be done with a few workarounds and the help of third-party apps.
We hope that this article has helped you do exactly that and get back to recording calls. It’s important to be aware of and follow the regulations in your area regarding call recording, as turning it on in some areas could get you in trouble. Use call recording carefully and only if everyone involved agrees to it.
