Tom Clancy’s Ghost Recon Breakpoint is an online-only tactical shooter video game where players will have to fight against a rogue spec ops faction named the Wolves. Though Ubisoft has done a tremendous job in terms of development and other aspects, it seems that Windows platform users aren’t happy enough with the optimization in some cases. The chances are high that if you’re using a Windows PC then you might have encountered the High GPU and CPU Usage on Ghost Recon Breakpoint so often.
As you’re here and reading this article that means you’re definitely experiencing several issues or bugs regarding the in-game performance like FPS drops, stutters, graphical glitches, lags, texture loading issues, and more. Well, most of these issues appear on the Windows desktop or laptop due to incompatibility with the hardware specifications. Whenever the game’s system requirements don’t meet the computer’s expectations, game launching or gameplay issues are bound to occur.
Whereas it’s also possible that even though your PC specification is compatible with the game’s system requirements, somehow the system resources can’t be able to pull out the performance. It might happen due to the background running tasks, an outdated game version, an outdated graphics driver, an outdated Windows operating system build, third-party overlay apps running in the background, overclocked CPU or GPU performance, corrupted or missing game files, etc.

Page Contents
- How to Fix High GPU and CPU Usage on Ghost Recon Breakpoint
- 1. Check System Requirements
- 2. Restart the PC
- 3. Run Ghost Recon Breakpoint as Administrator
- 4. Update Ghost Recon Breakpoint
- 5. Verify and Repair the Game Files
- 6. Use a Dedicated Graphics Card
- 7. Update the Graphics Driver
- 8. Check for Windows Updates
- 9. End Unnecessary Background Tasks
- 10. Disable CPU or GPU Overclocking
- 11. Select Best Performance in Power Mode
- 12. Check Updates for Chipset Drivers
- 13. Disable Overlay Apps
- 14. Disable Antivirus Protection
- 15. Perform a Clean Boot
How to Fix High GPU and CPU Usage on Ghost Recon Breakpoint
Luckily, here we’ve shared with you all the potential workarounds that should come in handy to fix the high CPU or GPU usage on your Windows computer while running Ghost Recon Breakpoint. If you’ll be able to terminate the unnecessary applications from the background as well as foreground and follow all other methods one by one, the system performance will increase. So, without wasting any more time, let’s jump into it.
1. Check System Requirements
To start with, we’ve provided the game’s system requirements for you to cross-check whether your PC specification meets the requirements or not. If any of the hardware seems outdated or not compatible with the game, you can try upgrading to the higher variant. You can check out both the minimum and recommended requirements below. If everything seems okay then head over to the next method.
MINIMUM REQUIREMENTS:
- Requires a 64-bit processor and operating system
- OS: Windows 8.1, Windows 10 (64-bit versions only)
- Processor: AMD Ryzen 3 1200 @3.1 GHz, Intel Core i5 4460 @ 3.2 GHz, or better
- Memory: 8 GB RAM
- Graphics: AMD Radeon R9 280X or NVIDIA GeForce GTX 960 (4 GB VRAM with Shader Model 5.0 or better)
- DirectX: Version 11
- Network: Broadband Internet connection
- Storage: 67 GB available space
RECOMMENDED REQUIREMENTS:
- Requires a 64-bit processor and operating system
- OS: Windows 8.1, Windows 10 (64-bit versions only)
- Processor: AMD Ryzen 5 1600 @3.2 GHz, Intel Core i7 6700K @4.0 GHz, or better
- Memory: 8 GB RAM
- Graphics: AMD Radeon RX 480 or NVIDIA GeForce GTX 1060 (6 GB VRAM with Shader Model 5.0 or better)
- DirectX: Version 11
- Network: Broadband Internet Connection
- Storage: 67 GB available space
2. Restart the PC
The chances are high that somehow your PC is going through a temporary system glitch or cache data issue. In that scenario, the system resources of the PC might gonna encounter several problems whatsoever. So, make sure to restart the computer properly to check for the issue. Multiple reports are coming out that a normal reboot of the PC can easily fix temporary glitches.
3. Run Ghost Recon Breakpoint as Administrator
Make sure to run the game app file on your PC as administrator access to allow the User Account Control (UAC) access to the system. In some cases, your system requires the UAC access permission to run a program which is quite important. By following the steps below you’ll have to allow the admin access for once and it won’t ask you for the same again. To do so:
- Go to the installed Ghost Recon Breakpoint game directory.
- Right-click on the game application file on your PC.
- Click on Properties > Click on the Compatibility tab.

- Click on the Run this program as an administrator checkbox to enable it.
- Once done, click on Apply and then OK to save changes.
4. Update Ghost Recon Breakpoint
Another thing you can do is simply update the game manually by following the steps below to ensure there is no issue with the outdated patch version. An outdated game version can eventually trigger multiple issues with the performance.
For Steam:
- Open the Steam client > Go to Library.
- Click on Ghost Recon Breakpoint from the list of installed games.
- Now, the client will automatically search for the available update.
- If there is an update available, click on Update.
- Wait for a while to complete and relaunch the game.
For Epic Games Launcher:
- Open the Epic Games Launcher > Head over Library.
- Now, click on the three dots icon of Ghost Recon Breakpoint.
- Make sure the Auto Update option is turned on.
For Ubisoft Connect:
- Launch Ubisoft Connect on the PC.
- Click on the Games tab > Head over to the My Games section.
- Select the Ghost Recon Breakpoint game tile.
- Now, click on Update to check for available updates.
- Once done, make sure to reboot the PC to apply changes.
5. Verify and Repair the Game Files
Sometimes missing or corrupted game files installed on the PC might also trigger several issues with the game launching or even conflicting system resources to run properly.
For Steam:
- Open the Steam client on the PC and log into the account.
- Head over to Library > Right-click on Ghost Recon Breakpoint.
- Click on Properties > Click on the Local Files tab.
- Then click on Verify Integrity of game files.
- Now, wait for the process to complete, and close the Steam client.
- Finally, restart the PC to apply changes.
For Epic Games Launcher:
- Open the Epic Games Launcher > Click on Library.
- Click on the three-dot icon of Ghost Recon Breakpoint.
- Click on Verify and it’ll start verifying the game files.
- Wait for the process to complete and restart the launcher.
For Ubisoft Connect:
- Open Ubisoft Connect on the PC.
- Go to the Games tab > Click on Ghost Recon Breakpoint.
- Select Properties > From the Local Files section, click on Verify Files.
- Now, wait for the verification process to finish and then reboot the PC.
6. Use a Dedicated Graphics Card
It’s highly recommended to use the dedicated graphics card on the PC to run graphics-intensive games like Ghost Recon Breakpoint smoothly. It’ll reduce game stutters, lags, and frame drops apart from GPU/CPU using 100%. If you don’t know which settings you need to adjust, then follow the steps below.
For Nvidia GPU:
- Right-click on the blank desktop screen > Open Nvidia Control Panel.
- Go to 3D Settings > Click on Manage 3D Settings.
- Open Program Settings > Select Ghost Recon Breakpoint from the list.
- Select Preferred graphics processor for this program from the list.
- Once done, you can see it as High-Performance Nvidia Processor.
- Make sure to save changes and reboot the PC.
For AMD GPU:
- Right-click on the blank desktop screen > Open AMD Radeon Settings.
- Head over to Additional Settings > Go to Preferences.
- Click on Power > Click on Switchable Graphics Application Settings.
- Select Ghost Recon Breakpoint from the list.
- If the game is not visible, select Add Application to include the game.
- Once done, select High Performance from Graphics Settings.
- Finally, reboot the PC to apply changes.
7. Update the Graphics Driver
An outdated or corrupted graphics card driver can trigger multiple issues with the games or system performance while running programs. It’s highly recommended to check the graphics driver update. To do so:
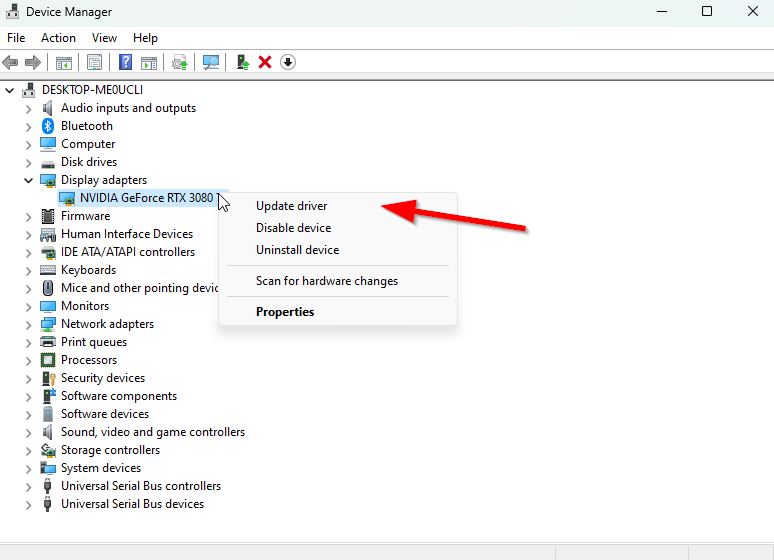
- Press the Win+X keys to open the Quick Link Menu.
- Click on Device Manager from the list > Double-click on Display adapters.
- Right-click on the dedicated graphics card that you’re currently using.

- Click on Update driver > Choose Search automatically for drivers.
- If there is the latest update available, it’ll automatically download & install the latest version.
- Once done, restart the computer to apply changes immediately.
Alternatively, you can manually download the latest version of the graphics driver and install it on the PC via the official website. Make sure to download the graphics driver file respective to your graphics card model and manufacturer.
- Nvidia graphics card users can update the GeForce Experience app via the Nvidia official site.
- AMD graphics card users can visit the AMD website.
- While Intel graphics users can visit here.
8. Check for Windows Updates
An outdated Windows OS version or build number can eventually trigger performance issues, program crashes, device driver connectivity issues, and so on. Just like updating the game, updating the system software to the latest version is always recommended. To do so:
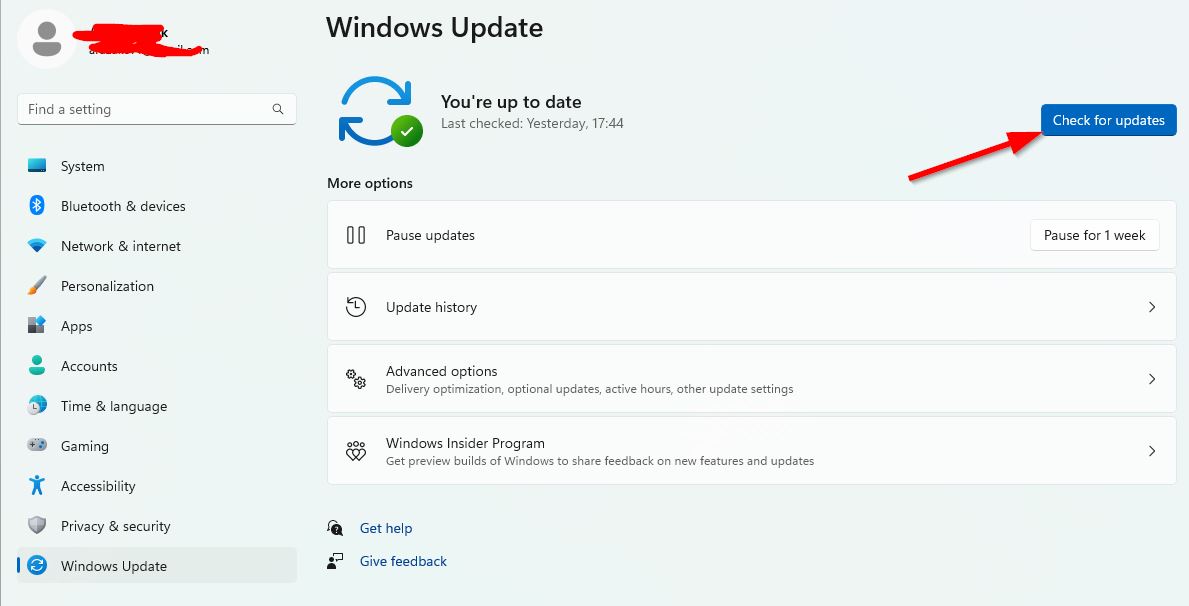
- Press the Win+I keys to open Windows Settings.
- Click on Update & Security.
- Select Check for updates under Windows Update.

- If there is a feature update available, select Download and Install.
- Wait for a while to complete the software update process.
- Once done, restart your computer to install the update.
9. End Unnecessary Background Tasks
Unnecessary background running tasks or programs can eat up a lot of system resources like CPU or Memory usage literally reducing system performance. You can close all the unnecessary background running tasks completely. To do this:
- Press the Ctrl+Shift+Esc keys to open Task Manager.
- Now, click on the Processes tab.
- Click to select tasks that are unnecessarily running in the background and consuming enough system resources.
- Click on End Task to close them one by one.
- Once done, restart your system.
10. Disable CPU or GPU Overclocking
It’s also worth recommending disabling the CPU or GPU overclocking feature from your PC to the default factory state which will help in fixing the performance issues. Though overclocking can increase performance, sometimes it can affect in-game performances and causes higher CPU or GPU usage. Try using overclocking software like MSI Afterburner.
11. Select Best Performance in Power Mode
It’s also highly recommended to change the power plan on the computer because the Windows system basically uses the Balanced power plan by default. But it reduces performance which can be improved by changing the power plan. Keep in mind that the performance plan can consume higher power. To do so:
- Press the Win+R keys to open the Run dialogue box.
- Search and open Control Panel > Search and open Power Options (Power & battery).
- Click on Best Performance > Reboot your PC to save changes immediately.
12. Check Updates for Chipset Drivers
In case, your chipset drivers are outdated on the PC then such issues might appear a lot. It’s always a better idea to check for updates and fix the low CPU usage or even not using the CPU while playing games. To do so:
- Press the Win+X keys to open the Quick Link Menu.
- Click on Device Manager from the list > Double-click on System Devices.
- Right-click on the active chipset device from the list.
- Click on Update driver > Choose Search automatically for drivers.
- If there is the latest update available, it’ll automatically download & install the latest version.
- Once done, restart the computer to apply changes immediately.
Alternatively, you can directly visit the official chipset manufacturer’s website and grab the latest version of the processor model based on its architecture (64-bit). You can check the links below.
13. Disable Overlay Apps
Sometimes a couple of applications may come with an additional overlay app that basically helps the streamers or gamers a lot. However, these overlay apps can eventually conflict with the game files to run smoothly and may cause high CPU or GPU usage. You should try disabling the overlay apps manually before relaunching the game to cross-check whether the high CPU or GPU usage issue has been fixed or not. To do so:
Disable Discord Overlay:
- Launch the Discord app > Click on the gear icon at the bottom.
- Select Overlay under App Settings > Turn on the Enable in-game overlay.
- Click on the Games tab > Select Ghost Recon Breakpoint.
- Finally, turn off the Enable in-game overlay toggle.
- Make sure to reboot your PC to apply changes.
Disable Xbox Game Bar:
- Press the Win+I keys to open Windows Settings.
- Click on Gaming > Go to Game Bar.
- Turn Off the Record game clips, screenshots, and broadcast using the Game bar option.
Disable Nvidia GeForce Experience Overlay:
- Launch the Nvidia GeForce Experience app > Head over to Settings.
- Click on the General tab > Disable the In-Game Overlay option.
- Finally, restart the PC to apply changes, and launch the game again.
Disable Ubisoft Connect Overlay:
- Launch the Ubisoft Connect app on your PC.
- Make sure that you’re signed in to your Ubisoft account.
- Next, click on the hamburger menu icon at the top left corner.
- Select Settings > Go to the General tab.
- Uncheck the Enable in-game overlay for supported games checkbox to disable it.
There are some other overlay apps that can cause trouble for you something as MSI Afterburner, Rivatuner, RGB software, etc. You should turn them off as well.
14. Disable Antivirus Protection
You can also try turning off the Windows Defender option on your PC to ensure there is no antivirus software blocking the game files to run properly. Check out the following steps below.
- Press the Win+I keys to open Windows Settings.
- Click on Update & Security.
- Click on Windows Security from the left pane.
- Now, click on the Open Windows Security button.
- Go to Virus & threat protection.
- Click on Manage Settings.
- Next, you’ll need to turn off the Real-time protection toggle.
- If prompted, click on Yes to proceed further.
15. Perform a Clean Boot
Multiple users claimed that performing a clean boot on the PC did fix the system boot-up issue because some apps or tasks start at the very beginning. These tasks run all the time and consume a lot of system resources. You should follow the steps below to do so:
- Press the Win+R keys to open the Run dialogue box.
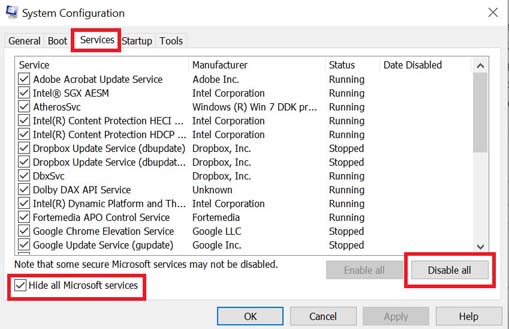
- Type msconfig and hit Enter to open System Configuration.
- Go to Services > Click on Hide all Microsoft services to enable it.

- Now, click on Disable All to turn off services.
- Click on Apply and OK to save changes.
- Next, go to Startup > Click on Open Task Manager.
- Click on the Startup tab > Ensure to select the specific task that has a higher startup impact.
- Now, click on Disable to turn it off.
- Finally, make sure to restart your computer to apply changes.
That’s it, guys. We assume this guide was helpful to you. For additional queries, you can comment below.
