In this tutorial, we will show you how to fix the Realtek High Definition Audio driver issue. These drivers allow the OS to interact with the audio hardware installed on your PC. If there are any issues with these drivers, then your PC wouldn’t be able to establish a successful connection with the hardware. As a result, it might not be able to play any type of sound. As for the reasons for this issue, then could be aplenty.
To begin with, most of the issue seems to stem out from having old audio drivers. Along the same lines, missing legacy hardware or the corrupt driver installation might also show up this error. In some cases, the Microsoft UAA Bus Driver might also conflict with the installation steps. In this guide, we will show you the steps to rectify all these issues which in turn should fix the Realtek High Definition Audio driver issue as well. Follow along for the complete instructions steps.
Page Contents
How to Fix Realtek High Definition Audio Driver issue
There isn’t any universal fix for this error. You will have to try all the below mentioned fixes until you are able to rectify the issue.
Fix 1: Update Drivers (Automatic Approach)
If you are using an outdated driver software, then there are bound to be some audio issues. In that case, it is recommended that you update the drivers to the latest version. The safest and easiest way to do so is to let Windows find and install the latest available drivers on your PC. Here are the required steps for the same:
- Right-click on the Start menu and select Device Manager.
- Then go to the Sound, Video and Game Controllers section.
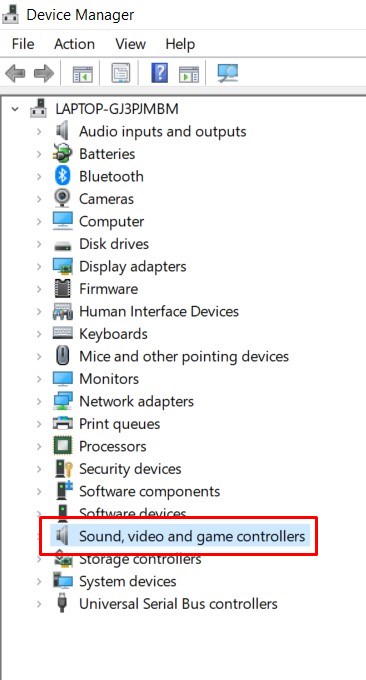
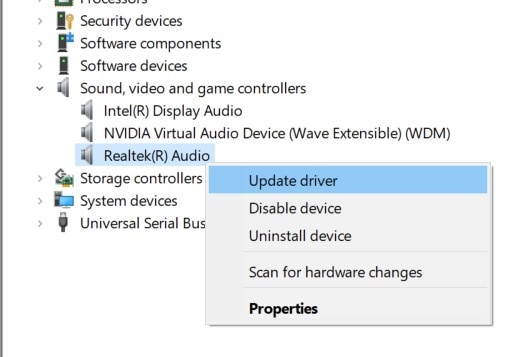
- Within that, you should see the Realtek Audio Driver. Right-click on it and select Update Drivers.
- Then click on Search automatically for updated graphics drivers.
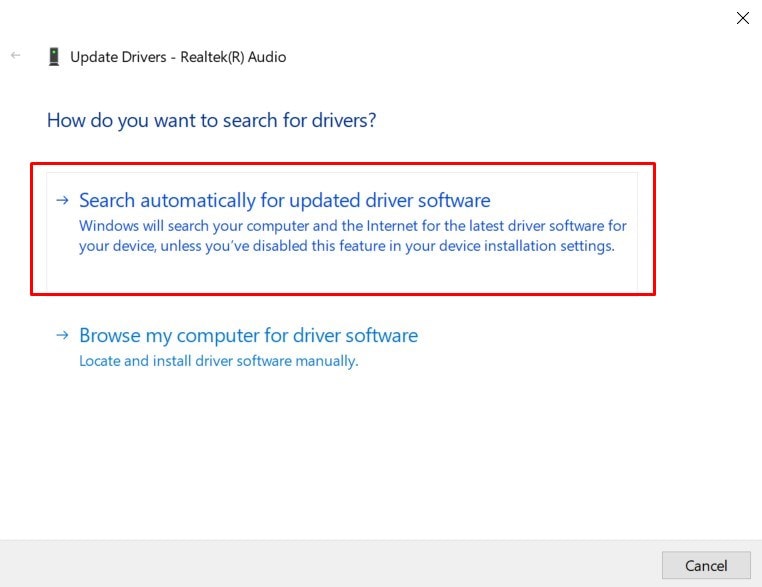
- Windows will then search for the latest available drivers and install them.
- Once that is done, restart your PC and check if it is able to fix the Realtek High Definition Audio driver issue.
Fix 2: Update Drivers via Legacy Hardware
In some cases, users aren’t able to find the Sound, Video, and Game Controllers option under Device Manager. If that’s the case with you as well, then you could manually add the drivers and then let Windows install them. Follow the below steps for that:
- Launch the Run dialog box using the Windows+R shortcut key combinations.
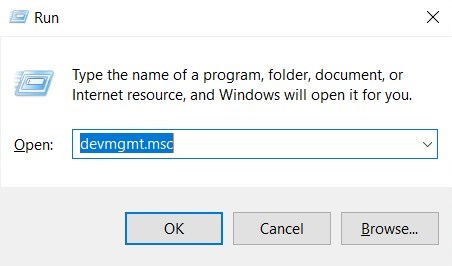
- Type in devmgmt.msc and hit Enter. This will take you to the Device Manager.
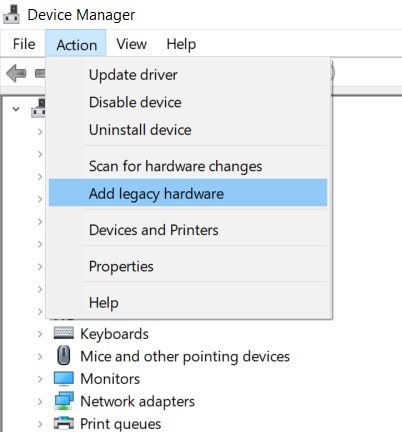
- Head over to the Action tab from the top menu and select Add legacy hardware.
- In the next dialog box that appears, select Search for and install the drivers automatically (recommended).
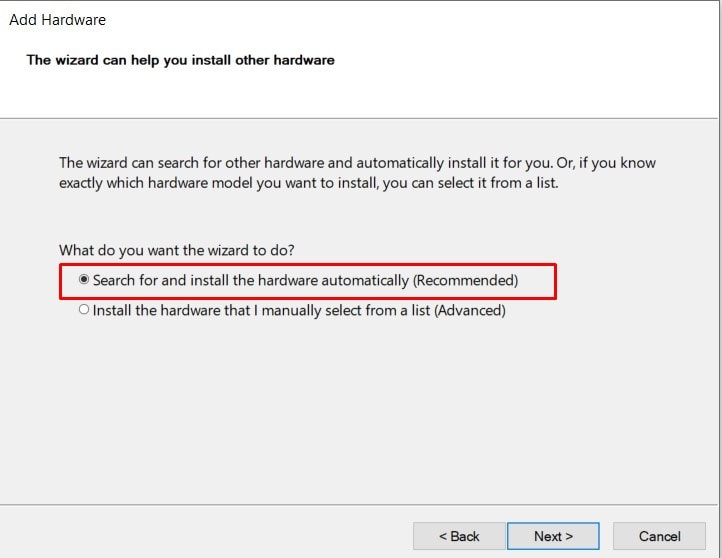
- Click Next and the Sound, Video, and Game Controllers should now appear under Device Manager. Right-click on it select Update and follow the instruction given in the first fix.
- Once the drivers are installed, restart your PC. Now see if it is able to able to fix the Realtek High Definition Audio driver issue.
Fix 3:Disable Microsoft UAA Bus Driver
Some users aren’t able to update their drivers, either via the automatic or manual approach. In those cases, the Microsoft UAA Bus Driver for High Definition Audio might be the culprit. It might interfere or conflict with the installation of Realtek drivers. So the best bet, in this case, is to temporarily disable these UAA Bus Driver. We would then install the Realtek Drivers and then re-enable the Bus Drivers. Here’s how it could be done:
- Use the Windows+R shortcut keys to launch the Run dialog box.
- Then type in devmgmt.msc and hit Enter. This will launch the Device Manager.
- Head over to the System Devices section and scroll to the Microsoft UAA Bus Driver for High Definition Audio.
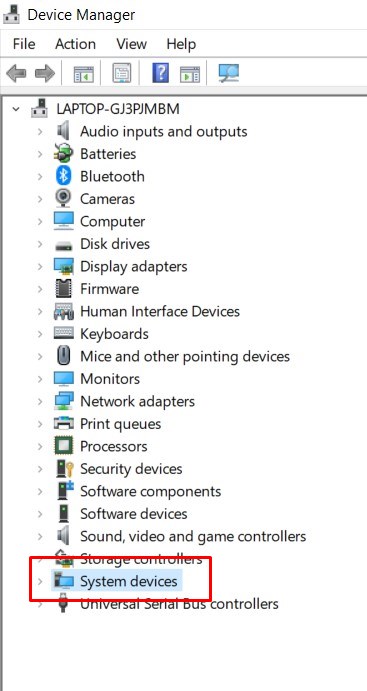
- Now right-click on it and select Disable.
- Once you have disabled them, install the latest Realtek drivers either via the Automatic approach (Fix 1) or through Legacy hardware (Fix 2).
- After installing the Realtek drivers, re-enable the UAA Bus Drivers. Check if this is able to fix the Realtek High Definition Audio driver issue.
Fix 4: Reinstall the Drivers
If none of the above methods managed to work out in your favor, then you should consider uninstalling them from your PC and then reinstalling the latest build. Follow the below steps for that:
- Right-click on the Windows icon and select Device Manager from the menu.
- Click on the Sound, Video, and Game Controllers to expand the menu.
- Now right–click on the Realtek Audio Driver and select Uninstall.
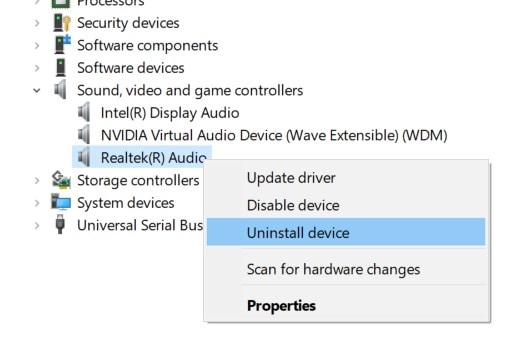
- Select Yes in the confirmation dialog box. The drivers will then be removed from your PC.
- Now go to the Action section under Device Manager and select Scan for Hardware Changes.
- Windows will then search for the latest driver and install it on your PC. Once that is done, restart your PC and the issue should now be rectified.
With this, we conclude the guide on how to fix the Realtek High Definition Audio driver issue. We have shared four different methods for the same, any one of which should be able to do its job. Do let us know in the comments which one managed to rectify this driver issue. Rounding off, here are some iPhone Tips and Tricks, PC tips and tricks, and Android Tips and Trick that you should check out as well.
