As the title suggests, here we’ll gonna share with you some of the possible workarounds on How to Fix the Skype Video Not Working problem. It’s reported by several users that while joining a video call or a video conference meeting, their Skype video not going well and has the display issue. Now, it’s worth mentioning that if your webcam has some issues, your Skype video calling won’t gonna work. So, if you’re also one of the victims then check out this troubleshooting guide.
Now, there may be plenty of reasons for this particular issue. But to be very precise, only a few of them are the primary reasons and mostly cause to the users which also can be considered as common reasons. Such as either your Skype configuration isn’t set properly or Skype is running on an older version, webcam drivers are either missing or outdated, sometimes webcam can also be turned off due to some reasons, using an outdated DirectX version, maybe another background running programs or security software is affecting, etc.

Page Contents
Methods to Fix Skype Video Not Working
Well, before jumping into the fixing methods below, make sure that your PC is running on the latest Windows build. Additionally, you should also check whether your webcam is physically damaged or not. If in case, the webcam is physically damaged or the lens has some moisture or even the lens has been damaged then you should either go for repair service or get a new one according to your preference.
Now, once you check both of these criteria, you can get into the guide below.
1. Cross-check If your Webcam is Disabled or Not
Before starting over the video call or conference, make sure that your webcam is turned on and working properly. To do that, connect your webcam to the computer or any integrated USB hub properly. Next, you should confirm whether the device is enabled in the system or not. So, just right-click on the Start menu on your PC > Click on Device Manager from the ‘Quick Start Menu’ > Expand the ‘Cameras’ section by clicking on the arrow icon > Right-click on the web camera name > Select ‘Enable Device’ (if any).
Keep in mind that if your webcam is already enabled on your system then you may see ‘Disable Device’ instead of the ‘Enable Device’ option. In that case, just click on the ‘Disable Device’ > Restart your PC > Follow the same steps and enable it again. After enabling it, rebooting your system should be required.
2. Update Skype App
No need to say that an outdated app or game always causes multiple issues to the device whether you’re using a PC or a gaming console or even a smartphone. One of the easiest ways to get rid of most of the issues & bugs is to just keep up-to-date your app/game and so the Skype app. To do this:
- Launch the Skype program on your PC.
- Click on the three-dots menu icon > Click on Settings.
- Go to Help & Feedback > Here you’ll be able to find out the Skype version. [Displayed Year number should be the latest one]
- Though the Skype app automatically searches for the latest updates and download on the Windows system, you can also force an update to the latest version by simply reinstalling the app.
Now, if you really want to reinstall the Skype app then do the following:
- Click on Start > Type Control Panel and click on it from the search result.
- Now, click on ‘Uninstall a program’ > Look for the Skype app and right-click on it.
- Select ‘Uninstall/Repair’ and follow the on-screen prompts to complete the removal process.
- Once done, restart your computer and go to the official Skype website and download for your desktop.
- Next, you can install the program and start using it.
Must Read: Guide to Disable Skype at Startup in Windows 10
3. Update Webcam Drivers
- Click on Start > Type Device Manager and click on it from the search result.
- Click on the arrow of Cameras > Right-click on the connected webcam device.
- Now, select Update driver > Choose Search automatically for drivers.
- If there is any update available, it’ll automatically download and install the update.
- Once done, restart your computer to change effects.
4. Configure Skype Video Calling
- Launch the Skype app on your PC > Click on the three-dots menu icon.
- Select Settings > Click on Audio & Video > Here you can see the already selected webcam device.
- Now, if the actual webcam device isn’t selected then select the currently active webcam device from the list.
- Once done, restart your computer and check if the problem persists or not.
5. Check & Update DirectX Version
Starting off, irrespective of which Windows OS you’re using, make sure that DirectX 9.0 or higher is required to run the Skype app properly. As we’ve already mentioned above to update your Windows OS build always, your system should have the latest DirectX version as well. Still, if you’re in a doubt, follow the steps below:
- Press Windows + R keys to open up the Run dialog box.
- Now, type dxdiag and hit Enter to open up the DirectX Diagnostic Tool.
- Under the System and Display tab, you’ll be able to check all the DirectX related info like the installed version, DirectX features, Display Memory, Direct3D Feature Levels, etc.
If in case, the DirectX version is 11 or lower then make sure to update your Windows OS build by following the steps below:
- Click on the Start menu > Select Settings.
- Next, click on Update & Security > Head over to the Windows Update section.
- Click on Check for updates to see if there is an update available or not. If yes, then download and install it.
- Once done, restart your computer and wait for the process to complete the installation.
- Finally, you can check the DirectX version again.
6. Close Unnecessary Background Running Tasks
Closing unnecessary background running tasks on your Windows system should fix multiple performance-related issues.
- Press Ctrl + Shift + Esc key to open up the Task Manager.
- Click on the ‘Processes’ tab > Check which tasks are consuming higher CPU/RAM usage.
- Click to select the process and confirm ‘End Task’ one by one.
- Once done, you can also go to the ‘Startup’ tab and check which programs have the major startup impact.
- Click to select the program and ‘Disable’ it one by one according to the High/Medium impact rate.
- Finally, reboot your PC and run a video call on Skype using the webcam if it’s working or not.
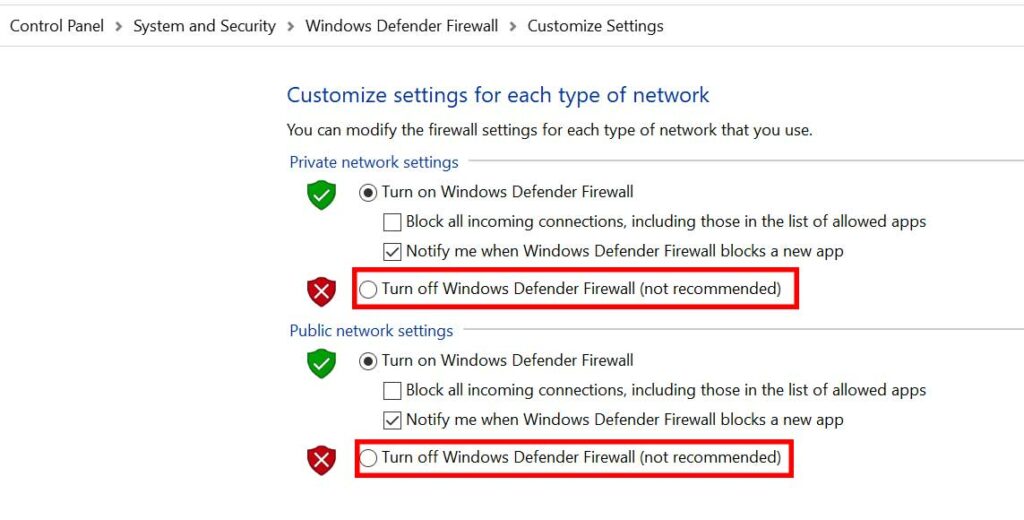
7. Disable Windows Defender & Firewall
Turning off the Windows Defender and Firewall protection temporarily on your PC can fix the Skype video calling issue.
- Click on Start > Type Control Panel and select it from the search result.
- Go to System and Security > Windows Firewall.

- Now, click on Turn Windows Firewall on or off.
- Simply click on Turn off Windows Firewall (not recommended) for both the Private and Public network settings.
- Finally, restart your system and check for the issue.
That’s it, guys. We assume you’ve found this guide pretty helpful. For further queries, let us know in the comment below.
