It’s not always like your PC games aren’t compatible to run properly. Sometimes the in-game files and Windows installation conflicts can also cause so many issues that lead to startup crashes. Well, the Blue Screen of Death (BSoD) error is one step ahead and forces your Windows system to crash when something wrong happens. Plenty of players complaining about the Helldivers 2 Blue Screen of Death Error on the Windows machine during startup or even gameplay sessions.
BSOD error occurs on the screen when the Windows system can’t handle a set of operations properly and the OS eventually crashes multiple times without any notice. As the crashing error screen appears in Blue, it’s considered one of the terrible issues on Windows due to its nature. If you’re also having the ‘Blue Screen of Death‘ error, it means your system is crashing due to the specific program or any issue with the OS installation itself. Win11 users recently faced this issue after installing a new buggy update, corrupted device driver, faulty hardware, etc.
According to several reports online, Helldivers 2 players are also encountering the BSoD error at their end (mostly on Windows 11) while launching the game or after playing for some time which seems unexpected. Meanwhile, some players claim to have faced this problem since the latest patch update arrived for the game. So, there is no proper reason found yet. However, a few players reported on Steam that the integrated GameGuard anti-cheat system is somehow causing the Blue Screen of Death error.
Page Contents
- How to Fix Helldivers 2 Blue Screen of Death Error
- 1. Restart the PC
- 2. Run Helldivers 2 as an Administrator
- 3. Use Windows Compatibility for Helldivers 2
- 4. Check for the Graphics Driver Update
- 5. Update the Helldivers 2 Game
- 6. Scan and Repair the Game Files
- 7. Check for Windows Updates
- 8. Force Use DirectX 12 on Steam
- 9. Disable Steam Input
- 10. Allow Helldivers 2 GameGuard in the Firewall
- 11. Perform a Clean Boot
- 12. Delete Temporary Windows Installation Files
- 13. Run the SFC Scan
- 14. Increase the Virtual RAM
- 15. Uninstall and Reinstall the Helldivers 2 Game
- 16. Reinstall Windows from Recovery
- 17. Fresh Install Windows 11
- 18. Contact Arrowhead Game Studios Support
- 19. Ask for the Helldivers 2 Refund
How to Fix Helldivers 2 Blue Screen of Death Error
So, keeping all of these aspects in mind, we expect Arrowhead Game Studios and PlayStation PC LLC to investigate the issue further. But there are always a couple of workarounds available for the users to try before going to any conclusion. Talking about game-related or PC-related reasons, an outdated game version, corrupted game files, an outdated graphics driver version, an outdated system version, antivirus blocking, and more can be crucial.
System compatibility issues with the game, startup program issues, DirectX issues, VCRedist issues, lower virtual memory, game installation or system installation conflicts, etc can cause game crashes to BSOD. Fortunately, here we’ve shared with you some workarounds that should come in handy. You should follow all troubleshooting steps until the problem has been fixed. So, without further ado, let’s jump into it.
In case, you’re not used to reading long articles, try checking our troubleshooting video guide below:
1. Restart the PC
Before checking other workarounds, you should try rebooting the Windows computer to clear temporary system glitches. Sometimes a normal system boot might fix multiple issues whatsoever. To do so, check the steps below:
- Open the Start menu by pressing the Windows key.
- Click on the Power icon > Click on Restart.
- Next, run the Helldivers 2 game to check for issues.
2. Run Helldivers 2 as an Administrator
You can try running the Helldivers 2 game application as an administrator on a Windows computer by following the steps below. It’ll allow the game program to run properly without any potential blocking.
- Open the Steam launcher on the PC.
- Go to the Library.
- Right-click on Helldivers 2.
- Click on Manage.
- Now, click on Browse local files.
- This will open the game installation directory.
- Right-click on the Helldivers2.exe app.
- Go to Properties > Click on the Compatibility tab.

- Enable the Run this program as an administrator option.
- Click on Apply and select OK to save changes.
3. Use Windows Compatibility for Helldivers 2
You should also check for the Windows compatibility option to Helldivers 2 so that the game can run smoothly. Ensure to follow the steps below to enable the system compatibility mode for the game program with Windows 7 or Windows 8.
- Head over to the installed game directory.
- Right-click on the Helldivers2.exe application.
- Click on Properties > Go to the Compatibility tab.
- Turn On the Run this program in compatibility mode for: option.
- Select Windows 7/8 from the drop-down menu.
- Now, click on Apply > Hit OK to save changes.
4. Check for the Graphics Driver Update
An outdated or corrupted graphics driver version on the Windows computer can also cause issues with the game crashes and more. It’s always recommended to check for the latest graphics driver update by following the steps below.
Recommended Method:
- Press the Win+X keys to open the Quick Link Menu.
- Click on Device Manager from the list.
- Double-click on Display adapters.
- Right-click on the dedicated graphics card.
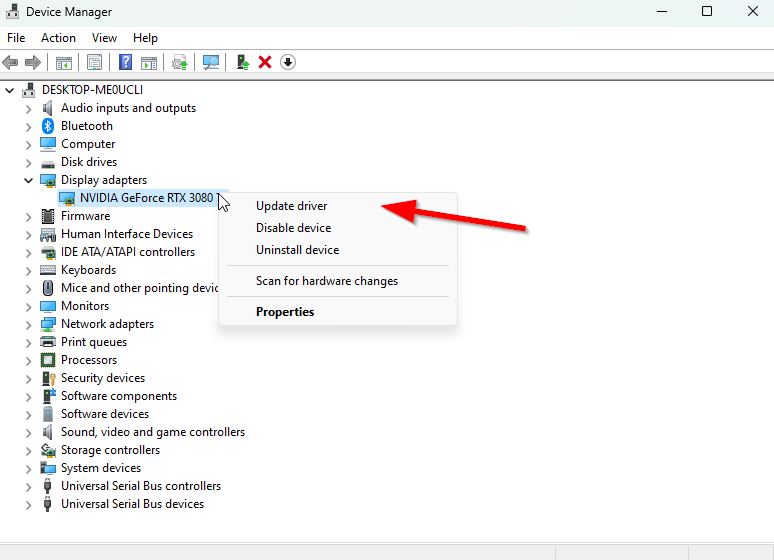
- Click on Update driver > Choose Search automatically for drivers.
- If the latest update is available, it’ll automatically download & install the latest version.
- Once done, restart the computer to apply changes immediately.
Manual Method:
You can also try manually downloading the latest version of the graphics driver and installing it on the PC via the respective official website of the graphics card. Download the graphics driver file respective to your graphics card model and manufacturer.
5. Update the Helldivers 2 Game
You’ll have to manually check for the game updates on your computer by following the steps below to ensure there is no outdated game patch version. Though the latest patch updates can also be buggy or unstable, you should try keeping your game up-to-date.
- Open your Steam client.
- Go to the Library.
- Right-click on HELLDIVERS 2.
- Click on Properties.
- Now, go to the Updates tab.
- Enable the automatic updates option.
- If a new update is available, Steam will automatically install it.
6. Scan and Repair the Game Files
It seems that the Helldivers 2 game files are corrupted or missing on the PC unexpectedly. Conflicts with the game files may cause crashes a lot. You should scan and repair the game files by following the steps below to fix potential crashes or even the BSOD error.
- Open your Steam client.
- Go to the Library > Right-click on Helldivers 2.
- Select Properties > Click on the Local Files.
- Next, click on Verify integrity of game files.
- Wait for the process to complete.
- Launch Helldivers 2 and check for the issue again.
7. Check for Windows Updates
An outdated or unstable Windows system version on the PC might also cause issues with the game running that we can’t deny. Ensure to check the steps below to install the pending system updates manually.
- Press the Win+I keys to open Windows Settings.
- Click on Windows Update.
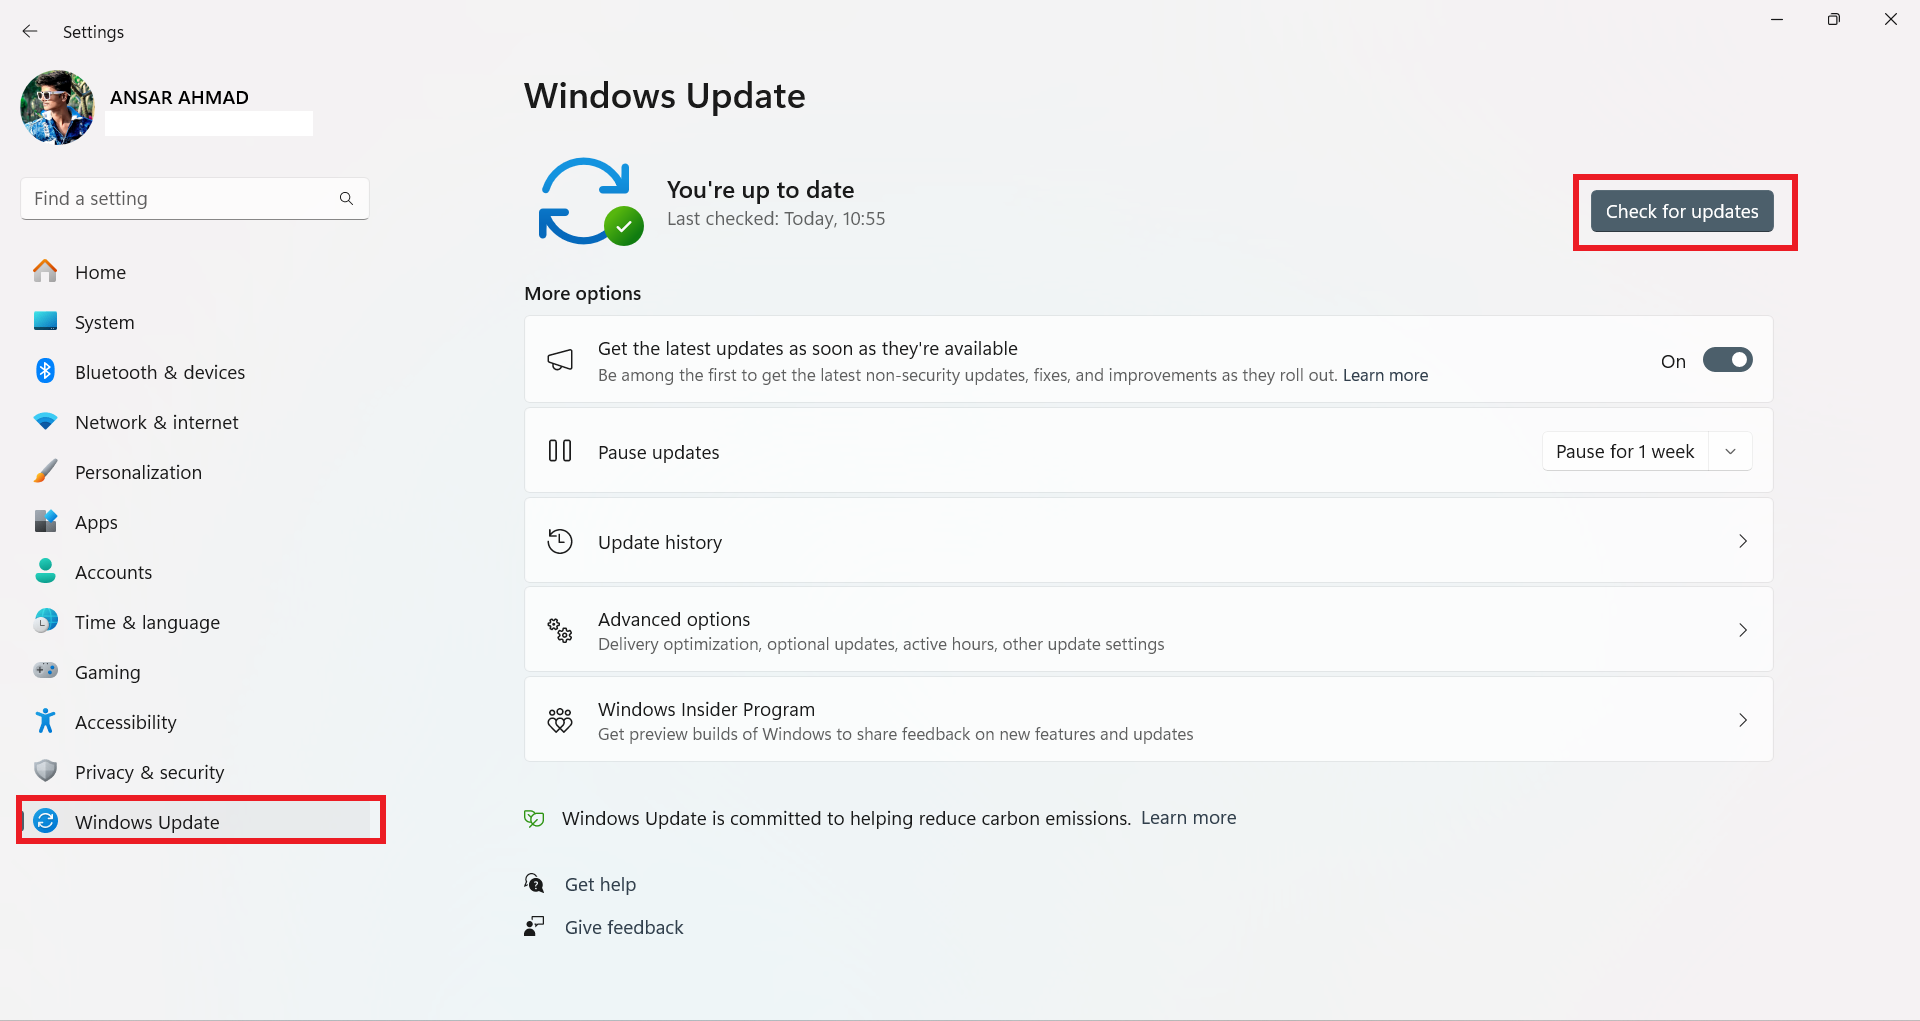
- Click on the Check for updates button.
- If there is a new update available, click on Download and Install.
- Once done, reboot your PC to apply changes.
8. Force Use DirectX 12 on Steam
You should force-run the Helldivers 2 game on Steam by using the DirectX 12 version. Multiple players have reported the same and using the latest DirectX version did fix their game crashing issue quite effectively. So, try checking the steps below to do so:
- Open Steam > Click on Library.
- Right-click on Helldivers 2 from the left pane.
- Click on Properties > Go to the General section.
- Go to Launch Options > Type -d3d12.
- Then try to launch the game.
9. Disable Steam Input
Steam Input mode can be useful enough for the Steam client users to easily connect to a compatible controller. But if you’re not using a controller then you should turn off the Steam Input mode on your PC. In case, you don’t want to disable Steam Input for every installed game then check the steps below to turn it off only for the Helldivers 2 game.
- Open Steam > Go to the Library.
- Right-click on Helldivers 2.
- Go to Properties > Click on Controller.
- Click on Override for Helldivers 2.
- Select Disable Steam Input.
- Launch Helldivers 2.
10. Allow Helldivers 2 GameGuard in the Firewall
The GameGuard program in Helldivers 2 might also cause issues with the crashes if there is a problem with the Firewall blocking. So, you should allow the GameGuard program in Firewall to run the Helldivers 2 game properly by following the steps below.
- Open your Steam launcher.
- Go to the Library.
- Right-click on Helldivers 2.
- Go to Properties > Click on Installed Files.
- Select Browse > Open the bin folder inside the game installation directory.
C:\Steam\steamapps\common\Helldivers 2\bin
- Delete the GameGuard folder.
- Next, right-click on Helldivers2.exe app.
- Click on Run as Administrator.
- If prompted by UAC, click on Yes to allow.
- Next, close the game > Open the Start menu.
- Search for Windows Firewall and open it.
- Select Allow an app or feature through Windows Firewall.
- Click on Change settings > Select Allow another app.
- Select Browse > Click to select GameGuard in Helldivers 2.
- Click on Add and save the changes.
11. Perform a Clean Boot
The chances are high that somehow a couple of programs are running in the background from startup once the system boots. In that case, even if you’re not using those programs, they will run until you shut down the system. Those programs can consume higher system resources which leads to potential issues like game crashes.
- Press the Win+R keys to open the Run dialogue box.
- Type msconfig and hit Enter to open System Configuration.
- Go to the Services tab.
- Tickmark the Hide all Microsoft services checkbox to select it.
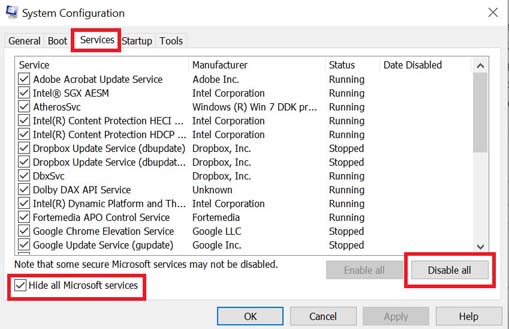
- Click on Disable all > Click on Apply and then OK to save changes.
- Now, go to the Startup tab > Click on Open Task Manager.
- Go to the Startup tab in the Task Manager.
- Then click on the specific task that has a higher startup impact.
- Once selected, click Disable to turn off the startup program.
- Do the same steps for each program that has a higher startup impact.
- Once done, reboot your PC to apply changes.
12. Delete Temporary Windows Installation Files
In some cases, you should delete temporary Windows installation files by following the steps below. The blue screen issue can be problematic when it comes to the Windows Update components are corrupted. So, delete the temporary update files to fix program crashes.
- Press the Win+I keys to open Windows Settings.
- Click on System > Go to Storage.
- Now, click on Temporary Files.
- Click on Refresh.
- Select the following options:
- DirectX Shader Cache
- Temporary Files
- Delivery Optimization Files
- Temporary Internet Files
- Temporary Windows Installation Files
- Next, click on the Remove Files button on top.
- Once done, head over to the main settings menu.
- Click on Windows Update > Select Check for updates.
- This will help in re-downloading the installation files in the Windows Update Settings.
13. Run the SFC Scan
The System File Checker (SFC) tool is one of the useful features in Windows that allows users to scan for corrupted system files and restore them. If your system becomes corrupted or the game installation disk drive has any bad sectors then you should run the SFC scan.
- Open the Start Menu > Type cmd.
- Right-click on the Command Prompt app.
- Choose Run as administrator > If prompted by UAC, click on Yes.

- Type the following command and hit Enter to execute the System File Checker process.
sfc /scannow
- Have some patience until the process is completed.
- Once done, close cmd, and reboot your computer.
14. Increase the Virtual RAM
The chances are high that your physical RAM capacity is getting low and the system performance is getting affected badly. This will also impact the program running experiences. So, make sure to increase the virtual memory on your system by following the steps below. Several users have found this method helpful.
Please Note: You must be logged on as an administrator or a member of the Administrators group to complete this process. The network policy settings may also cause such issues if your computer is connected to a network.
- Open the Start menu > Click on Control Panel.
- Click on Performance and Maintenance.
- Go to System.
- From the Advanced tab, click on Settings under Performance.
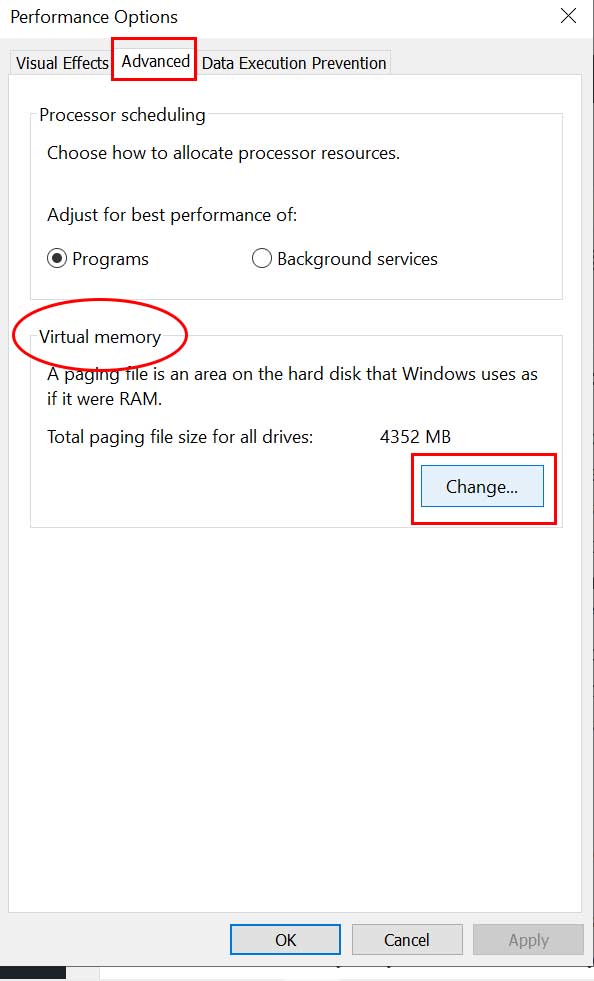
- On the Advanced tab, click on Change under Virtual Memory.
- Under Drive [Volume Label], click on the drive that contains the paging file.
- From the Paging file size for the selected drive, click on System Managed Size.
- Click on Set > Under Paging file size for selected drive, click Custom size.
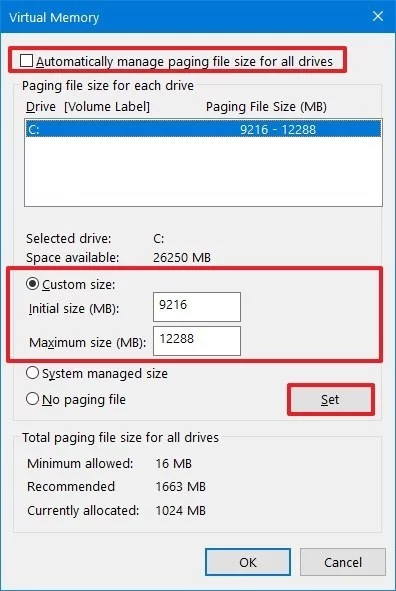
- Now, type a new paging file size in megabytes in the Initial size (MB) or Maximum size (MB) box.
- It should be 1.5x-2x higher than the physical RAM.
- Click on Set and Save changes.
- Restart the PC to apply changes.
15. Uninstall and Reinstall the Helldivers 2 Game
We mostly suggest our readers manually uninstall and reinstall the Helldivers 2 game on the PC by following the steps below. Issues with the game installation files can trouble you a lot. It’s recommended to reinstall the game freshly to fix potential crashing issues.
- Open the Steam client on your PC.
- Go to the Library > Right-click on Helldivers 2.
- Navigate to Manage.
- Click on Uninstall > If prompted, click on Uninstall.
- Follow the on-screen instructions to complete it.
- Once done, restart the PC to apply changes.
- Launch Steam > Reinstall Helldivers 2 on another drive.
- Finally, run the game and check for the issue again.
16. Reinstall Windows from Recovery
You should also try reinstalling Windows from the Recovery menu on Windows 11 to check if the problem can be fixed easily. This specific method helps in using the Windows Update settings and reinstalling the current version. Multiple Windows users prefer this method to resolve the Blue Screen of Death issue whenever they encounter BSOD with other programs too. You can check the steps below to do so:
- Open Windows Settings by pressing the Win+I keys.
- Click on System.
- Now, click on Recovery.
- Click on Reinstall Now.
- Select the Automatically restart my PC 15 minutes after installation option.
- Click on the OK button.
- Once done, this will reinstall the update/OS.
17. Fresh Install Windows 11
A clean installation of Windows can also come in handy at times. You’ll require a Windows 11 Installation Assistant or a Windows 11 Installation Media using a USB drive to do the same. Here we’re giving you steps to use installation media.
- Connect a USB flash drive to the PC.
- Head over to the Download Windows 11 website by Microsoft.
- Click on Download Now and transfer the installation media to a USB drive.
- Now, reboot the system > Go to the Boot Sequence menu by pressing F12.
- Select the USB drive as a first preference to boot.
- Apply changes and reboot the system.
Note: You can also directly go to the BIOS menu using the F2/Del key and select the boot drive sequence.
- The Windows 11 Installation page will open.
- Click on the Next button on the ‘Windows Setup’ page.
- Now, click on the Install Now button.
- Select ‘I don’t have a product key’ to continue.
- Select the proper Edition of Windows 11. (for product activation)
- Click on the Next button.
- Select the ‘I accept the license terms’ option to continue.
- Next, click on the Next button.
- Click the ‘Custom: Install Windows only (advanced)’ option.
- Choose the disk partition where you want to install the OS (by default, Drive 0′).
- Click on the Delete button to remove the drive.
- Now, select the empty drive ‘Drive 0 – Unallocated Space’.
- Click on the Next button > Start the Windows 11 installation.
- You can wait for a couple of minutes to install it.
- Once done, reboot the system > Wait for a couple of minutes further.
- Go through the initial setup process.
- Reinstall the Helldivers 2 game and check for the BSOD error.
18. Contact Arrowhead Game Studios Support
You can also try contacting Arrowhead Game Studios Support to get dedicated support. Additionally, submit the support ticket to get better assistance from the developers. Submit all required details so the game devs can investigate the issue deeply.
19. Ask for the Helldivers 2 Refund
Last but not least, if you’re fully exhausted by performing all workarounds and still nothing helps you, it’s better to ask for the Helldivers 2 refund (if applicable). Once the game becomes stable enough after a couple of patch fixes, you can purchase the game again. But ask for the refund as of now by following the steps below.
- Open the Steam client > Log into your Steam account.
- Click on Help > Select Steam Support.
- Select Purchases > Select Helldivers 2.
- Click on I would like a refund.
- Click on I’d like to request a refund.
- Now, select your refund method.
- Click on Submit Request.
- Wait for the approval and receive the payment.
That’s it, guys. We assume this guide was helpful to you. For additional queries, you can comment below.
