Setting up Git on your macOS is an important step for developers to work together on projects smoothly. Git, a distributed version control system, allows multiple contributors to work collaboratively on software development projects, tracking changes, and coordinating efforts seamlessly. Whether you’re new to coding or have been doing it for a while, learning how to install Git on your macOS can make your work more organized. In this guide we will discuss how to install Git on macOS. This guide will also provide full-fledged information regarding every method used for installing Git on macOS.
Git is mainly designed to track changes made in files that are commonly termed as source codes. The software Git is mostly used by the software developers, as version control is one of their needs. It also helps in tracking the history of the project, revert to previous versions and also facilitates in collaborating with other software developers. Git is available for most of platforms like Windows, macOS and Linux. In recent times, we found on dev forums that many developers and learners are confused about installing git on their macOS. This problem is mostly faced by users who have newly moved to macOS.

Page Contents
How to install Git on macOS
To initiate the installation process on macOS, users typically have several options. One common approach is through the command line, leveraging the Terminal application, or Homebrew application. However, in this guide we will mainly focus on only the methods which are easy and do not require much effort.
Method 1: Installing Git on macOS using Xcode
This is one of the easiest method to install Git on your macOS. Apple ships the binary package of Git with the Xcode , so it becomes an easy method. Here is , how you can install Git on macOS using Xcode.
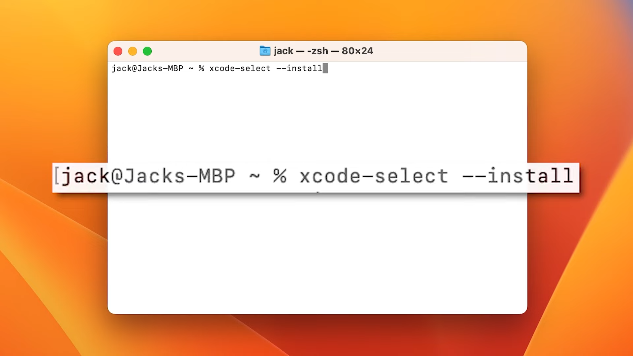
- On your macOS, launch the Terminal App.
- When Terminal launches run the following command shown below.
xcode-select --install

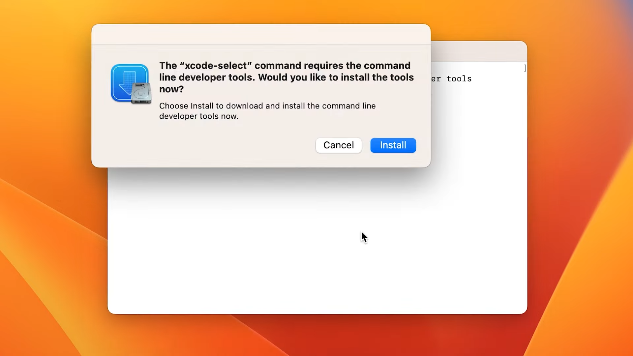
- Now you will be prompted to install “xcode-select” , follow the steps and install it.

- This will take a few moments and Git will be successfully installed in your macOS.

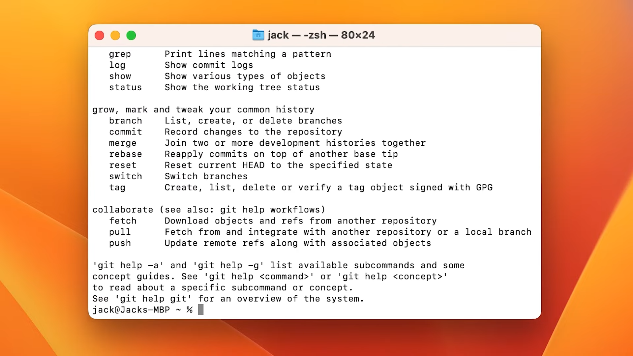
- Now verify the installation of Git by entering Git in Terminal. A help content will appear on the screen which means Git is successfully installed on your macOS.
This was all about installing Git on macOS using Xcode , now let’s move to other method.
Method 2: Installing Git on macOS via macPorts
macPorts are also known as DrawinPorts. macPorts helps in straight forward installation of Git on macOS. However, here is how you can install Git on macOS via macPorts.
- On you macOS launch the Terminal.
- When Terminal launches enter the command “xcode-select –install” and press enter.
- Now you will be prompted to install “xcode-select” , follow the steps and install it.
- Now Navigate to this website https://www.macports.org/install.php , and download MacPorts (macOS Sonoma v14).
- When download completes , install it quickly on your macOS.
- Now Launch the terminal again , and run the command given below
$ sudo port selfupdate
- After that to find the available Git Ports and variables , run the command given below. (This command will help in searching the ports available for installation).
$ port search git
$ port variants git
- Now , it’s time to install Git , run the command given below to install Git on your macOS.
$ sudo port install git
- Congratulations, you have successfully installed Git on your macOS , you can also check if Git is successfully installed on your mac or not by using command shown below. (run this command in terminal window).
$ git --version
Note: Ignore the installation of macPorts , if you have already installed it on your macOS.
This was all about installing Git using macPorts, now let’s move to another method.
Method 3: Installing Git on macOS using Homebrew
Homebrew is another method for installing Git on macOS quickly and easily. Let’s see how we can install Git on macOS using this method.
- Firstly , you need to install Homebrew on your mac if you haven’t. To install Homebrew , run the command given below.
/bin/bash -c "$(curl -fsSL https://raw.githubusercontent.com/Homebrew/install/HEAD/install.sh)"
- This will automatically install Homebrew on your macOS.
- For installation of Git , run the command given below ton install Git on your macOS.
$ brew install git
- Congratulations, you have successfully installed Git on your macOS , you can also check if it Git is installed on your mac or not by using command shown below. (run this command in terminal).
$ git --version
Conclusion
This brings us to the end of this guide for How to install Git on macOS. It’s great to know that Git allows multiple people to work on the same project without causing problems. It keeps track of changes made by everyone and helps coordinate everyone’s work. It’s like having a smart system that ensures everyone has the latest and correct version of the project. I hope the above guide has cleared all your doubts regarding installation of Git software on your Mac OS.
