If you’re seeing SOS text in the status bar of your iPhone 15 or 15 Plus, don’t worry. You’re not alone. Many iPhone users have reported the same issue, and there are effective solutions available to fix it. In this article, we will dive deep into the meaning of this text and provide you with troubleshooting steps to resolve the problem.

Page Contents
- What Does “SOS” or “SOS Only” Mean on iPhone?
- Here’s How to Fix if iPhone 15 and 15 Plus Keep Showing SOS
- 1. Ensure You’re Within Your Carrier’s Coverage Area
- 2. Enable Data Roaming
- 3. Turn Off/On Mobile Data
- 4. Check if the SIM Card Is Properly Inserted
- 5. Switch to 4G or LTE
- 6. Disable and Enable Airplane Mode
- 7. Choose a Different Network Selection Mode
- 8. Update Your iPhone and Carrier Settings
- 9. Reset Network Settings
- 10. Contact Your Carrier
- Conclusion
What Does “SOS” or “SOS Only” Mean on iPhone?
Have you ever seen “SOS” or “SOS Only” text in the status bar of your iPhone? If yes, it means that your device is unable to connect to a network, which could be due to being outside the carrier’s coverage area. If that’s not the case, it could be due to an issue with the cellular tower, or your iPhone’s signal reception. It is also possible that incorrect network settings on your iPhone are causing the SOS mode.
Simply put, when iPhones display “SOS” or “SOS Only”, it means that the device cannot connect to a cellular network. As a result, you won’t be able to make a phone call, send a message, or use cellular data. However, thanks to the satellite connectivity feature, you can use the emergency services such as Police, Fire, or Ambulance.
The emergency SOS via satellite was introduced last year on the iPhone 14 lineup and has also been included in the latest iPhone 15 series. While the emergency SOS via satellite is an excellent feature on iPhones, it can be frustrating to see the “SOS” text even when you are located within the network range.
If you are sure that you are within the carrier coverage area, you can try the solutions mentioned in the next section to fix the SOS issue on your iPhone 15 or 15 Plus.
Here’s How to Fix if iPhone 15 and 15 Plus Keep Showing SOS
If your iPhone shows SOS in the status bar, apply these solutions to resolve network issues.
1. Ensure You’re Within Your Carrier’s Coverage Area
First, you have to ensure that you’re located within your carrier’s coverage area. You can check out the coverage map for your carrier using the links below:
You can type “[carrier name] coverage map” on Google for other carriers to check the coverage area.
If you’re already located in an area that usually gets strong network signals but is still seeing SOS, check whether your neighbor’s mobile phone is getting signals. If they are getting good signals, try the below solutions.
2. Enable Data Roaming
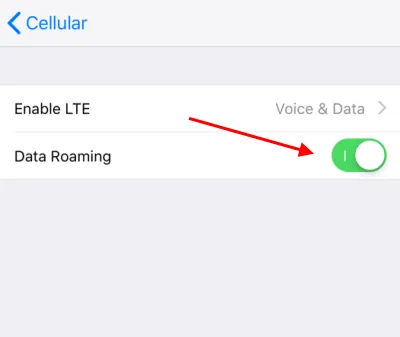
If you’re traveling to a different state or country and forgot to turn on data roaming, this could be the reason for SOS on your iPhone 15 or 15 Plus. You must ensure it when moving to a different location.
Steps to enable data roaming on iPhone:
- Go to the Settings app and tap on CellularData / Mobile Data.
- Click Cellular data options / Mobile data options.
- Toggle on Data Roaming.

When Data Roaming is enabled, your iPhone may try to establish a connection. If the connection is successful, SOS will turn off automatically. Please keep in mind that you may be charged extra for roaming.
Also Read
3. Turn Off/On Mobile Data
Turning off your mobile data and turning it on again refreshes your carrier’s network connection. It can resolve temporary glitches that could trigger SOS on your iPhone.
Here are the steps you need to perform:
- Go to the Settings app and tap on Cellular/Mobile Data.
- Toggle off Cellular/Mobile Data.
- Wait for 60 seconds.
- Toggle on Cellular/Mobile Data.
If Mobile Data was disabled before, turn it on and off after a few seconds.
You can also enable or disable Mobile Data from the Control Center itself. Swipe down from the top of your screen to open the Control Center.
4. Check if the SIM Card Is Properly Inserted
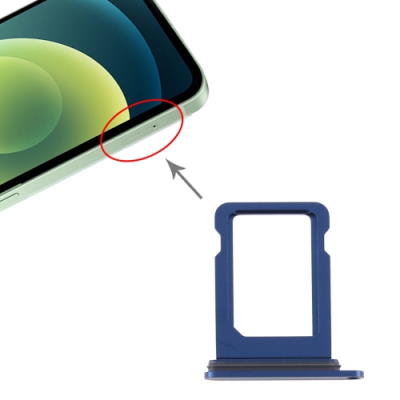
Removing SOS on your iPhone could be as simple as re-inserting the SIM card. You might keep seeing SOS in the status bar if the SIM card is incorrectly inserted or not clean.

Please remove the SIM card safely; otherwise, it can damage the SIM or SIM card tray. Clean the SIM card with a soft cloth (again with safety), place it correctly on the SIM card tray, and put it back into your iPhone.
Wait a minute or two while your iPhone locates the SIM card and registers on the network.
5. Switch to 4G or LTE
While 6G is under development, the truth is that 5G is still in the rollout stage. You may get strong 5G signals at home, but don’t expect the same everywhere you go. In comparison, 4G is much more stable.
Although iPhones are smart enough to switch to the best network mode automatically, I recommend manually switching to 4G or LTE.
- Open the Settings app on your iPhone.
- Tap on Mobile/Cellular Data and click Mobile/Cellular Data options.
- Choose the Voice & Data option and select LTE.
Switching to a different network mode can take a couple of minutes. Hence, be patient and check if it can remove SOS and bring back network signals.
6. Disable and Enable Airplane Mode
If you have tried the above solutions but have had no success, try turning the Airplane mode on and off. It will restart your connection and could fix the network issues.
Swipe down from the top of your screen to open the Control Center. Then, please tap on the Airplane icon to enable it. After 10 -15 seconds, tap this icon to turn off the Airplane mode. Alternatively, you can enable or disable the Airplane mode by going to Settings > Airplane mode.
Allow the device to connect to the network. It can take around 1-2 minutes.
7. Choose a Different Network Selection Mode
If you have manually selected the network on your iPhone 15 or 15 Plus in the past, it could be the reason for SOS showing in the status bar. The device won’t be able to choose the network, resulting in no networks automatically. Switching to the Automatic network selection mode works best for most people, and I recommend the same.
- Open the Settings app and tap on Cellular/Mobile Data.
- Choose the Network selection option.
- Enable the Toggle next to Automatic.
If your iPhone is already set to the Automatic network selection mode, turn it off and then turn it on again.
8. Update Your iPhone and Carrier Settings
If you haven’t updated the carrier settings in a while, it could be a reason for the SOS on your iPhone. Updating it ensures that your device has the latest bug fixes and improvements from the carrier.
Although iPhone carrier settings are updated automatically, you should manually check for new updates.
Before I tell you the steps, ensure your iPhone is connected to a stable Wi-Fi network.
- Open the Settings app on your iPhone.
- Please scroll down to General and tap on it.
- Click About.
If a carrier update is available, a pop-up should appear for the same. Click Update to download and install it.
Sometimes, updating the carrier settings won’t work if an iOS bug has caused the problem. In that case, updating your iPhone to its latest version can resolve the issue.
To update your iPhone, follow these steps:
- Open Settings and tap on General.
- Select Software Update.
- If an update is available, hit the Download and Install option.
iOS updates are generally bulky in size. Hence, connect the device to a stable Wi-Fi network before downloading the update.
9. Reset Network Settings
Incorrect network settings on your iPhone can result in no signal, which could then show SOS in the status bar. Reset the network settings to ensure it’s not causing the problem.
Before we move further, please remember that resetting the network settings will remove saved Wi-Fi networks and paired Bluetooth devices and restore all network-related settings to their default options.
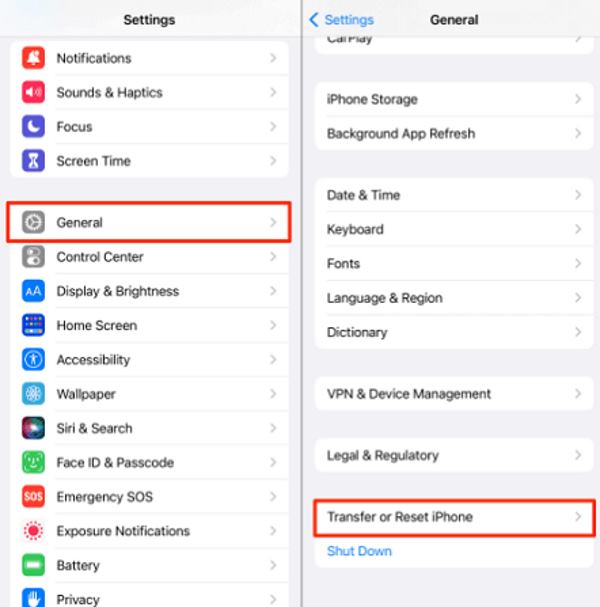
- Open Settings and tap on General.
- Click on Transfer or Reset iPhone.
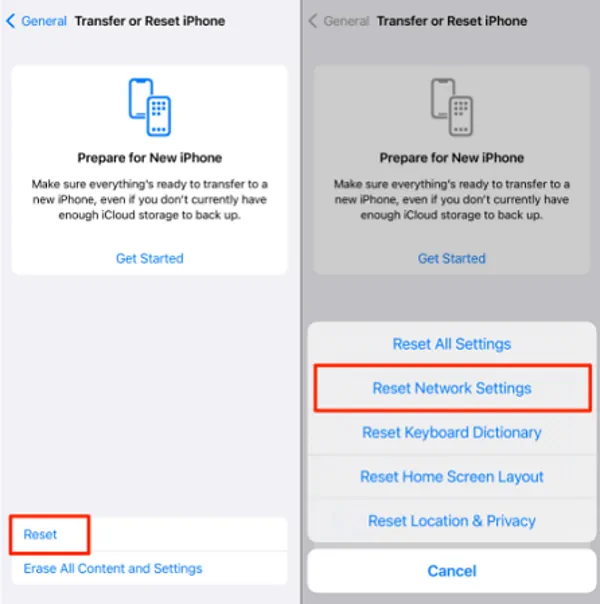
 Click Reset and choose Reset Network Settings.
- Confirm your lock screen PIN or password.
- Tap on Reset Network Settings.
10. Contact Your Carrier
If you are still seeing “SOS” or “SOS Only” on your iPhone 15, most likely your carrier is facing technical glitches. Your carrier could be facing outages, or it could be under maintenance. Talk to your carrier support to check if something is wrong.
If everything is fine on the carrier’s end, talking to Apple support or going to an Apple service center are the only options left.
Conclusion
Apple iPhones have great software and hardware, but occasionally, they can run into problems. If your iPhone 15 or 15 Plus keep showing SOS in the status bar, it could result from incorrect network settings, software bug, or network glitches. Assuming no problem on the carrier’s side, you should fix the problem by applying the solutions I’ve mentioned in this guide. Feel free to drop your questions or suggestions in the comments section below.
