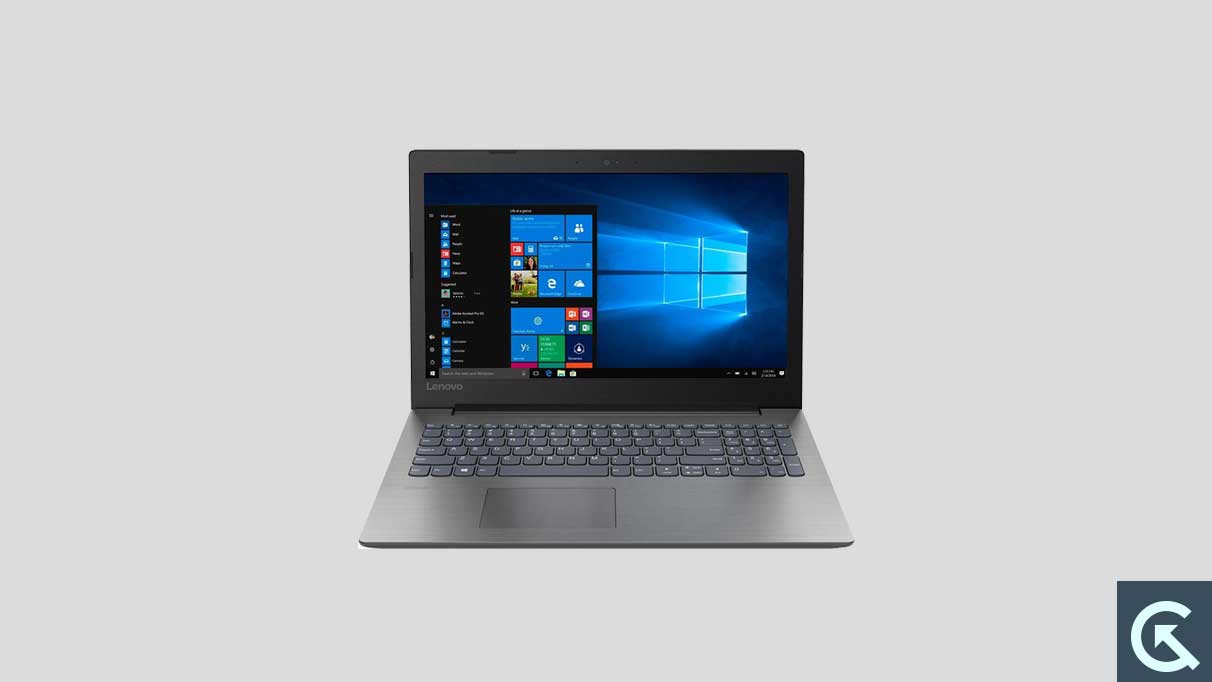
Are you having trouble connecting your Lenovo IdeaPad laptop to a Wi-Fi network? If yes, then don’t brood. We’re here to help you. Many users complained that they could not connect their laptops to the Wi-Fi network. Apart from that, some users also reported that their Wi-Fi network keeps disconnecting,, which could be disappointing for users willing to connect their laptop with the Wi-Fi network.
Although, Lenovo makes great and innovative Laptops and other electronic gadgets which mainly highlight the user experience, stability, and performance, their additional features are included as well. Specifically, when a Lenovo user tries to connect with a wireless network, the system doesn’t allow them to connect with the Wi-Fi network, which can be annoying. But being a newbie, it is pretty arduous to know what to do properly. So, worry not. Read on to know how to fix Lenovo IdeaPad 310, 320, and 330 Wi-Fi not working or keeps disconnecting.
Page Contents
- Reasons Why Lenovo IdeaPad 310, 320, and 330 Wi-Fi Not Working or Keeps Disconnecting?
- Fix: Lenovo IdeaPad 310, 320, and 330 Wi-Fi Not Working or Keeps Disconnecting Issue
- Fix 1: Ensure You Have Entered Correct Password
- Fix 2: Forget and Re-Pair Wi-Fi Network
- Fix 3: Restart Your Laptop & Router
- Fix 4: Run Network and Internet Troubleshooter
- Fix 5: Disable and Re-enable the Network Adapters
- Fix 6: Change Wi-Fi Properties
- Fix 7: Reset the TCP/IP Stack
- Fix 8: Reset Network Settings
- Fix 9: Update the Network Adapters
- Fix 10: Check for Windows Update
- Fix 11: Add Your Wireless Network Manually
- Fix 12: Factory Reset Your Laptop
- Wrapping Up
Reasons Why Lenovo IdeaPad 310, 320, and 330 Wi-Fi Not Working or Keeps Disconnecting?
Entered Incorrect Password: If you are having an issue with the Wi-Fi network on your Lenovo IdeaPad laptop, you could have entered the incorrect password. Make sure to check if the password you have entered is correct or incorrect.
Outdated or Damaged Drivers: In the Windows operating system, every driver is essential as they care for the functionality of your connected hardware, applications, and much more. It could be possible that your network driver is outdated or corrupted, causing the issue with the Wi-Fi network on your Lenovo IdeaPad laptop.
Poorly Configured Wireless Adapter: There may be a chance that the settings, such as channel frequency range detection, are changed in your Wireless Adapter configuration, and that’s the reason why you are unable to connect the Wi-Fi network with your Lenovo laptop.
Faulty or Damaged Router: Lastly, your Wi-Fi router or modem may be faulty or damaged, causing an issue with the Wi-Fi network on your laptop. Also, there may be a chance that your laptop isn’t providing enough network or coverage to the laptop.
Therefore, these were some of the primary reasons why your Lenovo IdeaPad 310, 320, and 330 Wi-Fi is not working or keeps disconnecting. Now, let’s focus on the troubleshooting solutions, which are mentioned below.
Fix: Lenovo IdeaPad 310, 320, and 330 Wi-Fi Not Working or Keeps Disconnecting Issue
If you look over the Google search results trend, then you will find multiple keyphrase trending for the last few weeks which can be a frustrating issue. According to several reports including Reddit and other platforms, most users encountered the same issue with the Wi-Fi network on their Lenovo IdeaPad models. But most users don’t know the perfect way to fix the problem they’re facing.
For such a scenario, we have compiled a list of solutions that users can take to troubleshoot the problem they have with the Wi-Fi network on their laptops. As mentioned before, you’re unable to connect with the Wi-Fi network due to incorrect passwords, outdated or corrupted drivers, electronic Interference and much more. Accordingly, there are other things to look at, so keeping all of them in mind, here we have compiled a few troubleshooting tips which definitely resolve the problem.
Fix 1: Ensure You Have Entered Correct Password
Before attempting any other solutions, it is essential to ensure you have entered the correct password. I know it’s a common thing, but most users don’t enter the correct password at a time, preventing the users from being connected to a Wi-Fi network. Therefore, make sure you have entered the correct password and look for the each and single alphabet or letters you have entered whether it is correct or not. Once done, try connecting your device with a Wi-Fi network to check if it’s connecting.
Fix 2: Forget and Re-Pair Wi-Fi Network
If you have entered the correct password by remembering the letters and space in mind and still are unable to connect with the Wi-Fi network, you should try to forget and re-pair your Wi-Fi network. So, to reach out the concern then forget the Wi-Fi network you are trying to access on your laptop and pair again with a fresh connection by entering the password you have set and enjoy your Lenovo IdeaPad.
Fix 3: Restart Your Laptop & Router
The Foremost thing you should try is to restart your Lenovo laptop and Wi-Fi router at the same time. However, it could be possible that your laptop isn’t able to connect with the Wi-Fi network because of software issues and technical problems. Apart from that, Wi-Fi routers also have similar reasons why it’s not providing sufficient network to the device. There may be a chance that due to long hours, the run router seems slow, preventing users from being connected to the Wi-Fi network.
Therefore, we recommend you restart your Lenovo IdeaPad laptop and Wi-Fi router at the same time to check if it helps you to resolve the network connectivity problem on your Lenovo laptop. Most of the time this simple method did a great job which may resolve minor issues and glitches. Here’s what to do.
Restart Your Lenovo IdeaPad Laptop:
- Press the Windows key on the keyboard to open the Start Menu.
- Click on the Power icon at the right bottom of screen.
- Next, select the Restart option.
- Now your laptop will automatically shut down and turn back on.
Restart Your Wi-Fi Router:
- Unplug the power cord or cable from the wall socket.
- Wait for about 5-10 minutes.
- Plug the power cord or cable back to the wall socket.
- Power on your Wi-Fi router and connect your device with the Wi-Fi network.
- Now check if the issue has been resolved on your laptop.
Fix 4: Run Network and Internet Troubleshooter
In the Windows operating system, there is a dedicated feature known as Network and Internet under the troubleshooter section. Generally, this feature detects the problem related to the Wi-Fi and network connectivity and fixes it from itself. By doing this method, your laptop will automatically resolve the problem if any issues are found related to the network and internet connection. Here’s what to do.
- Press Windows + I Key on the keyboard to open the Settings.
- Select System from the left-hand side.
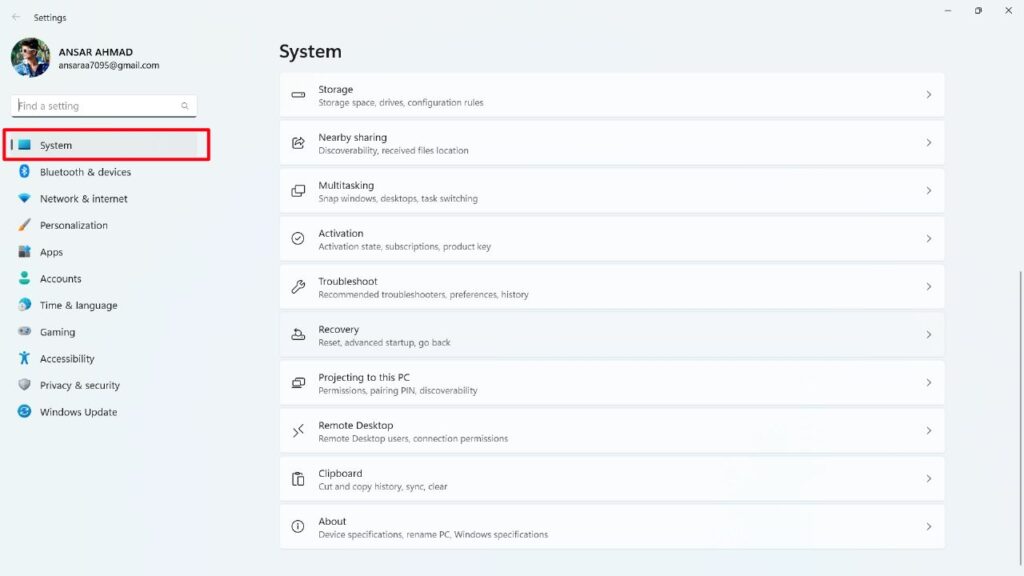
3. Scroll to Troubleshoot and click on Other troubleshooter options.
4. Click Run next to Network and Internet.
5. Now your Windows OS will automatically search and resolve the problem if detected.
Fix 5: Disable and Re-enable the Network Adapters
The next thing you have to do is to disable and re-enable the network adapters under the Device Manager section. Generally, the Wi-Fi adapter is responsible for establishing a Wi-Fi network connection on your Lenovo IdeaPad laptop. Here’s what to do.
- Press Windows Key + X on your keyboard and select Device Manager.
- In the Device Manager section, locate the Network Adapters and expand it by clicking the arrow next to it.
- Locate your Lenovo IdeaPad’s network adapter, (Similar to “Intel Dual Band Wireless-AC 7260” or “Realtek RTL8821AE Wireless.”)
- Right-click on the dedicated adapter and choose Disable device from the pop-up menu.
- Now wait for a few seconds.
- After that, right-click on the adapter again and click the Enable device from the pop-up menu.
- Now your WiFi adapter should be re-enabled and working properly. If the issue persists, move down to the next solution.
Fix 6: Change Wi-Fi Properties
You can also try to change the Wi-Fi network properties if the above solutions don’t work. By changing the certain properties of your Wi-Fi connection could potentially help improve connectivity. However, if you are unable to access the Wi-Fi network on your Lenovo IdeaPad laptop, you should try changing the Wi-Fi properties. Here’s what you need to do.
- Press the Window Key + X on your keyboard and select Device Manager.
- Look for the WiFi adapter in the list of devices.
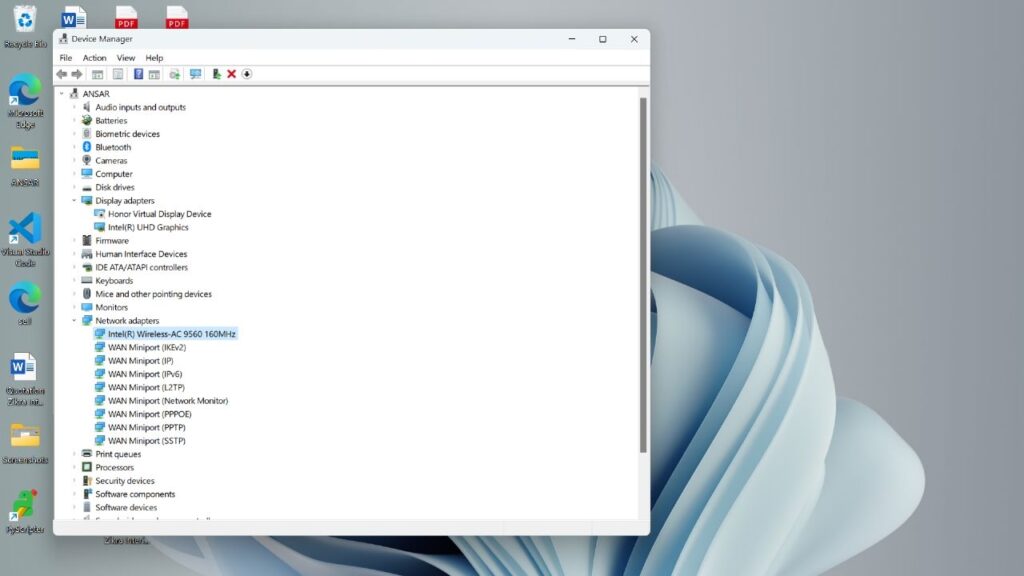
3. Right-click on it and choose Properties from the pop-up menu.
4. In the Properties section, click on the Advanced tab.
5. Look for “802.11n Mode” and change it from “Enabled” to “Disabled.”
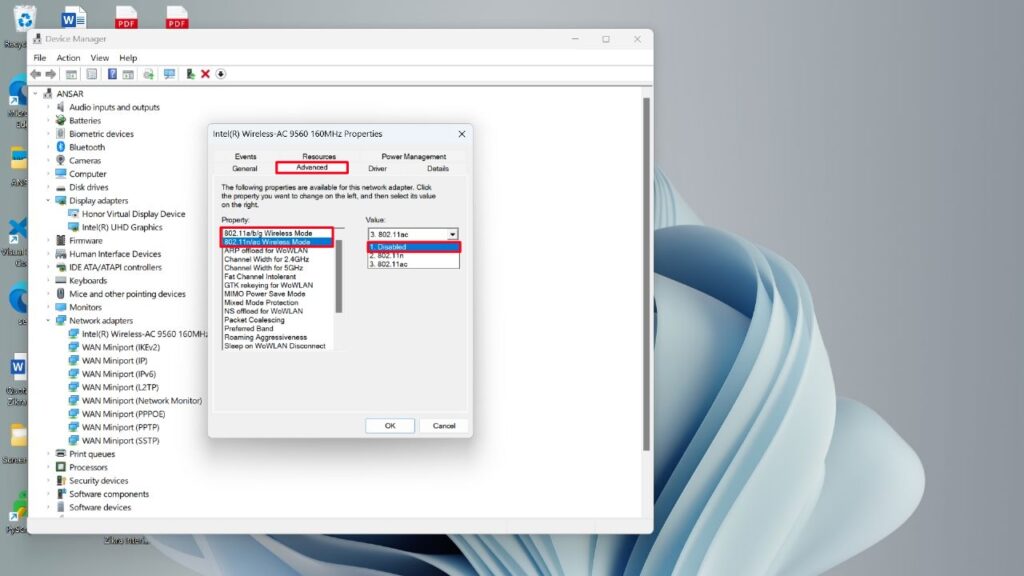
6. If this option is not available on the menu, look for a similar property related to the 802.11 protocol and disable it.
7. Select OK to save the changes and close the Properties section.
8. After that, restart your Lenovo IdeaPad and check if the WiFi is working again.
Fix 7: Reset the TCP/IP Stack
You can also try to reset the TCP/IP Stack to resolve the WiFi not working or keep disconnecting issues on your Lenovo IdeaPad laptop. However, the TCP/IP stack is basically a set of protocols that governs the way data is transferred between the devices on a network. By resetting the stack, you may easily resolve the network connectivity issue which includes Wi-Fi network problems.
To reset the TCP/IP stack, follow the steps steps:
- Press the Windows Key on the keyboard to open the Start Menu.
- Type “Command Prompt” in the search bar and open it.
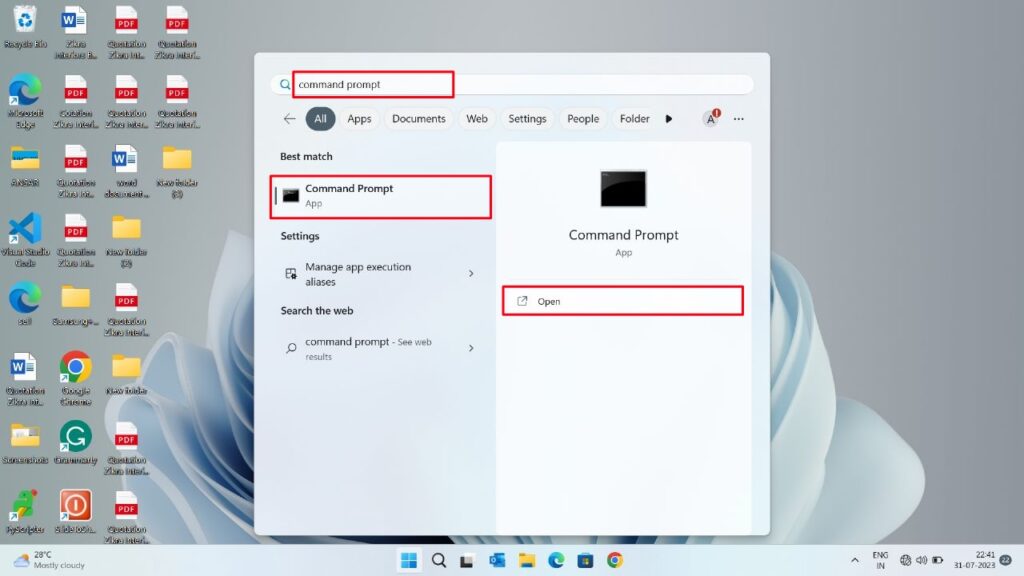
3. In the Command Prompt section, type the following commands one by one and hit Enter.
- netsh winsock reset
- netsh int ip reset
- ipconfig /release
- ipconfig /renew
- ipconfig /flushdns
By following these commands, you can reset the TCP/IP stack to its default settings. Once done, try restarting your Lenovo laptop and check if the issue has been resolved.
Fix 8: Reset Network Settings
Resetting the network settings is a useful and convenient tool for fixing any network connectivity issues whether you are using smartphones or laptops. This feature is also available on mobile devices, where you can easily refresh the network connection by resetting the network settings. However, if you are having an issue with the Wi-Fi network on your Lenovo laptop, then this fix may resolve the problem.
To reset the network settings on your Lenovo IdeaPad laptop, follow the steps below:
- Press the Windows Key + I on the keyboard to launch Settings.
- Select Network & Internet from the left-hand side on the screen.
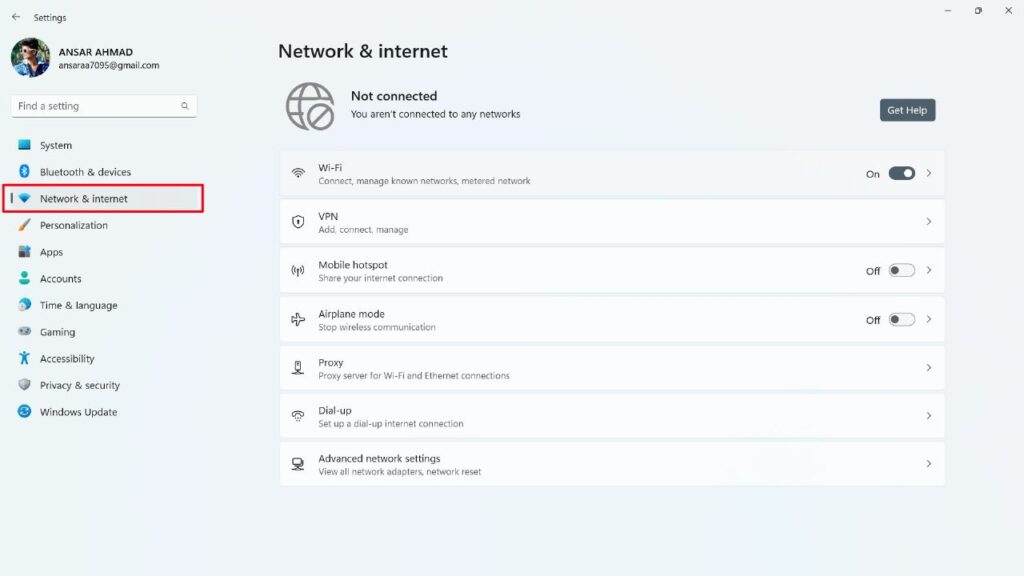
3. Choose Advanced network settings.
4. Click on the Network reset option.
5. Before resetting the network settings, read the description carefully and click on Reset now.
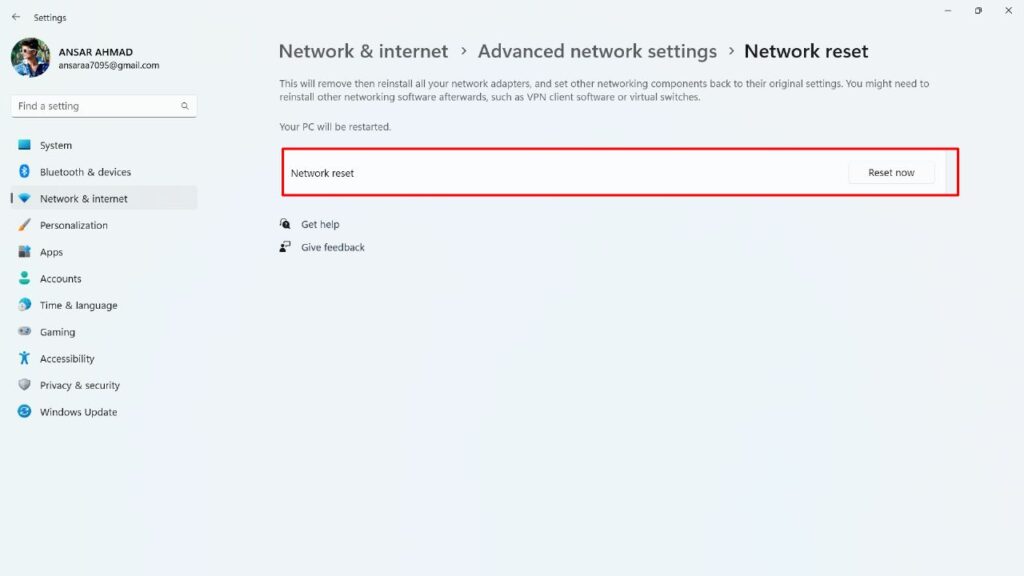
6. Confirm that you want to reset all network settings by clicking on Yes.
7. Now your laptop will automatically reboot. Once done, try checking if the issue has been resolved.
Note: Remember that after performing a network reset on your Lenovo IdeaPad laptop, you may have to reconfigure ant network software you have installed on your laptop, such as aVPN. In addition to this, if you had previously customized the network settings, then you will have to set them up again.
Fix 9: Update the Network Adapters
An outdated network adapter on your Lenovo IdeaPad laptop could be the reason why the WiFi network isn’t working or keeps disconnecting. In such a case, you have to check whether the driver is updated to the latest or has an outdated one. As the driver is essential to function the hardware components as well as other settings in the laptop. Therefore, updating the network adapters to the latest version, you may surely fix the problem.
To update the network adapters on your Lenovo IdeaPad laptop, follow the steps below:
- Press Windows Key + X on your keyboard and select Device Manager.
- In the Device Manager section, locate the Network Adapters and expand it by clicking the arrow next to it.
- Locate your Lenovo IdeaPad’s network adapter, (Similar to “Intel Dual Band Wireless-AC 7260” or “Realtek RTL8821AE Wireless.”)
- Right-click on the dedicated adapter and choose the Update driver from the pop-up menu.
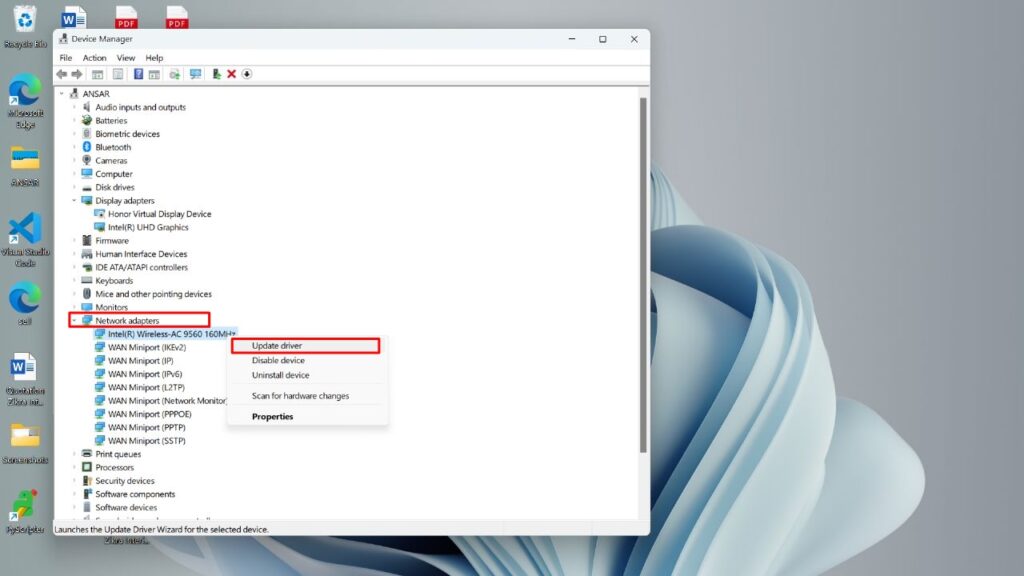
5. Again, click on the Search automatically for drivers option.
6. Now your laptop will automatically search for available updates.
7. If an update is available, download and install it.
8. If there is no update available, simply close the window and move on to other solutions.
Fix 10: Check for Windows Update
It could be possible that you are unable to connect your laptop to a Wi-Fi network, because you are running on the outdated Windows version. In such a case, you have to update your Windows to the latest version if it’s available. Generally, Windows updates often contain bug fixes and security patches, but they can also improve the overall performance of the laptop, including the Wi-Fi connectivity and other features.
To check for Windows update on your Lenovo IdeaPad laptop, follow the steps below:
- Press Windows Key + I simultaneously to launch Settings on your laptop.
- Select Windows Update from the left side panel.
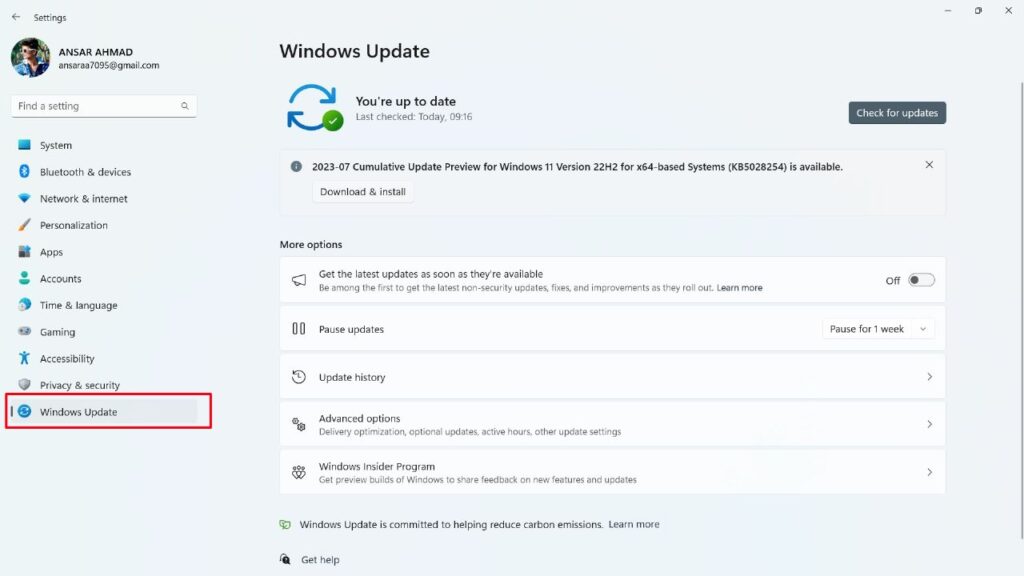
3. Click on the Check for updates.
4. If an update is available, click on the Download & Install button.
5. Once downloaded, restart your laptop.
6. Now check if your Wi-Fi connection has been resolved.
Fix 11: Add Your Wireless Network Manually
If you have tried the above workarounds and it doesn’t work, then you can also add your wireless network manually if the Wi-Fi network isn’t working or the WiFi keeps disconnecting on your Lenovo laptop. There may be a chance that you could resolve the problem by following these methods.
To add the wireless network manually on your Lenovo laptop, follow these steps:
- Press Windows Key + I on the keyboard to launch Settings.
- Select Network & Internet > Wi-Fi.
- Click on the Manage known networks and choose Add a new network.
- Enter the network details such as Network name, Security key and Security type. You may easily find these on your router’s device or it’s manual.
- Check the mark on the Connect automatically option and click Save.
- Again, click on the network button at the right bottom of the screen on the toolbar.
- Finally, choose your saved wireless network and click on it to and select Connect.
Fix 12: Factory Reset Your Laptop
If you have tried the above workarounds and it doesn’t help you to resolve the problem you are facing on your Lenovo IdeaPad laptop, then the final method is to factory reset your laptop. A factory reset will erase all your personal data including photos, videos, documents and installed applications. Make sure to back up the important files and data first and again proceed with the reset process.
To factory reset your Lenovo IdeaPad laptop, follow the steps below:
- Press Windows Key + I on the keyboard to open the Settings.
- Select System from the left side panel.

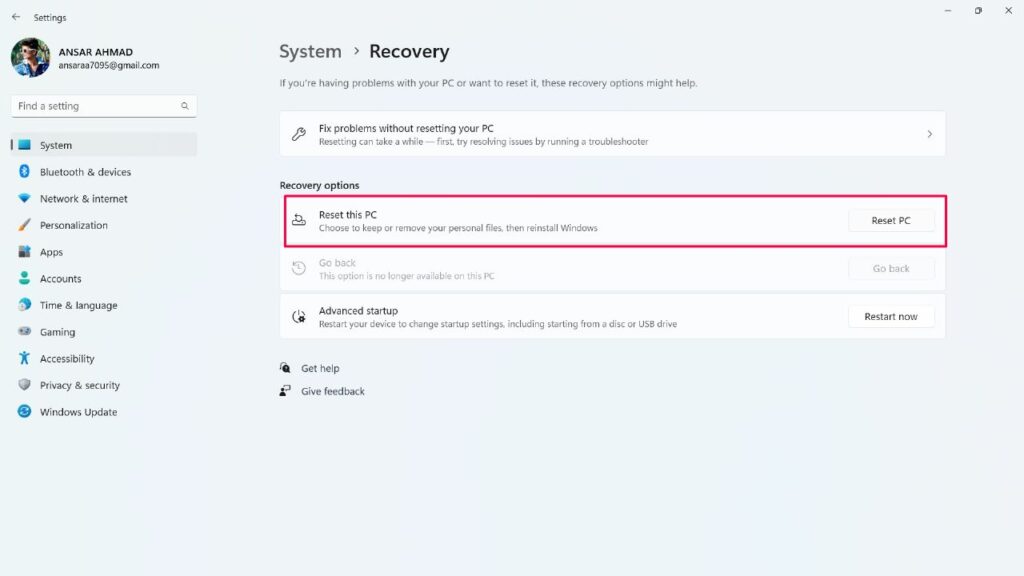
3. Scroll down and click on the Recovery option.
4. On the next window page, click on the Reset PC option next to Reset this PC.
5. Lastly, confirm it by clicking on the Remove everything option.
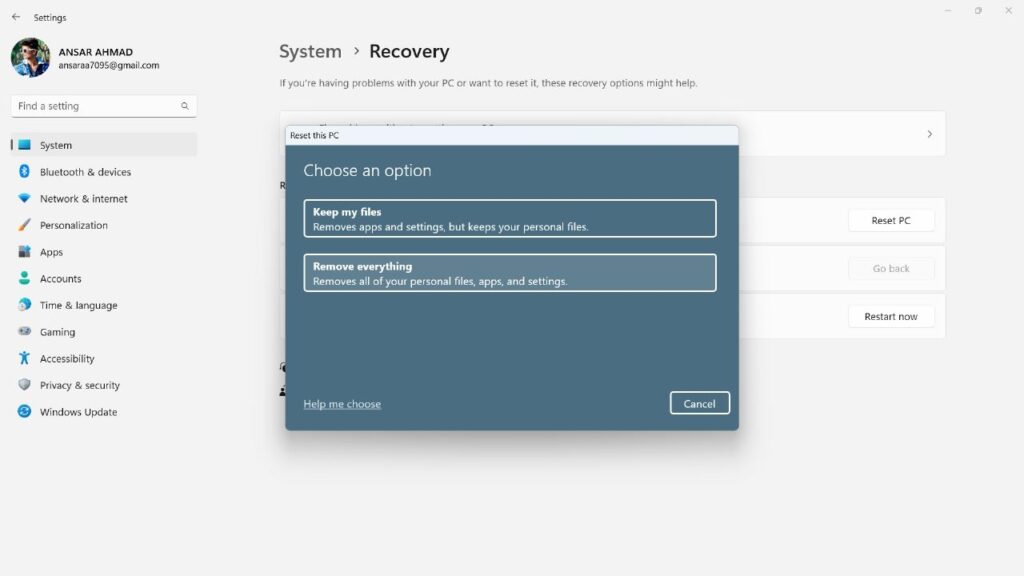
Now your laptop will automatically start the reset process, so make sure to wait until the process gets completed. Once the device turns back on, you have to set it up by following the screen instructions. After that, try connecting your laptop to a Wi-Fi network and check if it’s working. Hopefully, the issue has been resolved on your Lenovo IdeaPad laptop.
Wrapping Up
Although Wi-Fi network connectivity issues can be annoying and inconvenient for several users, they can also be fixed with simple methods. We have mentioned a compiled list of solutions, including restarting your laptop and router, updating the network adapters, enabling the network adapters, resetting network settings, updating windows and much more.
Make sure to pay attention to each and every single method to check which solutions work for you to resolve the problem. In case if the above solutions don’t work, you might need to contact Lenovo support team for help. Let us know which of the above workarounds helps you to resolve the problem. Thanks for reading. Cheers!
