Logitech StreamCam is a webcam that is mainly designed for streamers and content creators where it offers high-quality streaming and records videos for YouTube in a full HD 1080p resolution at 60 fps, giving the best video content with smooth motion. It has a USB Type-C connection that can be easily attached to the computer port. But it could be not very pleasant when you have inserted the Logitech StreamCam on your computer and, unluckily, it is not detected. This frustrates the users, especially when you want to stream or record the content on the screen.
If you have recently inserted the Logitech StreamCam on your computer and it’s not detected, it can be due to several reasons. As many users stated that they’re unable to access StreamCam on their Windows or Mac computer. Don’t worry if the Logitech StreamCam is not detected or working on your system. In this article, we will provide some possible workarounds to address the Logitech StreamCam not detected issue on Windows 10/11 and Mac. So, without much ado, let’s get started.
Page Contents
- Why Is Logitech StreamCam Not Detected on Windows 11/10 and Mac?
- How to Fix Logitech StreamCam Not Detected on Windows 10/11 and Mac
- Fix 1: Check the Webcam’s Compatibility
- Fix 2: Check the Connection Port
- Fix 3: Check Your Privacy Settings
- Fix 4: Restart Your Computer
- Fix 5: Run the Camera Troubleshooter
- Fix 6: Update the Logitech StreamCam Driver
- Fix 7: Uninstall and Reinstall StreamCam Driver
- Fix 8: Disable the Antivirus
- Fix 9: Remove or Uninstall Conflicting Apps
- Fix 10: Update Windows Software
- Troubleshooting Ways to Fix Logitech StreamCam Not Detected on Mac
- Summing Up
Why Is Logitech StreamCam Not Detected on Windows 11/10 and Mac?
Numerous reasons could stop the Logitech StreamCam from detecting on the Mac and Windows operating system. But before we move to the troubleshooting strategies, let’s look at the most common reasons for it. So read the below section to know the actual reasons for the Logitech StreamCam not detected on Windows 10/11 and Mac.
- Connection Issue: There’s a possibility that the connection between the computer port or Logitech StreamCam is the main cause, preventing the Logitech StreamCam from detecting on your Windows and Mac.
- Outdated & Glitchy Camera Driver: It could be possible that due to outdated and glitchy camera drivers, the Logitech StreamCam is not working sufficiently or detecting on the computer.
- Incorrect Privacy Settings: To access the StreamCam on your computer, you need to have the correct privacy settings. Under the privacy settings, you will find the option to access the camera permission. Ensure it is enabled to use the Logitech StreamCam.
- Software Conflicts & Glitches: Sometimes, the software issues and glitches are the real culprit behind the Logitech StreamCam not detected issue on Windows and Mac. It also prevents the other services and apps from running correctly.
- Incompatible StreamCam: If the Logitech StreamCam isn’t detecting on the Windows or Mac computer then it could be due to an incompatible Logitech StreamCam device. Make sure the StreamCam you’re trying to use on the computer is compatible with it.
- Corrupted System Files: In some instances, the StreamCam doesn’t perform well due to corrupted system files. Ensure to uninstall or remove the corrupted system files from the computer to solve the problem.
- Outdated StramCam Drivers: It is possible that the StreamCam you’re trying to access on your computer is running on the oldest driver version that prevents the device from functioning correctly. Ensure to update the StramCam driver to the latest version.
- Damaged USB-C Port: Mostly, the Logitech StreamCam device comes with the Type-C connection which can be easily attachable on the computer USB-C port. In case if the USB-C Port has been damaged or faulty, it will not be recognized on the computer.
How to Fix Logitech StreamCam Not Detected on Windows 10/11 and Mac
Luckily, you can quickly solve the Logitech StreamCam not detected or working issue on your Windows 10/11 and Mac. Here, we have listed the most workable solutions to address the problem you’re facing on your computer with StreamCam. So, without any further ado, let’s dive into the solutions.
Fix 1: Check the Webcam’s Compatibility
Before performing the below strategies, it is necessary to check the Logitech Webcam’s compatibility with your computer. In certain situations, StramCam isn’t detected due to compatibility issues. Make sure to verify the StramCam compatibility with your computer by visiting the official Logitech website.
Fix 2: Check the Connection Port
The Logitech StreamCam comes with the Type-C connection that can be attached to the computer USB-C port. However, if you are trying to run Logitech StreamCam on your computer but it’s not detecting it, then it can be due to an unfair connection. For such a case, try checking the connection between the computer and StreamCam. Be sure the StramCam is properly connected to the USB-C port on the computer without any loose or damaged.
Although, if it’s properly connected to your computer and still Logitech StreamCam is not recognized, disconnect it by unplugging the Type-C cable from your computer port. Afterwards, plug the Type-C cable back to the computer port and check if StreamCam is detected on your computer. However, if the issue persists, follow the next solution.
Fix 3: Check Your Privacy Settings
If the programs on your windows computer are not able to access the camera which is connected then it can be possible that they don’t have access on the camera. In such a case, check your privacy settings to ensure that the camera access is enabled. This will allow you to use the Logitech StreamCam on your Windows computer. Simply, follow the below steps to allow the camera access to use the Logitech StreamCam.
- Press the Windows + I keys together on the keyboard to open the Settings app.
- Click the Privacy & security option on the left-hand side.
- In the Privacy & security menu, click the Camera option under the App permissions section.
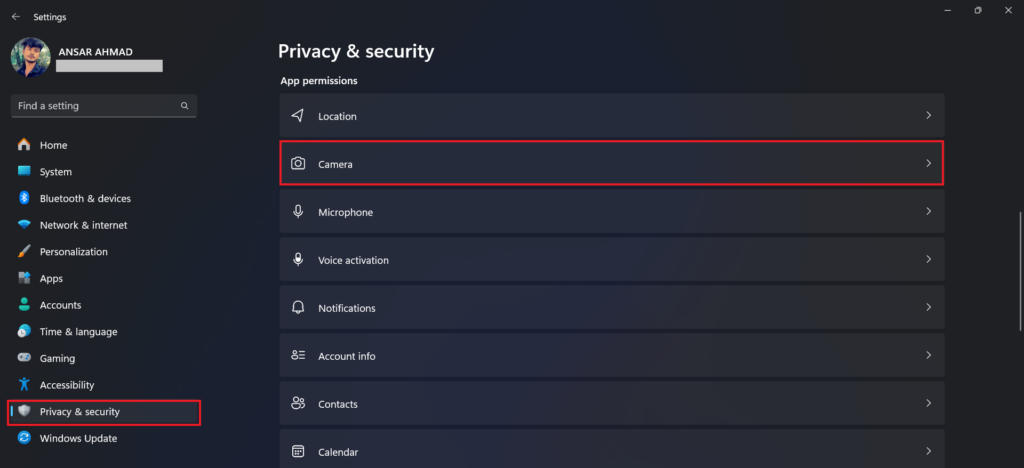
4. Click on the toggle next to Camera access to enable it.
5. Now you’ll see the “Let apps access your camera” option on the screen. Ensure to switch on all the toggles to allow the camera access to all applications on your Windows PC.
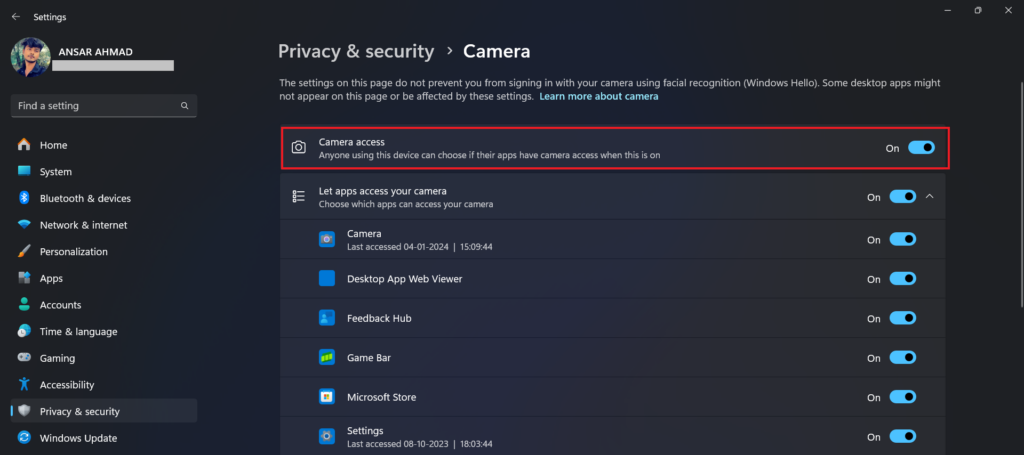
Once you allow the camera access on the computer then you can check the Logitech StreamCam whether it has been detected on the computer or not. Unfortunately, if the issue persists, follow the next solution.
Fix 4: Restart Your Computer
Occasionally, the Logitech StreamCam and other services don’t function appropriately due to conflicts and bugs on the computer, which is why the StreamCam isn’t detected and working on the computer. We suggest you restart your computer to fix the glitches and bugs in order to use the StreamCam on your computer.
To restart the computer, press the Windows key and click the Power icon menu in the bottom. From the menu, select the Restart option and your computer will automatically start the process. Afterwards, check if your StramCam is detected on your Windows 10 or 11 operating system.
Fix 5: Run the Camera Troubleshooter
You can run the camera troubleshooter to address the camera-related issues on your Windows computer to resolve the Logitech StreamCam not detected issue. Generally, this feature will find and solve the issues by itself with the external camera and built-in camera. So, run the camera troubleshooter on your computer and check the results.
To run the camera troubleshooter on your Windows computer, follow these steps:
- Press the Windows + I keys on the keyboard to open Settings.
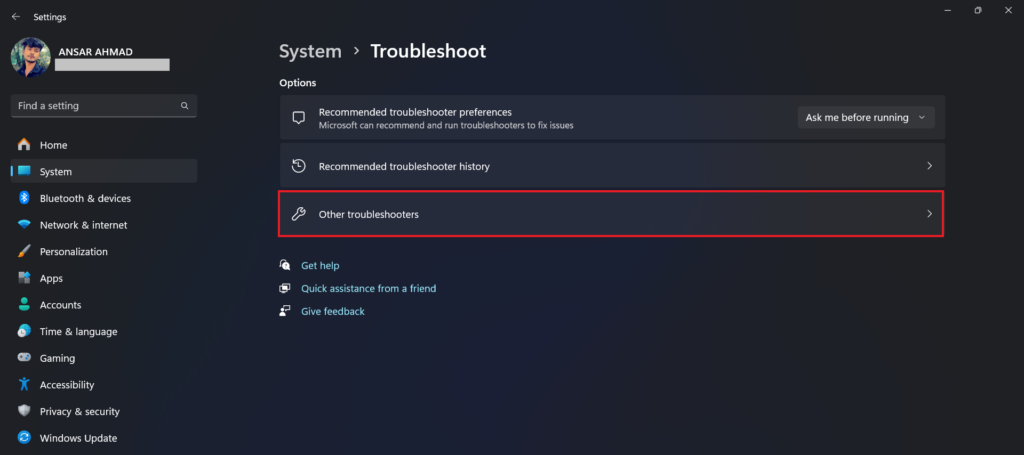
- Click on the System and go to the Troubleshoot option on the right-hand side.
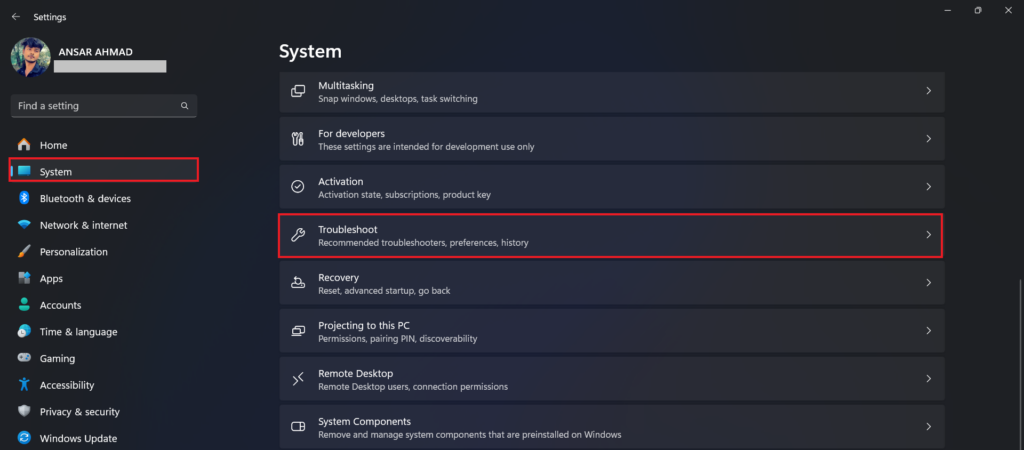
3. In the Troubleshoot window, click the Other troubleshooters option.
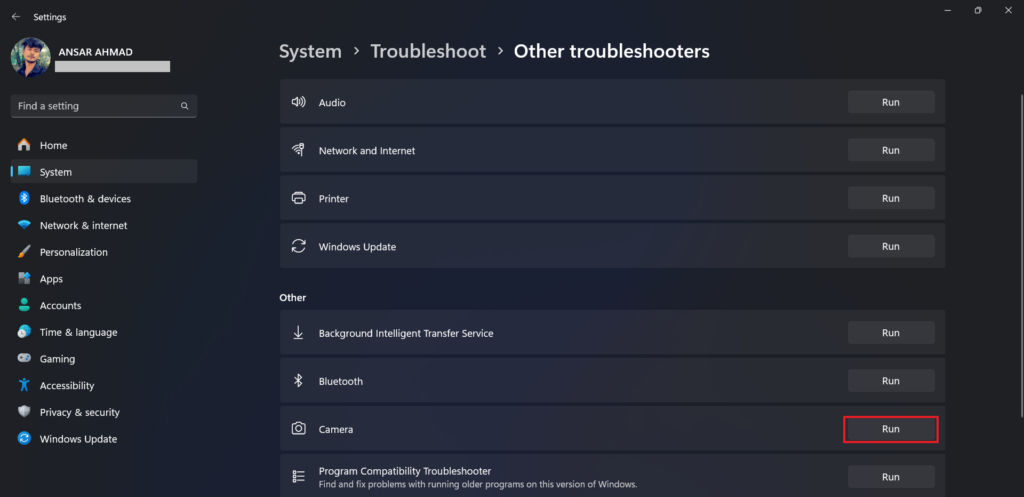
4. Click on the Run option next to the Camera to run the troubleshooter.
5. Select the USB external camera option for the “What type of camera are you using?” question.
6. In the end, answer the question on the screen accordingly and read the troubleshooting guides under the More help option.
Fix 6: Update the Logitech StreamCam Driver
It may be possible that the StreamCam on your computer has some bugs and glitches or it may be an older version that prevents the Logitech StreamCam from recognizing on the Windows computer. If the Logitech StreamCam isn’t detected on the computer, you should update the StreamCam driver to the latest version to tackle the issue. It will automatically fix the problem and you’ll get back using the StreamCam again.
To update the Logitech StreamCam driver on your Windows 10/11 computer, follow the steps below:
- Open the Start Menu and type the Device Manager in the search bar and hit Enter. [This will launch the Device Manager window.]

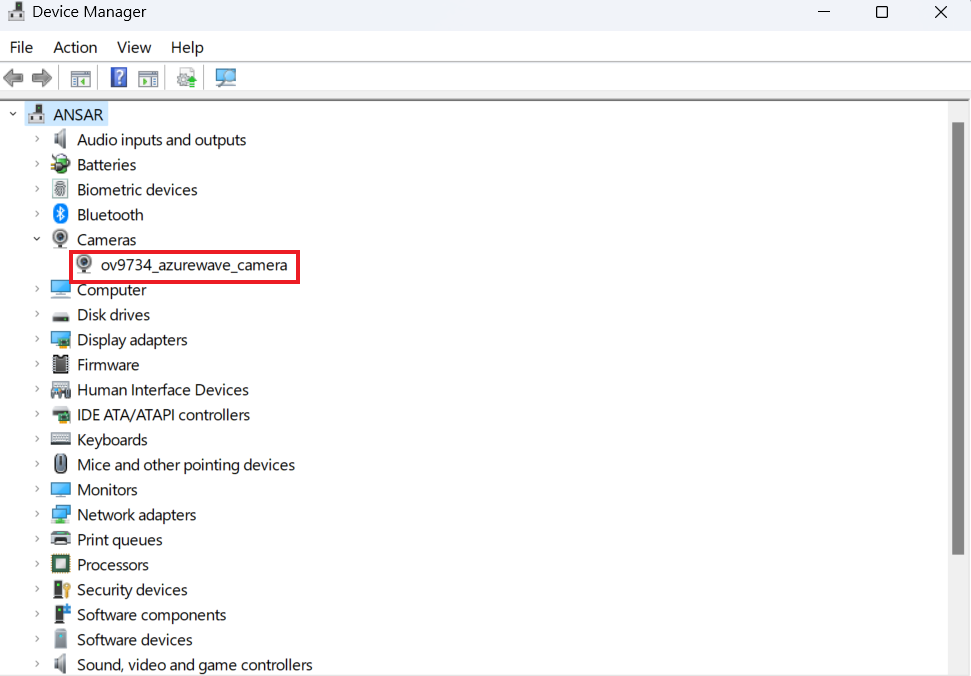
2. Expand the Cameras section by clicking the arrow on the left side.
3. Now you will see the Logitech StreamCam driver (version) on the screen.
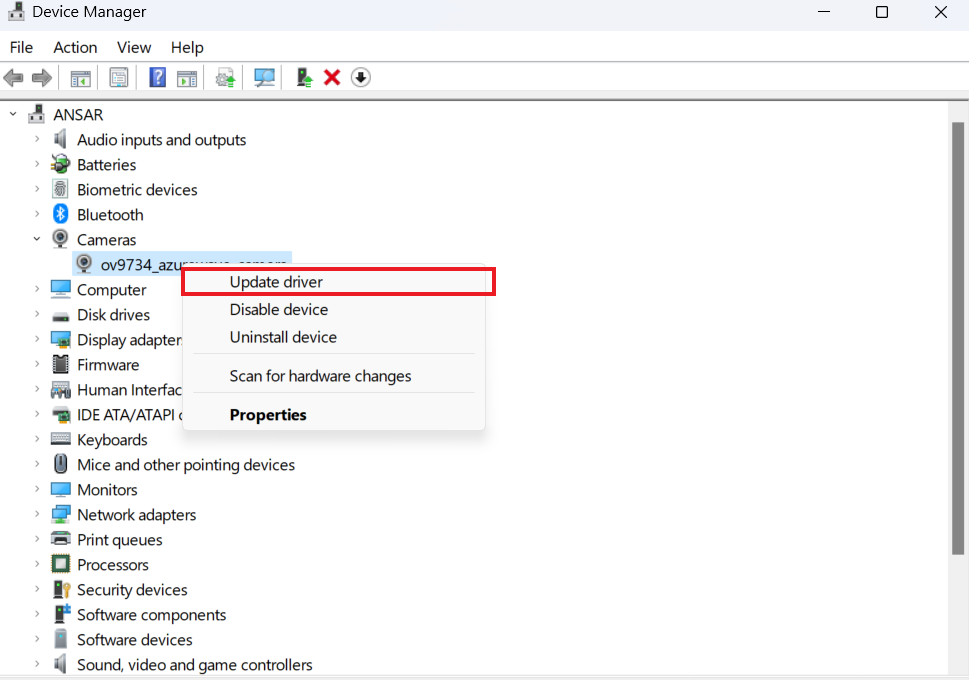
4. Right-click on the StreamCam driver and choose Update driver.
5. From the Update Drivers menu, you should choose Search automatically for drivers option.
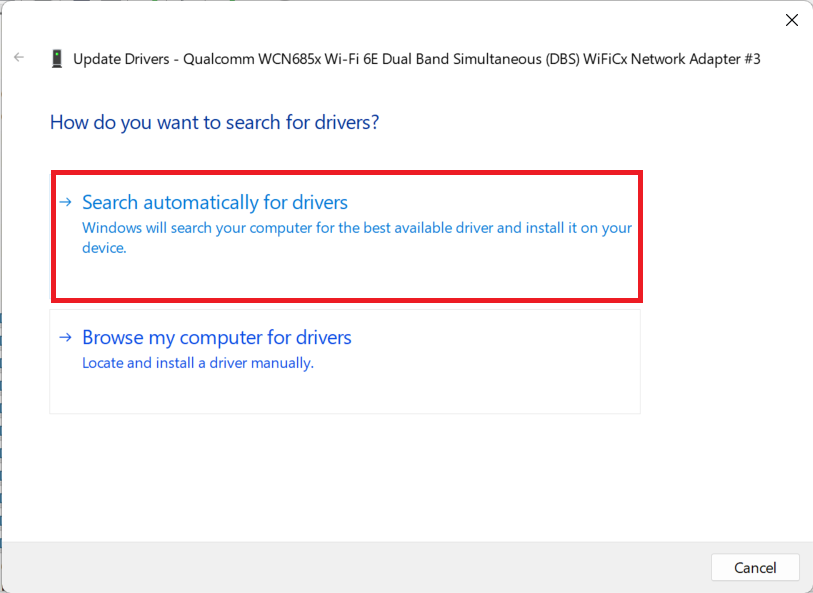
6. Follow the on-screen instructions to download the latest Logitech driver on your computer.
7. Lastly, restart the computer to apply the changes.
Fix 7: Uninstall and Reinstall StreamCam Driver
If updating the camera driver doesn’t fix the issue on your computer, then uninstall and reinstall the StreamCam driver. It will delete all the data regarding the driver from your Windows computer and PC. You can follow the below steps to reinstall the StreamCam driver:
- Open the Start Menu by pressing the Windows key on the keyboard.
- In the search bar, type the Device Manager and hit Enter.

3. Expand the Cameras section by clicking the arrow on the left side.
4. Now you will see the Logitech StreamCam driver (version) on the screen.

5. Right-click on the dedicated driver and choose the Uninstall driver option.
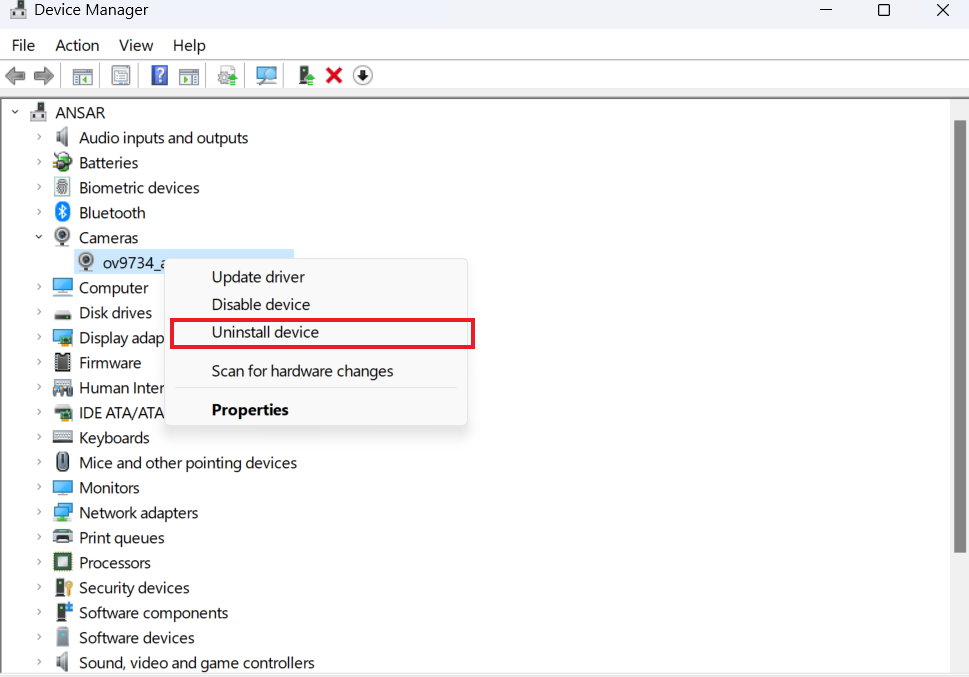
6. Confirm the process to uninstall the driver from your computer.
7. Finally, restart your Windows PC to reinstall the StreamCam camera adapter on your computer.
8. Alternatively, you can download the latest Logitech StreamCam driver from the official Logitech website.
Fix 8: Disable the Antivirus
There’s a chance that your Windows 10/11 computer’s integrated antivirus, preventing the StreamCam from detecting or working. In that case, you should disable the system antivirus on your computer to address the webcam’s functionality issue. We suggest you disable the antivirus and check out the results. Here’s how to disable the antivirus on your Windows 10/11 computer:
- Press Windows + I keys together on the keyboard to open the Settings.
- Click on the Privacy & security on the left-hand side and choose the Windows Security option.
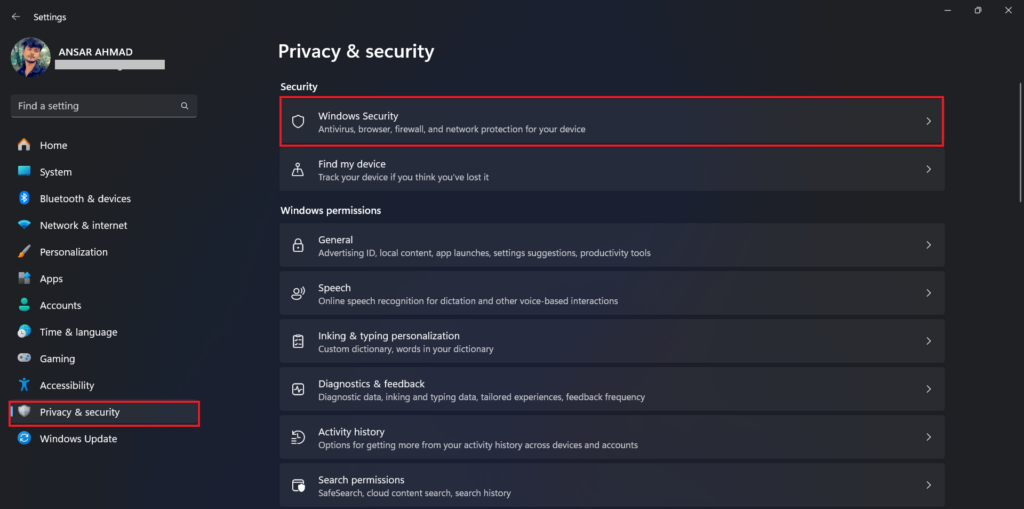
3. Click the Virus & threat protection.
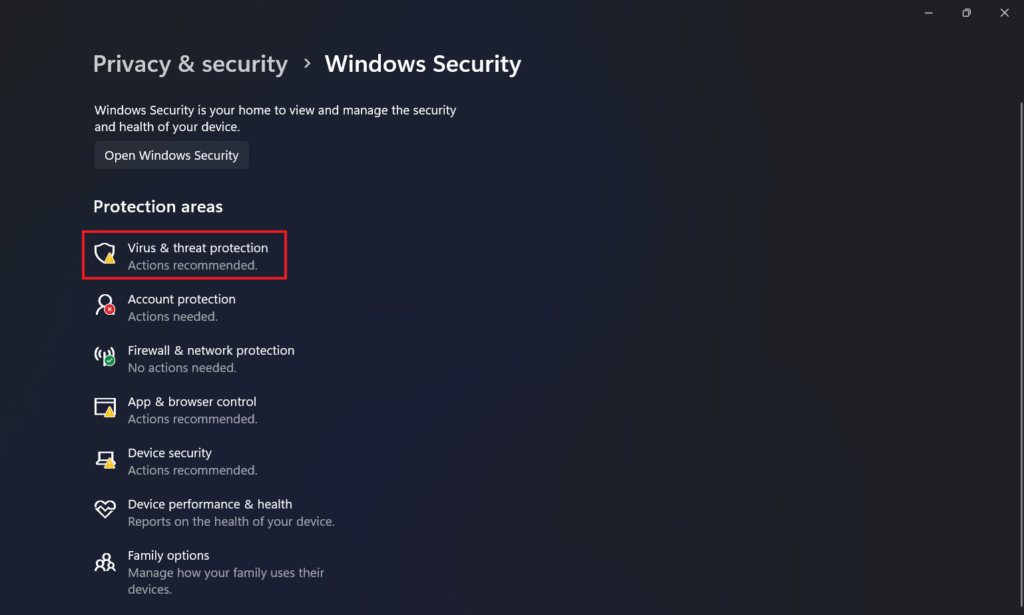
4. Next, click on Manage settings in the Virus & threat protection settings section.
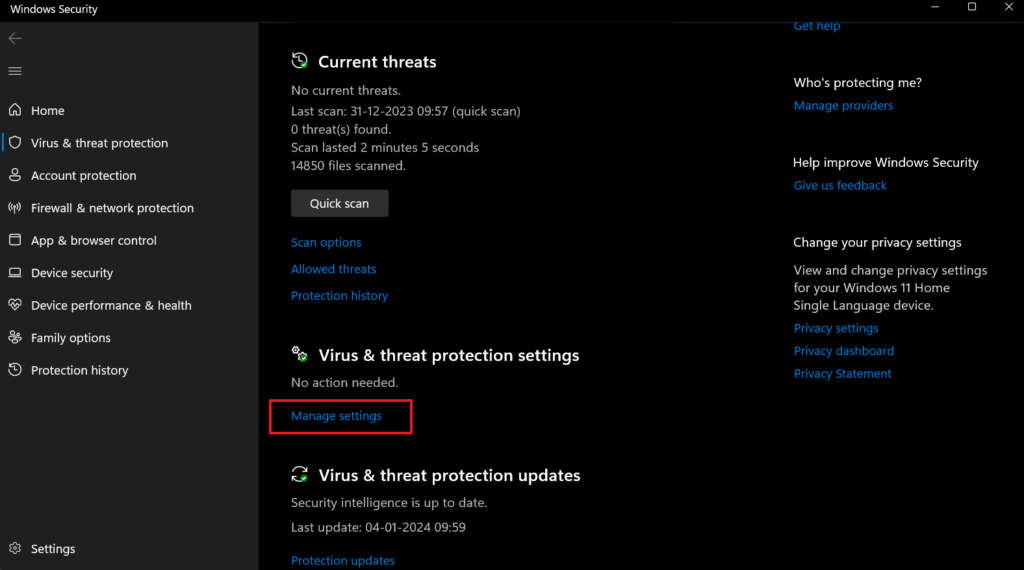
5. Turn off the toggle under Real-time protection to disable the antivirus on your computer.
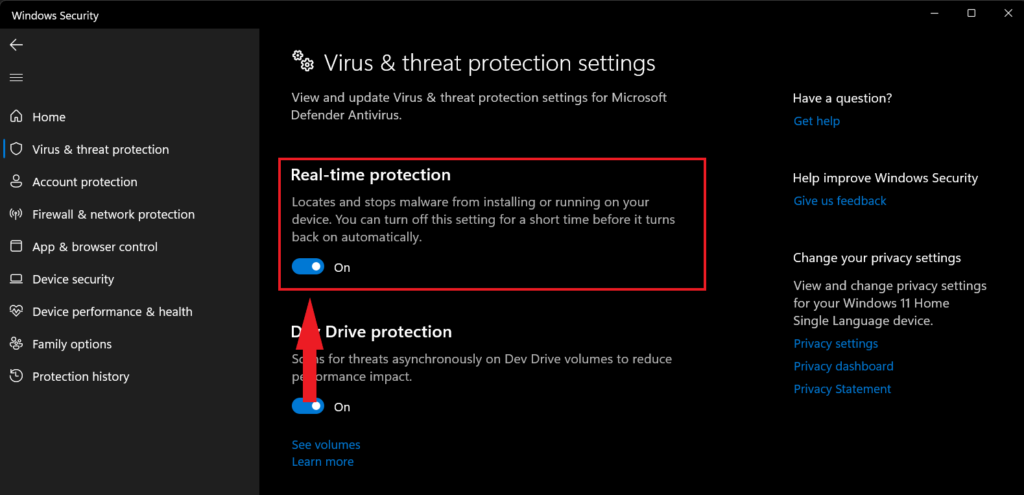
6. Now, try checking if the Logitech StreamCam has been detected on your computer. If it’s not, then turn on the Real-time protection option back and move on to the next solution.
Note: The above-mentioned steps work on both the Windows 10 and 11 OS. However, the steps are slightly different on Windows 10. In case the options aren’t showing, then search it on the search bar and you will get the option on the screen.
Fix 9: Remove or Uninstall Conflicting Apps
If you have tried the above solutions and it doesn’t work out, consider removing or uninstalling conflicting apps or services on your Windows computer. However, if you feel that a particular application or service running in your system is conflicting with the Logitech StreamCam and causing the webcam from detecting, uninstalling the conflicting app is the best choice.
Here’s how you can remove or uninstall conflicts application on your Windows PC:
- Press the Windows + I keys on the keyboard to open the Settings app.
- Click the Apps and then choose the Installed apps on the right side.
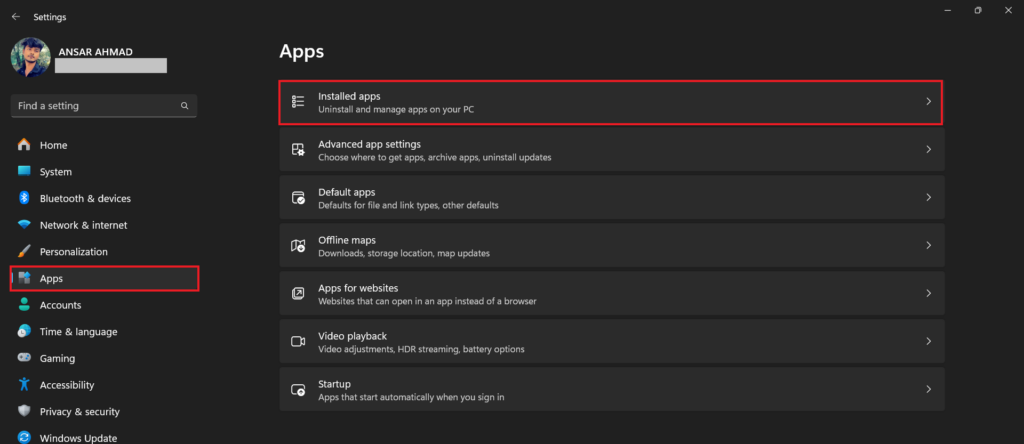
3. From the installed apps or services, look for the conflicting programs or apps.
4. Once you found it, click the three dots next to the program and then choose the Uninstall option.
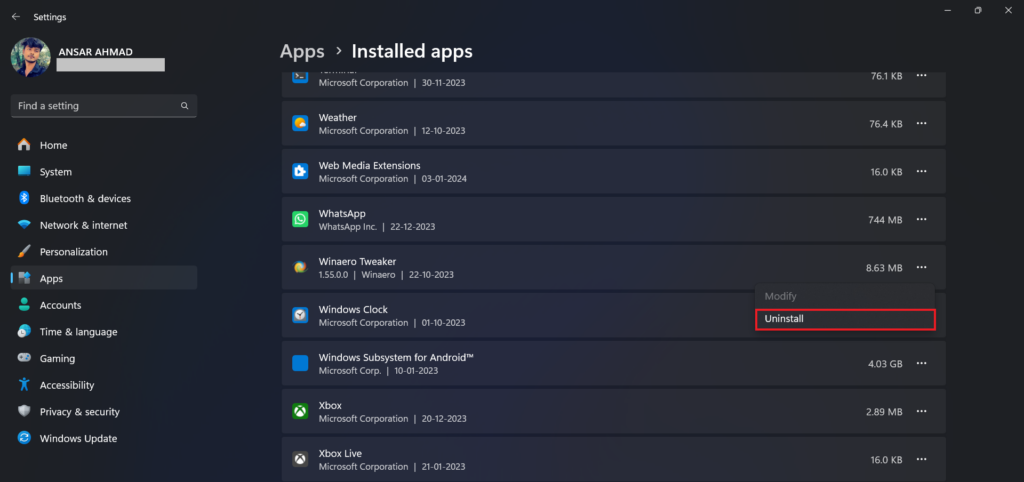
5. Confirm the process by clicking the Uninstall button again on the new prompt.
6. Lastly, follow the same procedure with other programs and check if the issue has been resolved.
Fix 10: Update Windows Software
Are you running on the outdated Windows version? If so, you may experience issues with the Logitech StreamCam. Many apps or programs don’t function well, especially on the older version of the system. In such a situation, you should update the system to the latest version to address the problem you’re facing with Logitech StreamCam.
Windows frequently updates software on the computer to increase the performance as well as brings additional features. Many users are excited to use the new features on their computer. However, if you’re using the Windows older version, we suggest you update the Windows software to the latest version that fixes various bugs and issues.
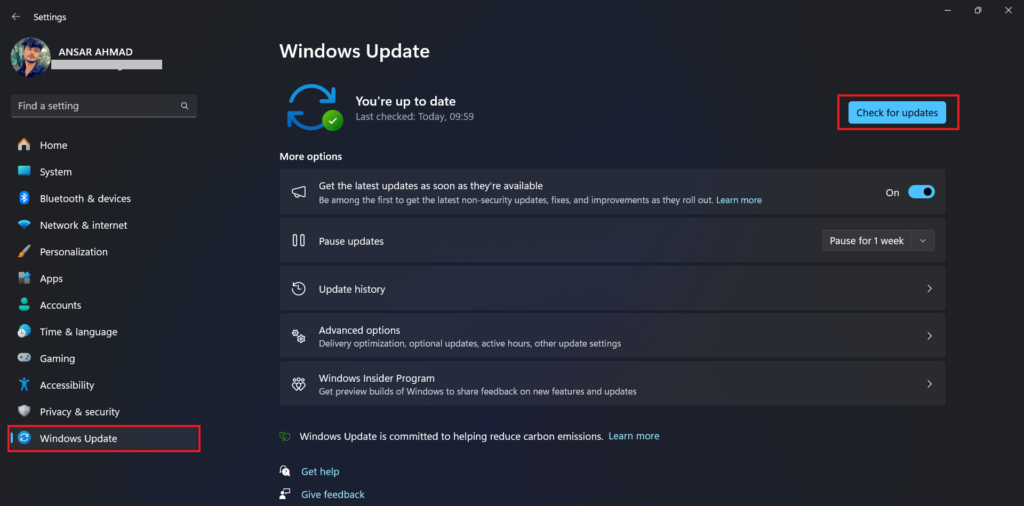
To update Windows software version, you should follow the steps below:
- Press the Windows + I keys on the keyboard to open the Settings.
- Click on the Windows Update on the left-hand side.
- Then, click the Check for updates option. [Now your computer will check for available or pending windows updates.]
- Download and install the updates by following the on-screen prompts.
- Once the update is installed, restart the computer to apply the changes.
Troubleshooting Ways to Fix Logitech StreamCam Not Detected on Mac
If you’re facing the Logitech StreamCam not detected issue on your Mac, then follow the below mentioned strategies to address the issue.
Fix 1: Check the StreamCam Connection
To access Logitech StreamCam on your Mac, you must connect the StreamCam to the Mac correctly without losing the USB Type-C connection. Make sure to check the StreamCam connection on your Mac and connect it properly if you find any loss on the cable connection. However, you may also disconnect the Type-C cable from the computer and then reconnect it properly to check if the issue has been resolved.
Fix 2: Restart Your Mac
As mentioned earlier, restarting your Mac computer will fix software issues and bugs including StreamCam not detected. If you are unable to use the Logitech StreamCam on your computer, simply restart your Mac and check the results. Normally, you can restart your Mac by clicking the Apple icon menu in the upper left corner. From there, you should select the Restart option to start the process. This will help you in fixing the temporary bugs and software issues which will help you get back to use StreamCam.
Fix 3: Check the Camera Permission
Camera permission is necessary to enable on your Mac to access the StreamCam on the system through which you’re connected with the Type-C connection. Enabling the camera app permission lets you access the Logitech StreamCam without any further interruptions. Here’s how you can enable the camera permission on your Mac:
- On your Mac screen, click on the Apple icon menu in the upper left corner.
- From the menu, click on the System Settings. [This will open the system settings of your Mac.]
- Navigate to the Privacy & Security section and click the Camera.
- Here, toggle on the permission that requires access to the camera.
- After enabling the option, check if the StreamCam is working on your Mac.
Fix 4: Reset System Management Controller (SMC)
You can also reset the system management controller (SMC) on your Mac if the Logitech StreamCam is not detected on your computer. It’s a powerful trick you can attempt that will help you in fixing the StreamCam not detected issue. Here’s how you can do the reset system management.
Reset the SMC on a Mac Laptop Without Removable Batteries:
- Shutdown your Mac laptop and then unplug the power.
- Press and hold the Shift + Control + Option keys down, then press and hold the power button. Keep all the four buttons pressed down for about 10 seconds and then release it.
- Plug the power cable back in and turn on your Mac. This now reset the SMC on your Mac.
Reset the SMC on an Older Mac Laptop with Removable Batteries:
- Firstly, shut down your Mac and then remove the battery.
- Press and hold the Power button for about 5 seconds and then connect the battery and the power.
- Once done, turn on your Mac and your Mac is now reset to SMC.
Reset the SMC on a Mac Desktop:
- Firstly, shut down your Mac.
- Unplug the Power cable from the power source and wait for about 15 seconds.
- Next, plug the power cable back to the Mac and source. [This will reset the SMC.]
- Finally, turn on your Mac and check the issue has been fixed.
Fix 5: Remove Other USB Devices
Are you connected with another USB cable or device on your Mac? If so, then the other USB devices can interfere with StreamCam on your computer. In that case, we suggest you remove other USB devices that you’re connected with on your Mac. This will allow you to access Logitech StreamCam back on your Mac. Hopefully, the issue has been resolved.
Fix 6: Update Software Version
An outdated software or Mac version may prevent you from accessing certain apps or programs on your computer which includes the webcam’s functionality. If you’re trying to utilize the StreamCam on your Mac and it’s not detected by the computer, it can be due to an outdated software version which usually prevents the webcam from working or detecting. For such cases, the best way to tackle the issue is to update the software version on your Mac.
Updating the software version to the latest one brings several features and increases the device performance. In addition, it also fixes unknown bugs and glitches whether it is a specific application or program. If you are unable to use the StreamCam on your Mac, try updating the software version and check the results. Here’s how to check for an update:
- Click on the Apple icon menu in the upper left corner.
- From the menu, select “About This Mac.”
- Click the “Software Update” option on the screen. [This automatically checks for software updates.]
- Download and install the update to the latest version.
- Once the update is finished, restart your Mac to apply changes.
Note: If you see “Your Mac is up to date” it means you’re running on the latest macOS version and you don’t need to update until the new update will be available.
Fix 7: Reinstall Logitech Software
If you have tried the above solutions and it fails to work out, then you should reinstall the Logitech StreamCam software from the official Logitech website. It can be possible that the file is corrupted and that’s why the device is unable to detect. It’s best to visit the official website and download the latest Logitech driver by choosing the model you are going to use on your computer.
Fix 8: Contact Logitech Support
If nothing works out to fix the StreamCam not detected issue, there may be a chance that your Logitech StreamCam device has been damaged or faulty and that’s why it is unable to be detected on your Windows or Mac computer. In such a case, you should contact Logitech support for help. They’ve the expert team assistance that will guide you how to troubleshoot and address the problem on the spot.
Summing Up
This is how you can troubleshoot and solve the Logitech StreamCam not detected on your Windows or Mac. However, it can be frustrating when you’re unable to use the webcam on your system, especially when you want to record the screen or attend a meeting. This powerful device is a popular and convenient tool for the content creator and those who prefer using the camera as a webcam.
You can quickly address the issue on your Windows or Mac computer by following the solutions outlined in this tutorial. We hope that this guide was helpful to you. However, if you have any questions or thoughts, let us know in the comments section. We will get back to you as soon as possible.
