4A Games and Deep Silver did release Metro Exodus as a first-person shooter open-world post-apocalyptic video game in 2019, which is the third instalment under the Metro lineup. Players can enjoy the epic journey in an immersive gaming experience to enjoy single-player mode. Though the title has received plenty of positive reviews on Steam, several Metro Exodus players face DirectX 11/12 Crash Issues on PCs.
Apart from the startup crashes, lags, stutters, and other graphical glitches, the chances are high that several Metro Exodus players have started receiving DirectX-related issues while launching the game on the PC. It’s also encountering fatal errors during the startup, which might bother affect players a lot. Now, if you’re also one of the victims to encounter such an issue, then make sure to follow this troubleshooting guide to resolve it. So, let’s get into it.
Page Contents
- Fix: Metro Exodus DirectX 11/12 Crash Issue
- 1. Run the Game as an Administrator
- 2. Update GPU Drivers
- 3. Update Metro Exodus
- 4. Verify and Repair the Game Files
- 5. Check for Windows Updates
- 6. Force Use DirectX 11 or DirectX 12
- 7. Disable Windows Firewall
- 8. Disable Windows Defender
- 9. Close Background Running Tasks
- 10. Reinstall the Latest DirectX
- 11. Reinstall Microsoft Visual C++ Runtime
- 12. Try Disabling Overlay Apps
- 13. Disable CPU or GPU Overclocking
Fix: Metro Exodus DirectX 11/12 Crash Issue
According to multiple reports on several online forums, the chances are high that Metro Exodus players are facing the “DX11 startup error” or “DX12 startup error” on the PC during the startup process. We can’t deny that it becomes quite frustrating for unfortunate players but the error is common for plenty of PC games for a while. Issues with the DirectX version, an outdated graphics driver, an outdated game version, anti-virus software blocking, etc can trouble you a lot.
In some cases, corrupted or missing game files, issues with the background running tasks, overclocked CPU/GPU, conflicts with the third-party overlay applications, etc might trigger DirectX-related crashes quite often. Fortunately, there are a couple of potential workarounds mentioned below that should come in handy. Now, without wasting any more time, let’s jump into it.
1. Run the Game as an Administrator
First of all, you can try running the game executable application file as an administrator on your PC to allow the User Account Control (UAC) access to the system. Sometimes lack of system admin permission, your game file might become unable to run properly or even launch easily. You can follow the steps below to run the game exe file as admin to give the required permissions. To do so:
- Go to the installed Metro Exodus game directory on the PC.
- Right-click on the game application file > Click on Properties.
- Click on the Compatibility tab.

- Click on the Run this program as an administrator checkbox to enable it.
- Once done, click on Apply and then OK to save changes.
- Finally, just double-click on the game app file to launch it.
If you’re running the game via the Steam client then perform the same steps for the respective game client too.
2. Update GPU Drivers
The second thing you can do is simply check for the graphics driver on the PC by following the steps below. Sometimes issues with the outdated graphics driver version on the system might trigger multiple conflicts while launching programs. To do that:
- Press the Win+X keys to open the Quick Access Menu.
- Click on Device Manager from the list.
- Double-click on Display adapters to expand it.
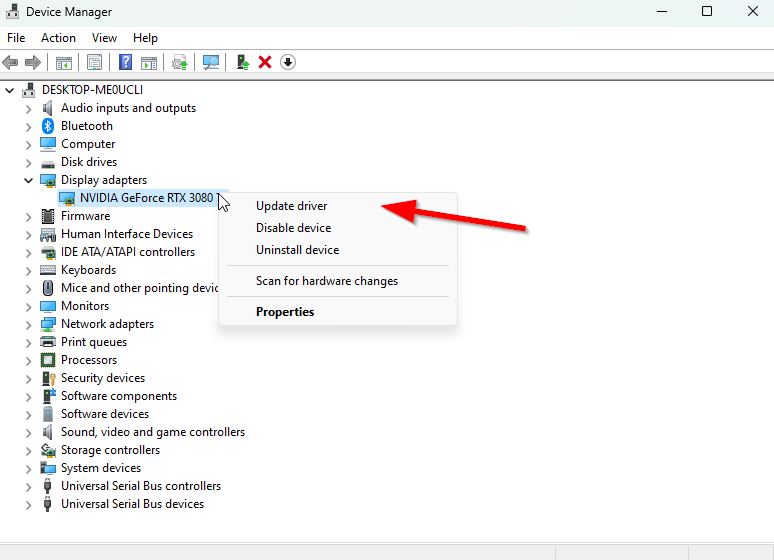
- Right-click on the dedicated graphics card that you’re using.
- Now, click on Update driver > Click on Search automatically for drivers.
- It’ll now automatically check for the available update then download and install the latest version.
- Just wait for the same and reboot the PC to apply changes.
If there is no update available for your GPU then you can go to the official graphics card website from the links below and search for the model of your graphics manually. Make sure to download and install the latest GPU driver for your model number as per the manufacturer.
3. Update Metro Exodus
It’s highly recommended to manually check for the game update at your end to avoid any kind of pending game updates by following the steps below. An outdated game version can eventually cause multiple issues or glitches with the game launching as well as the gameplay experience.
- Open the Steam client > Go to Library.
- Click on Metro Exodus from the left pane.
- Steam will automatically search for the available update.
- If there is an update available, click on Update.
- Make sure to wait for some time until the update completes.
- Once done, ensure to reboot the PC to apply changes.
4. Verify and Repair the Game Files
In some cases, missing or corrupted game files that are installed on the PC might also occur multiple issues with the game launching or a smoother gameplay experience. Luckily, you can easily verify and repair the installed game files on the PC version with the help of the game launcher by following the steps below.
- Launch Steam > Click on Library.
- Right-click on Metro Exodus from the list of installed games.
- Now, click on Properties > Go to the Local Files tab.
- Click on Verify Integrity of Game Files.
- You’ll have to wait for the process until it gets completed.
- Once done, just restart your computer.
5. Check for Windows Updates
An outdated Windows OS version or build number might trouble you a lot with the program launching which can be fixed manually by checking for Windows updates on the PC. You can follow the steps below to do the same.
- Press the Win+I keys to open Settings.
- Click on Windows Update > Click on Check for updates.
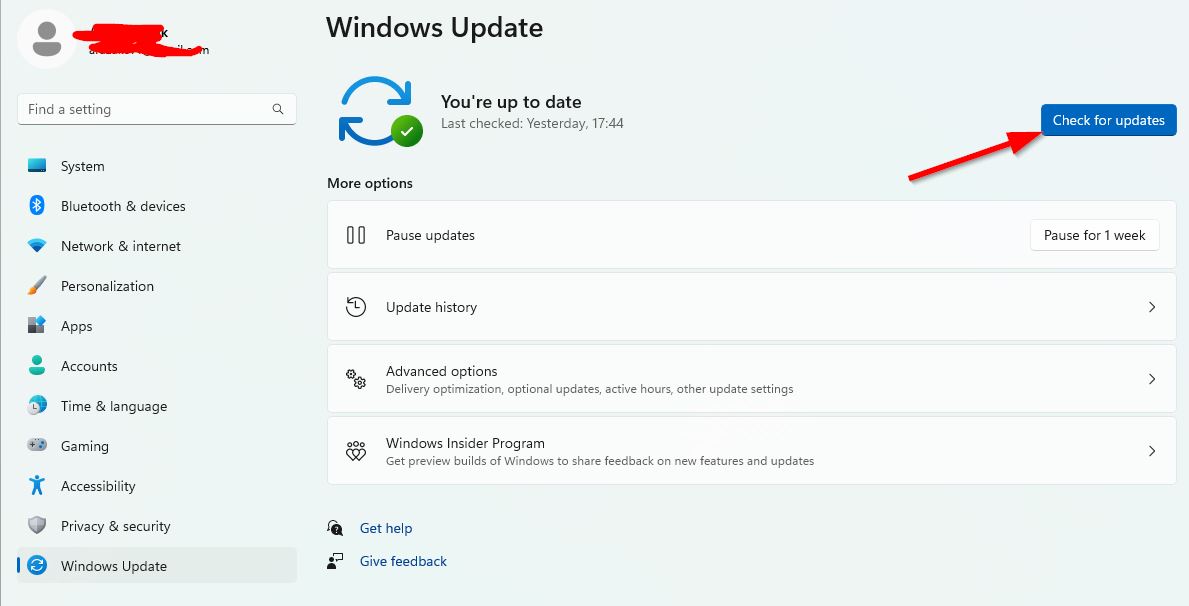
- If there is an update available, click on Download and Install.
- Wait for the update process to be completed.
- Once done, reboot your PC to apply changes.
6. Force Use DirectX 11 or DirectX 12
You should forcefully run the Metro Exodus game on Steam with DirectX 11 or DirectX 12 by following the steps below. Sometimes issues with the DirectX version can also cause multiple conflicts with the game launching on Windows.
- Open the Steam client > Go to Library.
- Right-click on the Metro Exodus game > Go to Properties.
- Click on General > Go to Launch Options.
- Here you can type -dx11 or -dx12 inside the field.
- Once done, reboot the Steam client, and run the game.
Note: If in case, the error persists then you can follow the steps below to use DirectX 11/12 in another way.
- Go to Steam > Click on Library > Click on Manage.
- Select Browse local files > Make sure to create a desktop shortcut for the Metro Exodus game.
- Right-click on the new desktop shortcut that you’ve created.
- Go to Properties > At the end of the Target line, click & add dx11 or dx12.
- Finally, click on OK to apply changes, and run the game to check for the issue.
7. Disable Windows Firewall
The chances are high that you’re using the default Windows Firewall protection on your PC to maintain the security level but it can block ongoing connections for the installed programs. So, you can follow the steps below to temporarily disable the Firewall program.
- Click on the Start Menu > Type Windows Defender Firewall and open it.
- Next, click on Turn Windows Defender Firewall on or off from the left pane.
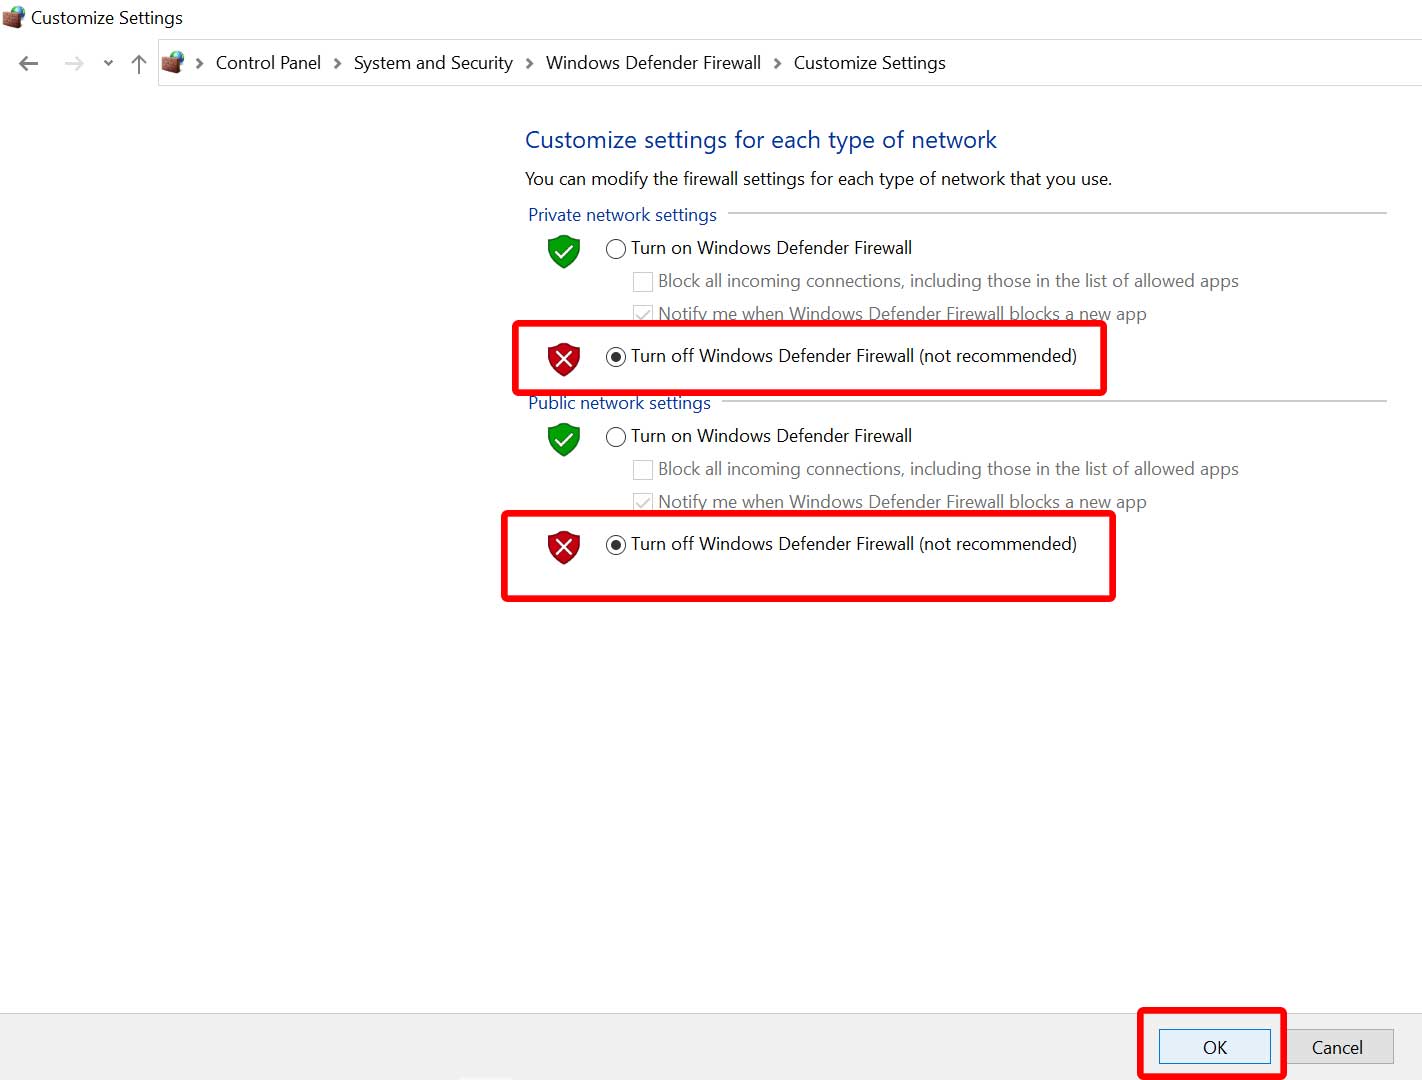
- Select the Turn off Windows Defender Firewall (not recommended) option for all domains.
- Once done, click on OK to save changes > Reboot your PC to apply changes.
8. Disable Windows Defender
You should also turn off the Windows Defender antivirus program temporarily on your PC to ensure there is no issue with the game file blocking due to suspicious or potentially harmful files which might not be dangerous in most cases. To do so:
- Press the Win+I shortcut keys to open Windows Settings.
- Click on Update & Security > Open Windows Security.
- Click on Open Windows Security > Go to Virus & threat protection.
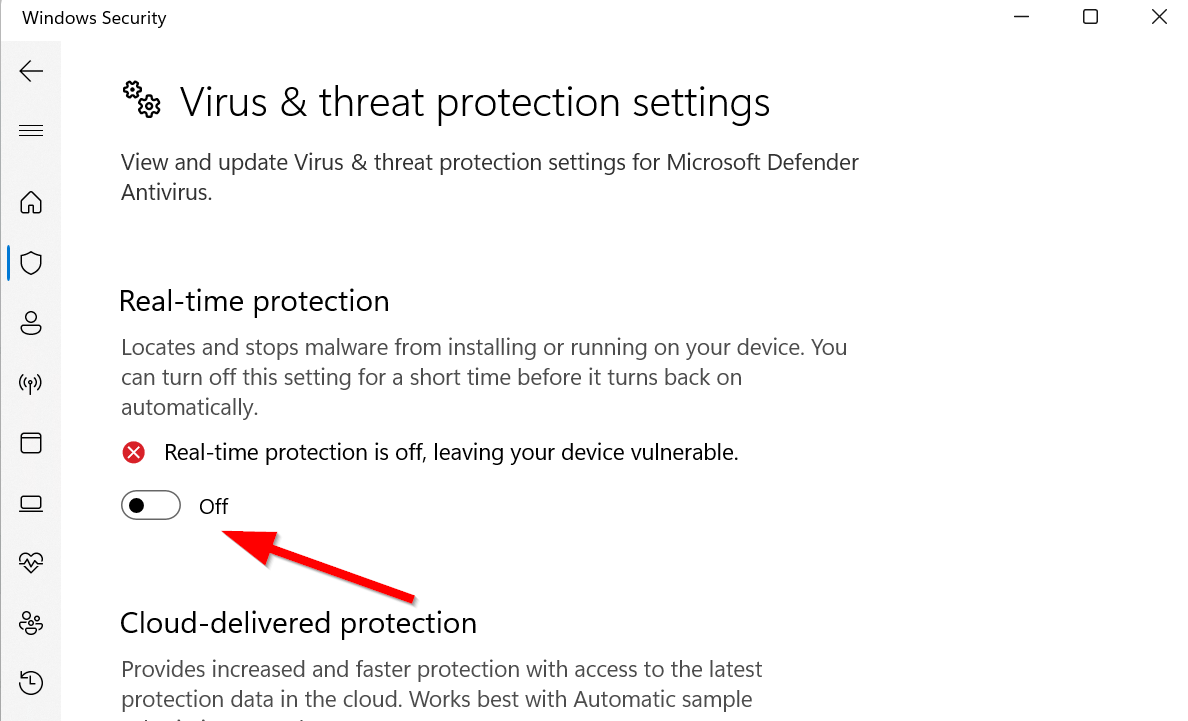
- Now, click on Manage settings > Just turn off the Real-time protection toggle.
- If prompted, click on Yes to confirm turning it off.
Please Note: If you’re using any other third-party antivirus program on your PC then ensure to turn it off from its settings menu.
9. Close Background Running Tasks
Some of the reports are suggesting that a couple of unnecessary background running tasks or programs can consume a lot of system resources like CPU or Memory usage. Such activities might reduce system performance on the machine during crunch moments that need to be fixed manually by following the steps below via closing background tasks. To do this:
- Press the Ctrl+Shift+Esc shortcut keys to open the Task Manager.
- Now, click on the Processes tab > Click to select the unnecessary task individually and select End Task.
- Once done, restart your system to save changes.
10. Reinstall the Latest DirectX
You should reinstall the latest version of DirectX on your PC via the official Microsoft website. You’ll have to download and run the DirectX installer package to install it. Keep in mind that the Metro Exodus game requires DirectX 11 minimum to run on the PC. But having DirectX 12 will ensure a better gaming experience.
11. Reinstall Microsoft Visual C++ Runtime
It’s recommended to reinstall the Microsoft Visual C++ Runtime program on your PC by following the steps below to fix DirectX-related errors while launching games or other programs whatsoever.
- Press the Windows key to open the Start Menu.
- Type Apps & Features and open it from the search result.
- Now, make sure to locate & click on the Microsoft Visual C++ program(s) from the list.
- After selecting the program, click on Uninstall.
- Visit the official Microsoft website and download the latest Microsoft Visual C++ Runtime on the PC.
- Once done, run the installer, and install it.
- Finally, reboot the PC to apply changes.
12. Try Disabling Overlay Apps
Sometimes conflicts with the third-party overlay applications on the system might trouble you a lot which can trouble gaming performance or even while launching programs. You can follow the steps below to manually disable overlay apps whatever you’re using on the PC.
Disable Discord Overlay:
- Launch the Discord app > Click on the gear icon at the bottom.
- Click on Overlay under App Settings > Turn on the Enable in-game overlay.
- Click on the Games tab > Select Metro Exodus.
- Finally, turn off the Enable in-game overlay toggle.
- Make sure to reboot your PC to apply changes.
Disable Xbox Game Bar:
- Press the Win+I shortcut keys to open Windows Settings.
- Click on Gaming > Go to Game Bar > Turn off Record game clips, screenshots, and broadcast using Game bar option.
If you’re unable to find out the Game Bar option then just search for it from the Windows Settings menu.
Disable Nvidia GeForce Experience Overlay:
- Launch the Nvidia GeForce Experience app > Go to Settings.
- Click on the General tab > Disable the In-Game Overlay option.
- Finally, restart the PC to apply changes, and launch the game again.
You might disable other third-party overlay applications such as MSI Afterburner, Rivatuner, other RGB software, keyboard or mouse software, etc applications that run in the background most of the time no matter whether you’re using them or not.
13. Disable CPU or GPU Overclocking
Last but not the least, you should disable CPU or GPU overclocking on your machine by using any reliable overclocking software which might help in gaining gaming performance as well as fixing startup issues. You’ll need to basically set the clocking frequency to factory default for optimal performance. There are several popular and reliable overclocking software available online that you can use quite easily. If you’re not using an overclocked CPU/GPU, skip this step.
That’s it, guys. We assume this guide was helpful to you. For additional queries, you can comment below.
