A newly launched first-person psychological horror survival video game ‘The Outlast Trials’ by Red Barrels, is gaining popularity. It’s the third installment in the Outlast series and a prequel to the first two games and includes test subjects in a mysterious Cold War experiment. Definitely, some visuals or gameplay scenes might be filled with terror, which will be an ISP. Meanwhile, some players are reporting that The Outlast Trials Error F0C5 and F101C2 are troubling a lot.
As the title is currently going through the early access stage, the chances are high that you might encounter stability or bugs. It might take some time for the game developers to make The Outlast Trials game more stable in a few weeks or months. Till then, if you’re one of the victims to encounter The Outlast Trials F0C5 error or F101C2 error, then don’t worry because there are a couple of possible reasons that can be found behind such an issue.
Also Read

Page Contents
- Fix: The Outlast Trials Error F0C5 and F101C2
- 1. Reboot the PC
- 2. Run the Game as an administrator
- 3. Check the Internet Connection
- 4. Power Cycle the Wi-Fi Router
- 5. Disable VPN or Proxy Servers
- 6. Update The Outlast Trials
- 7. Verify and Repair the Game Files
- 8. Update Networking Drivers
- 9. Check the Server Status
- 10. Flush DNS Cache
- 11. Disable Windows Firewall
- 12. Change the DNS Server Address
Fix: The Outlast Trials Error F0C5 and F101C2
When it comes to the F0C5 and F101C2 error codes, the chances are high that somehow the game server has some connectivity issue or the internet connection isn’t working properly. On the other side, issues with the outdated game version, not running the game application as admin, networking glitches, outdated networking drivers, Windows Firewall blocking, and more can be potential reasons for the F0C5 or F101C2 error on the PC.
Luckily, here we’ve shared all the potential workarounds that should come in handy. Make sure to follow all methods one by one until the problem gets fixed. So, without wasting any more time, let’s jump into it.
1. Reboot the PC
Before doing anything else, you should restart the PC to ensure there is no issue with the temporary system glitch or cache data. Sometimes rebooting the PC can help in fixing The Outlast Trials Error F0C5 and F101C2.
2. Run the Game as an administrator
It looks like running the game application file as an administrator on the PC to avoid user account control regarding privilege issues. You should also run the Epic Games Launcher as an administrator on your PC. To do this:
- Right-click on The Outlast Trials application on your PC.
- Select Properties > Click on the Compatibility tab.

- Make sure to click on the Run this program as an administrator checkbox to checkmark it.
- Click on Apply and select OK to save changes.
3. Check the Internet Connection
It’s also worth suggesting to check out the internet connection properly at your end before going to any other conclusion because a poor or unstable network can trigger such issues a lot. If in case, you’re using a wired (ethernet) connection, then you can switch to Wi-Fi or vice versa to ensure there is no issue with the specific networking connectivity. If the internet is working fine, then you can head over to the next one.
4. Power Cycle the Wi-Fi Router
We’ll also recommend you perform a power cycle to your Wi-Fi router by following the steps below to easily clear networking glitches or temporary cache issues.
- Just Power Off the Wi-Fi router.
- Once the LED indicator stops blinking, unplug the power cable from the power source.
- Now, wait for around 30 seconds, and then plug back the power cable in.
- Then Power On the router and check for the issue again.
5. Disable VPN or Proxy Servers
The chances are high that somehow you’re using the VPN service on your networking device or gaming device. Though the VPN (Virtual Private Network) allows you to connect to the game servers depending on the region, sometimes the VPN connection might trigger several issues with the game server connectivity.
6. Update The Outlast Trials
According to multiple reports, corrupted or damaged game files can cause various problems and errors with game launching or gameplay. Mostly updating the game can resolve these issues in a jiffy.
- Open the Steam client > Go to Library.
- Click on The Outlast Trials from the list of installed games on the left pane.
- Now, the client will automatically search for the available update.
- If there is an update available, click on the Update option.
- Wait for a couple of minutes or so until the game update completes.
- Once done, make sure to close the Steam client.
- Finally, reboot your PC to apply changes, and launch the game again.
7. Verify and Repair the Game Files
If in case there is an issue with the game files and they somehow get corrupted or missing, then make sure to perform this method to easily check for the issue.
- Launch the Steam client > Click on Library.
- Right-click on The Outlast Trials from the list of installed games.
- Now, click on Properties > Go to the Local Files files.

- Click on Verify Integrity of Game Files.
- You’ll have to wait for the process until it gets completed.
- Once done, just restart your computer.
8. Update Networking Drivers
Some of the affected players have also mentioned that an outdated or missing networking driver on their Windows system was troubling them a lot. So, if you’re not sure enough whether your networking driver is updated or not, try following the steps below:
- Press the Win+X keys to open up the Quick Link Menu.
- Now, click on Device Manager > Double-click on Network adapters.
- Right-click on the networking device and select Update driver.
- Click on Search automatically for drivers to check for the update.
- If there is an update available, it’ll automatically download & install the update properly.
- Let the process be completed and then reboot your computer to apply changes.
9. Check the Server Status
If the above methods didn’t work for you then make sure to check the server status manually by visiting the official @TheRedBarrels Twitter handle to check if The Outlast Trials game servers are running fine or not. If in case, the servers are down then make sure to wait for a couple of hours and check further. Otherwise, head over to the next method.
10. Flush DNS Cache
Somehow, your system has gathered plenty of DNS cache data related to the internet configuration. Following the steps below, you can easily connect with the game servers after removing the DNS resolver cache data from the system.
- Press the Windows key to open the Start menu > Type Command Prompt and search for it.
- Now, right-click on Command Prompt > Select Run as administrator.
- Click on Yes to run with the admin access > Once the command prompt window opens, type the following command and hit Enter:
ipconfig /flushdns
- A successful message will appear that says, “Successfully flushed the DNS Resolver Cache.”
- Finally, close the command prompt window, and restart the PC to apply changes.
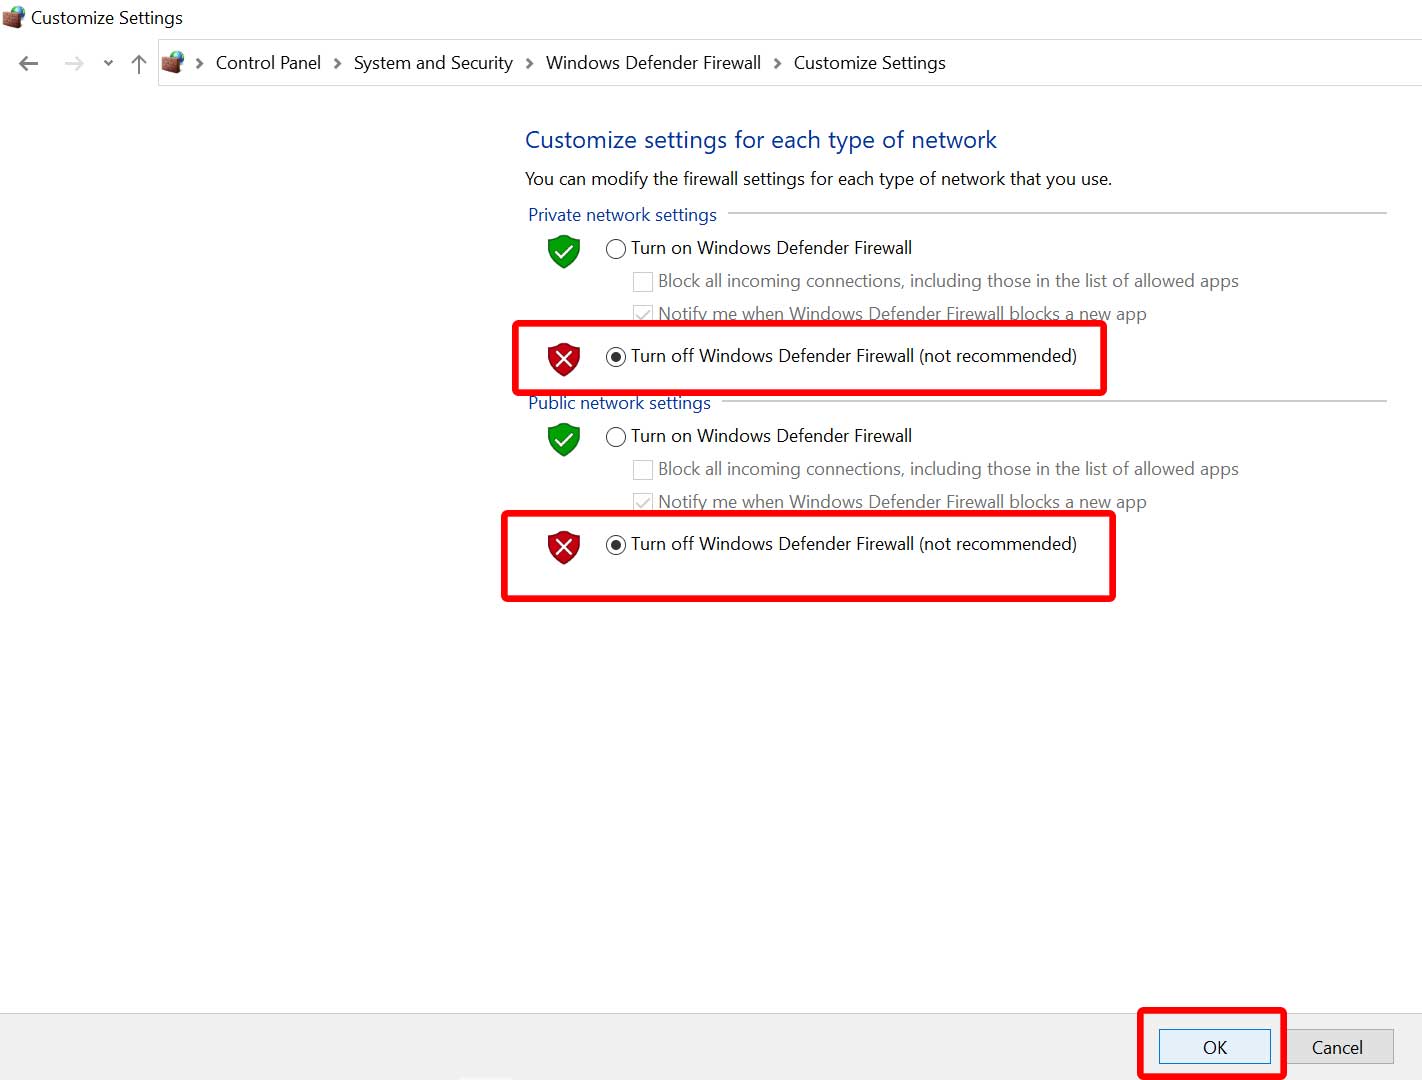
11. Disable Windows Firewall
The chances are high enough that maybe your default Windows Defender Firewall protection or any third-party antivirus program is preventing the ongoing connections or game files to run properly. So, make sure to temporarily disable or turn off the real-time protection and firewall protection.
- Click on the Start Menu > Type firewall.
- Select Windows Defender Firewall from the search result.
- Now, click on Turn Windows Defender Firewall on or off from the left pane.
- A new page will open > Select the Turn off Windows Defender Firewall (not recommended) option for both the Private & Public Network Settings.

- Once selected, click on OK to save changes.
- Finally, restart your computer.
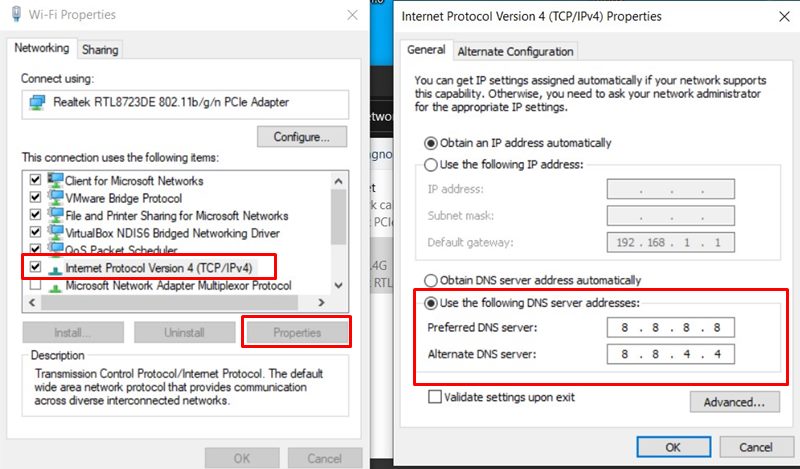
12. Change the DNS Server Address
You can use a Google DNS address (public DNS) to ensure there is no server connectivity issue with The Outlast Trials game. Sometimes issues with your blocked DNS address that have been provided by the ISP may have some issues while connecting to the game servers. To do this, you can follow the steps below.
- Press the Win+R keys to open the Run dialog box.
- Type ncpa.cpl and click on OK to open the Network Connections page.
- Now, right-click on your active network adapter > Click on Properties.
- Select Internet Protocol Version 4 (TCP/IPv4) > Click on Properties.

- Click to select Use the following DNS server addresses.
- Now, enter 8.8.8.8 for the Preferred DNS server and 8.8.4.4 for the Alternate DNS server.
- Once done, click on OK to save changes.
- Make sure to restart your computer to apply changes.
That’s it, guys. We assume this guide was helpful to you. For further queries, you can comment below.
