Microsoft Powerpoint comes with a wide range of customization options, and it applies to both text and images added on to the presentations. Most people are aware of the changes made to the text in Powerpoint; they are not aware of what sort of image editing is achievable in Microsoft PowerPoint itself.
When it comes to image editing, most people stick to professional tools from Adobe, and they are indeed the best. But there are some things that you can do with Microsoft PowerPoint itself, and you don’t need to use an image editing tool for that. One of the tasks that people often use professional image editing tools for is background removal.
If you are looking to remove the background of an image to add it to a presentation later, then you don’t need to use the Image editing tool at all. You can do it directly in Microsoft Powerpoint. SO how do you precisely remove the background of an image in Microsoft Powerpoint? Let’s find out in this article.

How to remove the background from an image in Microsoft PowerPoint?
Yes, to remove the background from an image in PowerPoint, you don’t need any extra tools. The options to remove background from pictures is natively built into Powerpoint.
- Firstly, open up the presentation where you want to add the image.
- Then go to insert and choose Picture to insert the image that you want into the presentation.
- After you insert an image, you will see a format tab appear on the top. Click on it.

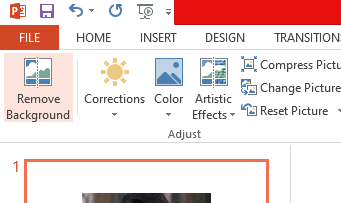
- Now in the “Adjust” group, you will see the option “Remove Background.” Click on it.

- Now you will see the part of the image in the background turn to Magenta, while the foreground part of the image will remain untouched. Unfortunately, this automatic selection of foreground and background for background removal is not always accurate.
- If you see that the section of the background that you want to remove from the image still shows up as the foreground, then you manually choose the part that you want to add to the background for removal.
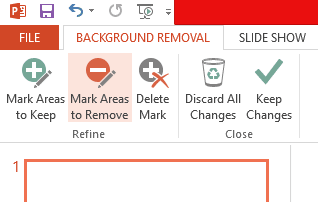
- After clicking on “Remove Background,” you will see that three new options show up. “Mark areas to keep,” “Mark Areas to remove,” and “Delete Mark.” Here click on “Mark Areas to remove.”

- You will notice that the mouse pointer has now changed into a pen pointer. Use that pen pointer to select the region that you want to remove from the picture. To select the area, click and drag the pen pointer over the region you want to remove.
- Alternatively, you can also click on “Mark areas to keep” and select the foreground you want to keep by clicking and dragging your mouse. The unselected part of the image will then be removed.
- After you are done selecting the region to remove(or keep), click in a space outside the image, and the change will be reflected in the image immediately.
So that is how you can remove background from a picture in Microsoft PowerPoint. If you have any questions or queries about this guide, then comment down below, and we will get back to you. Also, check out our other articles on iPhone tips and tricks, Android tips and tricks, PC tips and tricks, and more for more useful information.
