Roblox Corporation is a well-known developer developing Roblox, an online gaming platform & game creation system. It allows users to program games and play games created by other users. Roblox is compatible with Windows, Android, iOS, Xbox, Mac, and FireOS. But recently, some users are complaining that Roblox stutters and freezes in the multiplayer mode on the PC, which becomes frustrating. It eventually happened in Windows 11 PCs these days.
Now, if you’re also one of the victims to encounter such an issue, then make sure to follow this troubleshooting guide to fix it. There are several possible reasons applicable behind the stuttering or freezing issue on the PC with Roblox that we’ve mentioned in brief. It includes an outdated game version, an outdated graphics driver, insufficient system resources, antivirus software blocking, poor or unstable internet connection, etc. During in-game graphics settings, problems with the installed Roblox application, etc, can be another reason.
Page Contents
- Fix: Roblox Stuttering and Freezing on PC in 2023
- 1. Reboot the PC
- 2. Run Roblox as an administrator
- 3. Clear Web Browser Cache and Cookie
- 4. Run Roblox in the Compatibility Mode
- 5. Try Disabling Fullscreen Optimizations
- 6. Clear the Roblox Cache Data
- 7. Remove the Temporary System Files
- 8. Update the Roblox Game
- 9. Run SFC Scan
- 10. Turn Off Overlay Applications
- 11. Check the Internet Connection
- 12. Change the DNS Server Address
- 13. Update Graphics Drivers
- 14. Disable Windows Security Protection
- 15. Reinstall the Latest DirectX Version
- 16. Disable Startup Programs
- 17. Enable Hardware-Accelerated GPU Scheduling
- 18. Optimize Windows Game Bar and Game Mode
- 19. Uninstall and Reinstall Roblox
Fix: Roblox Stuttering and Freezing on PC in 2023
Fortunately, here we’ve shared with you a couple of possible workarounds that should come in handy. Make sure to follow all methods one by one until the problem gets fixed. So, without further ado, let’s jump into it.
1. Reboot the PC
Before doing anything else, you should restart the PC to ensure there is no issue with the temporary system glitch or cache data. Sometimes rebooting the PC can help in fixing the Roblox stuttering and freezing issue.
2. Run Roblox as an administrator
It looks like running the game application file as an administrator on the PC to avoid user account control regarding privilege issues. You should also run the Roblox game app as an administrator on your PC. To do this:
- Right-click on the Roblox application on your PC.
- Select Properties > Click on the Compatibility tab.

- Make sure to click on the Run this program as an administrator checkbox to checkmark it.
- Click on Apply and select OK to save changes.
3. Clear Web Browser Cache and Cookie
Web browser cache and data can cause several issues with the webpage loading or redirect errors. So, clearing the saved cache and data can fix webpage loading issues. To do so:
- Open Chrome browser > Click on the Menu (three vertical dots icon) from the upper right side of the browser interface.
- Now, hover over the More tools field to expand the drop-down list.
- Click on Clear browsing data.
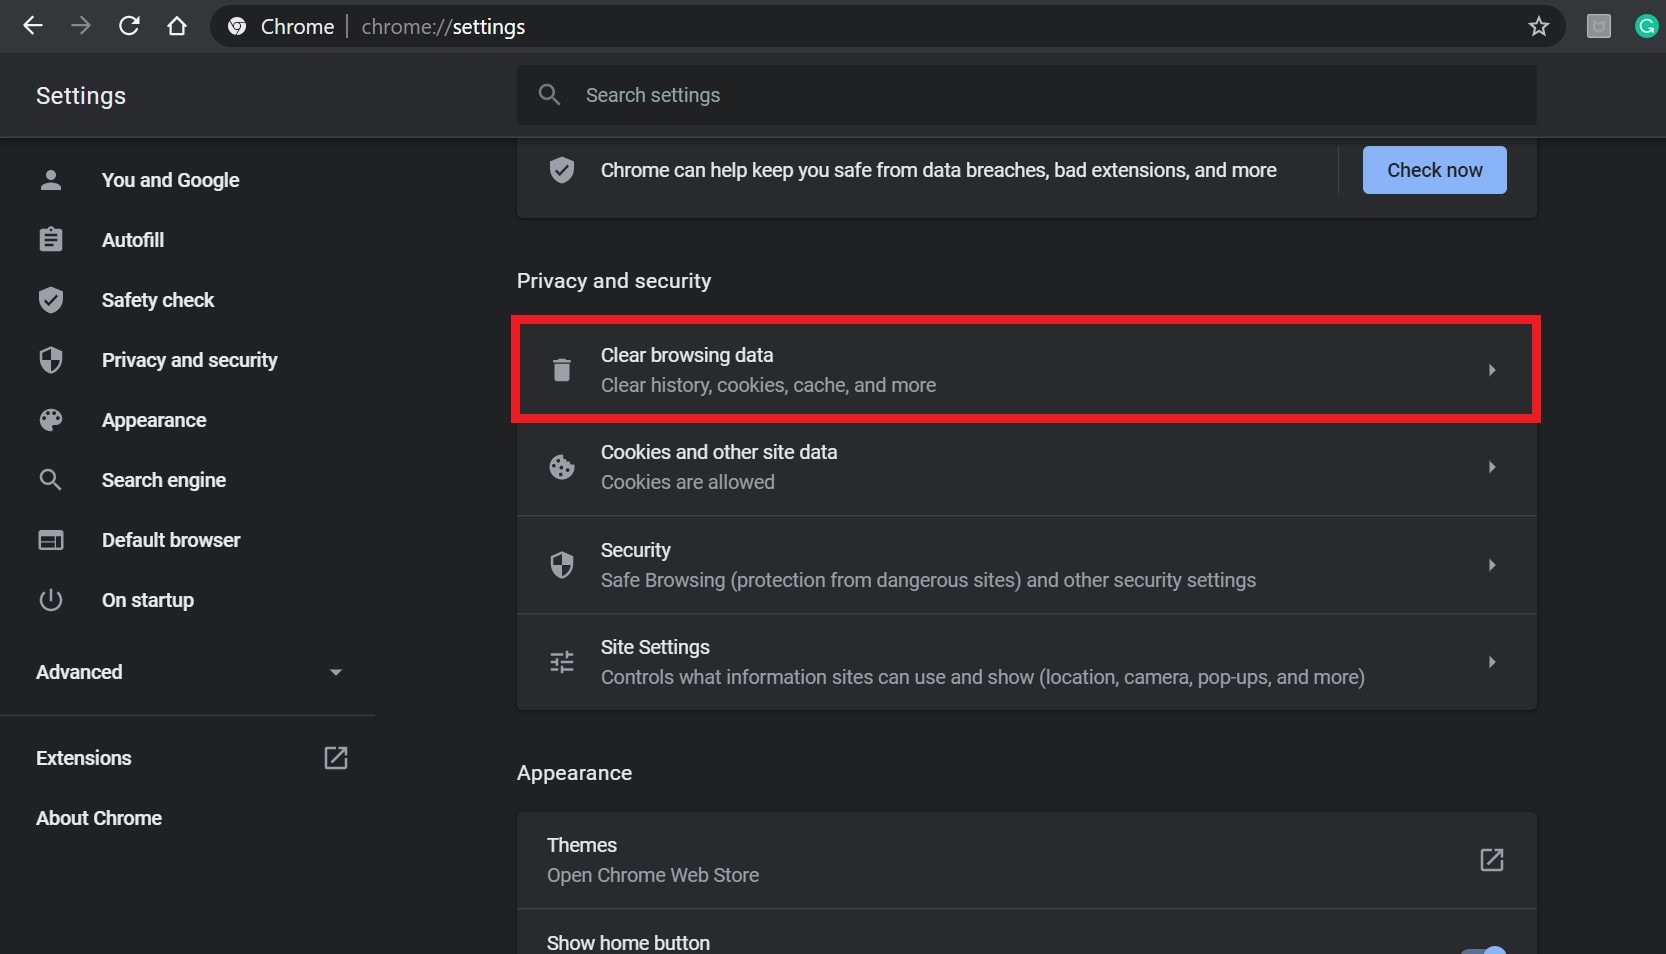
- Next, under the Basic tab, select the Time range according to your preference.
- Then click on the checkbox of Browsing history, Cookies and other site data, Cached images and files to select them.
- Finally, click on Clear data.
- Once done, restart your Chrome browser, and check whether the problem has been fixed or not.
4. Run Roblox in the Compatibility Mode
You might also need to run Roblox in compatibility mode on the PC to ensure there is no issue with the game running. It actually allows PC users to run a specific application or program in the lower Windows OS version to check if the problem has been fixed or not.
- Right-click on the Roblox application on your PC.
- Select Properties > Click on the Compatibility tab.
- Now, click on Run this program in compatibility mode for: and select Windows 7 or Windows 8.
- Once done, click on Apply and then OK to save changes.
5. Try Disabling Fullscreen Optimizations
You can try disabling the fullscreen optimizations on the Windows computer to ensure there is no issue with the fullscreen display feature in some scenarios. Some of the PC users did find this trick helpful. So, you can try it out.
- Right-click on the Roblox application on your PC.
- Select Properties > Click on the Compatibility tab.
- Click on Disable fullscreen optimizations to select it.
- Then click on Apply and select OK to save changes.
6. Clear the Roblox Cache Data
Just like other programs, the Roblox application does also have some cache data that can be stored on the system after installing or while using the same to run the program faster and smoother. However, the cache data can become corrupted and cause the game to crash while loading. It’s always a better idea to follow the steps below and clear the Roblox cache data easily to refresh the program cache.
- Press the Win+R keys to open the Run dialog box.
- Now, type AppData in the field > Click on OK.
- Go to the Local folder > Right-click on the Roblox folder.
- Click on Rename and set the Roblox.old name then save it. [Do not delete the Roblox folder]
- Next, run the Roblox launcher application on the PC to automatically create the cache folder.
- Click on Login > Type in your Roblox account username and password.
- Finally, click on Log In > You’re good to go.
7. Remove the Temporary System Files
You can manually open up the Windows temporary folder and remove all the temporary files to refresh the system glitch whatsoever. To do this:
- Press the Win+R keys to open up the Run dialog box.
- Now, type %temp% and hit Enter to open up the Local Temp folder.
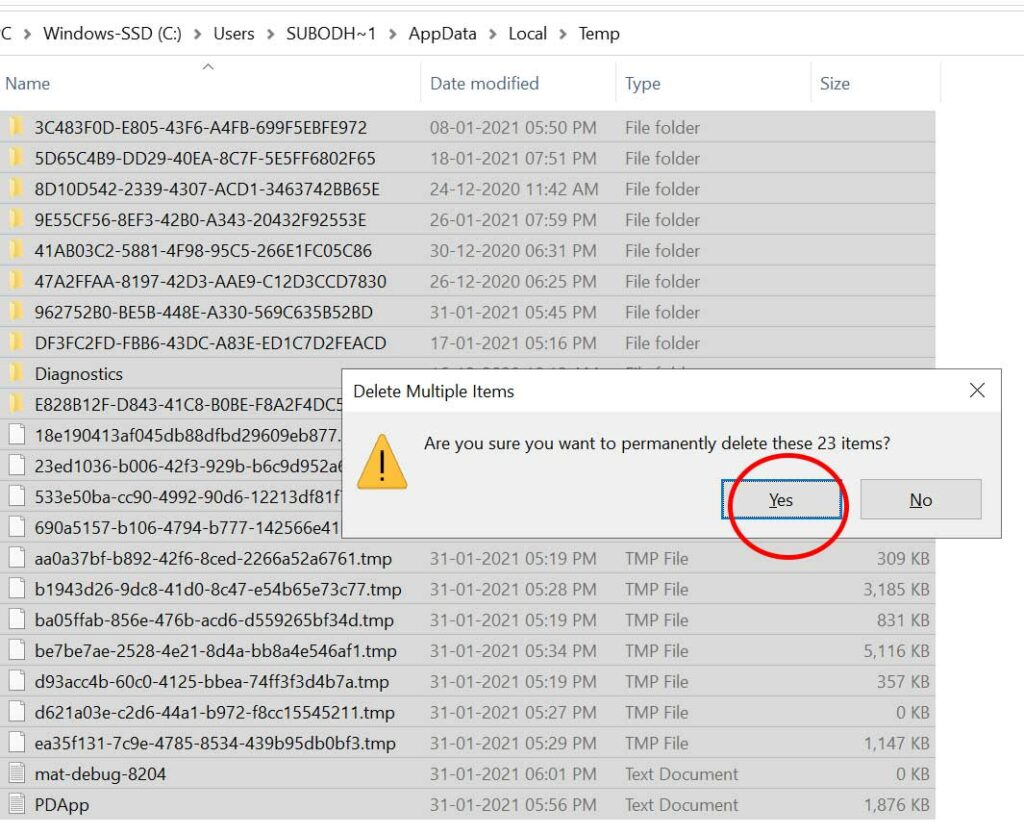
- Then press Ctrl + A keys to select all the temporary files inside the folder.
- Once all are selected, simply press the Shift+Delete keys.
- Click on Yes to permanently delete all temporary files from the system.
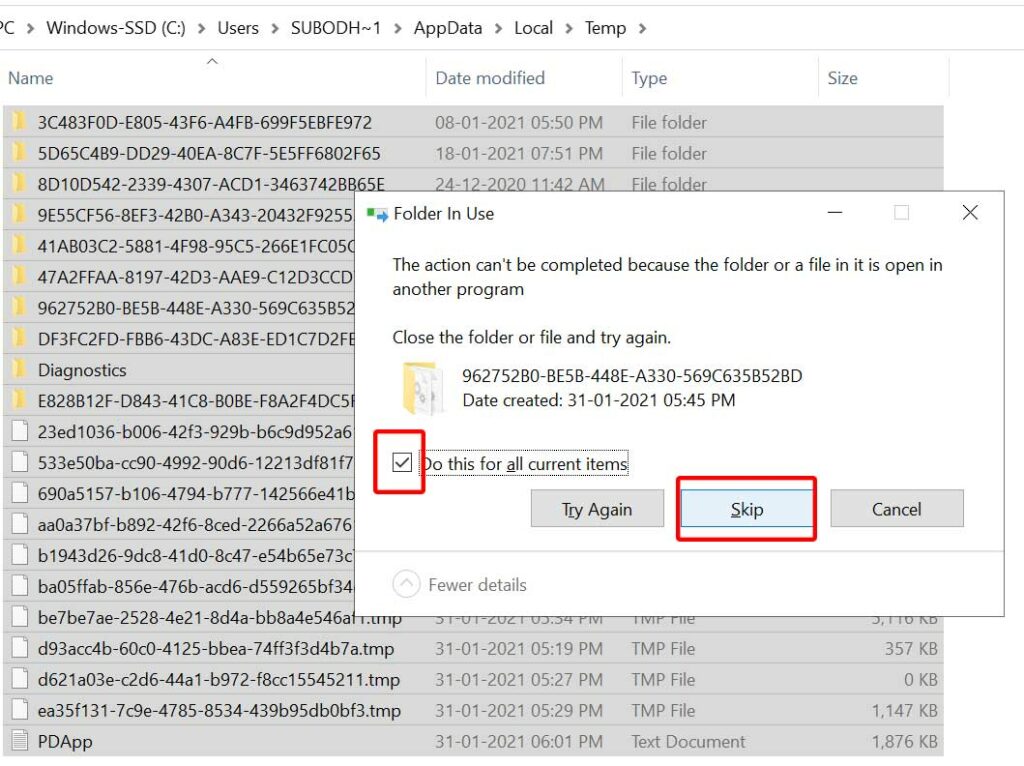
- Mostly some of the temporary files can’t be deleted. In that case, if you’re receiving a Folder In Use popup window, click on the Do this for all current items checkbox and select Skip.
- Close the window and you can skip the rest of the files to delete.
8. Update the Roblox Game
There are two types of Roblox editions available on Windows that you can follow according to your preference. Mostly updating the Roblox game player might come in handy to easily resolve the stuttering and freezing issue on the PC.
Update Roblox Player:
- First, launch any web browser on your Windows computer.
- Then go to Roblox’s official website > Log into your account.
- Now, open the experience page from the homepage.
- Use the Play button to open the experience.
- Your web browser will now try to launch Roblox.
- Next, click on the Open Roblox button when prompted.
- Finally, Roblox will automatically launch and update itself.
- Wait for the update to complete and then check if the problem has been fixed or not.
Update Roblox from Microsoft Store:
- Open Microsoft Store from the Start Menu.
- Now, search for Roblox in the Microsoft Store.
- Click on the Update button next to Roblox.
- It might take some time to finish the update.
- Once done, run Roblox to check for the issue.
9. Run SFC Scan
System File Checker (SFC) is a utility tool in Microsoft Windows that allows users to scan for corrupted Windows system files and restore them automatically. This method should fix the Roblox stuttering and freezing issue in most cases.
- Click on the Start Menu and type cmd.
- Now, right-click on Command Prompt from the search result.
- Select Run as administrator > If prompted, click on Yes to give admin privileges.
- Once the command prompt window opens, type the following command and hit Enter to execute it:
SFC /scannow

- Now, wait for the process to complete.
- Make sure to restart your computer to apply changes.
10. Turn Off Overlay Applications
Sometimes a couple of applications may come with an additional overlay app that helps the streamers or gamers a lot. However, these overlay apps can eventually conflict with the game files to run smoothly and may cause issues like FPS drops, black screen issues, lags, glitches, inability to use any game modes, etc. You should try disabling the overlay apps manually before relaunching the game to check if the game stutters or not. To do so:
Disable Discord Overlay:
- Launch the Discord app > Click on the gear icon at the bottom.
- Select Overlay under App Settings > Turn on the Enable in-game overlay.
- Click on the Games tab > Select Roblox.
- Finally, turn off the Enable in-game overlay toggle.
- Make sure to reboot your PC to apply changes.
Disable Xbox Game Bar:
- Press the Win+I keys to open Windows Settings.
- Click on Gaming > Go to Game Bar.
- Turn off Record game clips, screenshots, and broadcast using the Game bar option.
Disable Nvidia GeForce Experience Overlay:
- Launch the Nvidia GeForce Experience app.
- Head over to Settings.
- Click on the General tab > Disable the In-Game Overlay option.
- Finally, restart the PC to apply changes, and launch the game again.
There are some other overlay apps that can cause trouble for you something as MSI Afterburner, Rivatuner, RGB software, etc. You should turn them off as well.
11. Check the Internet Connection
It’s also worth suggesting to check out the internet connection properly at your end before going to any other conclusion because a poor or unstable network can trigger such issues a lot. If in case, you’re using a wired (ethernet) connection, then you can switch to Wi-Fi or vice versa to ensure there is no issue with the specific networking connectivity. If the internet is working fine, then you can head over to the next one.
12. Change the DNS Server Address
You can use a Google DNS address (public DNS) to ensure there is no server connectivity issue with the Roblox game. Sometimes issues with your blocked DNS address that have been provided by the ISP may have some issues while connecting to the game servers. To do this, you can follow the steps below.
- Press the Win+R keys to open the Run dialog box.
- Type ncpa.cpl and click on OK to open the Network Connections page.
- Now, right-click on your active network adapter > Click on Properties.
- Select Internet Protocol Version 4 (TCP/IPv4) > Click on Properties.
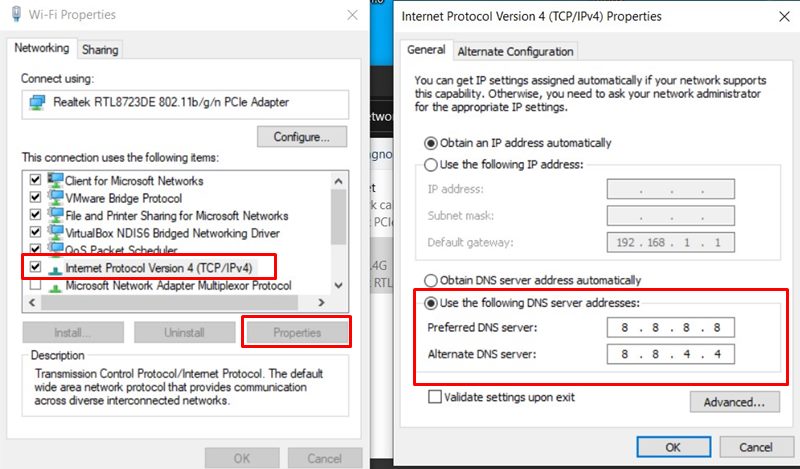
- Click to select Use the following DNS server addresses.
- Now, enter 8.8.8.8 for the Preferred DNS server and 8.8.4.4 for the Alternate DNS server.
- Once done, click on OK to save changes.
- Make sure to restart your computer to apply changes.
13. Update Graphics Drivers
You should try checking for the graphics driver update on your Windows PC and installing the latest version to ensure no update is pending. An outdated or missing graphics driver can trigger issues with properly functioning graphics-intensive programs. To do that:
- Right-click on the Start Menu to open up the Quick Link Menu.
- Click on Device Manager from the list.
- Now, double-click on Display Adapters to expand it.
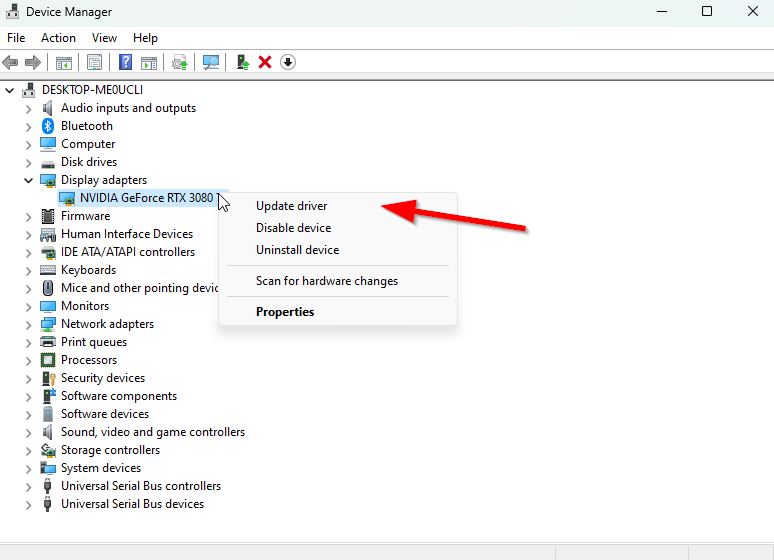
- Then right-click on the dedicated graphics card name you’re using to bring the context menu.
- Next, click on Update driver > Choose Search automatically for drivers.
- The system will automatically check for the available update.
- If an update is available, it’ll automatically download and install the latest version.
- Once done, make sure to restart your PC to apply the changes.
If you can’t find any pending updates then just head over to the official website of Nvidia website below and search manually for the latest update. If a new version is available for the graphics card, just download the driver and install it on your PC. You can jump to the link below to do so:
14. Disable Windows Security Protection
The chances are high that somehow the Windows security protection feature is preventing the game file to run properly on the PC by blocking ongoing connections.
- Click on the Start Menu > Type firewall.
- Select Windows Defender Firewall from the search result.
- Now, click on Turn Windows Defender Firewall on or off from the left pane.
- A new page will open > Select the Turn off Windows Defender Firewall (not recommended) option for both the Private & Public Network Settings.
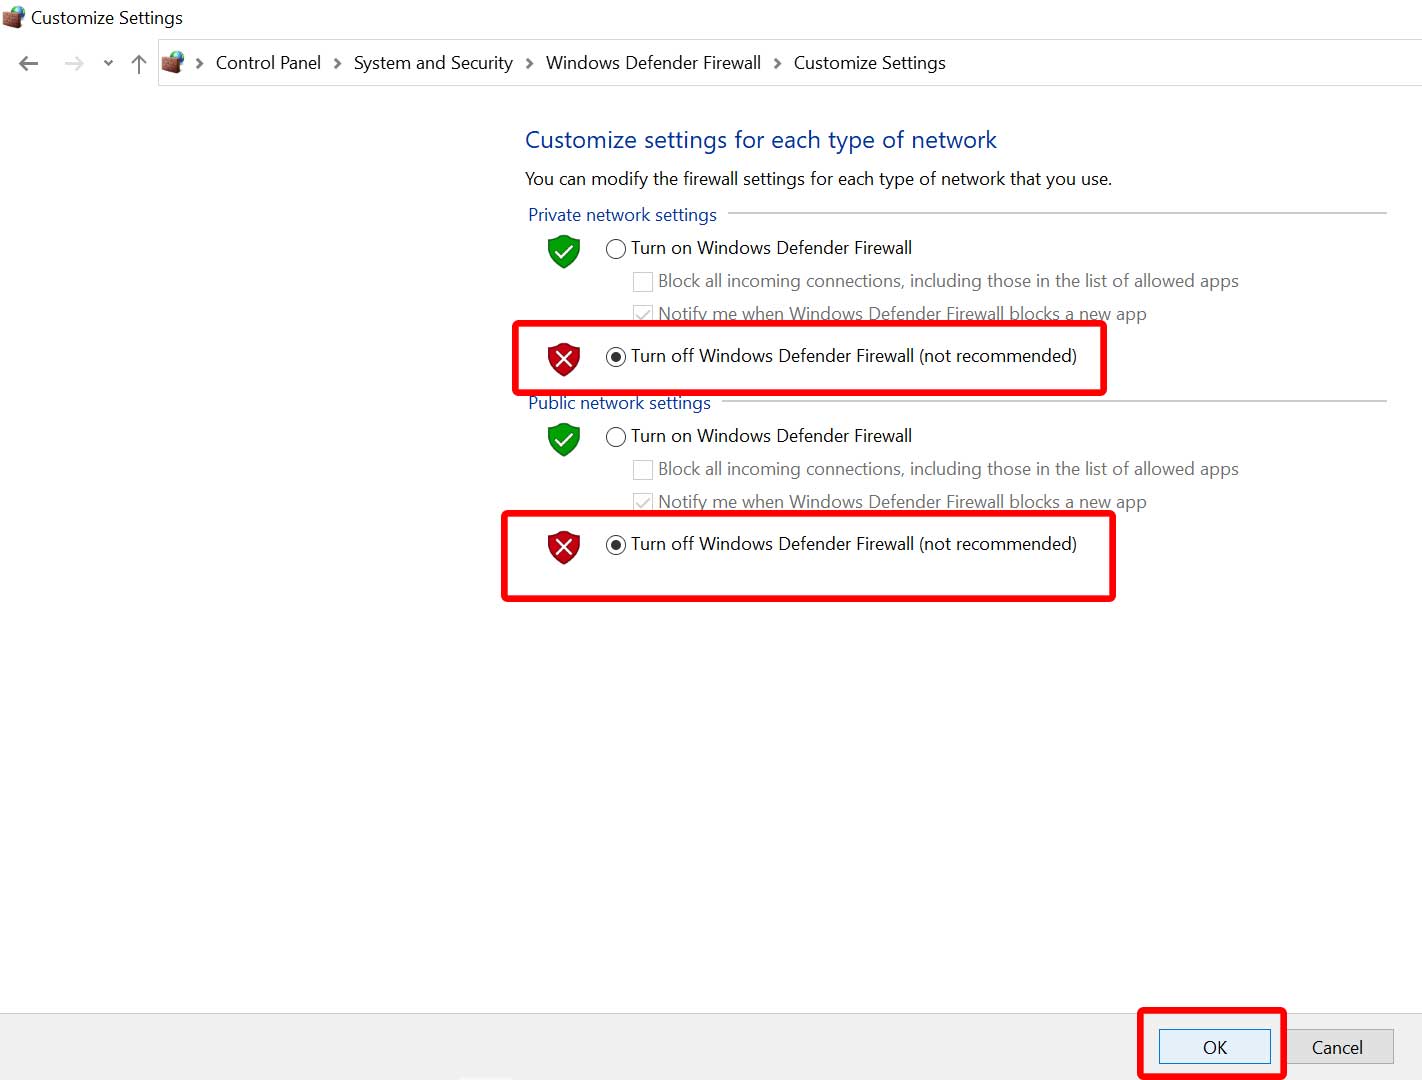
- Once selected, click on OK to save changes.
- Finally, restart your computer.
You have to turn off the Windows Security protection too. Just follow the steps below:
- Press the Win+I keys to open Windows Settings.
- Now, click on Update & Security > Click on Windows Security from the left pane.
- Click on the Open Windows Security button.
- Go to Virus & threat protection > Click on Manage Settings.
- Just Turn Off the Real-time protection option.
- If prompted, click on Yes to proceed further.
- Additionally, you can also turn off Cloud-delivered protection, and Tamper protection if you want.
15. Reinstall the Latest DirectX Version
You should try reinstalling the latest version of DirectX from the official Microsoft website on your PC/Laptop. You’ll need to download and install the DirectX installer package from the provided link and then try running it.
16. Disable Startup Programs
Another thing you should do is disable the startup program manually on the Windows system to ensure there is no issue with the automatic start of the programs when the Windows boots up. It will eventually improve the system’s performance and reduce gameplay issues. To do so this:
- Press the Ctrl+Shift+Esc keys to open Task Manager.
- Now, click on Startup Apps from the left pane.
- Then you should check the list of which apps are enabled for startup.
- Next, you can click on the specific program to select it > Click on Disable.
- Do the same process to disable other third-party programs from running in startup.
- Once done, reboot the PC to apply changes.
17. Enable Hardware-Accelerated GPU Scheduling
Hardware-Accelerated GPU Scheduling is a useful feature in Windows for graphics cards that basically allows GPUs to manage their resources much better and prioritize the tasks that run in the foreground rather than the background. To turn it on:
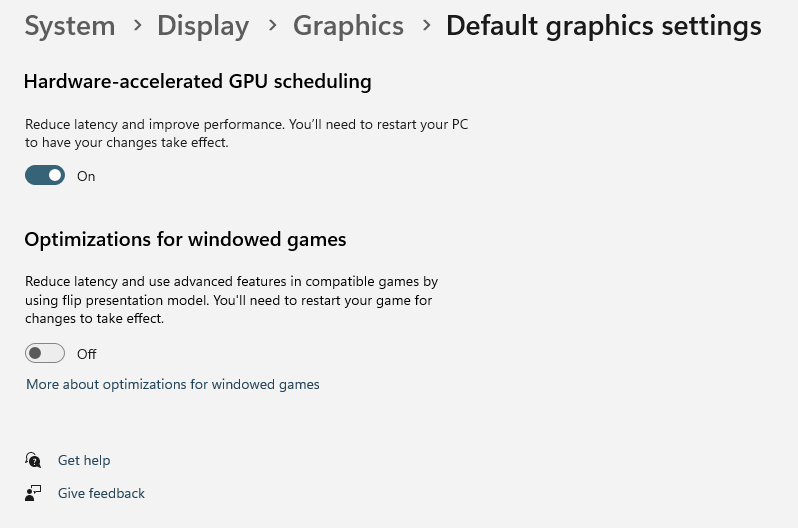
- Press the Win+I keys to open Windows Settings > Click on System from the left pane.
- Click on Display > Go to Graphics.
- Now, select Default graphics settings > Turn On the Hardware-accelerated GPU scheduling toggle.
Note: Do keep in mind that you don’t need to enable this option if you’re using OBS or Streamlabs for playing Roblox.
18. Optimize Windows Game Bar and Game Mode
Well, a couple of Roblox PC version players claimed that optimizing Windows Settings like Xbox Game Bar or Game Mode, Game DVR, and Scaling options did fix the Roblox stuttering and freezing issue up to some extent. So, you should also try this method once.
Turn Off Xbox Game Bar:
- Press the Win+I keys to open Windows Settings > Click on Gaming from the left pane.
- Go to Xbox Game Bar > Turn Off the Open Xbox Game Bar using this button on a controller: Xbox logo option.
Enable Game Mode:
Windows Game Mode basically enhances the gameplay on the desktop/laptop for better optimization by turning off tasks in the background. To do that:
- Press the Win+I keys to open Windows Settings.
- Click on Gaming from the left pane.
- Go to Game Mode > Now, Turn On the Game Mode option.
- Once done, restart the computer to apply changes.
19. Uninstall and Reinstall Roblox
If none of the workarounds did fix the issue for you then ensure to uninstall and reinstall the Roblox application on your PC. To do this:
- Open the Windows Start Menu > Search and open the Control Panel.
- Now, go to Programs > Click on Uninstall a program.
- Search for the Roblox application from the list and select it.
- Select Uninstall and follow the on-screen prompts to complete the uninstallation process.
- Once done, make sure to reboot your PC to apply changes.
- Then reinstall Roblox from the respective platform depending on whatever you use. [Either from Microsoft Store or via the official Roblox website]
- Finally, run the Roblox application, and sign in to the account to continue using it.
That’s it, guys. We hope this guide was helpful to you. For further queries, you can comment below.
Also Read
