The newly launched action-adventure pirate-based open-world title is storming the gaming community with its stunning visuals & better gameplay experience. We all know about Ubisoft for its games and services which are top-notch. Skull and Bones is no exception here as the game revolves around naval warfare and pirate scenarios in the late 17th century. However, several players getting frustrated by Skull and Bones FPS Drops issues across all available platforms.
Due to the low framerate count and in-game stutters, multiple players are unable to enjoy the full gaming experience most of the time. As per several reports on the Reddit forum, it seems that there has been a huge FPS drop and stutters with the title since it was released. It becomes unplayable once the game starts even after having powerful tech specs. Now, if you’re also one of the victims who encounter the framerate-dropping issue then don’t worry.

Page Contents
- Fix Skull and Bones FPS Drops on PC, Xbox, and PS5
- 1. Restart the Gaming Device
- 2. Check for the Skull and Bones Server Status
- 3. Check the System Requirements
- 4. Run the Game as an Administrator
- 5. Update Skull and Bones
- 6. Verify and Repair the Game Files
- 7. Check for the System Updates
- 8. Update the Graphics Driver
- 9. Ensure Your Gaming Device isn’t Overheated
- Tweak In-Game Graphics Settings
- 13. Enable Hardware-Accelerated GPU Scheduling
- 10. Close Background Running Tasks
- 12. Turn Off Ray Tracing
- 13. Turn Off 120FPS (PS5)
- Enable Precision Boost Overdrive
- Enable Intel XMP
- Delete the Skull and Bones Saved Data
- 17. Disable Antivirus
- 20. Rebuild Database (PS5)
- 22. Reinstall the Skull and Bones Game
- 24. Contact Ubisoft Support
Fix Skull and Bones FPS Drops on PC, Xbox, and PS5
The chances are high that somehow your gaming device is having issues with corrupted game files, an outdated game version, outdated graphics drivers, lack of the system admin privilege, temporary system glitches, conflicts with the in-game graphics settings, background tasks, overlay conflicts, hardware-accelerated GPU scheduling issues, and more. Incompatible system requirements, issues with the game saved data, corrupted database, antivirus blocking, etc can also trouble a lot.
Luckily, here we’ve shared with you some workarounds that should come in handy. Make sure to follow all troubleshooting methods until the problem has been fixed. So, without further ado, let’s jump into it.
1. Restart the Gaming Device
First of all, you’ll need to manually restart your specific gaming device to ensure there is no issue with the temporary system glitch. So, a normal reboot of the system can help in fixing the program running issues up to some extent.
2. Check for the Skull and Bones Server Status
We also recommend you check for the Skull and Bones server status on Ubisoft to be sure there is no issue with the connectivity & performance. Sometimes server outages can trigger multiple issues with the gaming platforms running properly. If the server downtime is there, you can wait for a couple of hours and try again later.
3. Check the System Requirements
You should also check for the Skull and Bones system requirements for your PC to ensure there is no compatibility issue. Any kind of software or hardware compatibility can cause multiple issues with the FPS drops on any gaming device. If your desktop or laptop specs don’t meet the system requirements then you should upgrade the necessary specs to be able to run the game smoothly.
- OS: Windows 10
- CPU: Intel i7 4790 AMD Ryzen5 1600
- GPU: Nvidia GTX 1060 6GB or AMD RX 570 8GB
- RAM: 8 GB Dual Channel
- Storage: 65 GB SSD
4. Run the Game as an Administrator
It’s also suggested to run the Skull and Bones game application as an administrator on your PC by following the steps below. You should allow the system admin privilege to run the game properly without any potential blocks or performance issues.
- Navigate to the game installation directory on your PC.
- Right-click on the SkullandBones.exe app.
- Click on Properties > Go to the Compatibility tab.

- Enable the Run this program as an administrator checkbox.
- Click on Apply and select OK to save changes.
5. Update Skull and Bones
You can try updating the Skull and Bones game to the latest version available to avoid any kind of conflicts with the performance. Several players have reported that an outdated game patch version can cause low FPS issues. You can check the steps below to do so.
For Ubisoft Connect:
- Open Ubisoft Connect on the PC.
- Log in to your Ubisoft account.
- Click on the Menu icon > Go to Settings.
- Click on Downloads from the left pane.
- Now, Turn On the Enable automatic game updates checkbox.
For Epic Games Launcher:
- Open the Epic Games Launcher.
- Go to Library > Click on the three dots of Skull and Bones.
- Enable the Auto Update option.
For PlayStation:
- Go to the Home screen on the PlayStation console.
- Navigate to Games > Select Skull and Bones.
- Press the Options button on your controller.
- Select Check for Update from the drop-down menu.
For Xbox:
- Go to the Xbox Dashboard menu.
- Navigate to My Games and Apps.
- Select Manage > Go to Updates.
- Check for the Skull and Bones update.
- If available, press the A button on the controller to start it.
6. Verify and Repair the Game Files
The chances are high that missing or corrupted game files installed on the PC can also cause FPS drops at times. You can check the steps below to verify and repair the game files completely.
For Ubisoft Connect:
- Open Ubisoft Connect on the PC.
- Log in to the valid Ubisoft account.
- Click on Games > Click on Skull and Bones.
- Select Properties in the menu.
- Under Local Files, click on Verify Files.
- If prompted, click on Repair.
- Wait for the process to be completed.
- Once done, restart the PC, and run the game again.
For Epic Games Launcher:
- Open the Epic Games Launcher.
- Go to the Library.
- Click on the three dots of Skull and Bones.
- Go to Manage > Click on Verify files.
- Wait for it to complete and then relaunch the game.
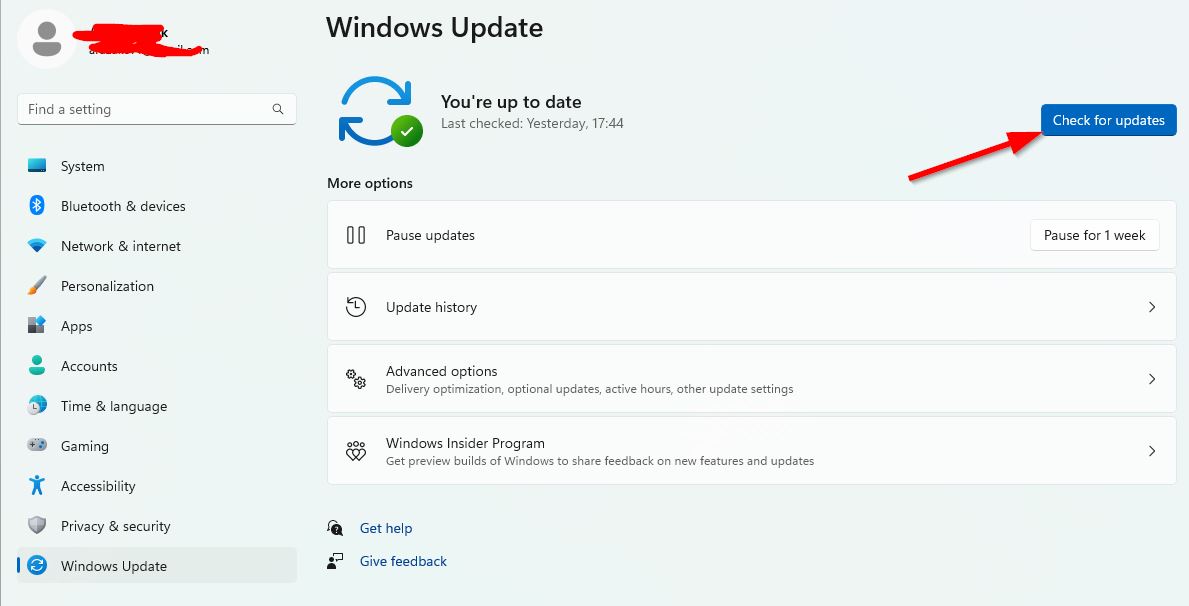
7. Check for the System Updates
Make sure to check for the available system software updates on the respective gaming device to install the latest version. Well, installing the latest update always comes in handy. It’s always recommended to check for available system updates on your respective gaming device.
For PC:
- Press the Win+I keys to open Windows Settings.
- Click on Windows Update.
- Select Check for updates.

- If an update is available, select Download and Install.
- Wait until the software update is complete.
- Once done, restart your computer to apply changes.
For Xbox Series X|S:
- Press the Xbox button on your controller to open the guide.
- Select Profile & system > Go to Settings.
- Choose System > Select Updates.
- Select Keep my console up to date to update your console automatically.
- Next, choose Keep my games & apps up to date to update games and apps automatically.
- Once done, reboot the console to apply the changes.
For PS5:
- Head over to the PlayStation home screen.
- Choose Settings > Go to System.
- Select System Software > Choose System Software Update and Settings.
- Turn On the Download Update Files Automatically option.
- Enable the Install Update Files Automatically option.
- Once done, restart the console to change effects.
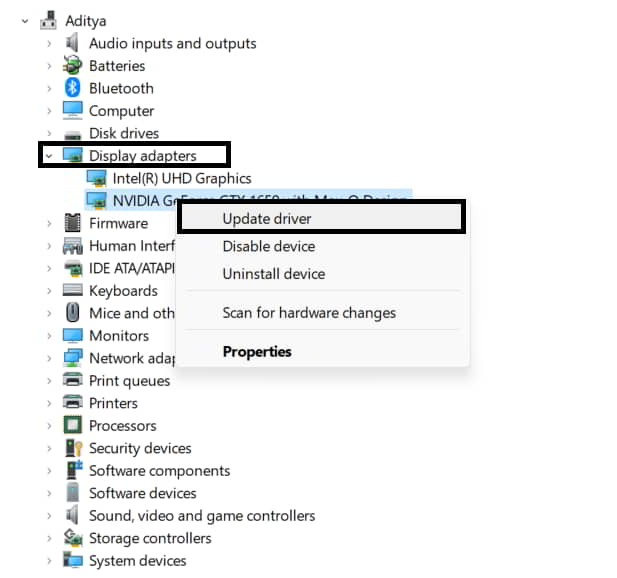
8. Update the Graphics Driver
Another thing you can do is to check for the graphics driver update on your PC by following the steps below. Here we’ve mentioned both the system recommended and the manual method to update the graphics driver at your end. An outdated graphics card driver eventually causes FPS drops or lags with the game most of the time.
Recommended Update:
- Open the Start menu > Search and open Device Manager.
- Double-click on Display Adapters.
- Right-click on the dedicated graphics card that you use.

- Select Update Driver > Click on Search automatically for drivers.
- If an update is available, the latest driver will be installed automatically.
- Once done, restart the system to apply changes.
Manual Update:
If you’re not seeing any updates then visit the official website of the respective manufacturer for the graphics card model. Download the latest graphics driver on the PC and run the installer to get it installed. Once done, reboot the PC. You can jump to the link below to do so:
9. Ensure Your Gaming Device isn’t Overheated
Sometimes overheating issues can also trouble you a lot when it comes to gaming. If your PC or gaming console is getting overheated unexpectedly that means there is an improper air ventilation or humid environment. Such things can lead to potential issues like FPS drops or freezes. So, make sure to arrange proper air ventilation and air intake to keep your gaming device cool down.
Tweak In-Game Graphics Settings
You might also need to adjust the Skull and Bones graphics settings manually regarding your low-end or mid-end gaming PC specifications. In that case, the game will be able to run smoothly without any further issues. Check the steps below to manage the in-game graphics settings. Open the Skull and Bones game > Go to the Settings menu > Then use the following steps.
Visual:
- Window Mode: Fullscreen Borderless
- Aspect Ratio: Native
- Resolution: Native resolution of the monitor
- VSync: Off
- Field of View: 100%
- FPS Limit: Off
Graphics:
- Graphics Quality: Custom
- Adaptive Quality: Off
- Shadows: Medium
- Upscaling Type: TAA
-
- Upscaling Mode: Balanced
- Environment Details: Medium
- Clutter: Medium
- Water: High
- Screen Space Reflection: Off
- Volumetric Clouds: Medium
- Ambient Occlusion: Off
- Depth of Field: Off
- Motion Blur: Off
- Ray-Traced Global Illumination: Off
13. Enable Hardware-Accelerated GPU Scheduling
The Hardware-Accelerated GPU Scheduling feature on Windows may appear on the advanced graphics settings page after installing the Windows 10 May 2020 update or later. This specific feature helps in increasing the GPU scheduling between applications. You can enable this feature to help in prioritizing graphical processes in the background. Make sure to follow the steps below to turn it on.
- Press the Win+I keys to open Windows Settings.
- Click on System from the left pane.
- Select Display > Go to Graphics.
- Click on Default graphics settings.
- Enable the Hardware-accelerated GPU scheduling option.
10. Close Background Running Tasks
It’s also suggested to close background running processes on the computer by following the steps below. Ensure to manually close all the unwanted third-party tasks that are running in the background to improve the overall system performance. This workaround will help in allowing the system to increase resources so that the game can run properly.
- Press the Ctrl+Shift+Esc keys to open Task Manager.
- Go to Processes > Click on the unnecessary tasks (third-party) in the list.
- Click on End Task to close it.
- Close tasks one by one > Once done, reboot the system.
12. Turn Off Ray Tracing
Ray Tracing is a graphics technology that simulates realistic lighting scenes and objects in the game with proper shadows, reflections, etc. But turning this on should consume higher system resources and the gaming experience will go down at times. It’s recommended to disable Ray Tracing on your PlayStation console by following the steps below.
- Run the Skull and Bones game on your PS5 console.
- Go to the in-game Settings menu.
- Head over to Graphics or Display settings.
- Turn Off the Ray Tracing option.
- Save the changes and then run Skull & Bones again.
13. Turn Off 120FPS (PS5)
You can manually disable the 120FPS mode on your PlayStation 5 console to fix potential glitches in the gaming performance. Several players have already found this method useful.
- Run the Skull and Bones on your PS5.
- Select the Game Mode that you’re using.
- Choose the menu icon at the top right side.
- Go to Settings > Select Video.
- TURN OFF the 120FPS Mode.
- Hit Apply and then check for the FPS drop issue.
Enable Precision Boost Overdrive
Another thing you can do is to turn on the Precision Boost Overdrive feature for AMD chipsets via BIOS. This method will help in improving the overall gaming performance whatsoever. Multiple AMD chipset users fixed the FPS drop issue with the Skull and Bones game.
- Boot into the BIOS menu on your AMD machine.
- Enable the XMP or DOCP Profile 1.
- Turn On the Precision Boost Overdrive option.
- Enable the Re-size BAR support option.
- You should also check for the FAN controls to set the higher RPM.
- Save changes and reboot the system again.
Enable Intel XMP
The Intel XMP (Xtreme Memory Profile) can improve the RAM speed to its higher potential. Just ensure to boot into the BIOS menu and enable XMP.
Delete the Skull and Bones Saved Data
In some cases, corrupted game-saved data on the gaming console can trouble you a lot with the gaming performance. You might need to delete the game-saved data on your PlayStation 5 or Xbox Series X|S console to check for the FPS drop issue. This will help in creating new saved game data on your system whenever you launch the title.
Please Note: It’s recommended to take a backup of the saved data or download it to avoid losing your progress in the game.
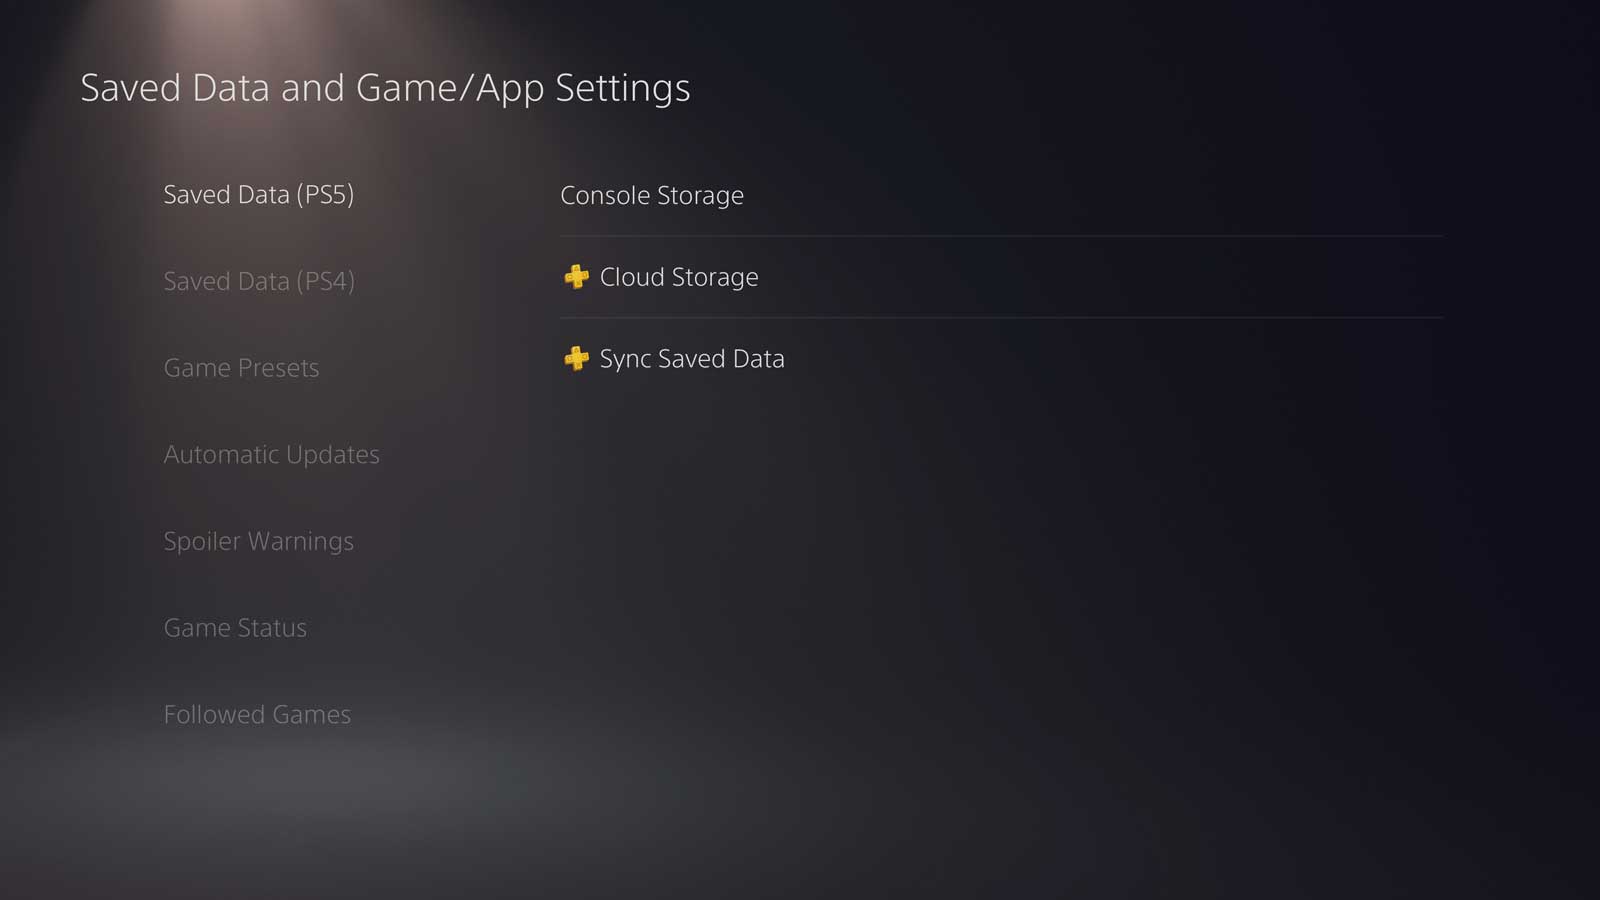
For PlayStation 5:
- Go to Settings on your PlayStation 5 console.
- Choose Saved Data and Game/App Settings.
- Select Saved Data (PS5).

- Navigate to Console Storage.
- Go to Delete > Select Skull and Bones.
- Press the Delete option at the bottom right side.
- Wait for some time to delete the saved game data.
- Restart your console and check for the FPS drop again.
For Xbox Series X|S:
- Press the Xbox button on the controller to open the guide.
- Select My games & apps > Select See all.
- Highlight Games > Press the Menu button of Skull and Bones.
- Choose Manage game and add-ons.
- Select Saved data.
- Choose Delete All if you want to remove all saved data on your console.
- You can also choose the profile that you want to delete.
- Choose Delete from Console or select Delete Everywhere.
- Once done, reboot the console, and check for the issue.
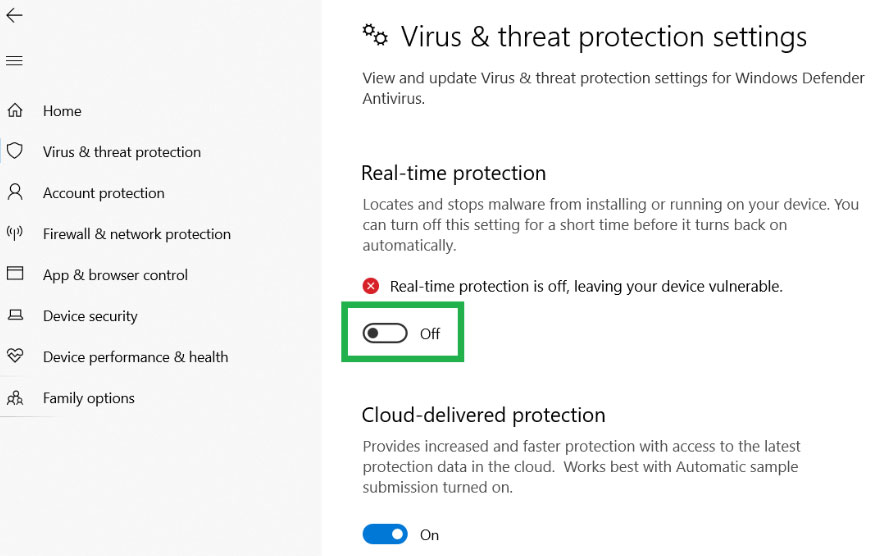
17. Disable Antivirus
We recommend you manually turn off the antivirus protection on your Windows computer by following the steps below. It looks like disabling the antivirus software mostly to avoid aggressive antivirus blocking with the game program.
- Press the Win+I keys to open Windows Settings.
- Click on Update & Security.
- Now, click on Windows Security from the left pane.
- Then click on Open Windows Security.
- Go to Virus & Threat Protection.
- Next, click on Manage Settings.
- Turn Off the Real-time Protection toggle.

- If prompted, click on Yes to proceed further.
- Finally, you can check for the Skull and Bones crashing issue.
Please Note: If you’re using any other third-party antivirus program on your PC, turn off the real-time protection feature manually.
20. Rebuild Database (PS5)
You can check the steps below to rebuild the PS5 database which will help in fixing potential issues with the system. It’ll delete and create the database on your PlayStation 5 console to avoid storage drive-related conflicts.
- Press and hold the Power button until you hear the second beep. This will boot your PS5 in Safe Mode.
- Connect the PS5 DualSense controller to a USB cable.
- Next, press the PS button on the controller to pair it.
- It may take a moment to display Safe Mode options.
- Select Clear Cache and Rebuild Database.
- Choose Rebuild Database.
- Wait for the process to complete.
- Then your PS5 will boot back to the system again.
22. Reinstall the Skull and Bones Game
If none of the workarounds help then ensure to uninstall and reinstall the Skull and Bones game respective to your gaming platform. Sometimes issues with the game installation might also trouble you with the FPS drop. To do so, check the steps below.
For Ubisoft Connect PC:
- Open Ubisoft Connect PC.
- Go to the Games tab.
- Right-click on Skull and Bones that you want to uninstall.
- Select Uninstall.
- Once done, open the client.
- Go to the Games tab again.
- Select the Skull and Bones game you want to reinstall.
- Click on Download.
- Wait for the game to be installed.
- Finally, run the game to check for crashes.
For Epic Games Launcher:
- Open the Epic Games Launcher > Click on Library.
- Click on the three-dot icon next to Skull and Bones.
- Click on Uninstall > Wait for the game to be deleted.
- Once done, reboot the PC to apply changes.
- Finally, open the Epic Games Launcher, and try to reinstall the game again.
For PlayStation:
- Go to the Skull and Bones game in the Games Menu.
- Highlight the game > Press the Options button on your controller.
- Select Delete from the menu.
- Confirm it and the game will be uninstalled.
- Once done, reboot the console.
- Finally, reinstall the game from the store.
For Xbox:
- Press the Xbox button to open the guide.
- Select My Games & Apps > Hit See All.
- Choose Games > Highlight Skull and Bones you want to uninstall.
- Press the Menu button > Select Uninstall.
- Next, follow the on-screen prompts.
- Once done, go to My Games & Apps.
- Go to See All.
- Select Full Library to reinstall the game.
- Finally, run the game to check for potential issues.
24. Contact Ubisoft Support
Last but not least, you can contact Ubisoft Support to get better assistance regarding the issue. You may also submit a support ticket for the same issue to get additional support. This will allow the Ubisoft developers to investigate the FPS dropping issue deeply.
That’s it, guys. We assume this guide was helpful to you. For further queries, you can comment below.
