Windows 10 comes with an integrated Snipping tool that allows the user to capture screenshots and then further save, share, and paste them into many programs. However, recently it has been reported that the snipping tool isn’t copying to the Clipboard.
Page Contents
How to Fix the “Snipping Tool Does Not Copy to Clipboard” issue?
Lately, Snip and Sketch tool has replaced the Windows Snipping tool, but it is noted that the tool isn’t working correctly. However, several users reported the same issue in the Microsoft Community Answers, and here are a few fixes in regards to that. Have a look:
FIX 1: Check the Auto copy to clipboard option:
The first and foremost resolution for the “Snipping Tool Does Not Copy to Clipboard” issue is the following:
- Firstly, launch the Snip and Sketch tool.
- Now inside the Snip and Sketch tool window, click on the three-dot icon and select the option Settings from the sub-menu.
- Now inside the Settings window, under the Auto copy to clipboard section, make sure that the Update the Clipboard automatically when annotating option is enabled. If not, Turn On the option.
- After that, close the Settings window.
- Further, launch the Snipping app and select Tools, and click on Options from the vertical menu.
- On the next prompt, make sure you tick the checkbox before the option Always copy snips to the Clipboard.
- Now consider snipping something on your screen to check if it copies to the Clipboard or not.
- If yes, then the issue has got resolved by now.
NOTE: For users who are unable to see the Settings option in their Snipping app, they might require to perform a Windows update.
FIX 2: Repair Microsoft Office:
Another fix for the “Snipping tool does not copy to clipboard” issue is explained right below. Have a look:
- Firstly, go to the Desktop search bar, type Control Panel and open the relevant search result.
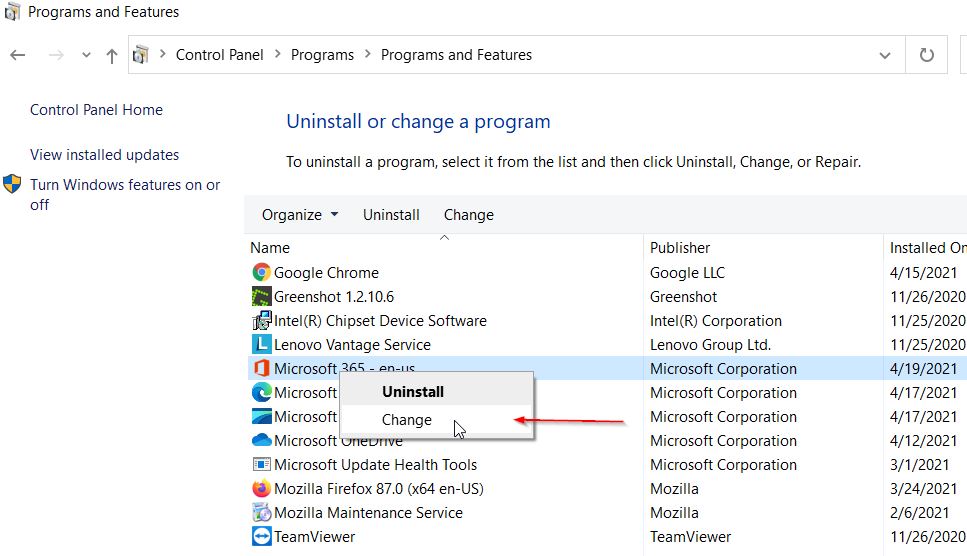
- Now inside the Control Panel window, navigate to Programs -> Programs and Features.

- Further, select the option Microsoft Office and then click on the option Change. If asked to confirm, click on Yes.
- You will further encounter the following options:
Quick Repair –It repairs all the files related to your Office application without internet access, and thus we recommend you to select these options first.
Online Repair – This option requires a stable internet connection. If Quick repair does not work for you, then make sure you follow this.
- Once done with the fix, restart your system and check for any improvement.
These were the two tested and proven methods that will help the users in resolving the “Snipping tool does not copy to Clipboard” issue. Perform them one after the other and check whichever help in your case.
However, at the end of the article, we hope that this issue affected users will find all the information mentioned in the article helpful and relevant. After reading this article, if you have any queries or feedback, please write down the comment in the below comment box.
