Superfetch is a Windows system process that is there in the system to make apps load faster. Windows had this feature even on Windows XP, Vista, 7, 8, and now 10. In the vista, 7, 8, and early versions of 10, it was called the Superfetch. But in later versions of Windows 10, it changed to Sysmain. And that is what the process shows up as in the Windows Task Manager application.
This process aims to improve the app loading time of the apps that you frequently use. The Windows system keeps track of all the apps you use, and it preloads those apps into the memory that you often use in your system. If you browse through the internet a lot on the Chrome browser, that it will have Chrome preloaded in its memory. But how it works, and what are its effects on the system overall? Let’s find out in this article.

What Is Superfetch or SysMain on Windows 10?
If you are using the latest version of Windows 10 and open up the Windows Task Manager, you will see this process in the “processes” tab with the name “Service Host: Superfetch.” This process monitors your application activity and stores or preloads the applications you frequently use to your memory. Some might think that this process is eating up the RAM, which might result in the system slowing down, but that is not precisely the case.
Superfetch or Sysmain does not take up the memory. It only takes the free memory that is available in the RAM. It does not mess with the already occupied memory of other applications. Additionally, if you are doing an intensive task on your system that requires a lot of memory, the Superfetch or Sysmain process will instantly release all that RAM that it was occupying virtually so that the necessary application gets all the required memory. The memory occupied by this process is entirely virtual, and even if you check your RAM usage in the Task Manager, you will not see the Sysmain process occupying any amount of RAM at all.
In terms of CPU, too, the process uses very little CPU power and keeps running in the background silently. So there is no need for anyone to terminate this process if they want faster app loading times. But in recent times, people have reported that this process has also caused their system to slow down quite a bit. It should not happen, but due to a bug, you might face issues because of this Superfetch or Sysmain process. Some of the frequently reported problems are:
- Screen freeze due to 100% disk utilization.
- Slow bootup when you turn on your computer.
- Constant lagging while gaming.
- Overheating of the PC.
How to disable Superfetch or Sysmain?
If you are using a system that is limited in terms of RAM and CPU, then disabling the Superfetch process might be a good idea. You should consider disabling this process only if you are facing any of the issues mentioned above. Otherwise, keeping it turned on will make the app loading speed on your Windows system faster.
- Press Windows Key + R, and the Run dialog box will show up.
- Enter “services.msc” in the Run dialog box and press the Enter key.
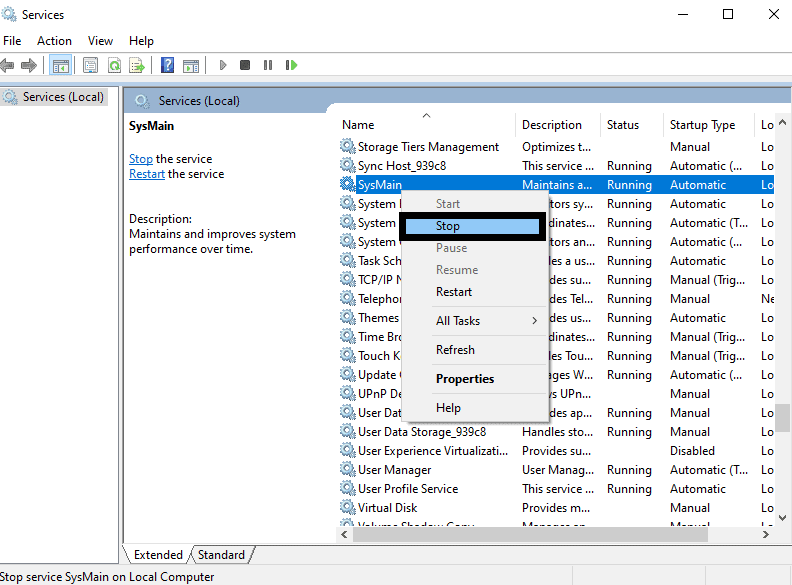
- When the services window shows up, look for the process named “Sysmain.” If you are an older version of Windows 10, then you might see the process as “Superfetch.”
- Right-click on it and choose “Stop.”

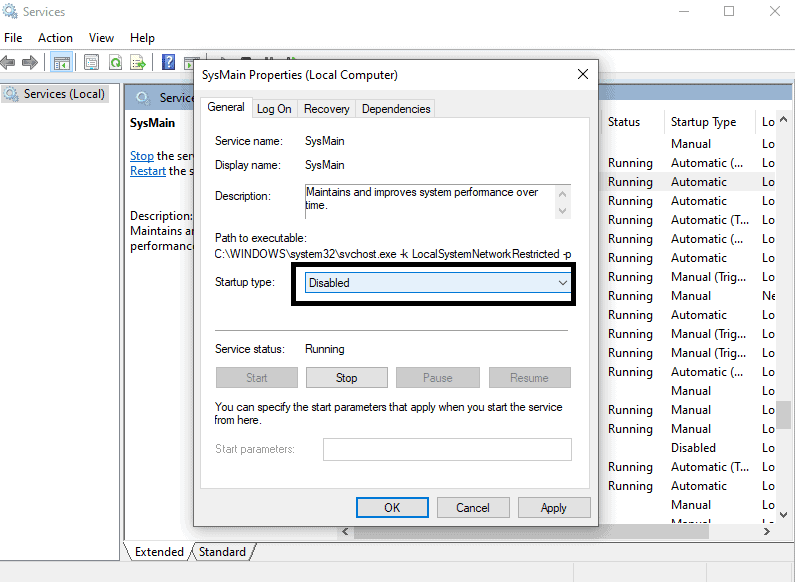
- Now right-click on it again and choose “Properties.”
- Under the “general” tab, click on the drop-down menu next to “Startup type” and choose “Disabled.”

- Click on Apply, and then click on Ok.
You can even use the command prompt to perform the operation.
- Click on the search bar and search for “command prompt.”
- When it shows up in the results, choose “Run as an administrator.”
- In the command prompt window, enter the following command and then press the Enter key.
sc stop “SysMain” & sc config “SysMain” start=disabled
Superfetch only works as a system optimization feature. So disabling it will have no issues in your system running well. But once you have disabled the process permanently, you will notice that your applications take a lot of time(more than usual) to load up. If you are still experiencing the same system lag issues you were experiencing before disabling the Superfetch(Sysmain) process, this process is not the reason behind the problem. In that case, you should enable it again and let it keep running in the background, making your frequent apps loading time much faster. To enable it again, open up the services window as mentioned in the first method and undo every change you have made to disable the system process entirely.
If you want to use the command prompt again to enable it, then, in the command prompt window, enter the following command and then press the Enter key.
sc config “SysMain” start=auto & sc start “SysMain”
100% disk utilization is the most common reason why someone might want to disable the Superfetch or Sysmain process. It is reported that many users were able to get rid of this disk issue by simply turning off the Sysmain process in their systems. If you encounter 100% disk utilization even after disabling the system process, you need to think about upgrading your hard drive. If you are using a traditional hard drive, then upgrade to an SSD. Nowadays, SSDs are much cheaper, and having the windows system installed on an SSD makes the OS much faster and optimized. You will also see improvements in terms of data transfer rates which is one of the main causes of why people opt for SSDs in the first place.
So that is all about the Superfetch or Sysmain system process and how to disable it. If you have any questions or queries about this article, then comment down below, and we will get back to you. Also, be sure to check out our other articles on iPhone tips and tricks, Android tips and tricks, PC tips and tricks, and much more for more useful information.
