Valve Corporation released Team Fortress 2 back in 2007 which offers a broad range of tactical abilities and personalities in Nine distinct classes. Players can get continuous updates with new game modes, maps, equipment, and more. This multiplayer first-person shooter title is a sequel to the 1996’s Team Fortress mod. Though the title has received overwhelmingly positive reviews on Steam, it seems that Team Fortress 2 Not Showing Up in Steam Library for some unexpected reasons.
Steam is one of the popular and widely used PC gaming digital distribution services as well as a storefront by Valve that allows PC gamers to easily play titles. As the Steam platform is free to use and offers a well-integrated client, it’s been considered a better place for PC games for many years. Just downloading the game and installing it on the PC via the Steam client will be required. However, multiple reports coming out that even after installing the game on Steam, the library doesn’t show it up.

Page Contents
- Fix: Team Fortress 2 Not Showing Up in Steam Library
- 1. Restart the PC
- 2. Run Team Fortress 2 and Steam as an Administrator
- 3. Update Windows
- 4. Check for Steam Updates
- 5. Force Update Steam
- 6. Try Launching Team Fortress 2 Directly
- 7. Check the Internet Connection
- 8. Check for the Valid Steam Account
- 9. Ensure the Game License is Valid
- 10. Check the Steam Library Filter Settings
- 11. Unhide Team Fortress 2 in the Steam Library
- 12. Reinstall Team Fortress 2 on Another Drive
- 13. Repair Windows
Fix: Team Fortress 2 Not Showing Up in Steam Library
As per several reports on the r/Steam subreddit forum, players are literally getting affected by Team Fortress 2 not appearing in the Steam library. Now, if you’re also one of the victims to encounter such an issue then don’t worry. If we talk about the possible reasons the chances are high that somehow an outdated Steam version, internet connectivity issues, lower system resources, an outdated Windows system, BSOD errors, etc. can be applicable.
Fortunately, here we’ve shared with you a couple of potential workarounds that should come in handy. Make sure to follow this troubleshooting guide to easily resolve such an issue. So, without wasting any more time, let’s jump into it.
1. Restart the PC
Before performing any other workarounds, make sure to restart the PC manually to check for the issue. Sometimes a temporary system glitch or the cache data issue can be problematic with the program launching as well as appearing in the library. As rebooting the system won’t take enough time, you should try it once.
2. Run Team Fortress 2 and Steam as an Administrator
Make sure to run the game app and client app on your PC as administrator access to allow the User Account Control (UAC) access to the system. In some cases, your system requires the UAC access permission to run a program which is quite important. By following the steps below you’ll have to allow the admin access for once and it won’t ask you for the same again. To do so:
- Go to the installed Team Fortress 2 game directory.
- Right-click on the game exe application file on your PC.
- Click on Properties > Click on the Compatibility tab.

- Click on the Run this program as an administrator checkbox to enable it.
- Once done, click on Apply and then OK to save changes.
- Finally, just double-click on the game app file to launch it.
You should also follow the same steps for your Steam client to allow the admin access permanently.
3. Update Windows
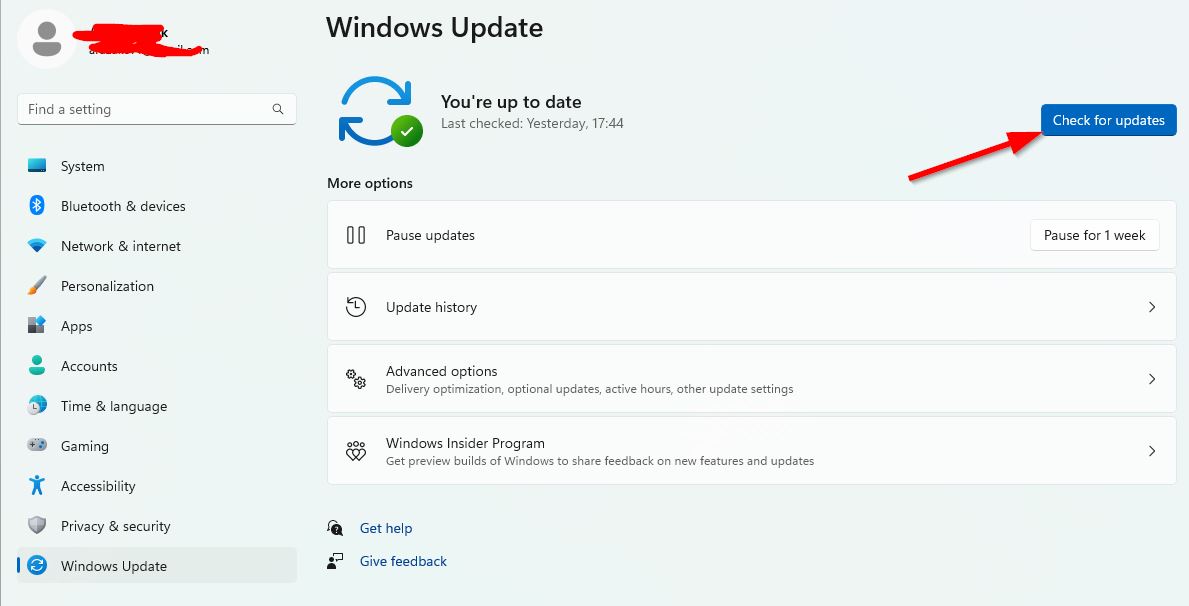
If you’re running an outdated Windows version or build number for a while then make sure to follow the steps below to check for the same. Always try to install the latest update of the system so that you can get the latest security patch, improved performance, bug fixes, additional features, and more.
- Press the Win+I keys to open Windows Settings.
- Click on Windows Update > Click on Check for updates.

- If there is an update available, click on Download and Install.
- Wait for the update process to be completed.
- Once done, reboot your PC to apply changes.
4. Check for Steam Updates
It’s also a better idea to manually exit Steam and then close it from the background processes before relaunching it. Whenever you launch Steam freshly on the system, it automatically checks for the available updates. If any update is available, it’ll automatically start downloading and installing the update without doing anything else. Even restarting the Windows and then launching Steam can do the job for you. Otherwise, follow the steps below to do so:
- Open the Steam client > Click on the Steam tab at the top left.
- Select Check for Steam Client Updates.
5. Force Update Steam
Another way you can try to force updating the Steam client is by following the steps below.
- Open File Explorer on your PC > Navigate to the C:\Program Files\Steam path. [or C:\Program Files(x86)\Steam]
- Now, search for the ClientRegistry.blob file in the Steam folder.
- Right-click on the Steam folder > Select Delete.
- Steam will automatically install the latest update.
- Once the process finishes, go to LIBRARY to see if the problem has been fixed.
6. Try Launching Team Fortress 2 Directly
As you’ve already installed the Team Fortress 2 game on the PC, just head over to the installation directory, and try launching the game directly. So, go to the location, and double-click on the TeamFortress2.exe application to launch it. If admin access is required, click on Yes to proceed.
7. Check the Internet Connection
You should always check for your internet connection before jumping to any other conclusion because a poor or unstable internet connection can trigger many issues with the game launching or connecting to the game servers online. Try switching your wired (ethernet) connection to Wi-Fi (wireless) or vice versa, and then check for the networking issue again. You can also increase the internet speed by upgrading your data plan (if required) or contacting your service provider to assign a new IP address.
8. Check for the Valid Steam Account
Check for a valid Steam account to ensure there is no issue with the incorrect account. Use the same Steam account that you used to purchase or install the game.
9. Ensure the Game License is Valid
Also, check for the game license whether it’s valid or not. Invalid game licenses or inappropriate purchase processes can cause several issues with the appearance of the Steam library.
10. Check the Steam Library Filter Settings
If the game is still not showing up in the Steam library then make sure to check the library filter settings by following the steps below.
- Open the Steam client > Go to LIBRARY.
- Click on the Show only ready to play games option to uncheck it.
11. Unhide Team Fortress 2 in the Steam Library
You should also unhide the Team Fortress 2 game in the Steam library by following the steps below.
- Open the Steam client > Click on View at the top left side.
- Select Hidden Games > You will see a list of the hidden games on your Steam.
- Right-click on the Team Fortress 2 game that you want to display in the Library.
- Then go to Manage > Click on Remove from Hidden.
- Once done, go to LIBRARY, and check for the game again.
12. Reinstall Team Fortress 2 on Another Drive
If the above methods didn’t work for you then try uninstalling and reinstalling the Team Fortress 2 game on your PC to ensure there is no issue with the game installation directory. Try reinstalling the game on a different drive.
- If the Team Fortress 2 game has been installed on the PC then go to Control Panel.
- Click on Uninstall a program > Click on Team Fortress 2.
- Select Uninstall and follow the on-screen prompts to delete it.
- Once done, reboot the PC to apply changes, and then launch Steam.
- Now, search and install Team Fortress 2 on a different drive.
- Allow the Steam client to completely install the game.
- Finally, go to the Library section, and check if the game is visible or not.
13. Repair Windows
Last but not least, try repairing your Windows system with the help of the automatic repair tool that you can find on the official Microsoft website as follows. Just download the assistant tool and run it on the machine to repair the system. It might come in handy to fix several issues with the Windows OS or installation files.
- Connect a USB flash drive to the PC with enough storage space.
- Visit the official Microsoft website and download Windows 10 Installation Media on the USB drive. [Windows 11 Installation Media]
- Now, Restart your PC > and press the Del/F2/Esc key to boot into the BIOS menu.
- Then go to the Boot Sequence option and select the USB Drive at the first position.
- Next, press the F10 key to save changes, and restart the system.
- It’ll give you a pop-up on the screen Press any key to boot from DVD/USB. Hit Enter to confirm it.
- Wait for a couple of minutes to load Windows installation media.
- Once done, click on Repair your computer.
- It’ll navigate to the Windows Recovery Environment.
- Next, select Troubleshoot > Click on Advanced Options.
- Then click on Automatic Repair > Wait for the repair process to complete.
- Once done, reboot the system again to check for the issue.
- This time remove the USB drive so that the boot sequence goes back to the default.
That’s it, guys. We assume this guide was helpful to you. For additional queries, you can comment below.
