Bandai Namco has done a tremendous job by releasing the eighth edition of the Tekken series called ‘TEKKEN 8’ for the PC, PS5, and Xbox Series X|S platforms. Players can get into the legendary fighting game to win matches in the single-player and PvP modes. This 3D action fighting title is doing pretty well in the market but some bugs or errors are troubling a couple of players that we can’t deny. Well, the TEKKEN 8 Connection Timed Out error is one of them which seems frustrating.
As per multiple reports on the Steam community, the “Connection timed out. [Error code: A-00604-00898-l/J3V9-3E78USX2W6R]” occurs most of the time whenever players try to initiate a rematch. Though it requires players to reconnect to the servers, the connection timed out appears after loading for a while. Eventually, unfortunate players are getting prevented by the server connectivity issue in Tekken 8. We should also mention that the same error may also occur during a short 2-minute practice session or even before a fight.
It seems that Bandai Namco will need some time to optimize the server scalability and performance to reduce the connection timed-out error. The chances are high that somehow the huge overload to the servers by the number of active players is also causing the server connection errors. Whereas the network connectivity issue at your end can also trigger such errors at times. Now, if you’re also facing the same issue then check this article to get it fixed.
Page Contents
- How to Fix TEKKEN 8 Connection Timed Out
- 1. Restart the PC
- 2. Run Tekken 8 as an Administrator
- 3. Update Tekken 8
- 4. Verify and Repair the Game Files
- 5. Check for Windows Updates
- 6. Check Your Internet Connection
- 7. Update the Network Driver
- 8. Add an Exclusion in the Windows Firewall
- 9. Whitelist Tekken 8 in the Antivirus
- 10. Check for the Tekken 8 Server Status
- 11. Flush Your DNS Cache
- 12. Change the DNS Address
- 13. Perform a Clean Boot
- 14. Contact Bandai Namco Support
How to Fix TEKKEN 8 Connection Timed Out
In other ways, lack of system admin permission, an outdated game version, corrupted game files, outdated system software, port forwarding issues, antivirus & firewall blocking, DNS cache issues, conflicts with the private DNS servers, and more can also trouble you with the connection timed out error in Tekken 8.
Fortunately, here we’ve shared with you some workarounds that should come in handy. Make sure to follow all troubleshooting methods below until the problem has been fixed. So, without wasting any more time, let’s jump into it.
1. Restart the PC
Before jumping any other workarounds, it’s recommended to restart the Windows computer to check if there is an issue with the temporary system glitch or cache data. Therefore, you should have to manually reboot your system to force restart your PC by following the steps below. This method will help in refreshing the system easily.
- Open the Start menu > Click on the Power menu.
- Click on Restart.
- Launch the game to check for the issue.
2. Run Tekken 8 as an Administrator
The second thing you can do is to run the Tekken 8 application as an administrator on the Windows computer by following the steps below. The chances are high that without having the system admin access, your game is failing to run properly.
- Head over to the installed game directory on your PC.
- Right-click on the Tekken8.exe app.
- Click on Properties > Go to the Compatibility tab.

- Turn On the Run this program as an administrator option.
- Click on Apply > Click on OK to save changes.
- Once done, run the game again.
3. Update Tekken 8
An outdated game patch version on your system might also trouble you when it comes to server connectivity errors. You should always check for the available game updates by following the steps below and installing the same to get optimized gaming performances. Newer patch updates also come with plenty of bug fixes and additional features.
- Open the Steam client > Go to Library.
- Right-click on the Tekken 8 game.
- Click on Properties > Click on Updates.
- Now, go to Automatic Updates.
- Select Only update this game when I launch it.
- Once done, reboot the system to apply changes.
- Whenever a new update is available, it’ll install the same automatically.
4. Verify and Repair the Game Files
It seems that verifying and repairing the installed game files on the Windows PC can also be helpful enough when it comes to server connectivity errors. Corrupted or missing game files can cause multiple issues whatsoever. So, check the steps below to do so.
- Open the Steam client > Go to Library.
- Right-click on the Tekken 8 game.
- Go to Properties.
- Now, click on Installed Files.
- Click on Verify integrity of game files.
- Wait for the process to complete.
- Once done, restart the system.
5. Check for Windows Updates
You might also need to check for Windows updates manually on your PC by following the steps below to ensure there is no issue with the outdated system version. Sometimes system bugs or stability issues can also trouble you a lot.
- Open Windows Settings by pressing the Win+I keys.
- Click on Windows Update from the left side.
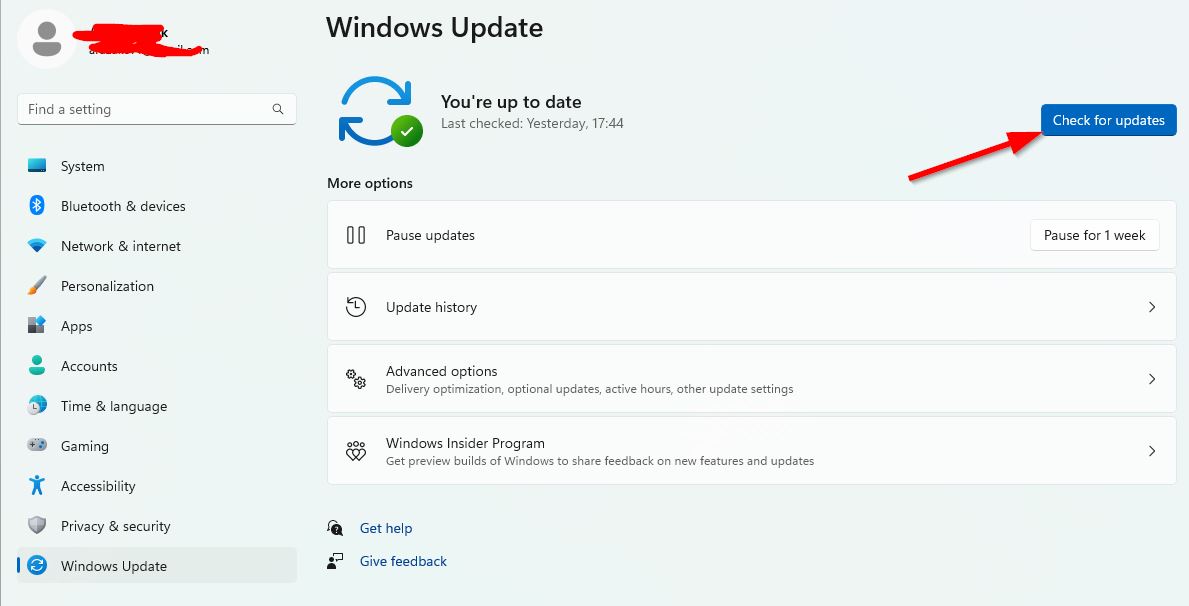
- Click on the Check for updates button.
- The available update will be downloaded and installed automatically.
- Wait for the update to complete and reboot the PC.
6. Check Your Internet Connection
There are possibilities that your internet connection is slow or unstable enough whether you’re using a wireless network or a wired network. You should cross-check the internet connection at your end if everything works fine. In case, you’re using a Wi-Fi network then try switching to the wired (ethernet) network or vice versa. You can also try contacting your internet service provider (ISP) to get technical assistance.
7. Update the Network Driver
An outdated network adapter driver on the PC can also trouble you a lot when it comes to server connecting issues. You can check the steps below to manually search for the network driver on your system.
- Open the Start menu > Search for device manager.
- Click on Device Manager from the list.
- Double-click on the Network Adapters category.
- Right-click on the specific network device.
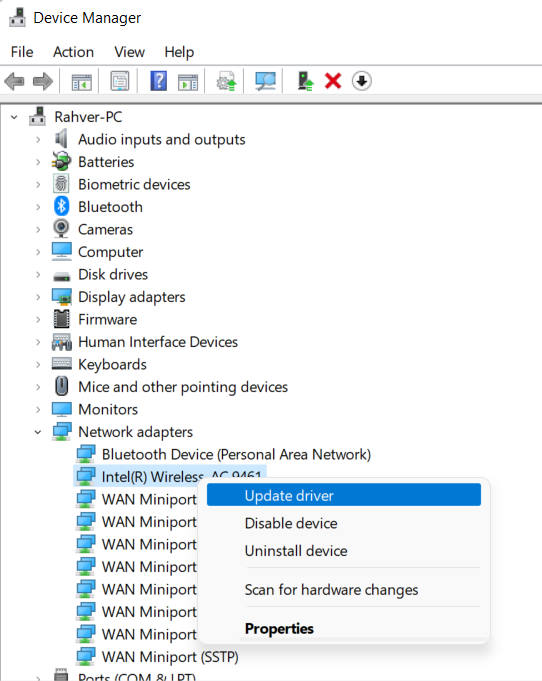
- Select Update driver > Click on Search automatically for drivers.
- If an update is available, the system will automatically download and install the latest version.
- Once done, reboot your computer to change the effects.
8. Add an Exclusion in the Windows Firewall
You can also try adding an exclusion of the Tekken 8 executable application in the Windows Firewall protection by following the steps below to avoid server connectivity or game startup issues in most scenarios.
- Open the Start menu > Search and open Control Panel.
- Go to Systems and Security.
- Open Windows Firewall.
- Select Allow an app or feature through Windows Firewall.
- Now, click on Change Settings.
- Select Allow another app.
- Click on Browse > Select Tekken8.exe file.
- Click on Add to save changes.
9. Whitelist Tekken 8 in the Antivirus
You can try whitelisting the Tekken 8 game application in your antivirus program to add an exception. This will allow the game to run properly without any kind of scanning or blocking by the antivirus protection. To do so, check the steps below:
- Press the Win+I keys to open Settings.
- Click on Privacy & Security.
- Now, click on Windows Security.
- Select Virus & Threat Protection.
- Click on Manage Ransomware Protection.
- Turn ON the Controlled Folder Access option.
- If prompted, click on Yes to proceed.
- Go to Allow an app through controlled folder access.
- If prompted, click on Yes to proceed.
- Next, click on Add an allowed app.
- Head over to the installed game directory.
- Browse and select the Tekken8.exe application.
- Click on Open to add it.
- Once done, reboot the PC to apply changes.
- Finally, run the game again to check for the connection timed-out error.
10. Check for the Tekken 8 Server Status
Several players have reported that the Tekken 8 game servers are down or having maintenance processes at times which can also cause game joining issues. So, it’s suggested to check for the Tekken 8 server status from the third-party DownDetector Tekken status webpage to ensure whether any technical issue is there or not. In case, the servers are down then wait for at least a few hours and try again later. If there is no issue with the servers, you can head over to the next workaround.
11. Flush Your DNS Cache
You should also try clearing the DNS cache data on your PC by following the steps below. DNS cache data can get stored over a period which may cause multiple issues with the network connectivity. So, ensure to flush DNS manually to check for the connection issue again.
- Open the Start menu > Search for cmd.
- Right-click on Command Prompt > Click on Run as administrator.
- Click on Yes (if prompted) > Copy-paste the following command and hit Enter:
ipconfig /flushdns
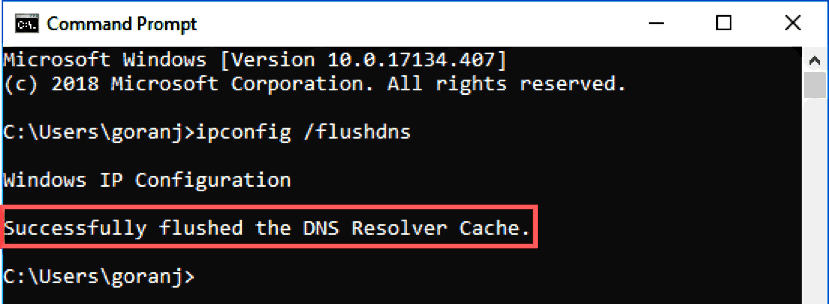
- You’ll receive the ‘Successfully flushed the DNS Resolver Cache.’ message.
- Next, execute the following command to register DNS:
ipconfig /registerdns
- Then execute the following command to release the ipconfig:
ipconfig /release
- Now, execute the following command to renew the ipconfig:
ipconfig /renew
- Then reset Winsock by performing the command below:
netsh winsock reset
- Close the command prompt and restart the PC to apply changes.
12. Change the DNS Address
Another thing you can do is change the private DNS address to the public Google DNS address manually on your PC to experience better server connectivity across all streaming platforms and multiplayer titles. You can try following the steps below to check for the issue again.
- Press the Win+R keys to open the Run dialogue box.
- Now, search and open the Control Panel.
- Click on Network and Internet.
- Select Network and Sharing Center.
- Go to your Connections to select Ethernet or Wi-Fi.
- Select Properties > Untick the Internet Protocol Version 6 (TCP/IPv6) option.
- Double-click on Internet Protocol Version 4 (TCP/IPv4).
- Click on Use the following DNS server addresses.
- Use 8.8.8.8 as a Preferred DNS server address.
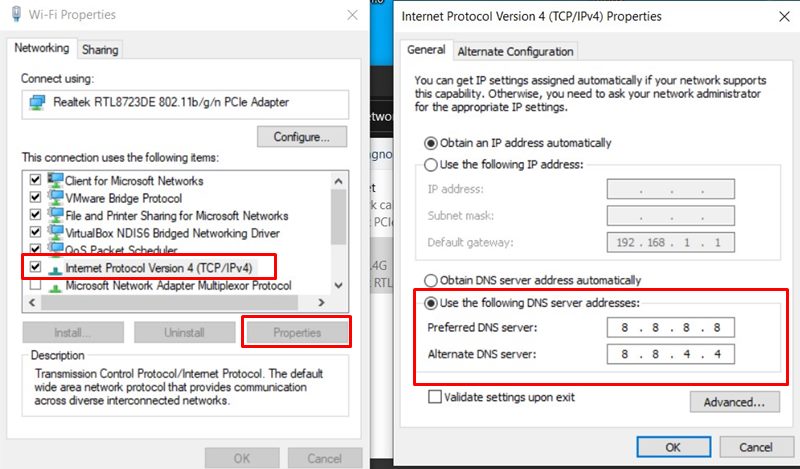
- Enter 8.8.4.4 as the Alternate DNS server.
- Click OK to confirm the changes.
- Once done, reboot the PC to change effects immediately.
- Finally, run the Tekken 8 game again to check for the issue.
13. Perform a Clean Boot
If none of the workarounds help, make sure to perform a clean boot method on your Windows system to avoid potential conflicts with third-party startup apps. The startup apps automatically start running in the background when you boot the Windows system. These programs unnecessarily consume system resources and data bandwidth which can affect the gaming experience. You can check the steps below to prevent unnecessary third-party startup apps.
- Press the Win+R keys to open the Run dialogue box.
- Type msconfig and hit Enter to open System Configuration.
- Go to the Services tab > Enable the Hide all Microsoft services checkbox.
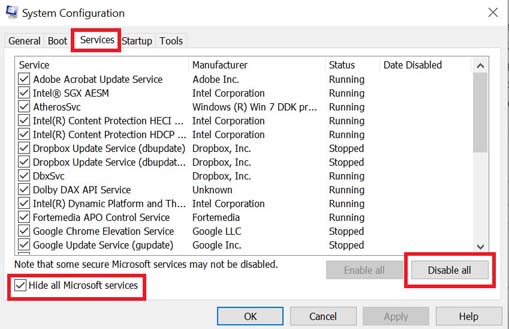
- Click on Disable all > Click on Apply and hit OK to save changes.
- Go to the Startup tab > Click on Open Task Manager.
- Click on the Startup tab in Task Manager.
- Now, click on the particular task that you want to disable. (OneDrive, Adobe Cloud, etc)
- Select the task and click on Disable to turn it off.
- Make sure to disable startup tasks that have a higher impact.
- Do the same steps for each program that has a higher startup impact.
- Once done, restart your computer to apply changes.
14. Contact Bandai Namco Support
As a final resort, you can contact Steam Support or Bandai Namco Support for the same issue to get a better resolution. If possible, try submitting the support ticket so that developers can investigate it deeply.
That’s it, guys. We assume this guide was helpful to you. For further queries, you can comment below.
