It’s quite an upsetting moment for anyone to deal with the black screen issue on gaming devices while launching The Finals or even during the gameplay sessions. The black screen issue keeps getting frustrating whenever it appears on the display monitor or TV. The endless black screen issue hits with an error message in-game with most of the video games these days. Sadly, The Finals Black Screen Issue also become one of the hot topics recently irrespective of the gaming platforms.
Not only does the black screen issue occur but also crashes back to the home screen of the gaming device. Even though The Finals title is quite new in the gaming market developed by Embark Studios, it looks like multiple players are having a tough time with the black screen problem as of now. The chances are high that server connectivity glitches, an outdated game patch version, corrupted or missing game files, compatibility issues with the configuration, problems with the game settings, etc can be possible reasons.

Page Contents
- Fix The Finals Black Screen Issue on PC, PS5, and Xbox Series X/S
- 1. Wait to Load The Finals Completely
- 2. Restart the PC or Console
- 3. Check The Finals Server Status
- 4. Check for System Requirements
- 5. Ensure Your Internet Connection is Working
- 6. Run The Finals as an Administrator
- 7. Update The Finals
- 8. Verify and Repair the Game Files
- 9. Update the Graphics Drivers
- 10. Adjust In-Game Graphics Settings
- 11. Perform a Clean Boot
- 12. Try Moving The Finals Installation Folder
- 13. Contact The Finals Support
Fix The Finals Black Screen Issue on PC, PS5, and Xbox Series X/S
Fortunately, here we’ve mentioned with you some workarounds that should come in handy. Make sure to follow this troubleshooting guide until the problem has been fixed. So, without further ado, let’s jump into it.
1. Wait to Load The Finals Completely
Sometimes the game might take a few moments to run properly during startup which eventually loads additional resources and shaders cache. If you’re having the black screen issue while booting up the game for the first time, try waiting for a few seconds.
2. Restart the PC or Console
Going through the black screen issue quite often? Make sure to reboot the system manually to check if the problem persists or not. A normal restart of the device can remove temporary cache and glitch most of the time. Several gamers have found this trick helpful.
3. Check The Finals Server Status
It’s also recommended to check out The Finals server status at your end to make sure there is no downtime with the server. You can follow the official @reachthefinals Twitter account to get all the latest info or updates. If there is a server-side issue, wait for a couple of hours and try again later.
4. Check for System Requirements
The chances are high that somehow your PC configuration doesn’t meet the system requirements of The Finals and that’s why your computer is experiencing multiple issues. Well, the graphical glitch like the black screen issue is one of them.
Minimum:
- OS: Windows 10 or later 64-bit (latest update)
- Processor: Intel Core i5-6600K or AMD Ryzen R5 1600 processor
- Memory: 12 GB RAM
- Graphics: NVIDIA GeForce GTX 1050 Ti or AMD Radeon RX 580
- DirectX: Version 12
Recommended:
- OS: Windows 10 or later 64-bit (latest update)
- Processor: Intel Core i5-9600K or AMD Ryzen 5 3600 processor
- Memory: 16 GB RAM
- Graphics: NVIDIA GeForce RTX 2070 or AMD Radeon RX 5700 XT
- DirectX: Version 12
5. Ensure Your Internet Connection is Working
It seems that you’re using a slow and unstable internet connection at your end which eventually causes server connectivity errors and black screen glitches. You should try switching to a different network such as a Wi-Fi network to a wired (ethernet) network or vice versa to cross-check the issue. Sometimes performing a power cycle method on the Wi-Fi Router might also come in handy. Otherwise, contact your service provider to get technical help regarding the internet issue.
6. Run The Finals as an Administrator
Sometimes running the game app as an administrator on Windows may also trouble you a lot with the program to perform correctly. Without having the system admin privilege, some of the programs might go through issues like the black screen problem. You can follow the steps below to allow the admin access which is a one-time process.
- Go to the installed game directory on the PC.
- Right-click on The Finals (exe).
- Go to Properties > Click on the Compatibility tab.

- Turn On the Run this program as an administrator option.
- Click on Apply and select OK to save changes.
7. Update The Finals
The chances are high that somehow an outdated game patch version on your PC might trouble you a lot. It can cause server connectivity errors and even game startup issues most of the time. You should follow the steps below to check if the game has been up-to-date or not.
For PC:
- Open Steam > Go to Library.
- Click on The Finals from the left pane.
- If a new update is available, click on Update.
- Once done, reboot the PC to apply changes.
For Xbox:
- Navigate to the Xbox Dashboard menu.
- Go to My Games and Apps.
- Hit Manage > Go to Updates.
- If an update is available for The Finals, press the A button.
- Once done, launch the game.
For PlayStation:
- Go to the Home screen.
- Navigate to Games > Select The Finals.
- Press the Options button on your controller.
- Choose Check for Update from the drop-down menu.
8. Verify and Repair the Game Files
Any corrupted or missing game files on the system might trouble you a lot with graphical glitches like the black screen issue. It’s also suggested to verify and repair the installed game files on the system by following the steps below.
- Run Steam and click on Library.
- Right-click on The Finals from the list.
- Click on Properties > Go to the Local Files files.

- Click on Verify Integrity of Game Files.
- Wait for it to complete and then restart the PC.
9. Update the Graphics Drivers
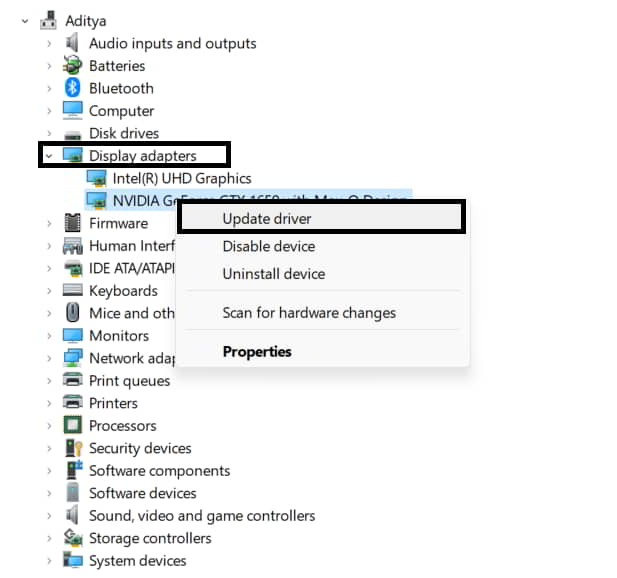
Another thing you should also try updating the graphics driver on your computer to avoid an outdated GPU driver or corrupted driver issues. You can check the following steps to ensure there is no conflict with the graphics driver installed at your end. Here we’ve provided both the recommended and manual update process for your ease.
Recommended Update:
- Open the Start menu > Search and open Device Manager.
- Double-click on Display Adapters.
- Right-click on the dedicated graphics card that you use.

- Select Update Driver > Click on Search automatically for drivers.
- If an update is available, the latest driver will be installed automatically.
- Once done, restart the system to apply changes.
Manual Update:
In case, you don’t get any pending updates, visit the official website of the respective manufacturer for the graphics card model. Download the latest graphics driver on the PC and run the installer to get it installed. Once done, reboot the PC. You can jump to the link below to do so:
10. Adjust In-Game Graphics Settings
In case, you’re not sure which graphical settings you should configure for your gaming device then make sure to check out the following options. You can also tweak some of the values from low to high depending on how powerful the hardware is.
- Window Mode – Fullscreen
- Resolution – Native monitor’s resolution
- VSync – Disabled
- NVIDIA Reflext – Low Latency On
- Resolution Scaling Method – NVIDIA DLSS
- NVIDIA DLSS – Ultra Performance
- Field of View – 100
- Motion Blur – Disabled
- Lens Distortion – Disabled
- Ray Tracing – Static
- Overall Quality Level – Custom
- View Distance – Medium
- Anti-Aliasing – Low
- Shadows – Medium
- Post-Processing – Medium
- Texture – Medium
- Effects – Low
- Foliage – Low
- Global Illumination Resolution – Medium
11. Perform a Clean Boot
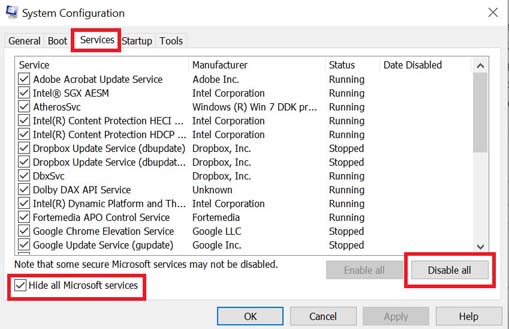
Multiple PC users reported that by using the clean boot method and disabling specific startup services, the system runs more smoothly than before. Performing a clean boot also fixes black screen issues with the video games. So, you should follow the steps below.
- Open the Run input box by pressing the Win+R keys.
- Type msconfig and hit Enter to open System Configuration.
- Go to Services > Enable – Hide all Microsoft services.

- Click on Disable all > Hit Apply and then OK to save changes.
- Go to Startup > Click on Open Task Manager.
- Go to Startup Apps > Check which app is unnecessarily running during Windows boot.
- Ensure to select the app and click on Disable to turn it off.
- Once done, restart your computer to apply changes.
12. Try Moving The Finals Installation Folder
Several reports suggest that changing the game installation folder to a different directory can also fix the black screen issue for The Finals on the PC. If you’re still encountering the same issue then consider following this method.
For Steam:
- Open Steam > Go to Library.
- Right-click on The Finals > Select Properties.
- In the Local Files tab, click on Move Install Folder.
- This will change the game directory.
- Wait for it to complete and then relaunch the game.
For Consoles:
Check for the platform’s settings with the game and perform the task accordingly, if available.
13. Contact The Finals Support
If none of the troubleshooting did work for you, try contacting The Finals Help Center and submitting the support ticket to get better assistance on it.
That’s it, guys. We assume this guide was helpful to you. For additional queries, you can comment below.
