Call of Duty Warzone is an online battle royale mode with the base Modern Warfare title. Meanwhile, Resurgence is a smaller and faster spin-off mode that is included in Warzone for interested players. It usually offers smaller maps and respawns for the players to get into combat with enemies quite quickly. However, several players seem to be having issues with the Warzone Resurgence Not Working unexpectedly. Now, if you’re one of the victims then you can check this guide.
Resurgence introduces some crucial changes to Warzone 2.0 but also adds some common problems for many players. The chances are high that somehow your graphics driver isn’t compatible or becomes outdated. Conflicts with the outdated game version, corrupted game files, server connectivity errors, in-game bugs or glitches, internet connectivity issues, and more can also be other possible reasons whatsoever. It can be frustrating at times whenever unfortunate players go through this.

Page Contents
- How to Fix Warzone Resurgence Not Working
- 1. Force Restart the Game
- 2. Restart the Gaming Device
- 3. Check Your Internet Connection
- 4. Run the Game as an Administrator
- 5. Update Warzone
- 6. Scan and Repair the Game Files
- 7. Check the Activision Online Services
- 8. Update the Graphics Driver
- 9. Change the Calling Card and Emblem
- 10. Adjust In-Game Graphics Settings
- 11. Reinstall the Warzone 2 Game
- 12. Contact Activision Support
How to Fix Warzone Resurgence Not Working
Fortunately, here we’ve shared with you some workarounds that should come in handy. Make sure to follow all troubleshooting methods until the problem has been fixed. So, without wasting any more time, let’s get into it.
1. Force Restart the Game
First of all, you’ll need to force close & relaunch the Call of Duty Warzone 2 game manually on your respective device to ensure there is no temporary glitch with the game application or files. Several players have found this trick helpful. So, you should have to try it once.
2. Restart the Gaming Device
You’ll need to manually reboot your gaming device no matter whether you’re using a PC or Console before trying any other workaround. Sometimes restarting the gaming device can help in resolving temporary system glitches or cache data issues.
3. Check Your Internet Connection
You can also cross-check the internet connection at your end to see if the problem is still troubling or not. Sometimes a slow or unstable internet connection can cause server connectivity errors and other potential issues. Conflicts with the network or networking device can also trouble you at times. It’s better to switch to a different network and check for the issue. If the internet connection is still problematic then you should contact the internet service provider to get technical help.
4. Run the Game as an Administrator
It’s suggested to run the Warzone 2 game application as an administrator on the PC to allow the admin access by following the steps below. Sometimes the lack of system admin access with the program running can trouble you a lot.
- Go to the installed game directory on the PC.
- Right-click on the Call of Duty Warzone 2.exe application file.
- Click on Properties > Click on the Compatibility tab.

- Turn On the Run this program as an administrator checkbox.
- Click on Apply > Hit OK to save changes.
5. Update Warzone
It’s always recommended to check for the Call of Duty Warzone 2 game update on your gaming device manually to avoid outdated game conflicts. You can follow the steps below to do so:
For Battle.net:
- Open the Battle.net client.
- Go to Library > Click on Warzone 2.
- Now, click on the cog wheel icon next to the game.
- Click on Check for Updates.
- If an update is available, download and install it.
For Steam:
- Open the Steam client > Go to Library.
- Right-click on Warzone 2.0 > Click on Properties.
- Click on Updates > From Automatic Updates, select Only update this game when I launch it.
For PlayStation:
- Head over to the PlayStation home screen.
- Select Warzone 2 > Press the Start button.
- Hit Check for Updates.
- If an update is available, select OK.
For Xbox:
- Go to the Xbox dashboard > Select Warzone 2.
- Hit the Start button > Choose Manage Game and Add-ons.
- Check for available updates > If available, select Update All.
- Once done, relaunch the game.
6. Scan and Repair the Game Files
Sometimes corrupted or missing game files on the PC might also trouble you while starting the game or conflict with the server connectivity. It’s always better to verify and repair the game files by following the steps below on your PC to avoid errors.
For Battle.net:
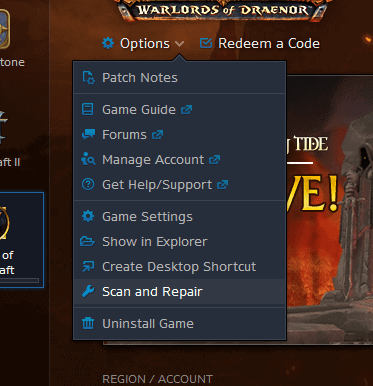
- Open the Battle.net client > Click on Warzone 2.
- Hit the Cog Wheel icon next to the Play button.
- Click on Scan and Repair.

- Wait for the repair to complete.
- Once done, relaunch the game.
For Steam:
- Open the Steam client > Go to Library.
- Right-click on Warzone 2.
- Go to Settings > Select Properties.
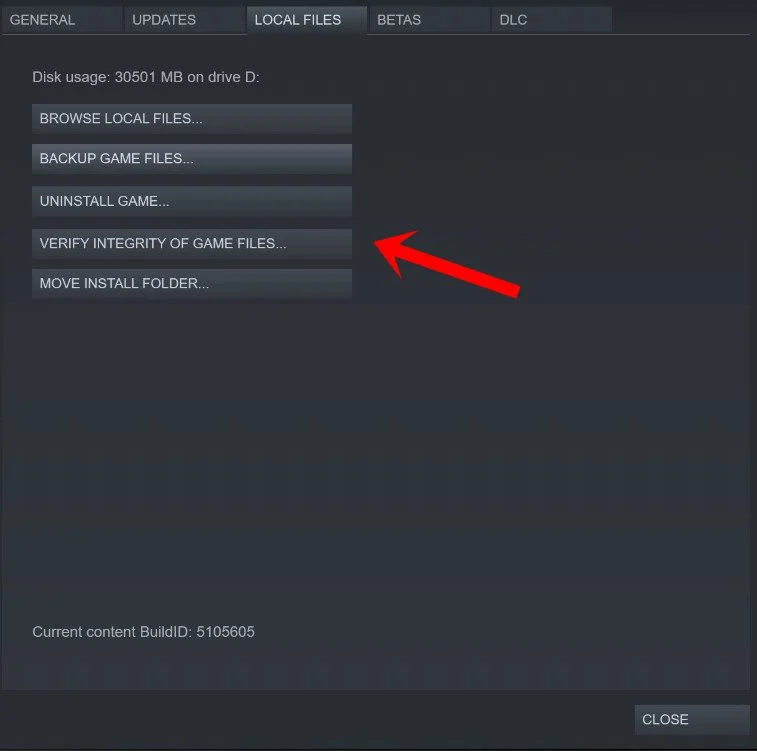
- Click on Local Files > Select Verify integrity of game files.

- Wait for the process to complete.
- Once done, relaunch the game.
7. Check the Activision Online Services
We’ll also recommend our readers to check for Activision Online Services here to ensure there is no issue with the server downtime or outage. The chances are high that any kind of server outage can trouble a lot of players at times. You might also visit the third-party DownDetector Call of Duty Status to check if other players are reporting the same issue or not. Additionally, you can follow the official @ATVIAssist Twitter handle to get regular notifications regarding the server issues.
If the online status becomes problematic then you should wait for a couple of hours and try again later. Still, experiencing the Resurgence not working issue? Well, skip to the next workaround.
8. Update the Graphics Driver
It would help if you tried manually updating the graphics driver by following the steps below. It’ll eventually fix an outdated graphics driver version or corrupted driver. An outdated graphics driver can eventually cause multiple issues with the game running or other potential graphical glitches.
Recommended Update:
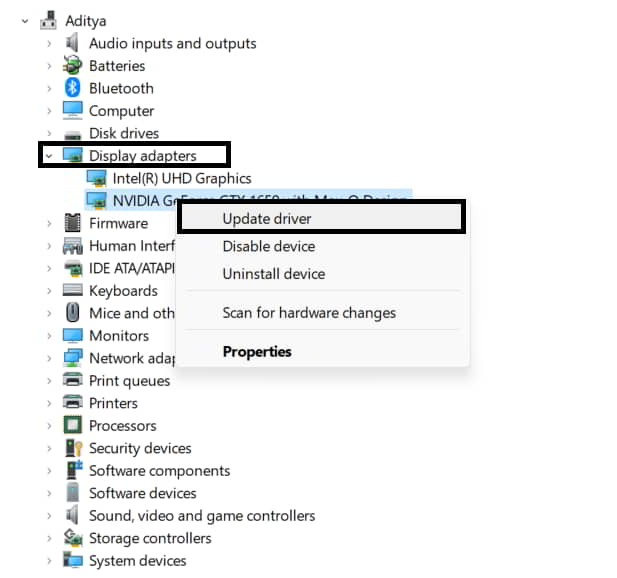
- Open the Start menu > Search for Device Manager and open it.
- Double-click on Display Adapters.
- Right-click on the dedicated graphics card.

- Click on Update Driver > Click on Search automatically for drivers.
- If an update is available, it’ll automatically download & install the latest version.
- Once done, restart the computer to apply changes.
Manual Update:
If you can’t find any pending updates, navigate to the official website of the respective graphics card brand below and search manually for the latest update. Do remember that you’ll always have to search for the latest driver version and specific for the model you’re using. If a new version is available for the graphics card, download the driver and install it on your PC. You can jump to the link below to do so:
9. Change the Calling Card and Emblem
Several players have already claimed that changing the calling card and emblem in Warzone did fix the Resurgence not working issue up to some extent. So, you should try following the steps below.
- Launch the Warzone 2 game.
- Set the calling card and emblem to ‘Randomized’.
- Go to Multiplayer > Choose Barracks.
- Select Customization > Go to Identity.
- Choose Calling Cards and pick one of them.
10. Adjust In-Game Graphics Settings
Another thing you should have to do is adjust the in-game graphics and display settings of Warzone to ensure there is no issue with the game startup. It’s recommended to tweak some of the graphics settings manually from this full guide. Depending on which PC configuration you’re using and which graphics card you’re using, it’ll be easier for you to manually set the graphics settings from high to low. By doing so, you’ll be able to get a better gaming performance with less crashes.
11. Reinstall the Warzone 2 Game
If none of the workarounds did come in handy then make sure to uninstall and reinstall the Call of Duty Warzone 2 game on your respective gaming device by following the steps below. Any kind of game installation issues might trouble you a lot when it comes to game startup or server connectivity conflicts.
For Steam:
- Open the Steam client on your PC.
- Go to Library > Right-click on Warzone 2.
- Head over to Manage.
- Click on Uninstall.
- If prompted, confirm the uninstallation process.
- Follow the on-screen instructions to complete it.
- Once done, restart the PC to apply changes.
- Finally, launch Steam & reinstall the game on a different drive.
For Battle.net:
- Open the Battle.net client.
- Choose Warzone 2 from the left pane.
- Select Options on the left side.
- Click on Uninstall Game.
- If prompted, confirm the uninstallation process.
- Once done, reboot the PC.
- Next, open the launcher > Reinstall the Warzone 2 game.
- Click on Options > Select Modify Install.
- Choose the mode that you want to install.
- Then select Confirm > Click on Start Install.
- Wait for it to complete & reboot the system.
For PlayStation:
- Head over to the PlayStation home screen.
- Go to the Games menu > Select Warzone 2.
- Highlight the Warzone 2.0 game.
- Press the Options button on your controller.
- Select Delete from the menu.
- Ensure to confirm and uninstall it.
- Once done, reboot the console.
- Finally, reinstall the COD Warzone 2 game.
For Xbox:
- Press the Xbox button to open the guide.
- Select My Games & Apps > Select See All.
- Choose Games > Select Warzone 2.0 that you want to uninstall.
- Press the Menu button and hit Uninstall.
- Then follow the on-screen instructions.
- Once done, go to My Games & Apps.
- Choose See All > Select Full Library to reinstall the Warzone 2 game.
- Finally, restart the Xbox console to apply changes.
12. Contact Activision Support
Last but not least, you should contact Activision Support for additional help regarding the specific issue. You should also create a support ticket so that the game developers can investigate the problem further. The chances are high that you’ll get a proper resolution ASAP.
That’s it, guys. We assume this guide was helpful to you. For further queries, you can comment below.
