In Microsoft Word, the Spell check feature works automatically and as soon as you start writing the document. It starts doing the job and tells you instantly your mistakes so that you can correct them easily. Errors in the document are underlined with different colors Wrong words are underlined with “Red color” whereas “Green color” is used for grammatical mistakes and “Blue color” is used for contextual errors.
As we know, all of Microsoft’s apps are always user-friendly and are loaded with ton of features, which helps us to make our daily activities very easy. The Spell Check feature can automatically detect all the grammatical and spelling mistakes that you did in the document.
Even though it works perfectly all the time but sometimes it may stop working and you will have to find the faults on your own. Use some simple tricks for troubleshooting your problems, and it will start working as it was working before. Also, these methods work in Word for Microsoft 365, Word 2019, Word 2016, Word 2013, Word 2010, and Word for Mac.

Page Contents
How to Fix If Word Spell Check Not Working
There are various possible causes for the spelling and grammar checker in Word to stop working. It’s possible that you made a small modification, or the language settings could be incorrect.
Or it can be that the document or spell-checker had exceptions, or that there was a problem with the Word template. Whatever the cause, a few quick changes should have Word pointing out errors in your papers again very soon.
Method 1: Check if the “spell check” is on
The most likely or simplest cause may be that you have not turned on the “spell check”. So if you have not turned on automatic spell check this function wouldn’t work on its own. So before starting your work make sure it is turned on.

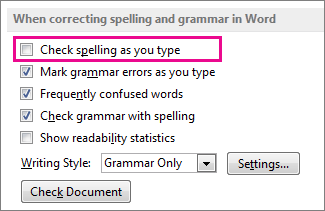
Also, select the Mark grammar errors as you type and Check grammar with spelling check boxes.
Method 2: Check MS Word’s proofing language
Word may miss mistakes if the correct proofreading language isn’t selected. Check to ensure if Word is proofing in the appropriate language, and then see if it fixes the issue.
Method 3: Check for proofing exceptions
There’s a setting in Word document called “Hide proofing” or other exceptions which might have been enabled by you knowingly or accidentally, so just make sure to turn it on.
Because the spell check won’t work if this option is enabled so make sure that this option is disabled so that you can do your work without any difficulty or using 3rd party apps.
Method 4: Repair MS Word
Repairing your app can simply cure some of your problems no matter what it is.
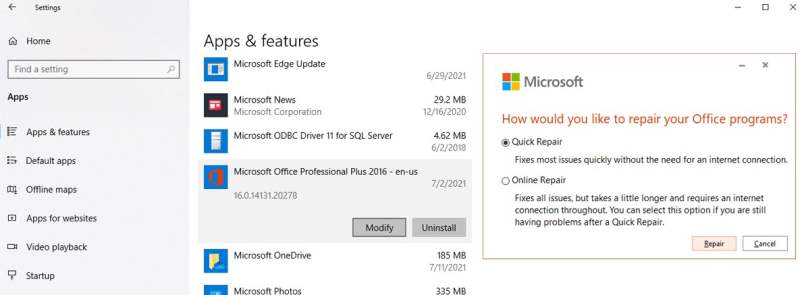
- Select Settings by performing a right-click on the Start button. You can also use the keyboard shortcut Windows key + I.
- Then go to Apps > Apps & features.
- Click Modify after choosing the Microsoft Office application.

- Select Quick Repair in the pop-up window. Continue with the previous procedures and try online repair if this doesn’t resolve the issue.
- Verify that spell check is now operational.
Method 5: Turn on Check spelling as you type
- Open File.
- Click Options > Proofing.
- Head to When correcting spelling and grammar in Word.

- Check the box next to Check spelling as you type.
In order to ensure that Word spell checks your work properly, you need also look at the When correcting spelling in Microsoft Office programs section and deselect Ignore words in UPPERCASE.
Method 6: Disable add-ins one at a time
Disable each add-on individually. If the spelling and grammar checker functioned properly in Safe Mode, an add-in could be the cause of the issue. To pinpoint the problematic add-in, disable them one at a time. When you identify the offender, disable it indefinitely.
Method 7: Repair Default Template
the default template’s name. If the problem is still not fixed, there can be an issue with Word’s default template, named normal. The issue might be resolved by renaming the template. Word will automatically create a new document that is completely stocked.
Method 8: Check Document Style
The improper settings for Word’s styles could prevent the spell checker from working properly. How to modify the settings is as follows:
- Select Modify by performing a right-click on the active style.
- Select Language under Format.
- Choose the language of your choice from the list.
- Verify that the checkbox for spelling and grammar is not checked.
Conclusion
This brings us to the end of this guide for fixing the MS Word Spell Check not working issue. Please note that such errors can also be due to technical glitches. So also try restarting the MS Word document app or computer and see if it helps.
