WWE 2K24 is a professional wrestling video game that has been developed by Visual Concepts and published by 2K. It is the latest installment in the WWE series and the successor to WWE 2K23. The game is available on various platforms such as PC, PlayStation 5, PlayStation 4, Xbox One, Xbox Series X and Series S. However, the game has been encountering several issues, and the WWE 2K24 Crashing issue is troubling many players on PC, PS4, PS5, and Xbox consoles.
Game crashes and launching issues have become common these days, and many players are experiencing startup crashes, regardless of whether they’re using a PC or any other gaming console. The game crashes may occur due to several reasons such as outdated game patches, corrupted game files, system glitches, incompatible hardware requirements, or corrupted game save data.
Other possible reasons behind game crashes include outdated system software, overheating issues, conflicts with game presets, graphics driver issues, and more. However, in most cases, game crashes can be resolved. If you’re one of the affected players, follow this troubleshooting guide to fix the issue.

Page Contents
Fix WWE 2K24 Crashing on PC, PS4, PS5, Xbox Consoles
Fortunately, we have provided some potential workarounds to fix the crashing issue. Please try all the methods until the problem is resolved. Let’s get started without any further delay.
1. Reboot the Gaming Device
Restarting your computer or the specific console might help in fixing the temporary system glitches or game crashes. Several users have found this workaround helpful.
For PC:
- Open the Start menu > Go to the Power menu.
- Click on Restart and check for the issue.
For PlayStation:
- Press the PS button on your connected controller.
- Select the Power icon > Choose Restart PS4/PS5.
Note: You can also try force shutting down the console by long-pressing the Power button until the console beeps two times and then power it on again.
For Xbox:
- Press and hold the Power button to shut down the console.
- Once the console is turned off, release the Power button.
- Next, unplug the power cable from the console.
- Wait for a couple of minutes > Plug back the power cable in.
- Power on the console and run the game to check for the issue.
2. Check System Requirements
It’s also recommended to check for system requirements of the WWE 2K24 game to understand whether your PC is compatible or not. If your system is incompatible to run the game smoothly then make sure to upgrade the necessary software/hardware. You can check the requirements below.
MINIMUM:
- Requires a 64-bit processor and operating system
- OS: 64-bit: Windows 10
- Processor: Intel Core i5-3550 / AMD FX 8150
- Memory: 8 GB RAM
- Graphics: GeForce GTX 1060 / Radeon RX 480
- DirectX: Version 12
- Storage: 90 GB available space
- Sound Card: DirectX 9.0c compatible sound card
- Additional Notes: SSD recommended | AVX – Compatible processor | At least 3GB of Video Memory
RECOMMENDED:
- Requires a 64-bit processor and operating system
- OS: 64-bit: Windows 10
- Processor: Intel i7-4790 / AMD FX 8350
- Memory: 16 GB RAM
- Graphics: GeForce GTX 1070 / Radeon RX 5600 XT
- DirectX: Version 12
- Storage: 90 GB available space
- Sound Card: DirectX 9.0c compatible sound card
- Additional Notes: SSD recommended | AVX – Compatible processor | At least 6GB of Video Memory
3. Run WWE 2K24 as an Administrator
Another thing you can do is to launch the game application with the system admin access to run it properly. Without having the system admin privilege for your game application, you’ll encounter several issues on Windows to run the game app.
- Go to the installed game directory on the PC.
- Right-click on WWE 2K24 (exe).
- Go to Properties > Click on the Compatibility tab.

- Enable the Run this program as an administrator option.
- Click on Apply and select OK to save changes.
4. Update WWE 2K24
Try checking for the WWE 2K24 updates on your respective gaming console to ensure there is no issue with the in-game bug or stability. Sometimes conflicts with the performance drops, lags, or crashes in the game might be related to the outdated patch version directly. To update the game:
For Steam:
- Open Steam > Go to Library.
- Click on WWE 2K24 from the left pane.
- Click on the Update button, if a new update is available.
- Once done, reboot the PC to apply changes.
For Epic Games Launcher:
- Open the Epic Games Launcher > Head over to Library.
- Now, click on the three-dot icon next to WWE 2K24.
- Make sure the Auto Update option is turned on.
- Whenever the update is available, it’ll automatically install the update.
For PlayStation:
- Head over to the PS5 Home Screen.
- Select the WWE 2K24 game.
- Press the Options button > Select Check for Updates.
- If there is an update available, your PS5 should automatically start downloading and installing it.
You should also Enable automatic video game updates via Settings > Saved Data and Game/App Settings > Automatic Updates > Turn on Auto-Download.
For Xbox:
- Go to the My Games and Apps section on your dashboard.
- Select Manage > Choose Updates.
- If an update is available, go to the WWE 2K24 game.
- Press the A key on the controller to start the update process.
- Once done, you can Set Automatic Updates.
- You should also Turn on ‘Keep my games and apps up to date’.
5. Scan and Repair the Game Files
Any corrupted or missing game files on the system might trigger game running issues up to some extent. We recommend you follow the steps below to verify and repair the installed game files.
For Steam:
- Run Steam and click on Library.
- Right-click on WWE 2K24 from the list.
- Click on Properties > Go to the Local Files files.

- Click on Verify Integrity of Game Files.
- Wait for it to complete and then restart the PC.
For Epic Games Launcher:
- Open the Epic Games Launcher > Go to Library.
- Click on WWE 2K24 > Select the three dots next to the game.
- Select the Manage option.
- Now, click on the Verify option > Confirm the task and wait for it to complete.
- Once done, reboot the PC to apply changes.
6. Check for Graphics Driver Updates
An outdated or corrupted graphics card driver can trigger multiple issues with the games or system performance while running programs. It’s highly recommended to check the graphics driver update. To do so:
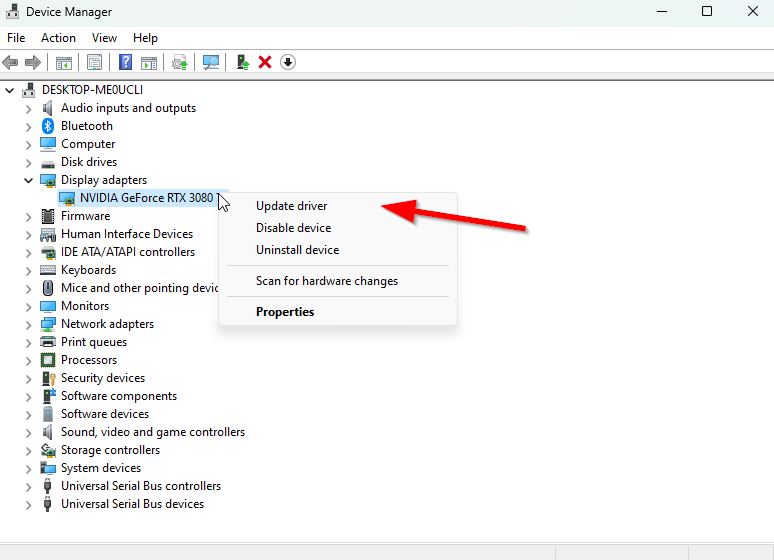
- Press the Win+X keys to open the Quick Link Menu.
- Click on Device Manager from the list > Double-click on Display adapters.
- Right-click on the dedicated graphics card that you’re using.

- Click on Update driver > Choose Search automatically for drivers.
- If the latest update is available, it’ll automatically download & install the latest version.
- Once done, restart the computer to apply changes immediately.
Alternatively, you can manually download the latest graphics driver version and install it on the PC via the official website. Download the graphics driver file respective to your graphics card model and manufacturer from the links below.
7. Update the System Software
An outdated system software version on your specific console will ensure there will be no lags or hiccups whatsoever. You should always check for the system software updates at your console to avoid incompatibility issues or bugs. To do so:
For PC:
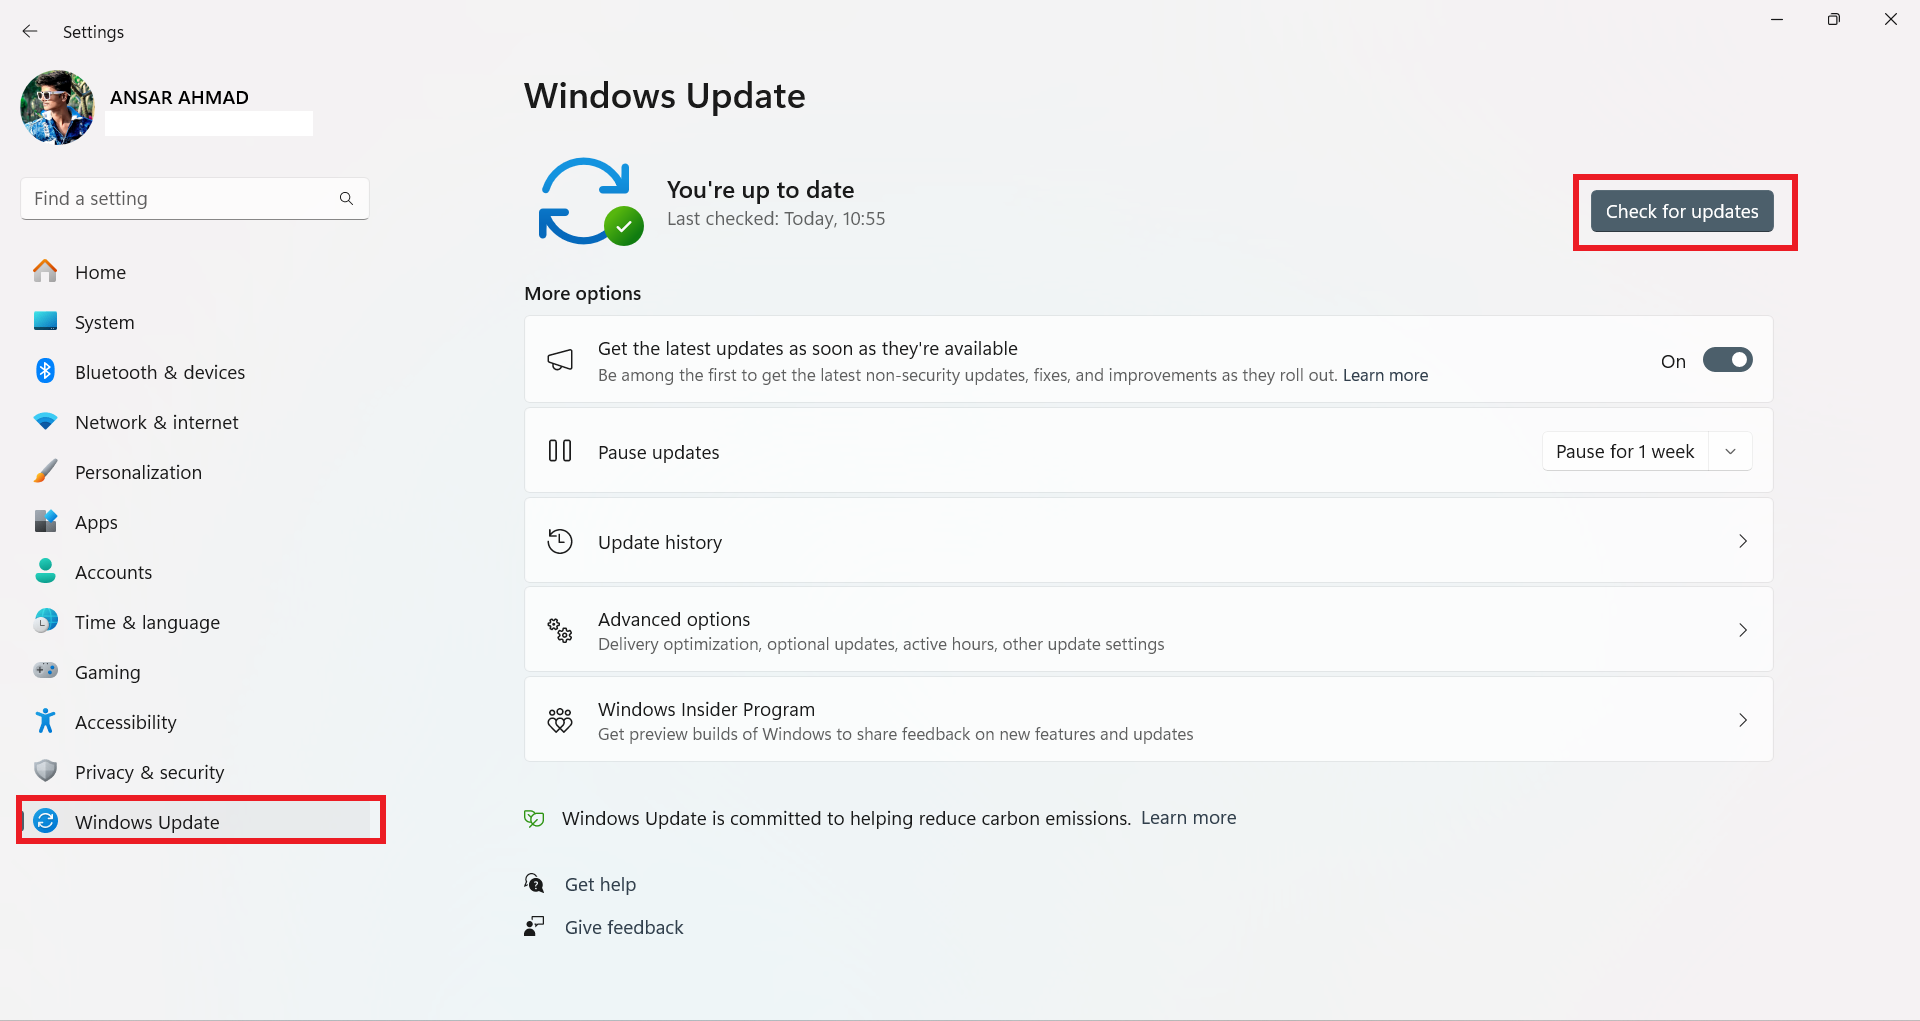
- Press the Win+I keys to open Settings.
- Click on Update & Security.

- Click on the Check for updates button.
- If there is a new update available, click on Download and Install.
- Once done, reboot your PC to apply changes.
For PlayStation:
- Head over to Settings on the top-right side of the Home Screen.
- Go to System > Navigate to System Software.
- Choose System Software Update and Settings.
- Select Update System Software.
- Hit Update Using Internet.
Note: If your PS4/PS5 isn’t connected to an active internet network then try downloading the update file via a computer. Ensure to copy and paste it to a USB flash drive from folders & select the Update Using USB option.
For Xbox:
- Ensure to connect your Xbox console to an active internet network.
- Open the Guide menu by pressing the Xbox button on your controller.
- Go to Profile & System > Select Settings.
- Navigate to System > Choose Updates.
- Proceed to update if you see ‘Console update available’.
8. Avoid Overheating
You should check for the console overheating while using it or playing video games for a long time because inadequate ventilation to the PlayStation or Xbox console can cause crashes and lags with the game. Try making proper adjustments to the console so that it can easily get air ventilation.
9. Clear the Game Save Data or Cache
Sometimes your game’s saved data might be missing or outdated and needs to be deleted manually from the console. It’ll eventually help in creating new saved game data on the system whenever you relaunch the title. So, follow the steps below to check for the same.
Please Note: It’s recommended to take a backup of the saved data or download the data to avoid losing your progress in the game.
For PlayStation:
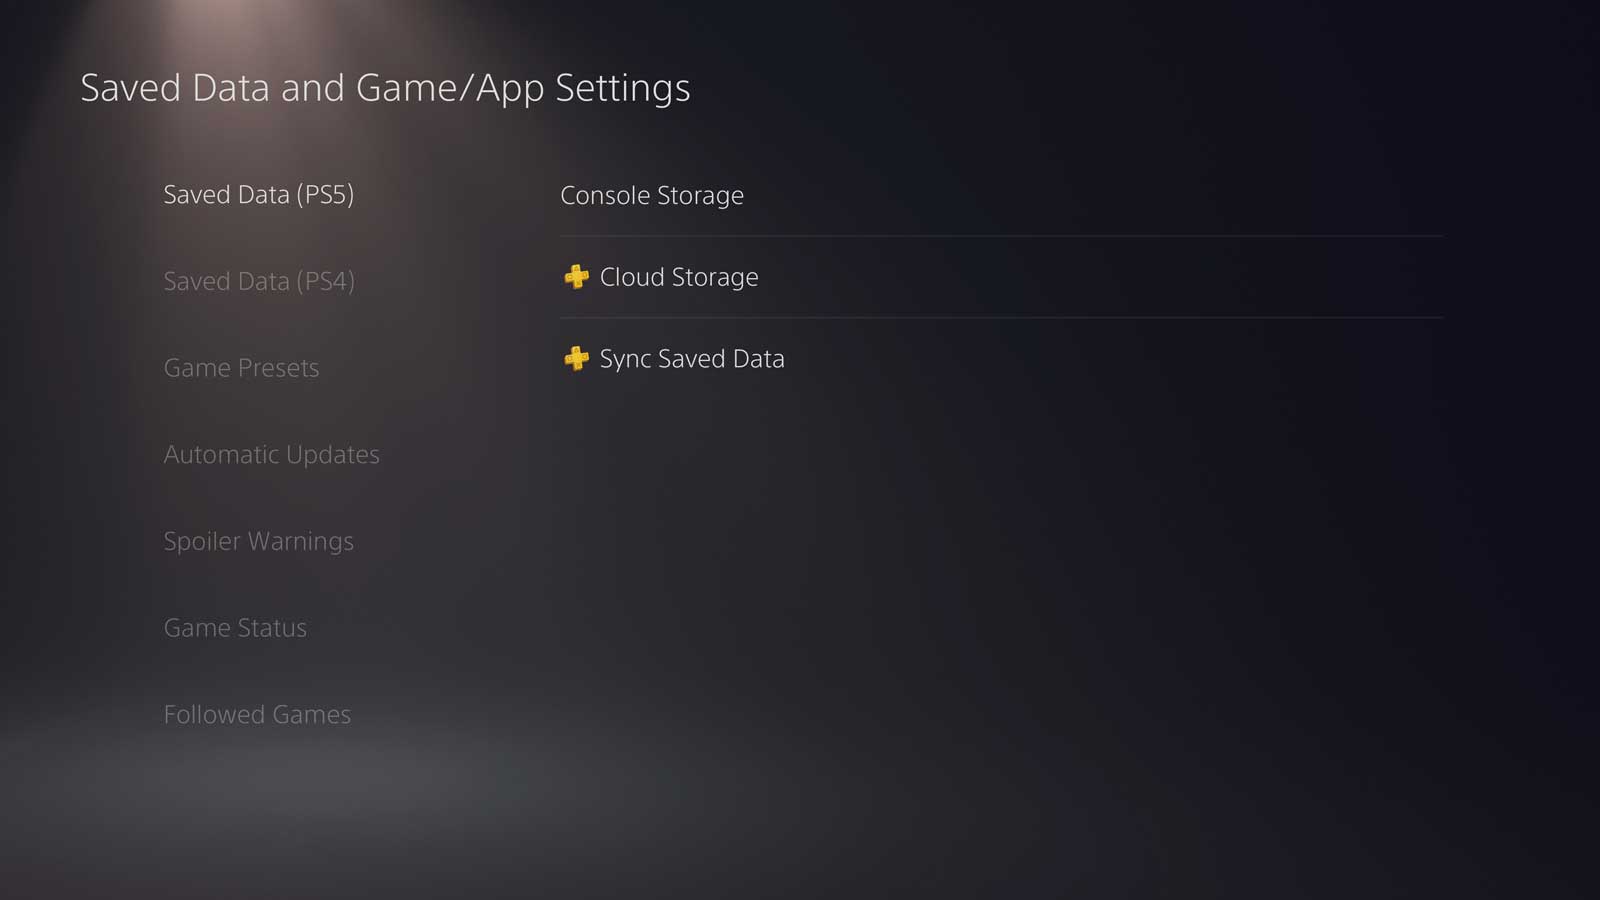
- Go to Settings on your PlayStation console.
- Choose Saved Data and Game/App Settings.
- Select Saved Data (PS5) or Saved Data (PS4).

- Head over to Console Storage > Go to Delete.
- Select WWE 2K24 > Press the Delete option at the bottom right side.
- Wait for a while to delete the saved game data > Next, restart your console.
- Once done, run the game, and sync the saved game data.
For Xbox:
- Press the Xbox button on the controller to open the Guide menu.
- Select My games & apps > Select See all.
- Highlight Games > Press the Menu button on the WWE 2K24 game.
- Choose Manage game and add-ons.
- Select Saved data > Select Delete All if you want to remove all saved data on your console.
- Otherwise, choose the profile that you want to delete.
- Choose Delete from Console to remove all local save files. [select Delete Everywhere]
- Once done, reboot the console, and check for the issue again.
10. Close Game Tasks and Retry
Try closing the game task manually from the background and then retry running the game to check if the problem persists or not. Background running tasks can affect applying changes or performing fixes from the core. To do so:
- Press the Ctrl+Shift+Esc keys to open Task Manager.
- Go to Processes > Click on the Steam/WWE 2K24 task in the list.
- Click on End Task to close it.
- Once done, reboot the system to apply changes.
- Then retry playing the game to check for crashes.
11. Reinstall WWE 2K24
If none of the workarounds did come in handy then make sure to uninstall and reinstall the game on your respective platform. Any kind of installation issues with the game might also trouble you a lot.
For Steam:
- Close the Steam client.
- Search and open the Control Panel in the Start menu.
- Now, click on Uninstall a program under Programs.
- Search for the WWE 2K24 game and select it.
- Select Uninstall and follow the on-screen prompts.
- Once done, reboot your PC to apply changes.
- Try re-installing the WWE 2K24 game again to check for the issue.
For Epic Games Launcher:
- Open the Epic Games Launcher > Click on Library.
- Click on the three-dot icon next to the WWE 2K24 game.
- Now, click on Uninstall > Wait for the game to be deleted.
- Once done, reboot the PC to apply changes.
- Finally, open the Epic Games Launcher, and try to reinstall the game again.
For PlayStation:
- Go to the WWE 2K24 game in the Games Menu.
- Highlight the game > Press the Options button on your controller.
- Select Delete from the menu.
- Confirm it and the game will be uninstalled.
- Once done, reboot the console.
- Finally, reinstall the game from the store.
For Xbox:
- Press the Xbox button to open the guide.
- Select My games & apps > Hit See all.
- Choose Games > Highlight WWE 2K24 you want to uninstall.
- Press the Menu button > Select Uninstall.
- Then follow the prompts.
- Once done, go to My Games & apps > See all > Full Library to reinstall the game.
That’s it, guys. We assume this guide was helpful to you. If you have any further queries, please comment below.
