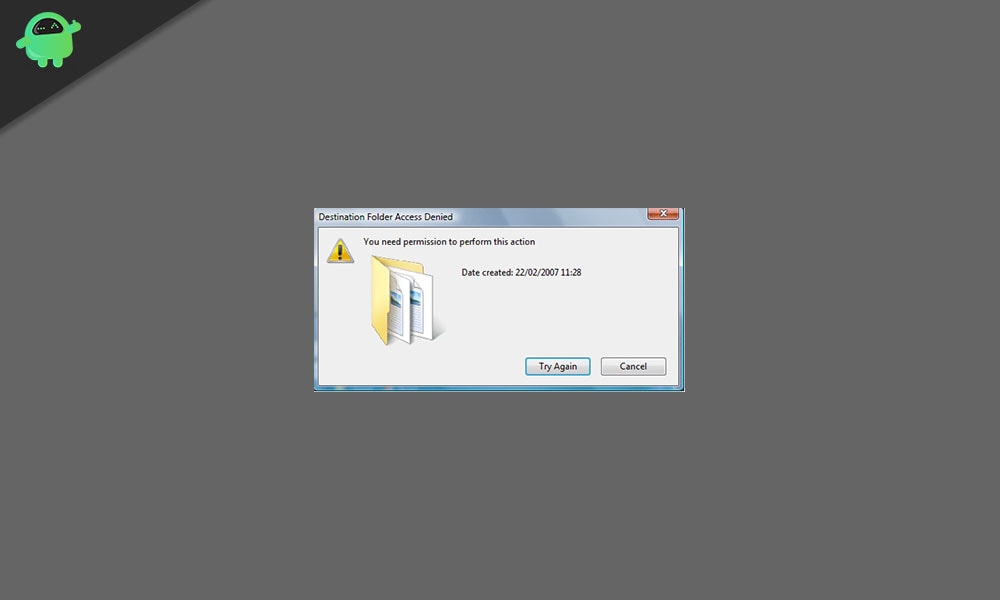
If you have ever encountered the “You Need Permission To Perform This Action” error on Windows, then you must know just how annoying that can be. You’re trying to get something done on your personal computer and all of a sudden, a pesky little error message pops up on your monitor screen telling you that you do not have permission to use your computer. We know it’s a real bother, but that is just Microsoft Corporation and the Windows operating system looking out for you.
As a security measure to prevent users’ information and sensitive data from getting into the wrong hands, Windows offers protections against granting permissions to carry out certain actions. Thankfully, this does not happen very often. However, in the case of any eventuality where it does, you’re going to need a solution to the problem and that is what this article is all about.
Page Contents
- What Causes This Error Message to Appear?
- Ways To Fix Permissions Error on Windows
- Turn Off/Disable All Your Third-Party Security Software/Antiviruses
- Scan Your Computer for Viruses/Malware
- Reboot Your PC To Safe Mode
- Double-Check Your Security Permissions
- Grant Your Account Administrator Privileges
- Acquire Full Control Permissions Over The Folder/File
- Modify The Ownership of the Problematic Program
- Run an SFC Scan
- Use The Unlocker App To Delete The Restricted Folder/File
- Uninstall and Reinstall The Problematic Program
- Repair Your System Registry
- Clean-Install Your Windows Operating System
What Causes This Error Message to Appear?
There are no clearly defined factors that cause this error message to appear. Users would usually encounter this error while carrying out ordinary tasks such as trying to copy files, move or delete files, install a program, change a file or folder name, and so on. These kinds of tasks are usually carried out effortlessly but sometimes, poor configurations, lack of proper security permissions, wrongly modified permissions, and as a result of a file being locked by a system service or process.
Whatever may be the cause of you encountering this error, there are a few potential fixes you can try. Each of these scenarios depends on a different factor and since you can’t always know what exactly is causing the error to appear, you would be better off trying each one of them until something works and the error is cleared.
Ways To Fix Permissions Error on Windows
In this article, we will walk you through twelve (12) potential fixes you can try to solve this error message. We are sure that at least one of these solutions would be able to fix this error for the majority of users.
Turn Off/Disable All Your Third-Party Security Software/Antiviruses
This is perhaps the primary cause of the error you’re encountering. Many third-party antiviruses have built-in security features that prevent certain actions from being taken on your PC if those actions are deemed to pose some sort of threat to your computer’s privacy and security. However, antiviruses don’t always get it right and might be a tad too paranoid, sometimes even blocking off useful actions from being taken. It all depends on the antivirus’ algorithm and what sorts of malware it was designed to target and correct.
To disable your third party anti-malware protection, the quickest way to get it done is through your Task Manager. These are the steps to achieve this:
- To access your Task Manager, press the Ctrl + Shift + Esc keys on your keyboard simultaneously. This would immediately bring up the Task Manager window. Alternatively, you can right-click on the taskbar at the bottom of your PC screen and select Task Manager from the list of options.
- In the Task Manager window, click on the Startup tab and check through the list of programs that start up automatically when your computer boots up.
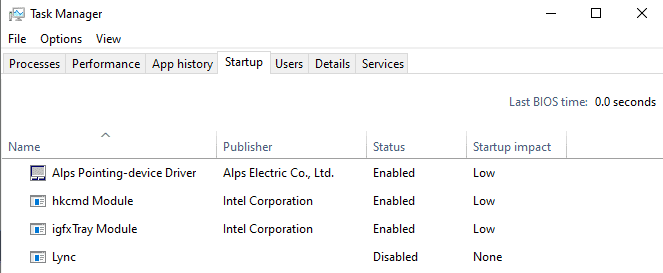
- Browse through the list of programs for your third-party antivirus app or apps, and finally, click on Disable to disable it/them.
Sometimes, the problem may be with the built-in Windows antivirus called Windows Defender. To learn how to turn off/disable Windows Defender, read this detailed step-by-step article by us: How to Disable the Antivirus Programs or Firewalls in Windows 10?
Scan Your Computer for Viruses/Malware
Besides a potential block by your antivirus, you may also be experiencing this error as a result of a virus in your computer. If this is the problem, your next best course of action is to scan your computer for potential viruses and malware and remove them before they do any further damage to your PC.
You are advised to use Windows Defender for your malware scan as you probably have already disabled all your third-party antiviruses by now. To run a system scan using Windows Defender, do the following:
- Click on the Windows icon (Start) in the bottom left corner of your PC screen and click on Settings.
- When the Settings window opens, click on Update & Security which should be the last option on the list. Then click on Windows Security in the menu on the left hand and select the Virus & Threat Protection option.
- When the new window pops up, click on the Scan Options hyperlink. At this point, you will be presented with four options which are Quick Scan, Full Scan, Custom Scan, and Windows Defender Offline Scan.
- Select the Full Scan option on the list. This will take a while but it will most effectively find and identify all possible malware hiding in and around your PC.
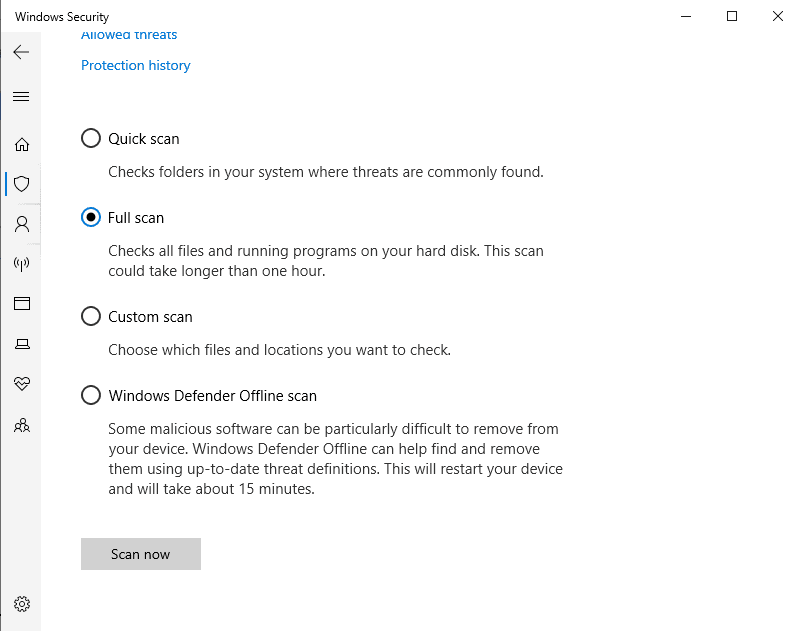
As an alternative, you could opt for the Quick Scan option which takes less time but is not as potent in finding all the potential foreign files and viruses present in your computer system at the time. If you decide to go for Custom Scan, you can select the exact files and folders that you would like to have scanned. This is a very good option as it allows you to target just the program you’re having this error message with. However, because the issues causing you to encounter this error message may not be isolated within the file you tried to access before encountering the error, this type of scan may not be your best option.
Either way, if any threats are discovered after any of the scans, take the proper suggested steps to eliminate them and then check again whether or not the error still appears whenever you try to carry out the action you’re trying to perform again.
Reboot Your PC To Safe Mode
If the above two solutions fail to resolve your issues, then it might be time to try rebooting your PC to Safe Mode. To pull this off, the first thing you need to do is to click on the Start button, then click on the Power icon. Press and hold the Shift key on your keyboard, and while holding it, click the Reboot option from the short drop-down list that appears after you click on the Power icon. This will make your PC reboot into the Troubleshoot screen from where you can select Advanced Options.
After this, click on Settings and then click Restart. After the restart, press the F4 button on your PC to refresh it, and then once again, attempt the action you were trying earlier before getting the “You Need Permission To Perform This Action” error on your Windows PC.
Double-Check Your Security Permissions
If after trying the three possible solutions above, you’re still being met with the same error message, then this may be indicative of a problem with your security permissions. To check and correct such problems, take the following steps:
- Right-click on the app, file, or folder you are having issues with and select Properties from the ensuing drop-down menu.
- Find and click on the Security tab and try to locate the account whose permissions you desire to check. All your available accounts can be found under the Group or Usernames section.
- Click on the Edit button and then select the account you are interested in editing its permissions.
- Navigate to the section labelled Permissions and under the Allow column, tick the Full Control box and then click on Apply.
- Select OK to finally save the changes that you have made.
After going through these steps, you may now check your file, app, or program again to see if you can finally carry out your desired action or whether the problem persists. If the problem persists, try the next solution option below.
Grant Your Account Administrator Privileges
Granting your account administrator privileges means adding the account you are logged in to on your PC to the administrator group. If you are using a shared PC with multiple different accounts for different users, then this solution is most likely to work for you. To add your account to the administrator group, these are the steps you should take:
- Press the Windows and “X” keys on your board at the same time (this is a shortcut) and then select Computer Management from the pop-up menu.
- Find your way to the Local Users and Groups option and select Users
- In the tray that sits on the left-hand side of your screen, locate the name of your account and then click on it twice (double-click).
- Navigate to the tab labelled Member Of and then click on the Add button.
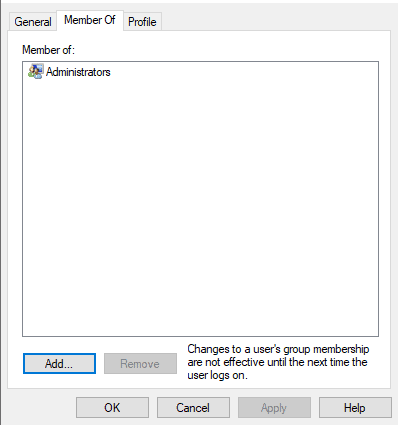
- Move to the text field labelled Enter the object names to select and type in “Administrators” into the provided textbox.
- Click on Check Names and then press OK.
- Click on Administrators, select Apply, and then press OK.
Restart your PC and then try the action you were attempting again.
Acquire Full Control Permissions Over The Folder/File
Another alternative you can try is to gain full control permissions over the file/folder that you are having trouble with. To achieve this, here are the things you must do:
- Right-click on the file or folder that you wish to perform an action on and then select Properties.
- Click on the Security tab and then click on the Advanced menu.
- Right next to Owner, click on Change.
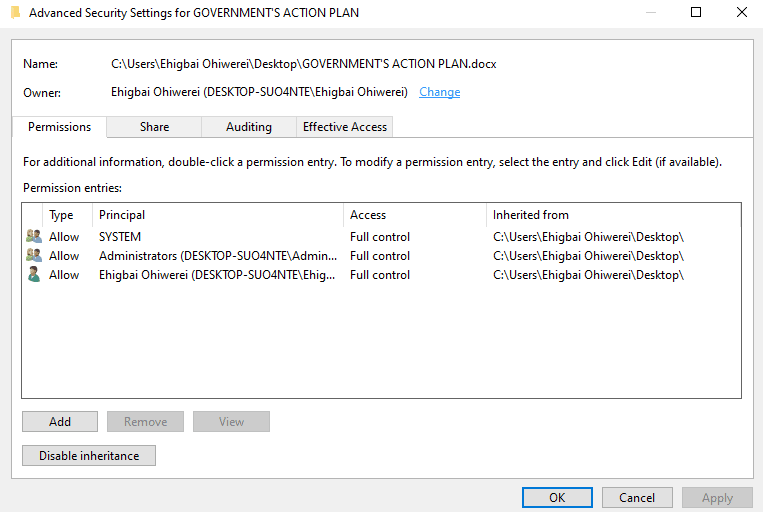
- When you arrive at the “Enter the object name to select” text field, enter your user account name and then click on Check Names.
- Next, click on OK and tick the Replace owner on the sub-containers and objects checkbox.
- Return to the folder labeled Properties and then click on OK.
- If you would prefer to change the permissions without exactly taking full ownership of the file/folder, right-click on the file or folder, select Properties and then go to the tab named Security and click on Advanced.
- Under the Access column, check if your user account has finally gained full control.
Modify The Ownership of the Problematic Program
If you are still having trouble getting the “You Need Permission To Perform This Action” error to disappear from the monitor of your Windows Pc, then you should try changing the ownership of the file giving you these persistent permission errors. To do this successfully, here are the steps you must follow:
- Right-click on the file or folder that is being restricted by the “You Need Permission To Perform This Action” error message.
- Select the Properties option and move on to the Security tab.
- Click on the Advanced button and navigate to the section labeled as Owner.
- Click on Change and you will be met with the Select User or Group window.
- Navigate to the field named Enter The Object Name To Select and type in “Administrators” or your username into the empty text field.
- Click on the Check Names button and then click on OK.
- Lastly, check the box named Replace owner on sub-containers and objects and click on Apply. Finally, click on the OK button to confirm this action.
Run an SFC Scan
One of the most potent troubleshooting tools that can scan, detect, and resolve different system-related issues in your PC is the System File Checker (SFC). To run an SFC scan, you should take the following steps:
- Press the Windows and “X” keys on your board at the same time (this is a shortcut) and then select Command Prompt (Admin) from the pop-up menu.
- Type in the command
sfc/scannowand wait for the verification process to be completed.
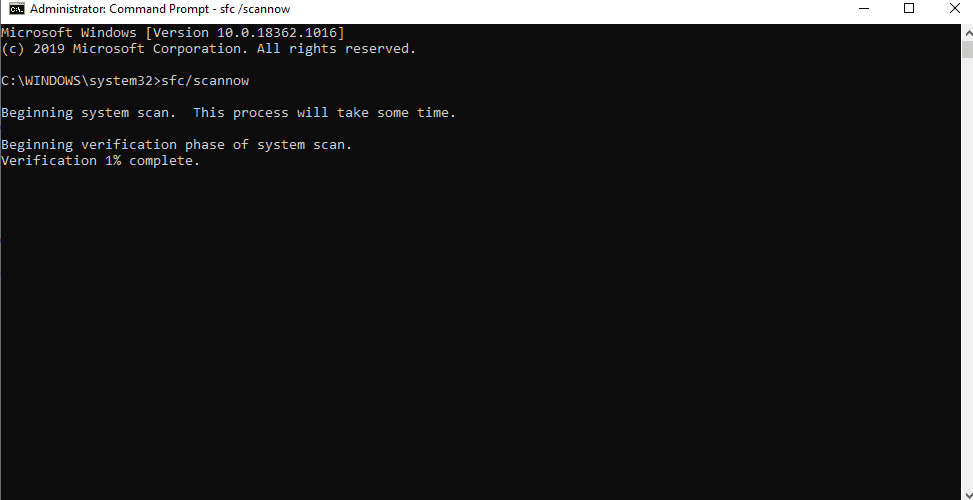
Note that this will take some time, but when the scan is finished, the SFC scanner will attempt to automatically resolve any issues it finds within your computer system. You can now retry whatever prior process you were attempting to see if the issue has indeed been resolved.
Use The Unlocker App To Delete The Restricted Folder/File
In case none of the above stock Windows operating system solutions works for you, you may want to try using a third-party application to unlock the locked folder/file. Unlocker is a free-to-use, effective tool to delete ‘stubborn’ files in your Windows PC. You can download Unlocker for your PC.
It is important to note that while installing Unlocker, you may be prompted to install other software programs. If this happens you will need to click the Skip button a few times when it asks you to install other programs.
To use Unlocker as a tool to clear the “You Need Permission To Perform This Action” error on your Windows PC, follow the steps below:
- Download Unlocker and run the installation after the download.
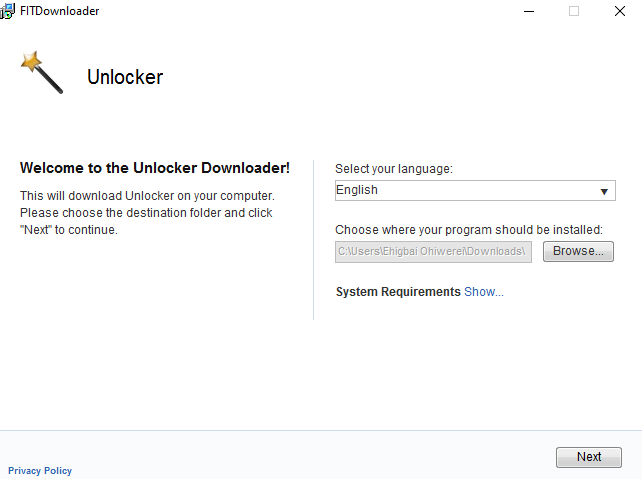
- Install the program, click on Advanced and untick the box marked Install Delta Toolbar.
- Immediately after a successful installation, move over to the file or folder you are trying to unlock in your computer’s File Explorer.
- Right-click on the folder and select Unlocker among the list of options in the drop-down menu.
- You will then see a pop-up window which contains a comprehensive list of all of the processes or programs that are restricting the file or folder.
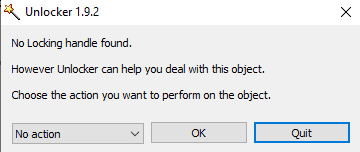
If there are no such programs/processing blocking the file, the Unlocker window will tell you that there aren’t any locks. However, if there are any locks on the file, they will all appear in a list. When this happens, you will be faced with three options. You can choose to either kill the process, or you may unlock a particular item, or finally, you may choose to unlock all the available items to release all of the available locks on the folder.
Uninstall and Reinstall The Problematic Program
In the possible scenario where all of the above solutions have failed to solve the problem and failed to clear the “You Need Permission To Perform This Action” error on your Windows personal computer, then you may, preferably as a last resort, need to reinstall the app/program that you are having this issue with.
Less drastically, you may just need to simply repair/modify the app/program. We recommend you try repairing the app first, and if that doesn’t work, you may then resort to uninstalling and reinstalling the app all over again.
To uninstall the problematic app/program, use the following steps:
- Click on the Start menu and then click on Settings.
- Navigate to the System menu and then select Apps & Features.
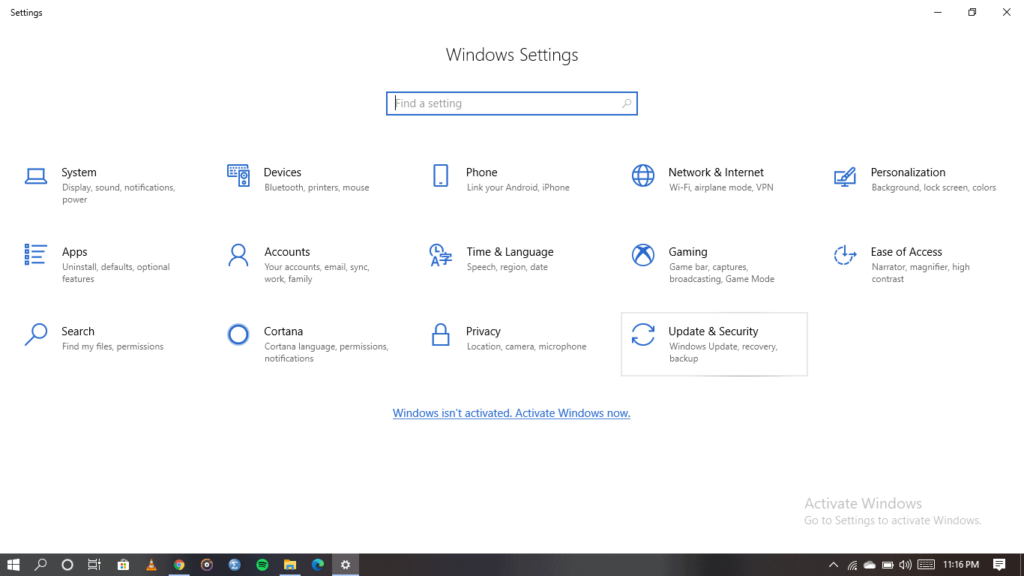
- Search for the app/program you want to uninstall.
- Select your desired (or undesired) app and click on Uninstall.
- If you are prompted to confirm your choice, kindly do so.
To repair/modify the program, simply follow steps 1 to 4 above, but rather than selecting the uninstall option, instead, click on the Modify button right next to Uninstall.
When you have successfully uninstalled the app/program, you can then reinstall it and try to perform your desired action again. If you only modified the app, simply run it again and try to perform the same action you were attempting before encountering the error message.
If you are having any trouble uninstalling the app, please refer to our article on How To Force Uninstall on Windows 10.
Repair Your System Registry
If you are still having trouble getting the “You Need Permission To Perform This Action” error message to vanish from your Windows PC, you may want to check your system registry for any potential errors. However, this is not a process you want to rush into as any slight errors could spell grave consequences for your personal computer.
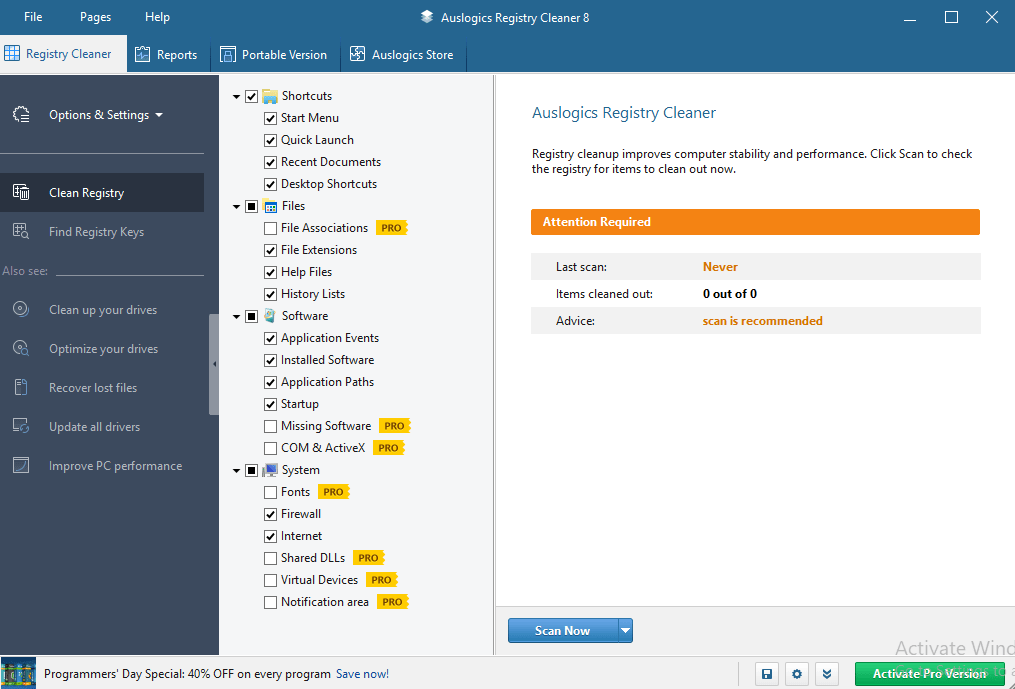
Therefore, to avoid damaging your PC in the process of trying to solve a minor problem, we recommend downloading a third-party system registry repair software program to prevent your computer system from going to the gallows.
For a safe system repair process, Auslogics Registry Cleaner comes highly recommended by us. This is a free, reliable and intuitive tool that will help you get the job done very quickly, very easily, and safely. You can download Auslogics Registry Cleaner.
Clean-Install Your Windows Operating System
At this point, if you still aren’t able to solve the problem, then you may have to turn to clean installing your Windows operating system as a last resort. You’re probably not likely to make it this far before having solved your problem successfully. But in the rare eventuality that you do make it this far, we have devised just the best and safest way to get your Windows operating system clean installed without doing too much damage to personal files on your system, as long as you back these personal files up safely and successfully.
To perform a clean install of your Windows operating system, we strongly recommend that you, first of all, find a means of backing up all of your important files. To do this, you may either get an external hard drive (or flash drive if you can get one large enough to contain all your files and documents), or back all your files up to a cloud storage option (OneDrive, Google Drive, and so on). You may also decide to back up all of your files and documents to another personal computer if you have a spare or alternative one available to you.
When you have backed-up all of your important files safely and properly, you may then proceed to take the following steps highlighted below:
- Click on the Start menu in the bottom left corner of your computer screen and click on the Settings gear icon.
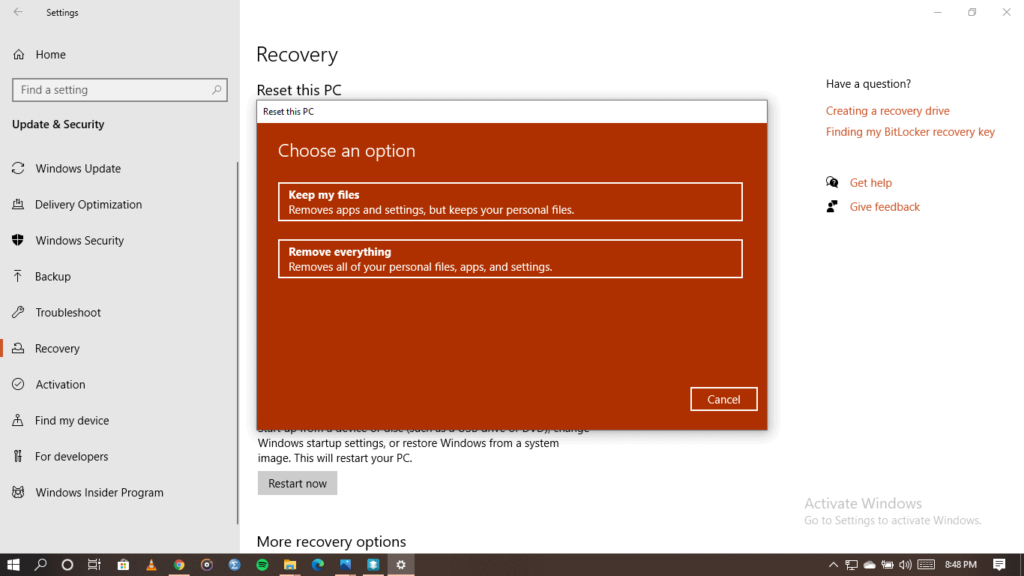
- Find your way to Update & Security and select the Recovery option from the list of options in the tray on the left hand of your PC screen.
- Click on the Get Started button under the Reset this PC sub-menu.
- From the ensuing menu, you would be presented with two options which are: Keep my files, and Remove everything. Select the “Remove everything” option and wait for the process to run its entire course.
Please do not forget to first of all back up all of your files, documents, folders, and so on before even attempting this process. And do not forget to use it only as a last resort in the instance where the other eleven potential solutions above have failed to help you solve the problem.
If this elaborate tutorial has been of great help to you in helping you solve the “You Need Permission To Perform This Action” error on your Windows computer, kindly let us know in the comments section below. If while trying to get around this issue, you have also managed to discover some pretty clever workarounds to the problem, also kindly let us know in the comments section below. We look forward to hearing from you. Good luck!
