As we know Windows systems are prone to several errors, and one of them is the error “0x800f0825 permanent package cannot be uninstalled”. At times while updating your system, Windows might install a corrupt update package. Now while the user tries to uninstall that corrupt package, it ends up showing the “0x800f0825 Permanent Package Cannot be Uninstalled” error issue.
The said error is commonly occurring for a lot of users nowadays. At times when a user tries to manually remove an update from the Control Panel or by using the Command Prompt, they might not be able to uninstall the update due to a component clean-up might have occurred. Though there are quite a few resolves for the same, and we have mentioned them systematically in the guide below. Have a look:
Also Read
How to fix the “0x800f0825 Permanent Package Cannot be Uninstalled” error issue.”
FIX 1: Make the update removable:
Changing the Update from Permanent to Removable has resolved the “0x800f0825 Permanent Package Cannot be Uninstalled” error for a few suffering users. Here we recommend you to do the same and make the update removable. For doing so, follow the steps given below:
- Firstly, download PowerRun by visiting the official website and then unpack its zip archive to a local folder.
- Further open PowerRun, and then if prompted by UAC, click on Run.
- Now locate Notepad.exe, right-click over it and then choose the option Run File in the PowerRun window.
- Inside the Notepad window, click on File -> Open and then set file Filter to all files.
- Further from the Open window, navigate to the following path,
C:\Windows\servicing\Packages
- Now in the search field, fill that update code (like KB5000802.mum.) which you are trying to uninstall. Here make sure that you will require to locate all the .mum files that are linked with the problematic update, and you might find more than one .mum File for the same update.
- Click on the first .mum File and then click on Open.
- Now to launch the Find dialog box, press Ctrl + F. In the empty text space, type permanency=”permanent” and then click on Next.
- Once you are able to locate permanency=”permanent,” here, change it as permanency=”removable.”
- Further to save the changes, press Ctrl + S and if prompted by UAC, click on Yes.
- You will require to repeat the process of changing permanency=”permanent” to permanency=”removable” for each .mum File that is associated with the KB update you were trying to uninstall.
Once you are done with the entire process, you will now be able to uninstall the KB update causing the error swiftly.
For uninstalling the KB update:
- Firstly, launch the RUN prompt by pressing Windows + R altogether.
- Now in the empty text space, type Control and then click on OK. It will launch the Control Panel window on the screen.
- Here under the Programs section, click on Uninstall a Program.
- Now from the left pane menu, click on View installed updates.
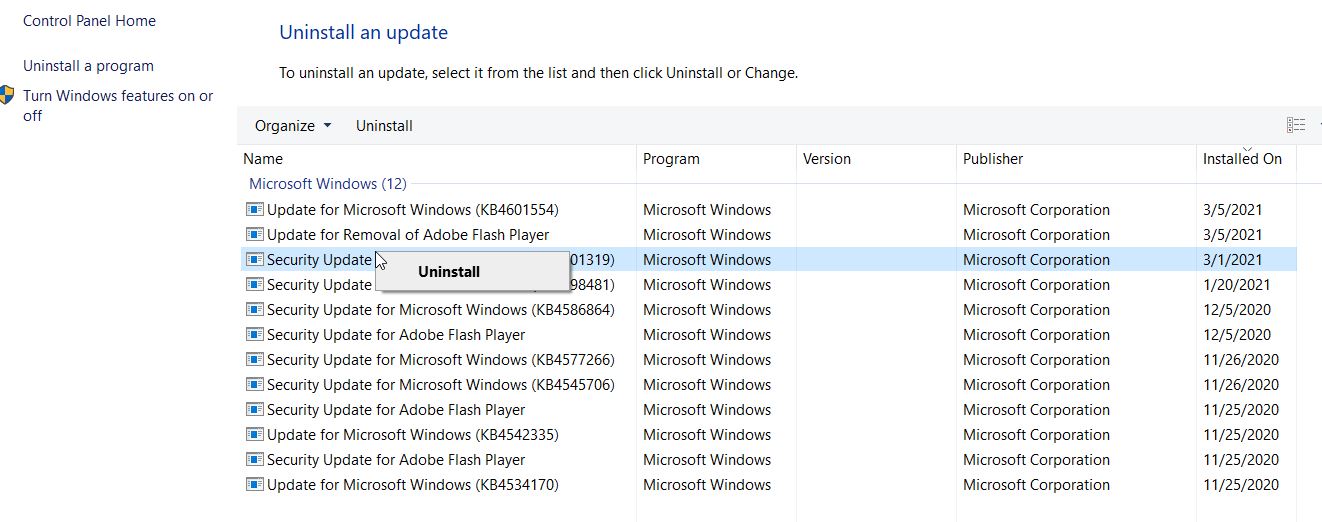
- Here locate and choose the KB update, whichever you want to uninstall and then click on the option Uninstall.
- Further, when prompted by UAC, click on Yes.
For uninstalling the update using Command Prompt:
- Firstly, launch the RUN prompt by pressing Windows + R altogether.
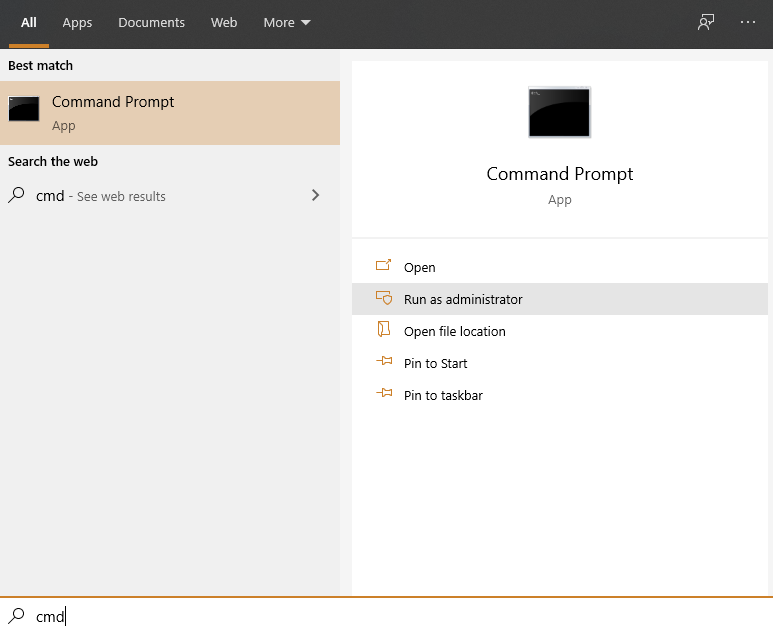
- Now in the empty text space, type “cmd” and then press Enter. It will launch the Command Prompt window on the screen. Make sure you are running it with Administrator access.
- Now on the Command prompt window, type the following command and then press Enter
wusa /uninstall /kb:KB5000802/quiet /norestart
The said command is used to uninstall the KB update; thus, make sure that you change the KB update number for the update you are trying to uninstall.
- Now until you see a notification for success, let the command run.
Once it is done, close the Command Prompt window, and you can now reinstall the essential updates.
FIX 2: Perform a System Restore:
Performing a system restore is an effective solution that will help you get rid of the “0x800f0825 Permanent Package Cannot be Uninstalled” error. For doing so, follow the steps given below:
- Firstly, go to the Windows search bar, and type System restore. From the search results, select the option Create a Restore Point.
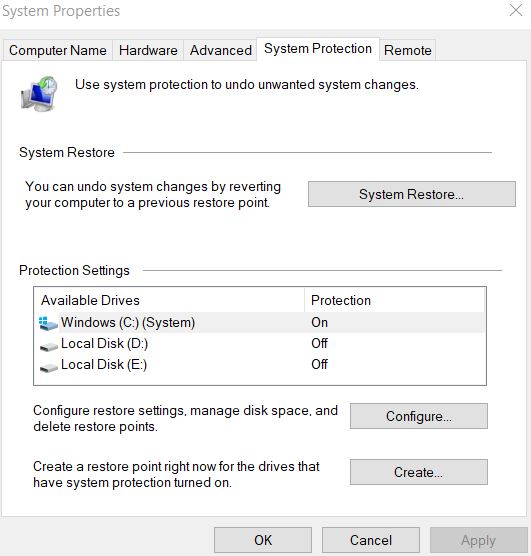
- Now on the System Properties window, click on the System Restore button and then click on Next.
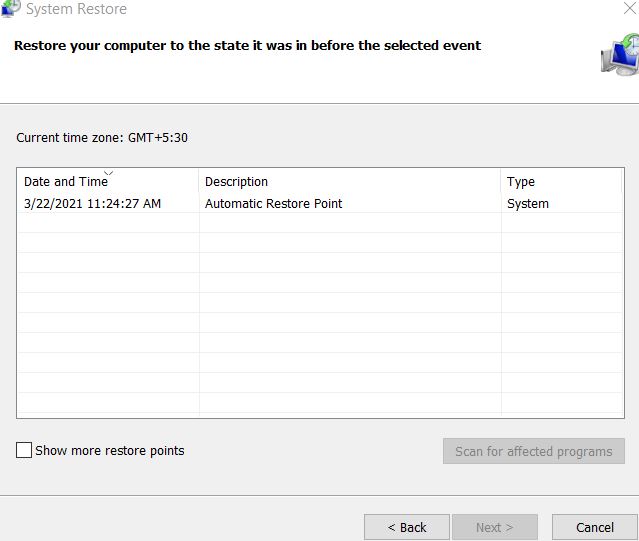
- From the System Restore window, choose any recent restore point available and then click on Next.
- Follow the instruction on the screen and finally click on Finish.
- Once done, restart your computer, navigate to the Control panel and check whether the “0x800f0825 Permanent Package Cannot be Uninstalled” error got resolved or not.
FIX 3: Run System File Checker:
In case any missing or corrupt system file is triggering the “0x800f0825 Permanent Package Cannot be Uninstalled” error, you can try running the System File Checker. It will possibly resolve the error within no time. For doing so, follow the steps given below:
- Firstly, launch the RUN prompt by pressing Windows + R altogether.
- Now in the empty text space, type “cmd” and then press Enter. It will launch the Command Prompt window on the screen. Make sure you are running it with Administrator access.

- Now in the Command Prompt window, type “Sfc /scannow” and then press Enter. The process will take a little extra time; until then, do not close the window or end the process.
- Once it is done, you will be able to uninstall the package easily.
FIX 4: Refresh or reset your Computer:
One of the easiest ways to resolve the “0x800f0825 Permanent Package Cannot be Uninstalled” error is reinstalling or resetting your computer. Here to reset your computer, follow the steps given below:
- Firstly, right-click on the Windows icon, on the vertical taskbar of your screen, select the option Settings from the context menu.
- Now on the Settings window, navigate to Update & Security.
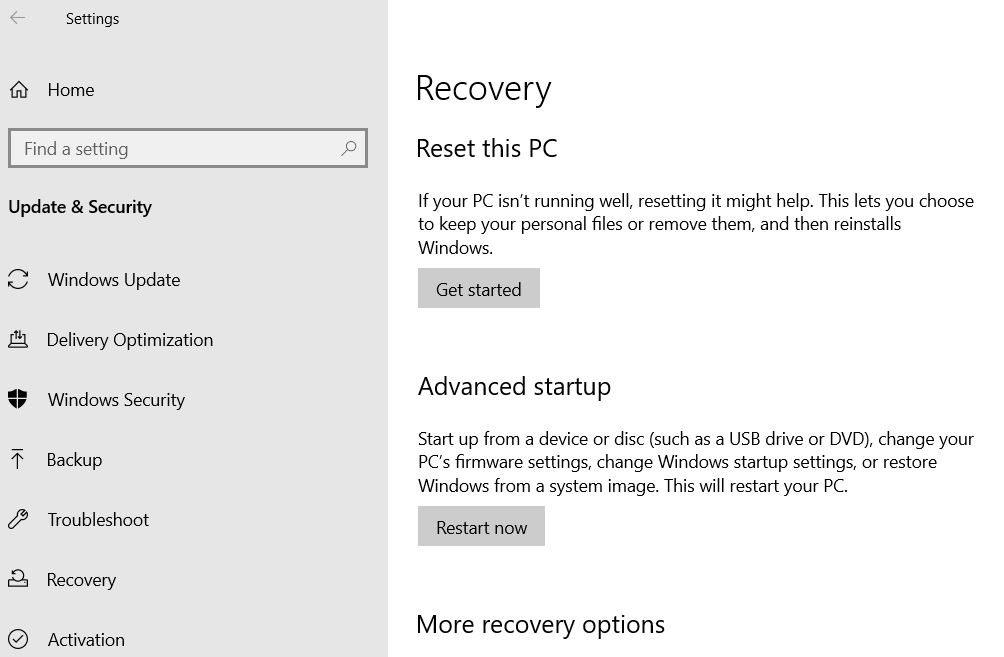
- Further from the left-pane menu, open the Recovery tab, and on the right-pane pane menu under the Reset this PC section, click on the Get Started button.
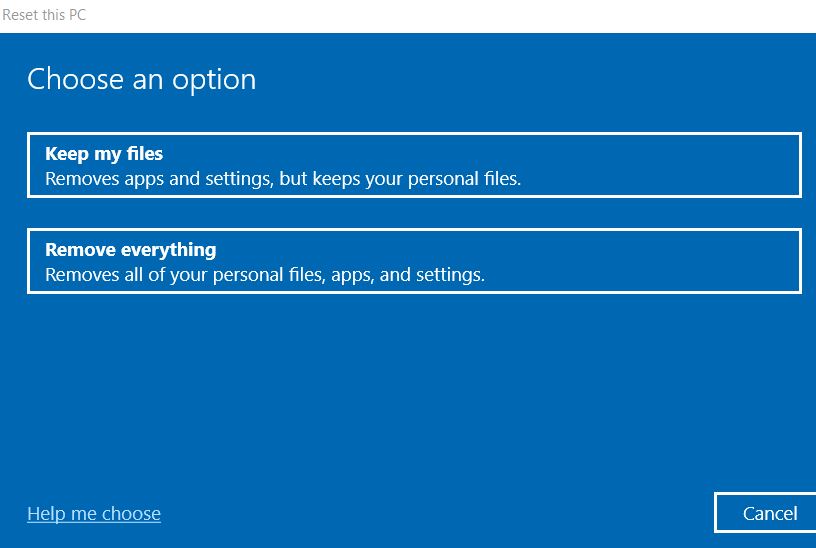
- On the next blue screen, click on the option Keep my files. (It will delete all the installed third-party programs but keep the personal files and reinstall Windows).
Further, follow the on-screen instructions and complete the process.
FIX 5: Go back to the previous version of Windows 10:
Going back to the previous version of Windows 10 is another resolve that can possibly make you get rid of the “0x800f0825 Permanent Package Cannot be Uninstalled” error. For doing so, follow the steps given below:
- Firstly, right-click on the Windows icon, on the vertical taskbar of your screen, select the option Settings from the context menu.
- Now on the Settings window, navigate to Update & Security.
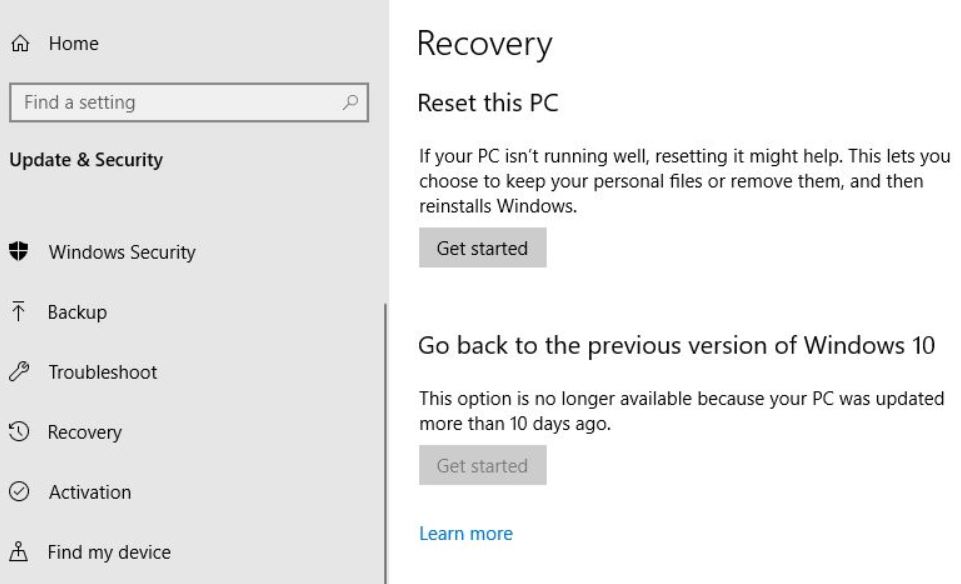
- Further from the left-pane menu, open the Recovery tab, and then from the right-pane menu under the Go back to the previous version of Windows 10, click on the Get Started button.
Please Note: The Get Started option will only be available 10 days before the update is installed. Else, the button will become grey and unusable.
- After that, follow the on-screen instructions and restore your computer to the last update.
These were all the tried, tested, and proven solutions for the “0x800f0825 Permanent Package Cannot be Uninstalled” error. However, if none of them helps in your case, then we recommend you to clean install Windows 10 and check whether it helps or not.
By the end of this article, we hope you have found all the questions regarding your query for the said error. You can try the regular fixes first and if they do not help in your case, then move to the lengthy and critical ones further. If you have any queries or feedback, please write down the comment in the below comment box.
