As the name suggests, Adobe Photoshop is an advanced image editing software developed and published by Adobe Inc. The software is available for Windows and macOS with fully-featured options. Everything is possible on Adobe Photoshop, from image editing to compositing to digital painting to animation and graphics design. But it’s one of the heavy tools for PC/Laptops that requires enough CPU & Memory storage apart from the free storage capacity to work in its free flow. However, Adobe Photoshop keeps crashing on my PC while using it, which is frustrating. If you’re one of the victims, fix Adobe Photoshop Crashing on your PC.
As we’ve already mentioned, the Photoshop application may start crashing or getting stuck while uploading or saving image files if your computer lacks free memory or storage space. Additionally, the role of the graphics card and the graphics driver becomes crucial while using Adobe Photoshop. Although most of the time, restarting the Windows system or reconnecting the graphics card can fix this issue, sometimes updating the system or driver is also necessary. So, without wasting any more time, let’s jump into it.
Also Read
Page Contents
- How to Fix Adobe Photoshop Crashing on PC
- 1. Restart Your Computer
- 2. Increase Timeout Detection Recovery
- 3. Update Windows OS Build
- 4. Update Graphics Driver
- 5. Close Unnecessary Background Tasks
- 6. Disable Background Apps
- 7. Check System Resources
- 8. Adjust Adobe Photoshop Preference Settings
- 9. Purge Memory
- 10. Set High Performance in Power Options
How to Fix Adobe Photoshop Crashing on PC
If in case, there has been some communication or glitch issue between Windows 10 and graphics card then make sure to increase the Timeout Detection Recovery to more than 2 seconds (default). It should resolve the Photoshop crashing problem completely. However, if this method doesn’t work for you, try other methods below.
1. Restart Your Computer
First of all, one of the most common and simplest solutions to fix any kind of issues on your Windows system is to simply restart your computer. It can possible that a simple reboot of the system may fix all the temporary glitch or cache issue that’s causing the problem. Especially during the program crashes or lags, you should restart your computer to check whether the issue is fixed or not.
2. Increase Timeout Detection Recovery
- Press Windows + R keys to open up the Run dialog box.
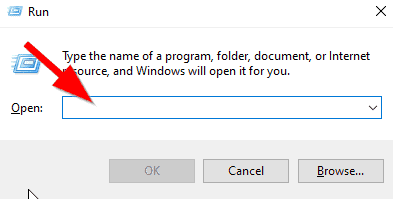
- Type regedit and hit Enter to open up Registry Editor.
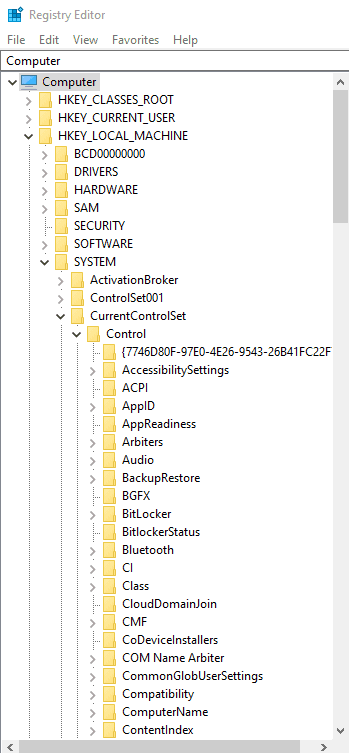
- Go to HKEY_LOCAL_MACHINE > Head over to SYSTEM.
- Click on CurrentControlSet > Select Control > Go to GraphicsDrivers.
- Now, select DWORD (32-bit or 64-bit Windows according to your system).
- Rename it to TdrDelay and hit Enter.
- Next, you’ll have to double-click to select TdrDelay > Input 8 in the Value data.
- Click on OK to save changes and exit the Registry Editor.
- Finally, restart your computer to apply changes.
3. Update Windows OS Build
Updating Windows OS build is very important to keep running all of your installed applications or programs properly. To do this:
- Press Windows + I keys to open up the Windows Settings menu.
- Next, click on Update & Security > Select Check for updates under the Windows Update section.

- If there is a feature update available, select Download and install.
- It may take a while to complete the update.
- Once done, restart your computer to install the update.
Then you can check whether the Adobe Photoshop Crashing on PC has been fixed or not. If not, follow the next method.
4. Update Graphics Driver
Just like the Windows OS, you’ll have to update your graphics driver too. After updating the graphics driver, your system and other graphics-intensive programs or games will run much better than before. To update it:
- Right-click on the Start Menu to open up the Quick Access Menu.
- Click on Device Manager from the list.
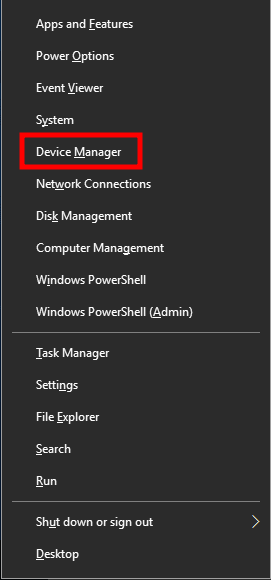
- Now, double-click on the Display adapters category to expand the list.
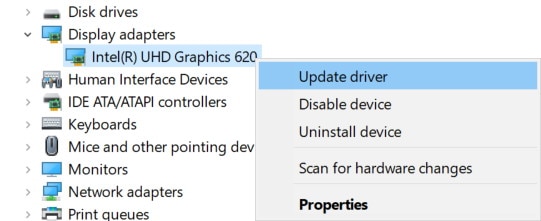
- Then right-click on the dedicated graphics card name.
- Select Update driver > Choose Search automatically for drivers.
- If there is an update available, it’ll automatically download and install the latest version.
- Once done, make sure to reboot your computer to change effects.
5. Close Unnecessary Background Tasks
If the Photoshop application is continuously crashing on your Windows PC/Laptop, make sure to close all the unnecessary background running tasks from your system. To do this:
- Press Windows + R keys to open up the Run dialog box.
- Now, type MSConfig and hit Enter to open up System Configuration.
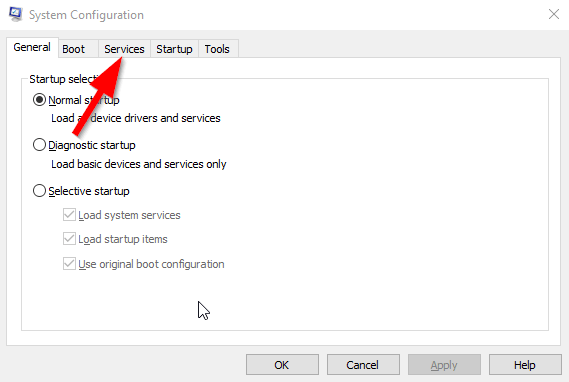
- Go to the Services tab > Click on Hide all Microsoft services.
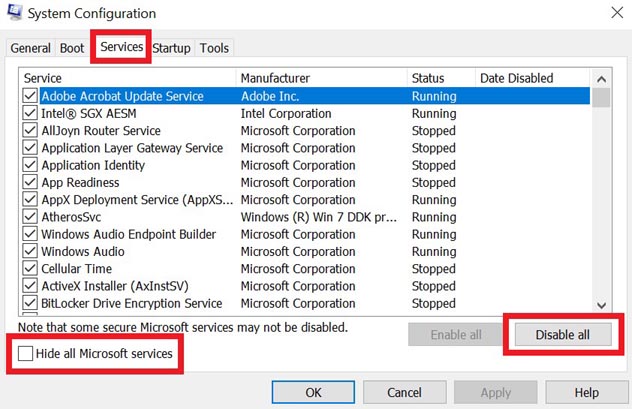
- Click on Disable all > Next, go to the Startup tab.
- Click on Open Task Manager > Select and End Task one by one those are running unnecessarily.
- Once all done, close all windows and restart your system to refresh it.
6. Disable Background Apps
Disabling the Adobe Photoshop application from the Background Apps section may help you a lot because it’ll forcefully prevent the program to run in the background even if you’re not using it. To do this:
- Press Windows + I keys to open the Windows Settings menu.
- Click on Privacy > Scroll down from the left pane and select Background apps.
- Scroll down and look for the Adobe Photoshop title.
- Just turn off the toggle next to the title.
- Once done, close the window and restart your computer.
It should fix the Adobe Photoshop Crashing issue on your PC easily. Still, the problem bothers you? Follow the next one.
7. Check System Resources
Make sure to check whether your computer is having enough RAM and storage space or not. Adobe Photoshop is a heavy program and always requires enough system resources to run smoothly or even launch properly than other programs for sure. Although Adobe Photoshop basically needs 2GB of free RAM to run without any issue, if you’re continuously using the program and working on it a lot, it may require more CPU performance and free RAM (Memory usage) than usual.
To be very precise, if you have 8GB of RAM installed on your Windows computer and you’re working on a large image file via Adobe Photoshop it’ll even start lagging or sometimes crashes if your system doesn’t respond for a while. So, you can’t really take the Adobe Photoshop program lightly with a lower RAM count.
Meanwhile, the CPU and RAM usage also depends on the use of other applications or programs on your Windows computer. If you’re using multiple programs or especially Google Chrome tabs while using Adobe Photoshop, it’ll start lagging and stuck the screen whenever your computer runs short on memory. Additionally, the RAM performance also depends on the higher frequency or DDR version.
Whereas talking about the storage space, similar kinds of requirements are necessary such as free storage space, type of storage (HDD or SSD), type of read/write speed, and more. So, if you’re working on a 50MB image file then keep at least 5-times more storage for the output result that will be around 250MB in file size. In real life, that’ll be either similar or higher enough depending on the file size and the format of the file or the quality of the image too.
Meanwhile, if somehow your drive partitions don’t have enough free space, make sure to free up some space by deleting the unnecessary or duplicate, or even older files. You can also clear temporary cache data or leftover files from the C: drive which may be available even after uninstalling apps. Alternatively, you can use external USB flash drives or portable storage for transferring additional data to free up the storage space. These days there are so many online cloud storage platforms available that you can use to reduce the pressure from your hard drives.
8. Adjust Adobe Photoshop Preference Settings
- You can open the Adobe Photoshop application.
- Head over to the Memory Usage section and check the available RAM. [If required, try setting the slider bar to 70% to allow Photoshop to use more RAM]
- Go to Edit > Go to Preferences > Select Performance.
- A new window will open and it’ll show you the memory usage like history and cache settings.
- Go to History & Cache > Reduce the number of History States.
- Once done, close the Adobe Photoshop application, and restart it.
9. Purge Memory
Yes! There are stored cache and memory data in the Adobe Photoshop application to run it properly. It basically helps you to work on images that store data temporarily like Undo, History, Clipboard, etc. So, purging the memory will increase the storage space and your program may run normally again. To do this:
- Open the Adobe Photoshop application > Go to the Edit menu.
- Head over to Purge > Click on All to free up the memory.
Please Note: After cleaning the memory, you won’t be able to access the ‘Undo’ option for your ongoing work in the Photoshop application.
10. Set High Performance in Power Options
If your Windows system is running on the Balanced mode by default in the Power Options menu then you should set it to the High-Performance mode for extreme results. Keep in mind that the High-Performance mode will use more power or battery than usual. To do that:
- Click on the Start Menu > Type Control Panel and click on it from the search result.
- Now, go to Hardware and Sound > Select Power Options.
- Click to select the High-Performance mode.
- Now, exit it and fully shut down your computer.
- Finally, you can turn it on, and check for the Adobe Photoshop Crashing on PC issue again.
We hope you’ve found this guide very useful. For further queries, you can comment below.
