Thermal management of a PC is a most important thing while building a PC. Too much heat can damage your sensitive PC components. If you’re overclocking it’s even more of an issue. Knowing how to apply thermal paste correctly is one of the foundations of proper PC cooling. If you’re a newbie getting ready to build a new system, or an old pro looking to make sure your technique is the best, read on to find out everything you need to know about properly mounting a CPU with thermal paste.
Here is the list of Top 5 Best Thermal Paste for CPU You Can Buy Today.

What is thermal Paste?
Thermal paste is also called as Thermal Grease. The thermal paste is used to eliminate the air gaps from the interface area in order to maximize the heat transfer, due to this property it is also called as the thermal insulator. Thermal paste consists of a polymerizable liquid matrix or suspension liquid which is thermally conductive. There are several types of thermal material, including ceramic and metal-based, silicon-based and carbon-based pastes. Some CPU comes with coolers and pre-applied pads, but most don’t, and we recommend using a thermal paste. Let’s see the steps for applying thermal paste.
Steps to Apply thermal paste
Here are the steps to apply thermal paste on your CPU or GPU.
STEP 1:

Check your CPU and cooler of your PC and you will find some gummy thermal paste residue if you have used your PC hardly for several years but in new PC you won’t find any thermal paste or its residue (follow step 2 for applying the thermal paste). Don’t think about using or reuse of this old paste, as it dries out over the time, and you won’t get the proper connection between your CPU and cooler. So the first step is to clean off the old thermal material. We use a cleaner like ArticClean to clean up this old paste or alcohol will do the job. Just apply a drop or two to the old material and let it sit for a minute while the cleaner breaks up the grease in the thermal paste. Then wipe it clean with lint free cloth and repeat the process until both the CPU and cooler are totally clean, and then follow the second step
STEP 2:
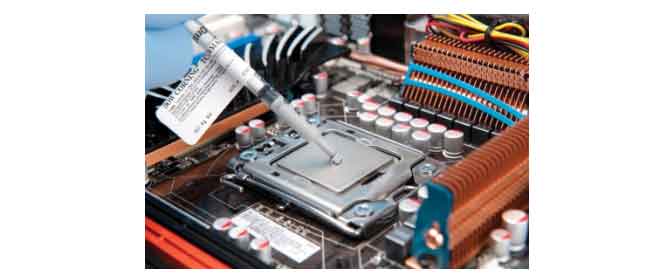
If you look around on the internet about how to apply thermal paste, you’ll find so many different types of ideas/logic like you should apply it as a dot, a line, an X and so on. We recommend a dotted one because it is pretty much perfect and you can spread the paste as a circle to reach all the edges of your CPU. Before doing this you have to keep it in the mind that you have to first insert the CPU/processor into your motherboard socket. Then Squeeze a little amount of thermal paste onto the center of your CPU as a dot. The dot should a size of a small pea. Next, take your cooler and press straight down onto the CPU so that the thermal paste spreads evenly in all directions. Then rub the cooler very slightly over your CPU until it fits or aligns with your CPU. Then you have to lock your cooler down. However, if you’re afraid that the thermal paste didn’t get spread properly, you can take a look by lifting your cooler back up, if you’ve got too much paste on the CPU, you can wipe up the excess from around the corner, and if you’ve got too little, you can add some more. Don’t worry if you have screwed up because you can clean up everything and try again.
Note that we don’t recommend anyone to lift up the cooler two or more times because you may allow air bubbles into the thermal paste, which will lower the cooling efficiency.
