Did you forget Google Credential after resetting your phone? then here is the guide to ByPass FRP Google Account on any Samsung Galaxy powered Android Devices using ODIN flash tool.
Alright, so you have forgotten your Google’s Mail Credentials, or maybe you have just purchased a second hand Samsung powered from someone and has reset the phone. Whatever the case might be, the thing is that you want to bypass the Google FRP on your Samsung Galaxy powered Android Device and you want to do it quick. Don’t worry as we at the GetDroidTips got you covered. Today, in this post we would be covering on How to Bypass FRP Google Account on any Samsung Galaxy devices. This works on any Android OS version 8.0, 7.0, 6.0].
Just in case you don’t already know, the FRP stands for Factory Reset Protection which is a security measure by Google for the Android Devices. The FRP gets automatically activated once you set up a Google Account on your device. When activated, this security measure prevents the unauthorized users to use the phone after a reset unless you enter the previously added Gmail Account Credentials.
Now, when you know what FRP or Factory Reset Protection is, let us take a look at How to bypass Google account verification on any Samsung Galaxy devices [Works on Android 8.0, 7.0, 6.0].
Page Contents
Steps to ByPass FRP Google Account on any Samsung device using ODIN
Before following this steps, make sure to download the required drivers and tools.
Pre-Requisites:
- Supported on any Samsung Galaxy powered device
- Download latest ODIN Tool and extract it on your PC
- You need to download the Stock ROM Combination files from the respective article
- Download Samsung USB Drivers and install on your pc
- You need a proper working USB cable.
- Charge your phone to at least 50% or more.
Instructions:
- First of all download the Combination ROM and move it to a new folder on your Desktop PC.
- Once that’s done, you need to download Odin v3.13.1 and install Samsung USB driver on your Windows Desktop PC.
- Now, boot your Galaxy into download mode or Odin mode. To do this, Press and hold Power + Bixby + Volume Down buttons simultaneously.
- You must now see a blue screen or green screen, just click on Volume Up key to boot into the Odin.
- In your PC run the downloaded ODIN exe
- Now, connect your device to your PC via a USB Cable.
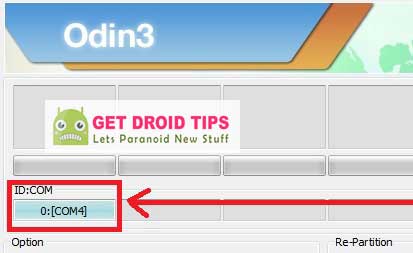
- Once your device is connected, you will see COM: ID should now change into the blue color.
- Now, click on the AP tab and browse the select the AP File from the combination ROM folder.
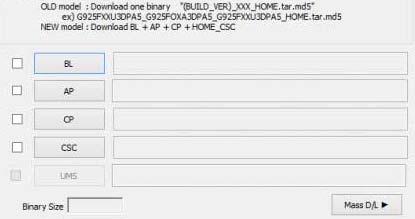
- Respectively do the below files to
- BL: select file BL_xxxxx
- CP: choose file CP_xxxxx
- CSC: select file CSC_xxx_xxx_xxxxxx
- Finally, click on the Start button to start flashing Combination ROM On Galaxy device.
- If you see a message has a pass which means the process has completed.

- Once the process has been completed successfully, you can disconnect your device from your PC.
So, guys, this was our take on How to ByPass FRP Google Account on any Samsung Galaxy device using ODIN Tool [Works on Android 8.0, 7.0, 6.0]. We hope that you found this post helpful. Just in case, if you have stuck somewhere between the steps or any queries related to the topic, then feel free to leave them in the comments section down below.
Comment: good apk
Good afternoon, I’m attempting to follow the steps but am unable to locate any files explicitly labeled, “AP,” “BL,” or otherwise, please help.
I made it all and failed.
Any idea why? Thx.
I followed these steps exactly & it still wand the original google email. Why?
Which is your phone?
I have a samsung sm550t and I also followed your instructions exactly. It said pass! After 3:31 but once the phone restarted it still has frp enabled. Any help would be appreciated
Sm-n950u. Note 8 T-Mobile USA
yeah same for me with same phone
Won’t work as FRP also protects against firmware flashing.
Dont work on samsung galaxy a7 (android 8) . After i need log to google and type old password
hello. i have the most updated firmware for smg935T as well as drivers and odin installed. still having a fail. ant idea why? it says aboot 10 binary 4 fail
thank you
Hi I cant get Odin to locate the rar file please help
Did not work, FRP is still active after a PASS in Odin. What a waste of time…
where do i find the files to download them..ive downloaded so many and cant find them with odin
ive downloaded everything and more but cant find them in oden so why
even install and drive the fixes galalxy tab s6 or odin does not recognize the tablet know why?
Since I’m not using a computer is there another way to google bypass Samsung Galaxy Tab Active 2 ?
I did it on S7 GM-G920W8 by first flashing the Combination files in order and then Flashing the BL File where the AP would go and then BooM! Got in, turned on debugging and OEM after activating Developer Mode and then Rooting with Magisk and TWRP… Then Flashed Custom Rom in to phone with Pixil Experience Android 9.0. Kudoos!
this does not do the full bypass it only takes you to the binary you have to do something else and then reinstall the original factory rom where are the rest of the instructions?